Level, level, plane builder - with the advent of the “laser” prefix, these useful devices for precise orientation in space acquire a modern sound and at the same time a significant cost. Despite the fact that any of the devices can significantly make the life of a builder, repairman, or simply a thrifty and homely owner, many are in no hurry to purchase “professional” models, mainly because of the high price. However, expensive equipment for one-time use (for example, leveling walls) can be completely replaced with a homemade device. To do this, you must first understand the structure of the level or plane builder.
Principle of operation
The basic element of any device whose name includes the word “laser” is an emitter of highly targeted monochromatic (one-color) radiation. The phenomenon is based on forced radiation, which, depending on the power, is perceived differently. Low-power laser emitters based on red, red-orange, yellow-orange and green diodes make it possible to produce a point or beam of light. At a high level of pumped energy, a laser beam can turn into a weapon - it can set fire to materials that absorb radiation well.
Devices used in everyday life and construction and repair work operate on laser diodes of the red, yellow-orange and green spectrum; blue and violet ones are much less common (such models are much more expensive). To concentrate light radiation, biconvex lenses are used, as well as other optical devices that allow the beam to be converted into a plane.
Household appliances have a standard circuit shown in the illustration. Design variations are related to the power of the emitter and additional accessories.
Laser-based level and level design
Laser levels and levels use the principle of directly indicating a target - a point or line on a surface. They can be tracked directly (in relatively low light) or through the eyepiece of the device.
In addition to a point or line (the trace of the intersection of a light plane with a solid opaque surface), levels and levels allow you to obtain a cross-shaped pointer, as well as simultaneously use two or more emitters.
Due to the scattering of the laser beam into a plane, such devices are often called “laser plane builders”. In general, the set of functions of the device depends on the number of emitters and optical devices for concentrating or scattering the beam.
Types of devices and their uses
Laser levels can vary greatly in design, price, capabilities and applications. The main types of devices are listed below.
- The simplest devices . These are models of bubble rack levels equipped with a laser. Usually their task is to project a point onto the surface. Sometimes tools are equipped with a laser plummet - a generator of a visible line perpendicular to the staff. Suitable for small household work, inexpensive (500-1000 rubles), made independently by craftsmen from a laser pointer.
- Point laser level . It projects only a point on the surface, its laser beam is invisible. It can be equipped with one or more emitters that perform the functions of a level, plumb line, and axis builders. There is a wide variety of models on the market ranging in price from 1 to 30 thousand rubles.
- Line laser level . This device is a builder of axes up to 20-30 m long. It is usually equipped with several LEDs and is used indoors. Some models are equipped with pulsed light sources and are intended for outdoor use, complete with detectors. Linear laser levels cost from 2 to 35 thousand rubles.
- Rotational plane builder . Generates rotating points to create 360 degree visible lines. Most devices are equipped with beam plummets. They are the most expensive and accurate class of instruments, their price ranges from 15 to 120 thousand rubles. They are often equipped with auto-leveling and the ability to be controlled from a remote control. Some specialized rotary levels are so bulky that they are mounted on a bed or chassis.
Over the past decade, laser levels have rapidly improved, becoming much more accurate, easier to use, more affordable and reduced in size. Now they can be found not only at large construction sites, but also among small contractors and home craftsmen.
Substitutes for professional equipment
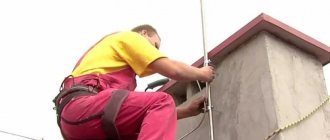
In homemade devices, a special laser emitter is replaced with a conventional laser pointer. With sufficient power and quality, as well as the presence of two or more attachments that allow you to transform the laser beam, such a pointer is quite suitable for making a laser level with your own hands. You just need to take care of sufficiently strong and convenient fastening and installation of the pointer in a strictly defined position with the possibility of displacement.
As can be seen in the illustration, a telescopic tripod with a convenient mount that allows the holder to be rotated is used to mount the professional device. Since such tripods are often found in the households of amateur photographers, they can be easily adapted to make a tripod for a laser level with your own hands. If you don’t have a tripod, you can make a simple stand based on a stick or timber with a support at the bottom, use a container of water or a hanging mechanism. These options will be discussed in detail below.
How to make a laser level on a tripod
If you have a tripod and a construction bubble (“spirit level”) level, creating a device comes down to installing a tripod and attaching a level to it with a laser pointer fixed on it. The illustration shows a level with an existing groove for the pointer, but in fact the fastening is simply done using clamps, wire or even tape.
The most difficult part is the correct orientation of the laser beam. To do this, it is advisable to insert a piece of hard rubber or foam between the pointer and the surface of the level, securing it with clamps or elastic bands, as shown in the diagram.
Here 1 is a pointer, 2 is a piece of dense and moderately elastic material, 3 is clamps or elastic bands. After setting the bubble level strictly horizontally (this can be done on any flat surface), the laser pointer turns on. By cutting the insert and tightening the clamps tighter or looser, we carry out a kind of adjustment of the level (of the future). Once parallelism between the horizontal plane and the laser beam has been achieved, you can mount the resulting device on a tripod in any convenient way.
Support in the form of a rod, float device or suspension
As already mentioned, in the absence of a tripod, we use improvised means - a barbell made from a broom handle, a shovel or just a piece of timber, or a container of water.
The structure of the rod is very simple: a beam or stick is attached to a piece of board or OSB board (plywood) strictly vertically and so that the structure is stable. You can check the angle between the support and the rod with a building square, but it is better to use a regular building level. Spacers can be used as support, as shown in the diagram below. A block the size of a bubble level with an attached pointer is mounted to the top of the rod - and the device is ready.
If you place a large container on the floor, filled almost to the brim with water, and place a level with a laser pointer on a flat piece of foam, you will also get a quite suitable support for a homemade level. In addition, in a container with water, the device can rotate freely, “drawing” a plane along all the walls of the room. Interestingly, for such a “float” level you don’t even need a bubble level. With an even piece of foam plastic on which the pointer is rigidly and strictly horizontally fixed, the laser beam will move only horizontally - due to the impeccable evenness and horizontality of the water surface. Simple steps for making such a laser level with your own hands and its operation are shown in the video.
The suspension is even easier to install. A beam is attached to a chandelier hook or other similar mount on the ceiling of the room using a rope or thin wire. A laser pointer is fixed on the beam so that the light beam is directed to the floor (if floor marking is needed) or to the walls. Next, by rotating the resulting level from the pointer, we obtain a light point or line on the desired surface. In the illustration, a tripod is used as a mount for the hanging level, and the pointer itself is fixed in a hole drilled in a beam.
Power supply and mounting of the laser level
The ease of operation and possibilities for use depend on how long the level works without recharging and how it is attached to surfaces. Often you have to work with the level all day, so it will be very inconvenient to take breaks several times to buy batteries.
Simple levels are powered by small batteries and have a run time of 5-8 hours. More powerful devices are designed to operate for 8-10 hours. Professional devices operate from built-in batteries for 10-20 hours without recharging. However, such devices are quite massive.
The level mount can be:
- Wall-mounted with Velcro or suction cup
- On a tripod
- On the bracket
- On a magnet
More convenient are those levels that have both types of fastening, which allows you to measure lines from any surface. It will also be convenient to mount it on brackets; this option will allow you to fix the level on the wall and move it in a certain direction.
Advice. A small tripod no more than 1 meter high is suitable for a household appliance. It is convenient to store and carry.
Additions to the homemade laser level device
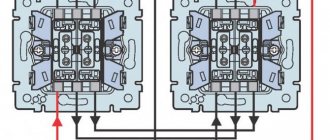
Additional details and the use of not one, but two or more laser pointers will help increase the accuracy of the device. One of the simplest improvements is the use of a bubble level with two pointers, mounted on a rotating flange with markings, which will help you rotate the device to an arbitrary angle. In order for the system to work properly, it is important to accurately align the axes of the laser beams and secure the flange strictly horizontally. The convenience of the system is that it can be mounted on a tripod or rod.
By changing the position of the levels and the number of pointers, you can get a laser marker that provides a light cross.
If your household already has an optical level, you can use it as a stand to add a laser pointer. An example of such a design is shown in the photo.
The scheme is extremely simple: a bar with a “bundle” of a construction bubble level and a laser pointer attached to it, rigidly mounted on the level’s stand.
For those who have a tripod for a camera or video camera at their disposal, we offer a diagram of a do-it-yourself level made from a tripod with adjustable legs, brackets and the same “bundle” of level + pointer.
What types of laser levels (levels) are there?
All levels that generate a narrowly directed light beam are divided into three main groups:
- Prismatic;
- Rotary;
- Spot.
In a prism device, LED radiation passes through two glass prisms and splits into two beams - horizontal and vertical, forming a cross at the intersection point. To save battery power, such devices have a button that allows you to turn off the “unnecessary” beam.
The range of household levels does not exceed 30 meters, so they are usually used indoors. The projection angle is the name given to the width of the laser beam on the surface; it is no more than 120 degrees.
Rotary levels are universal devices that belong to the professional class. They can work both indoors and outdoors. The projection of the light beam is formed by rotating the LED.
The range of rotary levels can reach several hundred meters, and the beam scanning angle is 360 degrees. In a room, such a device creates a visible line not on one, but on all four walls at once.
The point level is designed for making marks. It is not suitable for finishing work because it does not provide a continuous line.
But it is better suited for the street than a budget prism device, whose beam is scattered in natural light. A single laser dot is visible even in daylight at a distance of up to 30 meters. The simplicity of the design of the dot level is reflected in its price, which is minimal compared to other laser devices.
Useful tips for creating homemade levels using laser pointers
Despite the convenience, compactness and low price of self-made devices, they have two main disadvantages: relatively low accuracy and a short period of operation with constant use of laser emitters. The first issue is solved by setting up the device. To eliminate the second drawback, experts advise replacing the coin-cell batteries in laser pointers with an external power source. It is important to select a source with the required voltage. Typically it is 4.5 V, but may vary for different models.
When buying a laser pointer for a level device, you should carefully select its power and the color of the emitting diode. The best option is a green beam, it is less harmful to vision and is better visible even in relatively bright rooms.
By slightly increasing your budget, you can purchase a simple laser level with or without a tape measure. In this case, you can attach a ready-made device to any base, rather than a combination of a bubble level and a laser pointer.
Often these devices already have places for mounting on a tripod or tripod.
You can also use a laser tape measure as a source of laser radiation.
One more nuance: if a ready-made tripod (tripod) is used to install the laser, a useful addition to it will be a strip with markings or an ordinary metal (wooden, plastic) ruler. This will allow you to raise or lower your homemade level to a certain height without additional measurements. By the way, it is convenient to make the tripod itself from PVC pipes.
Important Specifications
The degree of tightness of the housing
If the device is planned to be used only inside the apartment in dry rooms, then special attention may not be paid to this issue.
When working outdoors or in conditions of high humidity, it is necessary to select devices with an IP class of at least fourth.
Laser beam range
The radiation power significantly affects the cost of the instrument. There is little point in using long-range devices for housework. They are also safer for the eyes.
Permissible errors
A laser level, like any measuring instrument, has its own accuracy class and must fit within the metrological characteristics, for example, 0.3 mm per 1 meter of distance.
Budget models have a higher spread of absolute errors. Typically 1 mm/m. This means that when laying the horizon line step by step along the surface of all the walls, you may end up not getting the end point to the start point. This is where the low accuracy class of the device will have an impact.
Check the manufacturer's stated beam deflection specification in mm per meter of distance.
Device setup
To set up a homemade laser level, you can use different methods, but one of the simplest is to use a mirror. The diagram below shows how this technique is used.
After the initial installation of the device, the laser is turned on and at the point where it falls on the wall (any other suitable plane), a small mirror is attached using a piece of plasticine. Using a level, achieve a strictly vertical (perpendicular to the planned position of the beam) position of the mirror plane. After this, the laser is turned on again. If the incident (emanating from the device) and reflected beam coincide, the adjustment is considered to be of high quality. If a match does not occur, change the position of the laser emitter until the desired result is achieved.
To set up a laser device that has a line rather than a point as a target designator, a target-rail is used (it is convenient to use a metal profile for drywall). In the place where the light line is reflected on the vertical surface, press the target (rail) and use a level to check its horizontalness (or verticality, depending on the position of the laser).
There is a quicker way to check if the settings are correct. The diagram shows how, using a bubble level and a stretched cord, the horizontality of the lines connecting the laser emitter and the screws on the wall at the point of impact of the beam is checked.
How to properly use a laser level for various purposes
A level can be called a very useful thing in the household. You can use it for any purpose related to the design of your home, from building a house to decorating.
Alignment of walls
The biggest challenge when renovating a house is leveling the walls. Here he can cope with any problems flawlessly. To do this, you need to direct the beam along the wall.
Then take a ruler and place it perpendicular to the emitted line. Using the measuring scale, look carefully at which of these points there is a deviation from the norm. After this, you will calculate the required layer of material required to level the wall.
How to use a laser level to level a floor
To level the floor, using a laser level, as for walls, is extremely simple.
It is important to level the tool from the very beginning, then turn on the horizontal line and mark its extreme points. Then turn the device and do the same across the entire floor plane, connecting the points to each other. After this, you will have a perfectly even straight line ready, which will show the height of the required report or fill of material.
- Floor
9 materials for leveling the floor for finishing
Wallpapering
The device will also be useful when wallpapering rooms. The vertical beam will help to perfectly align the joints, and the horizontal beam will be necessary for gluing borders or other decorative elements. You can also use it to check the quality of the work that the construction team has done for you. If any deviations are identified, you may request that the wallpaper be re-pasted or the cost of the services provided be reduced.
Furniture installation
Foter
The bubble leveler and all kinds of rulers have long become irrelevant in this matter. Modular furniture is a very complex design that requires a lot of calculations.
Therefore, to ensure that your shelves and cabinets are level, create a horizontal laser line. Now, focusing on it, you can attach everything you need to the walls.
Redevelopment
Redevelopment of rooms can also be easily done using a level. It helps to evenly install metal profiles for attaching drywall. To do this, you need to install the device so that it projects vertical and horizontal lines on the floor, walls and ceiling where the future partition will be located.
Construction of the foundation
In this case, using the installation, you can build a vertical along which the monolithic frame will then be erected. After the final measurements, in addition to the vertical beam, adjust the horizontal one. It will show on the walls the height to which the concrete mixture needs to be poured.
Laying tiles
The level helps to position the tiles at a strictly right angle.
Unsplash
To do this, turn on the cross plane construction mode. The radiation is converted into a grid, where the center of the crossed lines coincides with the center of the seams between the tiles. Next, use the guide strips to align each side of the tile.
Inclined planes
All modern devices have the ability to disable automatic alignment. In addition, in some models you can change the beam angle or lock the compensator. After you install the device at the required angle, you will receive inclined laser lines.