There is now a washing machine not only in every city apartment, but also in rural houses. Units from well-known foreign brands have been operating for decades and are distinguished by excellent quality indicators. This cannot be said about the products of some domestic companies and products from China. There is no need to list the reasons for marriage; they are standard and, unfortunately, have not changed for years.
If a city resident’s washing machine stops working, there is no problem; at any moment he will call a technician and he will quickly fix all the problems. In the most difficult cases, he will take the machine to a specialized workshop and, after a few days, deliver it back already repaired.
But what to do in a distant village where there is no such opportunity? There is only one way out - try to fix the problem yourself. Moreover, replacing the heating element is the simplest type of repair work.
Replacing heating element in a washing machine
Causes of heating element failure
Not a single manufacturer of washing machines produces all the components themselves; a significant part of them is made at related enterprises to order. As a result, the risks of supplying low-quality goods increase. Responsible manufacturers send their representatives to suppliers to monitor the entire process and check products on site, and hacks buy what is cheaper. As a result, the heating elements fail. This is the main cause of breakdowns. But there are also objective factors related to operating conditions.
- The heating element coil or control sensor has burned out. In villages, the voltage in the network often jumps; due to strong winds, wires on overhead power lines may overlap. The result is that the voltage instead of 220 V is 380 V. Either the heating element, or the automation, or all together burns out.
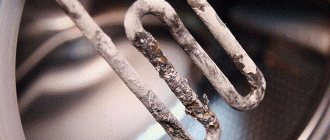
One of the causes of failure may be a burnt-out spiral - Poor water quality. Very often, water has a high concentration of calcium; at high temperatures it hardens and settles on the surface of the heating element. Calcium greatly impairs heat transfer, which significantly reduces heating efficiency. But these are not all the problems created by calcium solids. They provoke a significant increase in the heating temperature of the nichrome spiral; it is not designed for such modes and quickly burns out. The high temperature of the heating coil causes the metal casing to overheat - it also burns out.
Calcium deposits are most often the cause of heating element failure
Converting a washing machine motor into a generator
Many home craftsmen are engaged in the manufacture of homemade generators using electric motors from household appliances, including washing machines. This task is fraught with certain difficulties, primarily of a technical nature. The services of a qualified turner will be required at the first stage of work.
The first step is to disassemble the asynchronous motor removed from the faulty washing machine. Then the core falls into the hands of a turner, who removes a layer of the element 2 mm deep on the machine. Then grooves are cut into the core to a depth of 5 mm, into which neodymium magnets will be inserted. It is recommended to make the grooves after purchasing the magnets, when their dimensions become known.
After completing all the work, it is necessary to attach neodymium magnets to the core. For this purpose, a template is made from tin or other thin metal. Its dimensions must match the dimensions of the core and the width of the slots, and it must fit exactly where the magnets will be installed. The magnets are located on the core at the same distance from each other and are secured with glue. In addition to the distance, the angle of inclination of each element is of great importance. Deviations from the standard dimensions can cause sticking, as a result of which the power of the generator is noticeably reduced.
Cold welding is used to fill the gaps between the magnets. Finally, the rotor surface is sanded with sandpaper, after which the device is completely assembled.
The assembled generator must be tested. For this purpose, you will need a small battery, a rectifier, a multimeter and a charge controller. The connection occurs according to a certain scheme. The charge controller is connected to the two generator windings through a rectifier. Then the controller and multimeter need to be connected to the battery.
For normal testing, it is necessary to ensure rotation of the electric motor rotor. This operation cannot be performed manually, so you must use a drill or screwdriver. The tool is connected to the motor rotor, after which rotation begins at a speed of approximately 800-1000 rpm. When the generator is assembled well, the output voltage is 220-300 V. A lower voltage indicates poor-quality rotor assembly.
After assembly and testing, the generator can be used. This will require the energy required to rotate the rotor. You can connect to a small internal combustion engine, such as a chainsaw or motorcycle. However, this method requires the purchase of energy. Therefore, other options are recommended, relatively inexpensive and environmentally friendly, related to the use of wind or water energy.
All home craftsmen should remember that the electric motor from a washing machine can be converted into a generator with a power of no more than 5 kW. Typically, such devices produce an average of 2 kW, sufficient for 1-2 rooms or a bathhouse. So it will not be possible to completely replace the electrical network with a homemade generator.
How to tell if the heating element is not working
Due to the fact that it is impossible to open the tank during washing, you should find out about a breakdown of the heating element by indirect signs.
You can roughly calculate the time for draining dirty water into the sewer before rinsing and at this moment touch the surface of the hose. If it is warm, everything is normal, if it is cold, then the heater needs to be changed. But not everyone has the opportunity to do this. By what other signs can you notice a breakdown of the heating element?
- The quality of washing has deteriorated sharply. Moreover, it does not increase when replacing the washing powder used and increasing the heating temperature on the control panel.
- Electrical energy consumption during washing has been significantly reduced. We must remember that the machine uses at least 80% of all energy to heat water.
- The washing machine turns off on its own or the circuit breakers of the protective electrical fittings are triggered. Such situations are observed when filling the machine with water. If this happens to you, immediately disconnect the device from the power supply and do not use it until repaired.
If the quality of the wash has sharply deteriorated, you need to check whether the heating element is working
Important. Unfortunately, most domestic houses and apartments of old projects do not have grounding, which significantly increases the risk of injury. At the first sign of problems with short circuits, you should turn off the electrical equipment as quickly as possible and call a professional electrician, or fix the problem yourself. But for this you need to have special tools and devices, and know the requirements of the PUE.
Washing machine heating element device
Electric motor for wood splitter
The basis of the design, as in a lathe, is the bed. It is made of a metal profile or square. The resulting site will consist of two zones - power and working. The power side is intended for installation of an electric motor. It must be securely fastened, since the main load falls on it.
The engine control unit is located in the same area. A dielectric plate is provided to accommodate the electrical components, and they themselves should, if possible, be placed in a plastic housing. The work area is made in the form of a table. The material used is steel sheet, 2-3 mm thick. At the boundary that conventionally separates both zones, a pedestal is mounted on which the shaft of the splitting cone is fixed. This part must not be mounted directly on the motor shaft.
The cone shaft is equipped with its own bearing support. In order to compensate for jerks and create torque, it is recommended to install a flywheel on the shaft.
After assembling the entire structure, you can begin connecting the electric motor. Asynchronous motors are most often used. In older units of this type, a separate winding is provided for starting. To determine it on the engine, you need to use a tester to measure the resistance on each winding one by one. The desired winding will have a higher resistance. It is directly involved in creating primary torque in the desired direction. If it is necessary to change the direction of rotation of the shaft, the connection points of the starting winding are swapped.
Modern electric motors start much easier. To turn it on and off, you can use a regular household machine.
Algorithm of actions
We will give detailed instructions for checking and replacing the heating element a little lower, but now we suggest you familiarize yourself with the universal algorithm of actions, regardless of the specific brand of washing machine.
Table. Procedure for replacing the heating element.
| Repair stage | Brief description of actions |
| Manufacturers install heating elements in various places. Getting to some is not difficult, but in other cases you have to disassemble almost half of the unit to do this. This is done deliberately; using this method, manufacturers force consumers to repair machines only in specialized workshops. How to find out where the heating element is located? Move the machine aside and inspect the back wall of the case. If there is a large metal plug on it, then it is easy to remove the heater - remove the cover and gain access to the fixing screws. If the case is solid, you will have to remove the entire front panel. It will take much more time to dismantle the elements than it takes to replace the heating element. |
| Before starting work, be sure to unplug the washing machine from the socket. Unscrew all elements of the washing machine body that prevent access to the heater. Inspect the device carefully. If you don't trust your memory, it is recommended to take a photo of it. Some types of heating elements may contain temperature sensors; this complicates the replacement algorithm and increases the cost of repairs. |
| Additional performance check and installation of the heater | The heating element can fail for several reasons; you must make sure that it is faulty. We will explain how this is done a little further in this article. Installation of elements is carried out in reverse order. Pay attention to the condition of the rubber gasket; it may be damaged when removed. If you have such a situation, then you need to change it too. It’s better to do this right away than to discover leaks under the washing machine during operation. They can provoke very unpleasant consequences. |
Before starting work, it is recommended to familiarize yourself with the technology for checking the serviceability of the heating device.
How to determine the power of the device
Energy consumption depends on the rated power of the device. To find out the washing machine's power in watts, look at the sticker on the back of the washing machine. There are models of several classes based on the level of power consumption. The first letter before the power numbers will indicate which class the device belongs to based on the principle of economical consumption of electricity.
Taking into account the class of the washing machine, you can determine its approximate power. Class A is considered the most economical. The more advantages it has, the less energy it consumes. Class G consumes the most electricity. Classes are assigned to devices based on research results in kilowatt consumption per kilogram at a temperature of 60° Consumption according to classes
- Class A consumes 0.15 to 0.19 kW per hour to wash 1 kg of dry laundry.
- Class B consumes from 0.19 to 0.23 kW per 1 kg.
- Type C consumes from 0.23 to 0.27 kW.
- Type G consumes from 0.27 to 0.31 kW per 1 kg.
A separate class includes devices with clothes dryers.
Rules for checking heating element
You can check the heating element without removing it from the tank, which greatly simplifies and speeds up repair work. If it turns out that it is completely serviceable, then the problem is with the control electronics, and its repair requires special technical education. Without such knowledge, it is better not to touch the control system. The test is done with a tester or other electrical device that allows you to measure resistance and current.
The serviceability of the heating element is controlled by three parameters.
- To break a nichrome spiral. This is the most common reason for heating element failure: for some reason the coil burns out and no current passes through it. This malfunction is checked by testing the element; for this, the tester leads are connected to two terminals of the spiral. The measurement switch is set to the “Resistance” position. If the arrow of the device sharply deviates towards o, then the spiral has burned out. Before dialing, check the functionality of the device - close the two outputs, the resistance arrow should suddenly move to zero.
Using a multimeter you can determine the break in the spiral - For breakdown of the hull. This is a very dangerous malfunction, especially for those users of washing machines whose electrical wiring in their house or apartment is not grounded. The current enters the unit body, causing serious damage. By the way, many have already encountered small breakdowns in the body. If you easily run the back of your hand over the metal parts of such devices, you will feel a tingling sensation. It indicates that the entire unit is under voltage, although it is still low and does not cause harm to the body. How to check for a breakdown on the housing? Connect one output of the device to the heater terminal, and the second to the metal part of the housing. If the arrow is at zero, everything is fine; if it deviates, then the element must be changed. During testing, set the device switch to 200 MΩ. It is very important to repeat the test on a heated heating element. Connect power to it for a few seconds, disconnect and repeat the test. Very often, a breakdown is detected in a heated state. This is due to the expansion of the internal fillers of the heating element; such a heater must be changed.
This is how hull breakdown is determined - Power check. It is not considered mandatory, but you can do it for a full guarantee. Find out how much current should flow through the spiral. To do this, its power must be divided by voltage. For example, for a 1900 W heating element, the current is 1900:220 = 8A. Switch the tester to AC ammeter mode and connect all elements in series to the power source. If the arrow points to 8 A, then everything is normal. If the current strength has decreased, then the heater is critically worn. It still works, but we need to prepare for a replacement. In order not to disassemble the machine again in a few months, it is better to immediately install a new one.
Checking the power of the heating element
Lathe made from a washing machine engine
The motor from a washing machine is ideal for making a small wood lathe. The basis of the design is a frame, which can be made from a corner, profile pipes and other available materials. The dimensions of the frame are within 100 x 20 cm, with possible deviations in one direction or another.
The electric motor is quite suitable from an old washing machine, perhaps even from Soviet times. For example, the Vyatka-automatic was equipped with an asynchronous motor with two speeds at 400 and 3000 rpm. The connection can be made according to all known schemes, including using a capacitor.
Read also: Microphone preamplifier with phantom power
The engine-to-frame mounting system is made individually. The most important thing is that the motor axis is parallel to the supporting structure. This can be done using washers, which, if necessary, are placed at the support points. The headstock is attached to the electric motor pulley. The tailstock and guides are also made from improvised materials. The axis of the tailstock must be parallel to the frame and the headstock, that is, it must be centered.
An important detail is the tool rest, which serves as a support for the cutting tool. It is necessary to ensure its movement along and across the frame, as well as reliable fixation during operation.
Step-by-step instructions for replacing the heating element
We will consider a simple option - the heating element is located behind the drum.
Step 1 . Drain any remaining water from the drum. To do this, open the bottom cover on the front panel of the case and remove the plug. Place a low container to collect water, otherwise it will spill on the floor. To drain completely, it is recommended to tilt the washing machine slightly and hold it in this position for several seconds until the liquid drains.
There should be no water left in the machine
Important. Do not allow sudden movements of the washing machine; it has heavy balancers that can damage the body. Weights dampen vibrations during spinning of laundry.
Step 2 . Place the machine in a free space and provide access to the rear. Unscrew the shield; it is secured with four screws. Remove the part and place it near the wall. Do not throw anything under your feet; all elements of the washing machine, electrical appliances and tools must be in order and in their places.
Remove the back cover to get to the heating element
Step 3 . Find the heating element, it is screwed to the bottom of the drum. It has three terminals: phase, neutral and ground. Some models have temperature sensors on the body of the heating element; handle them very carefully, they do not respond well to impact forces.
The heating element is usually located below the drum
Step 4 . Remove the phase and neutral terminals, unscrew the grounding fixing nut, and remove the contacts connected to it from the screw.
Carefully remove the contacts and unscrew the nut
Practical advice. Before further dismantling, we recommend checking the functionality of the heater. We described above how this is done.
If the heating element is working properly, then there is no point in disassembling anything further; the cause of the breakdown is different. If you have enough technical knowledge, then you need to look for it in the control and automation system. If you have no experience, call a specialist. To make it easier to make the right decision, let us inform you that the cost of the control unit can be up to 50% of the price of the washing machine. And unqualified intervention in its work in most cases causes complete failure with the impossibility of further recovery. If the heating element is confirmed to be faulty, continue disassembling the machine.
You can check the serviceability of the heating element without removing it from the machine body
Step 5 . Unscrew the locknut of the grounding screw, but not all the way, but to the length of the thread. This is done so that when tapping on the nut the thread does not jam. You need to knock until it sinks a little, thus weakening the expansion of the rubber gasket. The fact is that to seal the heating element, an internal plate is used, which, when the nut is tightened, is pressed against the rubber gasket and expands it.
With light blows of a screwdriver, loosen the fixation of the heating element.
Step 6 . Using a screwdriver, carefully pry the heater body around the perimeter and slowly tear it off. The rubber has stuck a little, don’t rush, don’t deform the seats.
To pull out the heating element, you need to pry it slightly with a screwdriver
Step 7 . Buy a new part from the store. Professionals strongly recommend taking an old heating element with you, this is the only way to guarantee that you won’t make a mistake with your choice. The fact is that manufacturers produce a new heater for each model; it may differ by only a few millimeters in length or width. This gives the right to assign a new series to the washing machine and, accordingly, sell it at a new price. And heating elements are no longer interchangeable.
The new heating element must have identical dimensions
Step 8 . Clean the place where the heater is installed from calcium, there will be a lot of it there. Use any available items, check the quality with a flashlight.
The heating element installation site must be thoroughly cleaned
Step 9 . Inspect the condition of the sealing rubber seat and, if necessary, remove carbon deposits from the surfaces.
The seal seat must also be clean.
Step 10 . Loosen the grounding nut and insert the heating element into place. Make sure it occupies a special niche.
Insert a new heating element into the housing
Step 11 . Tighten the nut and connect all wires.
Connect everything in reverse order
Pour some water into the drum and turn on the heat for a few seconds, then turn off the machine. If the heating element is warm and there are no drips, great, screw on the remaining parts and place the unit at the place of use.
Replacing heating element in front position
Video - Replacing heating element in a washing machine
The process of replacing heating elements in different washing machines has significant differences. Now you understand what to do in each specific case, follow the instructions and carry out work only taking into account the requirements of the PUE. If you have time left, you can help your wife clean the oven; this also requires special skills. To make your work easier, we recommend reading an article about this on our website. It will give you the opportunity to avoid making annoying mistakes and save a lot of time.
What affects refrigerator consumption?
The energy consumption level of a refrigerator may vary due to various factors. This should be taken into account when choosing a model of household appliances and placing them in the house.
Effect of temperature
Each refrigerator comes with instructions that contain the requirements for its installation. This applies not only to free-standing equipment, but also to built-in ones. Neglecting these recommendations will result in excessive consumption of electricity and rapid wear of the unit.
Ideally, appliances should be placed in a room where the temperature is maintained from +18 to +20 C. It is in such conditions that the level of electricity consumption by refrigerators will be the most economical. At +30 C and above, electricity consumption can double. Unheated rooms are also not suitable for installing units. Negative temperatures can quickly damage a heat pump, causing the compressor to stop turning on.
Heat sources should not be located near household appliances: stoves, ovens, heating radiators. Care should be taken to ensure that the unit is not exposed to sunlight, which can heat its walls.
Compressor power
The compressor is the engine of the refrigerator, ensuring the movement of freon, due to which the chamber is cooled to a predetermined temperature. The efficiency of the compressor determines the power of the unit.
Some models have two compressors: in the refrigerator and in the freezer compartment. When choosing such a device, you should make sure that it has an asynchronous operating principle.
Linear compressors have begun to be installed in modern refrigerators. They ensure constant movement of freon, as a result of which electricity is consumed evenly. Such devices are more expensive than standard options, but they are safer and more economical.
Freezing power of refrigerators
Freezing power is the mass of products that the freezer compartment of the device can freeze to t -18 C per day. In the instructions and on the sticker, this indicator is indicated as an X with asterisks, the number of which indicates the effectiveness of freezing
For example, a family of four should pay attention to a device with a freezing capacity of 10 kg/day
Freezing power is indicated on the device and in the instructions
The amount of electricity a freezer consumes is influenced by a number of factors:
- chamber volume for freezing products;
- compressor power;
- amount of loaded food;
- room temperature.
At the same time, the type of control panel and camera lighting do not affect the efficiency of the equipment.
Energy efficiency classes
According to international standards, refrigeration equipment is divided into classes: A+++, A++, A+, A, B, C, D, E, F, G. Each of them reflects the level of energy consumption of refrigerators.
In addition, there is a COP factor. From it you can find out how many times more the equipment can remove heat than consume electricity. For example, if this indicator is 3, this indicates that the device will spend 1 kW to remove 3 kW of heat.
COP varies depending on the energy efficiency class:
- A+++, A++, A+ – about 3.6;
- A – from 3.4 to 3.6;
- B, C – from 2.8 to 3.4;
- D, E – from 2.6 to 2.8;
- E, F – from 2.2 to 2.6;
- G – less than 2.2.
How many kW per hour do different models consume?
Electricity prices are constantly rising, so consumers are increasingly purchasing machines with high energy efficiency. Let's consider several models of washing machines of different power with the most economical consumption.
- The LG F12B9LD model is made using direct drive electric motor technology. Class type A+, consumption is 1.02 kW per hour.
- Premium device Bosch WAY28790EU. It belongs to the optimal economy type A+++, consumes 1.31 kW per hour.
- Washing machine HOTPOINT ARISTON AQ114D697DEU/B. There is a function for automatic consumption optimization, classified as type A+++. Consumes 1.138 kWh
- Narrow device with front loading type INDESIT XWSA610517WUA. 16 washing programs, tank designed for 6 kg of laundry, class A+. Consumes 1.006 kW/h.
- Washing machine model LG F80C3LD. Front loading, spin quality class G, and only 0.75 kW per hour per 1 kg. Consumption type A++.
- Washing machine Bosch WVH228360OE. Front loading type, has a drying function, the tank holds 7 kg of clothes, electricity consumption class, consumption 5.67 kWh/kg, spin type B.
Theory
To wash, the machine must be connected to a water supply to draw water and a power supply to heat it. The program you have chosen for washing regulates the temperature to which the heating element will heat the water.
Operating principle
Externally, the heater looks like a tube. Inside it there is a special nichrome or fechral wire, which heats up when current is applied. All free internal space of the tube is filled with a dielectric, which transfers heat from the wire to the walls of the heater. To supply electricity to the nichrome thread, the tube is soldered to the contact pad on which the terminals are located.
When the machine is turned on, the wire inside the element begins to heat up, and the heat spreads through the dielectric to the external environment and begins to heat the water in which the element is located. When the desired temperature is reached, the built-in sensor-relay or central control module turns off the current supply.
Specifications
- Power is the main indicator on which the speed of water heating depends. Typically around 2.2 W. The resistance also depends on the power, the normal value of which is from 20 to 40 Ohms.
- Element shape and length: depend on the specific model. The part can be straight or curved.
- Temperature sensor. If the water heater is not equipped with a temperature sensor, it is only suitable for washing machines where the sensors are installed separately.
- Coating made of stainless steel, non-ferrous metals or ceramics (ceramic heating element).