What it is
The essence of the operation of such a sensor is to turn on the light when it gets dark outside and turn it off when it gets brighter. The principle of operation is the properties of electrical elements to change characteristics under the influence of solar radiation.
Most often, a semiconductor photocell or photoresistor is used as a basis. When the illumination decreases, the resistance of these elements changes and, at the required value, closes the relay contacts. The latter supplies power to the lamp. In the morning, when there is enough light, it turns off in a similar way.
Operating principle and design of the day-night sensor for turning on the light
Appearance of the sensor for adjusting and turning on street lighting
The day-night sensor has many names, the most common among them is photo relay. Despite the large number of items, the task remains the same - to turn the street lighting on and off automatically.
The operating principle of the light sensor is based on the ability of certain structural elements to respond to the intensity of ambient light. For this purpose, photoresistors, phototransistors and photodiodes are most often used. As the lighting decreases as evening approaches, the light sensitivity of one of these parts begins to change. As soon as the changes reach the set parameters, the closing relay is activated, which ensures an uninterrupted supply of electricity. When morning comes, the reverse processes occur, the contacts in the relay open and the lighting turns off.
Design features
There are several types of sensors, which are divided according to their purpose. The sensor can function normally only if it is selected correctly. Therefore, it is worth paying attention to the types of devices:
- Relay on a microcontroller with a photocell and other additions.
- With photodiode in housing for outdoor use. Most often, such sensors are protected from external factors.
- With remote photocell. Allows it to be placed separately, maximum range 150 m.
- With adjustable response threshold.
Sensors from the budget price range make it possible to automate lighting at a basic level. But to keep the light on until the morning, some manufacturers offer devices with more advanced capabilities. The following varieties are distinguished:
- A device with a motion sensor. The light turns on only if you start moving in a given area at night. The device is low cost, compact, and reliable. But if pets or plant branches come into its range of vision, then there is a high probability that it will turn on when it is not needed.
- With motion sensor and timer. It is configured so that it fires at the right time.
- Relay with timer. Turns off the device when lighting is not needed, for example, late at night.
- Programmable relay. Expensive types of devices are significantly superior to others in terms of functionality. They set the on/off switch depending on many factors, including the day of the week.
For a small budget, it is recommended to focus on a device with a timer and a movement sensor. In this case it is considered optimal.
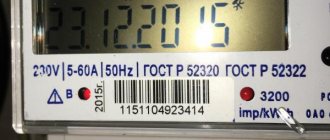
Operational and technical characteristics
A photo relay with a light sensor should be selected based on the conditions of its future operation. When used in street lighting, the light sensor can be remote and installed separately, or built into the design of the lamp. In the first case, the photocell, which is small in size, is easier to install in the desired location, protected from illumination. Such devices are suitable for installation inside the house and can be easily mounted in an electrical panel on a DIN rail.
A twilight switch with a built-in light sensor is usually located near the lamp. The main thing is that the light flux does not hit the sensor.
Main parameters and technical characteristics of the photo relay:
- Supply voltage. Depending on the model, it is 12 or 220 volts. That is, devices can operate on direct or alternating voltage. A 12-volt relay is often powered from a battery in a remote circuit.
- Operating temperature conditions. A relay with a photocell used in street lighting must operate in all weather conditions, regardless of the time of year. It is recommended to select the temperature range with some reserve in case of sudden changes in heat or cold.
- Housing protection. For this purpose, a special classification has been developed. For example, for outdoor installation you should choose an external type of device with protection class IP44 or higher. In this case, splashes of water and solid particles larger than 1 mm in size are prevented from entering the housing. The higher the protection class, the more reliable the selected device will operate. At home, devices with protection class IP23 are quite sufficient.
- Power of the connected load. Any photo relay corresponds to the power set by the manufacturer. When making calculations, it is recommended that the sum of the powers of the connected luminaires be 20% lower than this value for the twilight switch photo sensors. In this case, the device will last longer since it will not operate under extreme full load conditions.
Areas of application
Light-sensitive sensors are quite in demand. They are mainly used for lighting:
- areas around the house;
- paths in the yard;
- street stairs;
- gazebos with barbecue facilities and terraces;
- gates and parts of the street near them (the lights turn on when someone comes).
In organizations, light sensors are installed when necessary to illuminate the entrances of houses, shopping centers, various areas of high-rise buildings, and illuminate advertising stands. The purpose of such an event is to save energy and extend the life of lamps and consumables.
Important Features
When purchasing, the following parameters are considered fundamental:
- Voltage (measured in volts). Devices are available with supply voltages of 12, 24, 220 V. It is recommended to choose the latter type, since they can be connected to the home network. For the rest you will have to buy special power supplies.
- Switching current. If it is selected incorrectly, the operating life of the sensor will be reduced. Therefore, you need to decide on the number and type of lamps before purchasing a sensor. To obtain the most permissible switching current, you should sum up the power consumption of the light bulb and divide by the voltage. It is necessary that the nominal value be higher.
- Switching threshold (measured in lumens). Increasing this indicator makes the sensor more sensitive. A slightly sensitive sensor turns on the lighting very early, a very sensitive sensor does not allow it to turn on when there is snow outside. Different models do not have the same range of settings for this parameter.
- Response delay (in seconds). The range is one of the basic characteristics and is indicated in the instructions. It is optimal to set a delay of 5-7 seconds so that the lighting does not turn on at any rustle.
- Power (measured in watts). With a low value, the device will be more economical. Usually two types of power are indicated: how much the device consumes while the lamp is operating, and in standby mode.
Degree of protection. The sensors are mounted outdoors, so the housing must be dust and moisture resistant and not deteriorate under the influence of ultraviolet radiation. Resistance must be at least ip44. This figure may be lower if the sensor is in a housing that is protected from moisture.
You should also consider the temperature limits at which the sensor can operate, especially if it is installed in a region with severe winters.
Setting up the light sensor
In addition, the photo relay has its own sensitivity adjustment. You can manually set any trigger threshold.
That is, the flashlight will work in complete darkness at night, or in the evening, when it starts to get dark.
In popular photo relay models IEK FR-601 and FR-602, the regulator is located at the base and rotates in the range from “+” to “-”.
If you turn “+” to maximum, the photocell will work at sunset or in bad weather (cloudy sky). According to the technical characteristics, this adjustment corresponds to approximately 50 lux.
If you remove it in its extreme position to “-”, the sensor will only work in complete darkness (illuminance 5 lux).
Usually installed in the middle position.
These twists are quite thin and break easily if too much force is applied. So be careful, especially when adjusting sensitivity in cold weather.
At the same time, pay attention to one important nuance.
Error n. 1 The photographic relay should be installed outdoors, not indoors.
The sensor is always supplied in a black case to test its functionality. They covered the lid of the device with it - the relay worked.
Thus, in many models, sensitive photocells located inside the case can react, in addition to lighting, to ultraviolet light, which is part of the sun's rays.
At home, 80% of UV rays are lost due to glass, but not outside. Thus, the artificially dimmed home environment may differ from the actual outdoor environment.
When the radius is not enough, some use common sense and use film to make further adjustments. It wraps around the sensor (either fully or halfway) and therefore results in a higher dimming value initially.
Operating principle and installation
The sensor functions quite simply, it can be easily installed and used, provided you follow the instructions and have a minimum set of electrician skills.
How does it work
The sensor is based on a photo relay. It reacts to the brightness of natural or art light. When dusk sets in, the photosensor turns on the relay, causing the lamps to start working.
If the sun begins to shine stronger, the photo relay breaks the circuit and turns off the lamp. Thus, the relay controls the lighting device connected to it, which significantly reduces energy consumption.
There are several varieties of such sensors, but they have approximately the same operating principle.
Selecting a location
If the sensor is connected incorrectly, you will almost certainly not expect adequate operation. Therefore the location is selected:
- far from large buildings and objects;
- in an area of exclusively natural light;
- away from flammable substances;
- outside areas that are subject to mechanical or chemical irritants.
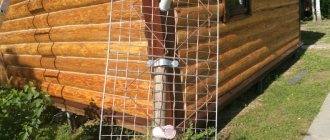
Connection diagram
Usually the control device is mounted near the lamp; the model instructions have its own connection diagram. The latter must be studied before installation.
Installation does not require special skills; it is enough to calculate the current so that the lamps do not cause an overload of the line. However, the photo sensor is selected taking into account the number of lamps and their power. It must not exceed the maximum possible, otherwise the device will quickly fail.
During installation, it is necessary to take into account some standards:
- It is recommended to connect the switch and lamps to a separate line from the electric meter with an automatic machine.
- Do not install the sensor upside down. The light of the sun falls on it from above, and a lamp is located below.
- The device must not be installed near flammable materials.
- If there are several lamps, then it is important to install a starter.
How to set it up correctly
After installation, the sensor is configured. A rotary switch is provided at the bottom for engraving the operating limit. A little higher on the body there is an arrow that indicates which direction to turn to adjust the sensitivity.
First of all, the sensitivity is set to minimum. To do this, unscrew the handle to its extreme position, according to the instructions. In the evening, when it is dark enough to turn on the lights, you can start setting up. Slowly turn the regulator until it turns on and leave it there. This is enough, you can install the device.
Connection diagrams
Connection diagram of a photo relay to a street lamp
Connecting a time relay for street lighting should not cause difficulties. A phase and zero are entered into the input of the device, from the output the phase is supplied to the load - lighting fixtures, the zero comes from the machine or bus.
If the installation is carried out in accordance with all rules and regulations, the wiring connections will be made in the junction box. If you have to turn on a powerful lighting device, it is recommended to supplement the circuit with a starter (contactor). If the lamps should light up only when a person arrives, the automatic lighting system is additionally equipped with a sensitive motion sensor.
Most models include three wires: black or brown, red and green. When drawing up a diagram, it is important to consider the following:
- A phase must be supplied to the black or brown wire.
- The red wire is necessary to connect the device to lighting fixtures.
- The neutral from the power cable is connected to the green wire.
If all wires are connected correctly, a fully working circuit will be obtained.
Installation and connection features
Mostly on the device there is a diagram with color coding of the wires that are used to connect it. Most likely used: brown for the phase from the shield, blue for zero, red or black for the lamp.
It is enough to strip the ends of the cables and connect them in accordance with the proposed diagram. With two contacts, only the phase is connected.
When connecting a lamp using a starter, it is connected to a photosensor instead of a light bulb. The relay then closes the starter, which minimizes the current passing through the sensor. Therefore, you can purchase a cheaper and more powerful soap device.
Where to install?
Pay attention to the location of the photo relay.
Error n. 2 For any connection scheme, the sensor itself should not fall into the lighting area of the luminaire.
Therefore, in 90% of cases, the photo relay is located above the lantern.
If the projector body allows, it can also be mounted directly on it.
Otherwise, the entire circuit will not work properly and spontaneous operation and flashes are possible.
In this case, the relay should not respond to short-term flashes, for example, the headlights of passing cars, due to the delay set at the factory.
If it is not possible to hide the sensor as far as possible from the lamp, at least cover the housing on the lamp side with plywood or other opaque partition.
Incorrect operation is also possible after prolonged use. This is because the photocell cover gradually becomes dirty and darkens, causing varying amounts of sunlight to pass through it over time.
As a result, the response thresholds change dramatically. If it is just dirt and dust, the problem can be easily solved by wet cleaning. But when the plastic turns black from time to time, only replacing the protective cap or the entire device can help.
Most often, the zener diode burns out in such relays. This is their main weakness.
Also, when choosing a photo relay, pay attention to the operating temperature. For example, the FR-601 itself works fine down to -25C, and then they start having problems.
In this case, a regular light switch will help you again. Only in the circuit it needs to be connected differently than discussed above.
The phase that passes through it must pass directly into the lamp. This is a jumper of sorts in case the sensor fails or fails.
The light turns on with the usual flick of a switch, just like all the light bulbs in your home.
Also, the passport data of such photocells indicates the degree of protection - IP44.
This means that the sensors can be safely used outdoors. They are protected from splashes and raindrops.
However, pay attention to the correct placement of the device.
Error n. 3 For example, some models can only be installed upside down!
They have a hole in the protective cover through which moisture can easily penetrate into the device.
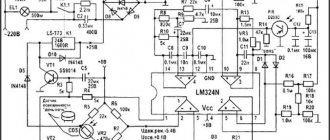
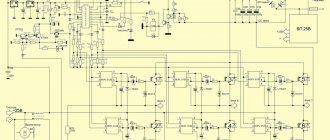
How to make it yourself
If you have the skills to use a soldering iron, you can make such a sensor yourself. To get started, you can use a simple diagram.
Designation:
- PR1 - photoresistor;
- R1 - 10 kOhm variable resistor;
- vd1-protective electrical diode;
- vt1,2 - npn transistors;
- K1 - 10 millifarad capacitor;
- k11 - switch.
In the diagram, the transistors are connected as an emitter follower, which amplifies the signal enough to drive the relay. The diode prevents reverse current flow.
You can connect the legs of radio components in a certain order or make a printed circuit board. To ensure the functionality of the device, test it with one lamp. The resistor adjusts the sensitivity. After calibrating it, you can solder a permanent one, which will be more reliable.
Astro timer
An astronomical timer is another way to control the lighting in your yard. The operating principle is not the same as that of a photosensitive relay. But the result is similar - turning on/off the light.
The device contains data about sunset/sunrise in each region. Location data, date, time are entered into the device and the device starts working according to the built-in program. Its advantages are as follows:
- there is no dependence on the weather, when it is cloudy outside the photo relay can often trigger falsely;
- The installation location is not important.
- It is permissible to postpone the start time by several hours.
The downside is the significant cost.