Dear site visitors!!!
I believe that the information presented in this topic will be useful to you. The topic will address various issues in this area, and many questions arise in this area:
- How does a household fan electric motor work?
- how to replace a capacitor in a fan's electrical circuit;
how to rewind the fan motor stator, how to repair:
- wall fan;
- ceiling fan;
- window fan;
- floor fan;
- bathroom fan;
- kitchen fan;
- fan with timer;
- exhaust fan.
It is almost impossible to immediately and completely provide information on issues that arise related to malfunctions resulting from the operation of various types of electric fans.
The topic will gradually expand, that is, after a certain period of time, additions will be made.
Take an interest in various sources of information in this direction:
- technical sites;
- technical literature
and so on. Accumulate your experience and knowledge.
DIY floor fan repair. All the reasons why it doesn’t spin and how to sort it out.
On the hottest summer days, the only salvation from the sweltering heat is a regular floor fan.
Not everyone can afford a full-fledged split system or even a mobile air conditioner.
But unfortunately, even this inexpensive and accessible wind blower breaks down from time to time. Chinese models especially fly like seeds.
And there is an overwhelming majority of them in our market. What to do if the fan stops rotating and working? What are its main problems and why does it break down?
In total, there are 5 main reasons for the failure of floor fans:
You cannot influence this in any way, since you already bought a fan with such an initial defect. Sometimes it seems to work, the impeller rotates normally, but it does not blow.
That is, there is no cooling air flow from it. Why is this happening?
Due to the incorrect angle of attack of the blades. Its petals are deformed and drive the air flow in a circle, rather than throwing it out.
This effect can appear over time, after the fan has been standing in direct sunlight for a long time and its impeller, having heated up, begins to gradually change its shape.
This can only be treated by replacing the impeller with a new one.
The most common problem is dried out lubricant or lack of it. The fan begins to jam, lose speed and, as a result, the load on the engine increases. The wind blower no longer operates at full capacity.
The motor, wound with a thin wire of 0.2 mm, begins to heat up and the windings gradually burn out.
How is such a defect detected? In this case, the fan stops rotating. It hums, but the impeller does not spin.
It also happens that it starts only at 3rd speed, and does not respond at all to the first two. It just doesn't have enough power to turn the shaft.
In order to start it, you have to brazenly spin the blades like on old airplanes.
By the way, the same symptom can occur if the starting capacitor is damaged. Without instruments, how can you find out which reason is to blame for the breakdown?
To do this, you need to at least get to the engine shaft by removing the protective casing and blades. If the shaft rotates by hand with great difficulty, then blame dirt and dried grease.
If you hold the fan blades with your hand while working, it may stop again. The capacitor is checked with a multimeter if it has an appropriate capacitance measurement scale.
To replace, select a new condenser according to the same parameters as indicated on the body of the old one.
By the way, a capacitor that is not yet completely dry also affects the speed. If you notice that they have fallen and the fan has begun to spin more slowly, this is a sign to check it.
The problem of tight rotation is solved by new lubrication of the bearings. So-called plain bearings are used here. Some people call them bushings.
It’s a bit expensive to use balls in such designs, and they rattle over time. For repairs, it is not at all necessary to disassemble the entire engine. Just unscrew a few screws and spray the required areas with WD40 universal aerosol.
How to get to the bushings without removing the engine? To begin, unscrew the central screw on the back wall of the protective casing.
Another self-tapping screw is hidden in the adjustment button-lever for turning or stopping the fan head.
After this, the back cover can be easily removed from its place. What's underneath? Here you can see the rotation gearbox that gives rotation to the entire head.
A special rod connects to it from below.
The starting capacitor of the engine is fixed on top.
By the way, keep in mind that it may not be there in different models. In this case, look for it near the speed shift buttons.
To access the motor bearing, you will need to remove the gearbox. It is secured with three screws and supported from below by a rod.
Tighten the screws and disconnect the rod. After this, the gearbox is removed from the shaft and you have access to the rear bushing.
There is no need to unscrew or disassemble anything else. Vedashka will do the rest for you.
Place a narrow guide tube on the WD40 can and poke it several times into the gap between the shaft and the bearing.
After spraying WD40, turn the shaft in different directions by hand and move it back and forth a little.
Excess thickened grease, foreign debris and dust will gradually come out. This excess dirt can be easily removed with cotton swabs.
If you have a thick lubricant like cyatim or litol, it is advisable to apply it to the gear worm. After these cleaning procedures, drop a few drops of sewing machine oil onto the bearing from the outside.
Just don't apply it too much. Otherwise, it will eventually spread all over and dust will stick to it, turning back into dirt. As a result, you will again get a wedge and a problem with fan rotation.
In some models, felt washers are placed near the bushings. They are saturated with oil and when heated, the oil flows onto the shaft, lubricating it.
By the way, if you overtighten the central screw on the back cover, and this is a self-tapping screw, not a screw, it can pass through the plastic of the rotary gearbox and rest against the shaft.
We've sorted out the rear bearing, then move on to the front part of the fan. There is a protective cap in the center here.
You throw it off and remove the propeller from the shaft. You now have access to the front journal bearing.
The principle is the same here. First, squeeze out and soften the old grease and dirt with a Vedashka, and then apply new one.
After that, put the propeller back on and close the lid. Having completed the repair, turn on the fan at high speeds, let it run for a few minutes, and switch to the speed required.
If the damage is more complex and simple lubrication does not help, you will have to disassemble the fan in more detail.
In your hands you still have the motor itself and the leg in which the power wires pass and the push-button mechanism is located.
You disassemble this leg by unscrewing 6 screws.
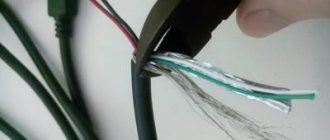
First of all, check the soldering of the wires. It is quite possible that one of them, or even several, has fallen off or burned off.
If everything is intact, how can you figure out which wire goes where and is responsible for what? Start testing with two wires from the power plug.
One of them, let it be black (as in the photo below), goes directly through the backlight to the fan motor.
The second wire goes to the lower terminal of the dial switch (button 0).
Each wire from these buttons goes to its own terminal on the winding, with a greater or lesser number of turns. By applying voltage to them, you make the propeller spin faster or slower.
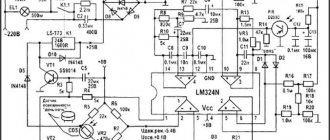
A simplified diagram of a wind blower looks like this.
Typical circuits for most inexpensive 3-speed floor fans are something like this:
Pressing each button is accompanied by the closure of its contact group.
In this case, the other contact group opens at this moment.
Sometimes these contacts burn out or do not reach their plate. Then you lose any of the speeds.
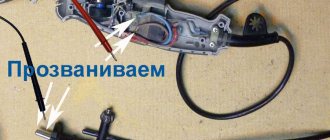
All this is checked simply with a Chinese multimeter, in circuit continuity mode.
If your very first wire breaks or there is no contact on it, the fan motor simply will not start. Therefore, if the fan is completely inoperative, check it first.
Unless, of course, before you make sure that the plug itself and the power cord from it are working properly. This is also caused by the tester.
Place one end of the probes on the pin of the plug, and touch the other end to the contact pad on the “0” button. If working properly, there should be zero resistance.
If there are zeros everywhere, then the switch and wires are working.
Next, check the second contact on the plug and the wiring that goes directly past the switch to the engine. Make sure your cord is intact here too.
Only after this can you proceed to checking the windings of the motor itself.
Set the resistance on the multimeter to 2000 ohms. Next, in order not to bite the wires anywhere, at the place where the capacitor is connected, strip off the insulation a little.
Look for the common point of the circuit, as in the diagram below.
Having found it, you call up the resistance of the winding. To do this, touch the contacts on the switch with the second probe one by one.
Approximate fan winding resistance values can be as follows:
Of course, they may differ slightly for different models, but the most important thing is that there is no breakage or short circuit. Measurements can show either several hundred Ohms or a little more than 1 kOhm.
It all depends on the power of the fan and the cross-section of the wire.
The capacitor winding and the total resistance of all windings combined are also checked.
Here is the most competent and complete video on checking the performance of fan windings with a multimeter.
If checking the integrity of the windings also does not reveal any deviations or defects, move on. To do this, you completely disassemble the fan, as they say, piece by piece.
First, the engine must be freed of all plastic parts. Unscrew the 4 screws from the front side and remove the cover.
On new models, in addition to screws, there are also latches. They need to be bent with a screwdriver.
To disconnect the leg, you need to find another screw, which is usually hidden under the plug.
Loosen it and pull out the mounting shaft. To dismantle the wires that pass through the leg, you will need to bite them out or unsolder them from the terminal blocks on the speed buttons.
At the same time, write down or sketch where each one is initially connected.
Let's take it apart. Unscrew the screws holding the back cover together.
At the same time, before disassembling, be sure to put marks on all covers and hardware indicating how everything was originally assembled.
Otherwise, after incorrect docking, you will lose alignment. There will be problems with the shaft wedging and the rotation of the blades.
After removing the bearing, you get to the windings themselves. Among the bundle of power wires coming from the switch, look for a special thermal relay.
Very often the engine stops working after it burns out. This relay should operate and open the circuit at a winding temperature of 135-145 degrees.
After cooling, the relay closes again and the fan starts. So, sometimes it burns out completely and actually plays the role of a fuse.
If your fan often turns off and starts again on its own, this protection is to blame. Know that it doesn't just work. This means that your shaft is either jammed, or the windings are exhausted and they are overheating.
Overheating of the windings may be associated with the destruction of the small impeller, which is located on the shaft inside the engine itself. It is designed to blow air and reduce the temperature of the coils.
The cheapest models do not have a temperature sensor-relay; everything is connected directly. Based on this, if your “thermal fuse” has burned out, you can, of course, bypass it and start the wind blower. But at the same time you will be left without fire protection.
This relay is also checked by the tester.
There should be a chain between its legs in continuity mode.
If all the parts and relays inside are intact, all that remains is to carefully examine the windings, shaft and rotor through a magnifying glass. You may see broken or damaged copper strands.
This happens when a bearing jumps out of its seat and the rotor begins to hit the windings.
With modern Chinese floor fans, the screw connection between the two halves of the motor quite often loosens. Do not forget that the shaft on both sides is mounted on self-centering copper-graphite bushings, which are tightly locked in the covers.
When assembling and tightening them, you can lightly tap the transformer iron itself with a hammer so that the shaft rotates easily, with little inertia. Someone tries to catch the center on their own and creates such a quiet horror.
Eventually the shaft falls out of the bearing, resulting in a wedge. As a result, the rotor begins to scratch the windings and its surface.
Also keep in mind that if your fan fell and then stopped working and rotating, then the bushings are most likely misaligned here too. Nothing else can break from such a fall.
This will not damage the capacitor, and the windings covered with varnish will not break. Perhaps some buttons may move away. But first of all, check the alignment of the bearings. And then everything will work as it should.
Unfortunately, you cannot cope with a mechanical defect in the windings or rotor, as well as their intra-turn short circuits. It is not rational to rewind the engines of cheap wind blowers; it will be much easier to buy a new model.
However, this is already the last stage of verification, and there is hope that you will never get to it, having found damage somewhere else using the methods discussed above.
Source
Do-it-yourself household fan repair
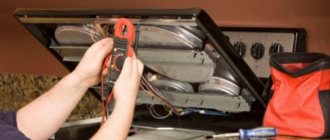
No matter how well electrical equipment works, sooner or later it fails. Especially often those devices that are used very intensively break down. These include a household fan. There are various types of breakdowns in this product. When they occur, the owner has no choice but to contact the workshop. However, in some cases you can do it on your own. To do this, it is enough to know well the structure and operating principle of this electrical equipment. Information on how to repair a fan yourself is presented in the article.
Electrical product design
Before you begin repairing a home fan, it is advisable to familiarize yourself with its structure. In this electrical equipment, cooling is carried out due to the rotation of the blades.
The place where they are mounted is a special shaft on cranks, which is driven by a motor. The fans are equipped with electric motors, which, depending on the model, can have different power. They are started using stators. The flanges are used as supports for the contact blocks. The fan can be equipped with a gearbox. It is fixed using a clamping bar. The mechanism is housed in a plastic case on a long stem.
Disassembly
Fan repair requires mandatory disassembly of the equipment. To do this you need to do the following:
- Unscrew the fan cover. This is its front part in the form of a protective mesh.
- Disconnect the propeller. It is mounted on the motor shaft using a nut. Since it has a left-hand thread, you need to rotate the nut clockwise. Upon completion of the fan repair, the nut is installed back by tightening it in the opposite direction.
- Remove another protective mesh. It is secured with a nut at the back of the device.
- Remove the protective cover. It is connected to a handle that adjusts the rotation of the housing in the product using a hidden bolt.
Engine repair
Fans become very overheated during intensive use. Motor failure is considered one of the most common breakdowns.
Fan repair should begin with an initial inspection. To do this you need:
- Remove the cover with the protective grille.
- Remove the motor. It is secured with four bolts.
- View contacts. If there is darkening on them, the problem should be sought in burnt out contacts. If there are no darkenings, then the master will have to “ring” the engine. A broken motor will make a humming noise.
- Measure the resistance of the stator windings. The normal value is 1.2 kOhm. If the motor hums but does not turn on, it means it needs a new rewind. This can be done in a specialized workshop. Judging by the reviews of some owners who were faced with the problem of a burnt-out engine, it is impossible to independently repair a household fan with such a breakdown. Many consumers advise buying a new engine straight away rather than taking the old one to a mechanic for winding.
Problems with the cooler
It often happens that the fan blades do not spin, although the motor in the product is in perfect working order. The reason may be:
- Faulty capacitor.
- There is no grease on the bearings.
Repairing the capacitor
The cause of capacitor failure can be sudden surges in voltage in the electrical network. In this case, repairing the fan, as usual, begins with disassembling it. For most models, the condenser is located immediately behind the central flange. To get it, you must first remove the engine and disassemble the power supply. In some fan models, removal of the condenser may be prevented by the presence of a crank, in which the owner will have to remove the flange as well.
In this case, repair of the floor fan will be limited to checking the capacitance of the capacitor. To measure the resistance on the conductors, the home technician will have to use a special tester. If the readings of this device exceed 50 Ohms, then you should purchase a new capacitor.
The speed switch is broken
If the fan makes a lot of noise during operation, the first thing the owner should do is check the serviceability of the product regulator. It is located next to the control unit.
Removing the regulator is simple: just remove the back cover. The control unit will be closed by a contact block. It is also removable. It is advisable that the clamping bar remains intact. After removing the block, you can begin to inspect the regulator. Very often, the cause of a speed switch breakdown can be a disconnected conductor. In this case, it is not difficult to repair the floor fan yourself. Using a blow torch, the DIYer mounts the conductor back into place. It happens that he simply burns out. Then the fan owner will have to get a new conductor.
How to repair the control unit?
The most common problem with blocks is broken worm gears. The fan owner will first have to remove the contact block. In this case, it is not necessary to remove the electric motor. Most models of electric fans are equipped with special pads that cover the control units. These pads should be removed. Then, using a screwdriver, you need to completely unscrew the shaft. Only after this is the control unit removed. By removing the back cover, you can see the condition of the worm gear. Below it is a contact shaft. The block resistance is checked by a tester. The resulting parameter should be up to 50 Ohms. If the readings are higher, then such a control unit should be replaced with a new one.
How to replace the rotor?
This procedure is considered rare for ventilators. But still, due to overheating of the electric motor, the rotor may also become unusable. To fix it, the owner first needs to remove the fan cover. The location of the rotor was a special gasket behind the shaft. To get the rotor, you will have to use a screwdriver to remove the electric motor. After this, an initial inspection is carried out. Very often the cause of a breakdown is burnt out wires. If they are ok, then the rotor itself is broken. According to many owners, in this case it should be immediately replaced with a new one. The old gasket can be used. The new rotor must be installed so that it does not come into contact with the electric motor.
If the diffuser is broken
The cause of failure of this element is considered to be twisting of the regulator. Such cases are very rare. Repairs should begin by removing the fan cover. The electric motor can be left in place. However, in order to make it more convenient to work with the control unit, some technicians recommend removing the central flanges from the fans. Otherwise, after repairing the diffuser, installing the unit back in its original place will be problematic. The diffuser is located on the back of the control unit. In some fan models, diffusers are secured using special clamps. The failed element is disconnected from the block using a knife or screwdriver. The technician just needs to slightly pry the diffuser. The faulty element is replaced with a new one.
Problems with the blades
Since plastic is used in the manufacture of the blades, this part of the fan is very susceptible to external mechanical influences. As a result, the blades often become deformed and break if any foreign objects get caught behind the mesh. In this case, in order to repair the fan, the owner needs to dismantle the protective mesh. The back cover can remain in place. There is no need to remove it. The protective mesh is held in place by a special clip in the form of a plastic cap. It is easy to turn with just your hands. After the clamp is twisted and the protective mesh is removed, the special lining that secures the blades is detached. This stage of work can be completed without the use of tools. The blades must be replaced if they are very deformed. If during operation of the fan there is slight friction against the protective grille, then they can be easily aligned by hand. According to fan owners, plastic blades bend very easily.
If the flange is broken
Since the flanges are made of plastic, this part of the fan is very susceptible to impacts. Flanges become unusable as a result of falling of an electrical product. Repair begins with dismantling the protective cover. In some models, the flanges are located near the electric motors. In this case, there is no need to remove the control units. After twisting the crank and removing the worm gear, the derailleur is disconnected. The location of the flange is a special panel on which it is mounted with four screws.
In some fan models, the flanges are located near the control units. In this case, the owner will first have to remove the clamping bar, and then the block itself. There is a special gasket near the rotor. In order to get to the flange, it must be removed. It is secured with two screws.
Basic faults
A household fan does not have a complicated design, and the principle of its design can be seen in the figure below.
If you look closely at the figure, it becomes clear that the electric motor, gearbox, crank, rotation speed switch and propeller that creates the air flow can fail in the device.
The main difference between a desktop cooler and a floor-standing one is the high stand in the floor-standing version. Otherwise the designs are identical.
So, the main malfunctions that you can observe in the cooler you purchased:
Troubleshooting mechanical problems
Household fans do not have rolling bearings or the like, which are replaced in case of failure. Sliding bearings are installed in them
, the shaft rotates in bronze bushings. They are permanently pressed into the body. But even if you take them out of there, there will be nothing to replace them with. Therefore, it is necessary to lubricate such bearings in a timely manner. If they run dry for a while, the gap between the shaft and the bearing will increase. This will lead to axial runout of the shaft, resulting in extraneous noise, a decrease in speed and an increase in the rate of bearing wear. This is especially fatal for computer coolers.
Machine oil is used for lubrication
, but it is better to use
a spindle
. If you have a sewing machine at home, then oil for lubricating it is the best option for fan bearings. For lubrication, the fan must be disassembled to get to the bearings. For coolers and some exhaust fans, it is enough to peel off the protective film on one side.
Pay attention to the presence of dirt
bearing. In some cases, you will have to disassemble the assembly, clean it, and then reassemble and lubricate it. There is no need to apply a lot of lubricant: one or two drops are enough for the bearing to function normally. The rest will be splashed all over the body during the first launch. Drops of oil inside the case collect dust quite well.
If after lubrication there is still noise during operation or shaft beating, then the product will have to be thrown away. It is not possible to replace the plain bearing.
Main problems
To identify the root cause of the malfunction, you need to find out what parts the fan consists of. Regardless of the type (floor-standing or tabletop), the device has exactly the same structure. The only difference is the length of the stand.
There are different problems with fan operation, and each of them has its own causes and symptoms.
TOP 15 best floor fans, read the next article.
The fan does not turn on
The device may not turn on, but in this case it is important to pay attention to whether the light comes on or not when you try to start the device. If the indicator lights up but the device does not turn on, it means that the block with the buttons, which is located on the fan stand, is broken.
If the light on the body does not turn on and the device does not make any sounds, there may be no voltage in the outlet, or the reason lies in a broken cord or plug. If it is impossible to start a household appliance and exclude the reasons described above, the problem should be looked for in the electric motor.
The blades do not rotate well
Blades may rotate slowly for several reasons. The main one is the lack of lubricant in plain bearings. Sometimes the blades become deformed under high temperatures from the engine (overheating occurs when the device runs too long). In this case, the blades cling to the protective mesh, so detecting such a problem is simple and quick.
The fan does not rotate to the sides
If the fan device does not turn in different directions, or turns occur with a delay, you will have to disassemble the motor housing. Main reasons:
Cooler hums and does not spin
Many people mistakenly call a fan a cooler, but in reality it is a cooling device that may not have blades. The main purpose of the cooler is to remove heated air from the fan. Sometimes it hums but doesn't spin. There are several reasons:
The fan makes a lot of noise or whistles
A floor or table fan makes noise and whistling in the following cases:
Read on to learn how to choose a fan for your home.
Other faults
What else can happen to a floor and table fan:
Regardless of the cause of the malfunction of the floor and table fan, carry out independent diagnostics, which will allow you to identify the area and cause of the breakdown.
Cooler blades do not rotate well
If the fan does not pull and does not move air well, you will need to disassemble the housing in which the motor is located.
Sometimes the fact that the propeller does not spin may indicate insufficient lubrication in the plain bearing installed in the electric motor. The fan is disassembled as follows.
First you need to unscrew the protective mesh (its front part) and remove it. After the grid, disconnect the propeller. It can be screwed to the motor shaft with a nut with a left-hand thread. That is, to unscrew the nut, rotate it clockwise, and to tighten it, counterclockwise. Remove the rear protective mesh by unscrewing another nut. Unscrew all fasteners holding the unit casing. Sometimes there is another bolt in the handle to adjust the rotation of the body. If you do not unscrew it, you will not be able to remove the motor casing. Now, when the engine is open, you should drop a few drops of machine oil (it is better to use spindle oil) onto the bushing (indicated by the red arrow) and rotate the shaft several times in different directions so that the lubricant is absorbed inside. After this procedure, slight rotation of the shaft is resumed. Reassemble the motor housing in reverse order. Turn on the unit and check the air flow.
The unit does not turn on
In this situation, there may be 2 options: the light indicating that the unit is ready for operation may light up or not. Depending on this, the breakdown diagnostic algorithm will differ.
The light doesn't light up
If, after plugging the device into the socket, the light located on its body does not light up and it does not start, then, first of all, you need to check whether there is voltage in the socket. This is done simply: take any electrical appliance and plug it into this outlet. If the device works, then you need to look for a fault in the electrical plug and cord.
To check the plug, unscrew it and check that the wires are securely connected to the terminals. To check the cable, you need to disconnect it from the terminal block of the device and “ring” it with a tester. If a break is detected in the cable cores, it should be replaced.
The light is on
The reason for this behavior of the unit, when the indicator light is on, but the fan does not work, and no sounds are heard, may be caused by a breakdown of the block with buttons. To check the buttons, you will need to disassemble the button block located on the stand of the floor fan or the stand of the desktop device. But, before disassembling the device, make sure that it is unplugged from the outlet.
The operation of the buttons is very simple: there is an “on” and “off” position. It is necessary to check the “output” and “input” on each key using a tester.
If a faulty button is detected, it cannot be repaired. Therefore, the switch should be replaced or the connection made directly. This approach to solving the problem will help to put the unit into operation if you are far from the store, for example, in the country.
Faulty speed switches can also be the reason why the fan does not turn on. To check the regulator, you will need to put it in the maximum position and check the “input” and “output” using the same tester.
Troubleshooting the electrical part of the fan
When the fan stops completely, you need to check the serviceability of the power cord and operating mode switches. For this you will need a multimeter. The best method for testing the power cord is to measure the voltage at the fan input terminal block or where the cord connects to its internal components.
Be careful when testing: do not touch live areas with your hands. After checking, immediately remove the plug from the socket
The serviceability of the switches is checked by measuring their resistance in the “on” position. They can fail if used frequently. It is best to immediately measure the voltage on the electric motor, but to do this you need to know the electrical circuit of the fan. And also the principle of its operation and control of the rotation speed.
Speed adjustment is carried out by switching leads from the motor. In this case, one of its windings has a number of taps (tap taps), by switching which the number of turns on the stator changes. With this design, you need to measure before and after the switch to find out if it is working. If there is voltage and the motor does not rotate, you need to measure the resistance of its windings. If the device shows a break, it means that the engine is to blame for the malfunction.
Fan speed control circuit by switching winding leads
Another element whose malfunction causes the fan to stop is the phase-shifting capacitor. In circuits where it is used, the electric motor has two windings. One of them is connected to the power supply directly, and the other is connected through a capacitor, which shifts the voltage across it in phase by 90 degrees.
Phase-shifting capacitor connection diagram
If the capacitor fails, the winding either does not receive power or there is no phase shift. In both cases, the electric motor will not rotate. You can check the serviceability of the capacitor with a multimeter in resistance measurement mode. In this case, you need to select the largest measurement limit. Before connecting the device, the capacitor must be discharged by shorting its terminals together.
If, at the moment of touching the multimeter probes, readings appear briefly, and then it shows a “break”, then the capacitor is working. If its readings are zero or infinity and do not change, then the capacitor is faulty and requires replacement.
The operating voltage of the new capacitor should not be less than that of the one being replaced, and the capacitance should correspond to the original one. Its value is calculated in relation to the parameters of the electric motor winding; if it is changed, the phase shift angle will be greater or less than 90˚, and the fan will not start or will rotate more slowly.
Attention, do not mix up the winding terminals. Before disconnecting, mark the wires and sketch how they were connected
Additionally, take a photo of the assembly before disassembling.
If breaks in the motor windings are detected, the repair ends. You can try to find the break point or make sure that the winding has burned out (this is indicated by the darkening of the color of the insulation of its wires). But rewinding modern household devices is not economically feasible, and to carry it out at home you need to have professional wrapping skills. Therefore, devices with burnt-out electric motors can be thrown away without remorse.
The same applies to malfunctions of electronic fan speed control devices.
Breakdowns of household floor fans
The approach to repairing floor or table fans should be rational. The presence of speed, tilt and rotation control units for the fan significantly complicate the design. The main task is to identify the cause. If the problem is simple, then you can try to repair it yourself.
The fan is noisy, but the blades do not rotate
The most common breakdown of floor fans is when the device makes noise, but the blades remain motionless.
The reasons may be as follows.
If the reason is in the lubricant, you need to remove the remaining thickened lubricant by cleaning the parts with gasoline, and pour fresh engine oil into the bushings. Care should be taken to ensure that no oil gets on the motor windings.
Fan motor
If the bushings wear out, you need to look for new ones in the store or take them from another non-working device. It will not be possible to restore worn-out ones.
If the motor winding is damaged, you will have to rewind it in a workshop or buy a new motor. It is difficult to restore the winding on your own.
If the capacitor malfunctions, you must replace it with a new one from the store. If this is not possible, then it is easier to purchase a new fan.
The fan makes a whistling sound
Whistling sounds may appear several months after purchase. The fan hums or squeaks due to deformation of the propeller or loosening of the plain bearing fasteners. Exposing the blades to direct sunlight or high temperatures leads to bending and imbalance during rotation. Similar sounds are also caused by indentation as a result of mechanical damage to the protective grille, to the surface of which the tips of the blades begin to reach.
Bearing failure
If extraneous noise occurs, do the following:
The bending of the protective grille can be easily corrected by carefully straightening it with your hands to the desired state.
Note! If the geometry of the blades is damaged, the propeller will most likely have to be replaced, since polyurethane cannot be returned to its original shape at home.
If the cause of extraneous sounds is loosening of the fasteners, then you just need to tighten all the bolts until the backlash is eliminated.
The device does not turn on
If the fan does not respond to pressing the power button, it may indicate a broken wire in the cable, a damaged connection between the cable and the terminals in the socket, or a malfunction of the socket itself. The button block or the speed shift buttons themselves may also be damaged.
First of all, you need to check whether the control light comes on when you try to turn on the device.
If the light does not light, you need to do the following:
If there is a malfunction in the plug, you need to restore the connection of the wires, possibly soldering the terminals. If a violation occurs in the wires inside the cable, it should be replaced with a new one.
Checking contacts with a tester
If the light comes on, but the fan itself does not work, the following steps should be taken:
If you discover that one of the buttons is broken, you should either purchase a working replacement from a radio store, or make a direct connection, bypassing it. If the speed controller fails, it must be resoldered or also replaced with a new one.
Fan does not turn
The reason why the fan does not turn left and right is that the crank is not working correctly.
To fix the problem you need to do the following:
A situation may also arise when turns are not completed completely. In this case, it is necessary to check the travel of the gear switch along the vertical axis. If there is any malfunction in its operation, it is necessary to disconnect the fixing bolt and lubricate the shaft, gear and upper part of the gearbox. If the plastic gear is worn out and you cannot find the part on sale, you will have to accept the fact that the fan does not rotate.
Good gear
When installing the impeller after eliminating the malfunction, you must follow the balancing rules, otherwise the fan will not rotate normally. The simplest and most convenient way is static balancing.
Install the fan manually, set the initial rotation by hand and mark the top point of the impeller with a pencil or marker. They make several more runs and check whether the obtained points of advantage coincide with the initial mark. If they do not match, then there is a fault in the bearings that need to be lubricated or replaced. If they match, take objects with different weights, such as nuts, pieces of electrodes, etc. For fastening, electrical tape, adhesive tape, mastic, plasticine, and thin wire are used.
Then they begin to attach them as a counterweight to the point of preponderance in order to achieve the loss of its permanent place. For a more accurate selection, you can grind off the weights using a hacksaw. After finding the optimal weight, the weight is welded or glued to the non-working side of the disk.
Balancing with screws allows you to quickly determine the required settings experimentally. But this option is not available on all fans.
You can also carry out balancing on balancing trestles by contacting specialists.
Floor Fan Motor Speed Control Method
Nothing is said about the speed control method, which is not surprising. In the model considered, four wires come to the coils, one supplies a plug. The other three enter the winding through fabric cambrics. What is inside is not known for certain. The choice is small; an asynchronous motor with an insulated rotor is controlled in two ways:
- Change in voltage amplitude.
- Switching windings with an unequal number of turns.
We don’t take inverter control into account; in this case there is simply no room for such a complex circuit. What remains is regulation of the voltage amplitude. Each wire has an unequal number of turns. If one speed (two) fails, the cambrics will have to be cut, therefore, the electrical circuit of the engine will become obvious. A diligent master will wind a new coil, a lazy one will take money from the client to buy a new engine (the old one will be used for non-ferrous metal).
The number of turns is indirectly determined through the resistance ratios between the terminals of each speed. The tester uses a constant voltage to measure the quantity, so the inductive part of the impedance is eliminated from consideration. The number of turns is directly proportional to the ohmic resistance of the winding section.
The cooler in the computer is noisy
When a user complains to you that their computer is loud, there are actually only two types of components that can create that noise: disk drives and cooling fans. But in most cases, you will find that the noise is generated by one of the cooling fans inside the computer. Most computers have three cooling fans, one inside the power supply, one on the case itself, and one on the processor. Of course, each of these cooling fans is designed to keep the entire system as cool as possible by creating a constant air flow inside the case that will draw cool air while moving hot air.
If any of these cooling fans fail, the system can overheat and cause operational problems. So your first instinct is to simply replace the noisy fan. Although this is a fairly simple operation, it is not always necessary. In many cases, the cooler only needs one drop of oil.
The fan does not turn to the sides
How to fix a floor fan if it stops spinning (turning) from side to side? It's all about the crank, the mounting screws of which can become loose or unscrewed. To find out, you will need to disassemble the motor housing. If during operation of the unit the body turns with a delay or a complete stop, then the gears in the gearbox should be checked for engagement. It is also necessary to check the gear switch itself, namely, its movement up and down.
Disassemble the gearbox and remove the main gear. The shaft will also have to be pulled out. Apply lubricant to all moving parts and assemble the gearbox. If the gears are heavily worn, they require replacement, although it is quite difficult to find analogues of broken fan parts. In this case, you will have to assemble the unit without a gearbox and use the cooler in normal mode, when the air masses move in one direction.
Ventilation problems in apartments
Built-in exhaust fans are much simpler in design. But their cost is low and it is often easier to purchase a new one than to look for parts that have disappeared from circulation. Poor ventilation of rooms may not be due to the operation of the device itself, but to errors in the organization of the exhaust system.
Ventilation in the bathroom
If ventilation in the bathroom does not work, the air becomes humid and is not ventilated, laundry does not dry well, and mold may appear.
Normal ventilation pattern
The reasons may be the following:
- the ventilation hole is clogged with dust and cobwebs;
- foreign objects in the shaft;
- The exhaust fan is set to draw in air instead of exhausting it.
The correct solution to the problem would be to contact the management company. Specialists lower a load into the ventilation shaft all the way to the apartment to break through all obstacles. In particularly advanced cases, a camera is lowered into the shaft to determine the location of obstacles. The ventilation shaft is opened from the entrance. You may have to go around the neighbors in the riser and check if they have incorrectly installed fans that are disrupting the hood.
Advice! An exhaust fan with a check valve is suitable for the bathroom, preventing air flow from the ventilation shaft.
Hood in the kitchen
Exhaust ventilation is designed to remove unpleasant odors and stale air from the apartment. However, if the construction technology is violated or due to other reasons, air begins to enter the apartment from the exhaust vent, despite the working fan.
Ventilation shaft contamination
Because of this, foreign odors arise in the apartment. Cooking products are not removed from the kitchen. The reasons may be the following:
- design defects in ventilation shafts and ducts create reverse draft;
- strong gusts of wind in one direction blow air currents into the mine;
- accumulation of vapor masses and frosty air in ventilation;
- mine contamination with snow and waste.
As a result, the axial fan draws air masses from one shaft to another and the hood begins to silently work in the opposite direction.
It is better to invite specialists to resolve the shortcomings. They will evaluate the rational use of equipment in accordance with the documentation and conduct a high-quality examination of the installation and operation of the ventilation system. The resulting report will indicate all the shortcomings of the existing system and measures to correct them. Management company employees are required to clear the ventilation shafts of foreign objects. Also, to get rid of the reverse draft effect, install a deflector in the hood to suck in smoke and create through air flows in the kitchen.
Design of a typical floor fan
Do-it-yourself floor fan repair is on the agenda! You should start small: the simplest fans do not have a ground terminal. The device does not have a degree of electrical safety. The floor fan device includes a housing made of plastic. If water gets inside, expect a good shake. This type of floor fan should not be used near water. Starting with an aquarium with fish, ending with a flower vase. Particularly dangerous where small children live. If the thing falls, the child will guess to pour milk inside... Draw your own conclusions:
If a floor fan falls, there is a high probability that nothing will happen. Let's dive inside the structure. Let's leave aside for now the features of regulating the engine speed and buttons. Let's talk about the gearbox. The Krasnodar floor fan carries one asynchronous capacitor motor. The front side of the shaft is connected to the blades through a pin and a nut with a left-hand thread, the rear side goes to a gearbox formed by two gears, one double.
The shaft is equipped with a thread that engages the teeth of a large wheel as it rotates. The moment is transmitted to the small wheel, which drives the flywheel. The gear of the crank mechanism is the diameter of a hand, so the rotation is inferior to the speed of the original shaft of the asynchronous motor.
Through the cardan transmission, the crank is hooked onto the leg, and the engine housing is mounted on the axle. When the shaft of an asynchronous motor rotates, the blades move smoothly in one direction or the other. However, you can stop the process. For a double gear, the roller is attached to the larger gear by two balls with a spring inserted into a through hole. If you pull the adjuster knob directly connected to the axle, the latch slides up. The connection between the gear and shaft is lost, and rotation stops. The mechanism provides fall protection: six grooves are cut into the inner mounting hole of the drive gear. Balls fit. There are six positions, the mutual transition is accompanied by a click, the axis rotates relative to the gear, the balls hit the walls, sliding into the grooves.
Clicking sounds are heard, there is a high probability that the floor fan has fallen. The drive is jammed, it works, clicking, a protective mechanism, protecting the motor from combustion.
We believe that the mode is unfavorable for a floor fan; if you do not turn off the device, the thermal fuse of the motor will certainly break. The gearbox is attached to the engine with three bolts and has a pair of lubrication holes through which the plastic gears can be lubricated. Refers to a drive rotating at the speed of an asynchronous motor.
Headache, how to fix a floor fan and assemble it. We see the situation: the relative position of the gearbox is incorrectly set, the legs through the gear, the head of the floor fan will move asymmetrically relative to the frontal plane. Can be annoying. Attach the gearbox, check the product by connecting power. Be careful not to get an electric shock, try to visually determine the correctness of the assembly.
Common Fan Motor Problems
Maintenance personnel are well aware of the most common malfunctions of electric motors of ventilation units. This allows repair work to be carried out in the shortest possible time and with minimal consumption of components. The main types of electric motor breakdowns are:
- loosening of the shaft bearing in the seat - reasons: high vibration of the electric motor, high radial load on the shaft;
- destruction of the shaft bearing seat - reasons: high vibration of the electric motor, destruction of the shaft bearing;
- destruction of the electric motor feet in the places where they are attached to the frame or housing - reasons: high vibration of the electric motor, misalignment between the electric motor shaft and the ventilation unit drive;
- unstable operation of the electric motor - reasons: lack of reliable connection of the contacts of the magnetic starter;
- the electric motor does not stop when the starter is turned off - reasons: the so-called sticking of the starter contacts due to the formation of a carbon layer on the surface of the terminals;
- noise during operation and overheating of the electric motor shaft bearing - reasons: misalignment between the shaft and the drive of the ventilation unit, lack of lubrication in the bearing, sand, dust and various small foreign objects getting into the bearing race;
- strong vibration of the electric motor - reasons: misalignment between the electric motor shaft and the drive of the ventilation unit, lack of reliable fixation between the motor feet and the frame;
- strong heating of the electric motor - reasons: lack of normal cooling of the electric motor, deviation of the power supply voltage from normal, overload of the electric motor, increased ambient temperature in the operating area of the ventilation unit;
- sudden stop of a running electric motor - reasons: disruption in the power supply circuit, jamming of the electric motor shaft bearing, activation of the electric motor protection;
- lack of rotation of the electric motor rotor and the hum of the installation after turning on the equipment - reasons: jamming or destruction of the electric motor shaft bearing, jamming of the ventilation unit drive, contact of the rotor and stator as a result of misalignment.
The cooler makes a humming noise and does not spin
Cases when the fan does not spin and the motor hums are quite common. There may be several reasons causing this failure:
Capacitor failure
Repairing a floor fan in this case comes down to checking the capacitance of the capacitor using a tester. To get to the radio component, you will need to disassemble the motor housing. A detailed description of how to disassemble the case was given above. After removing the casing, you will see the capacitor attached to the motor.
The presented device has a capacitor capacity of 0.85 microfarads. For this reason, the device must be set to a value ranging from 2 microfarads to 200 nanofarads, as shown in the figure below.
In this case, after connecting the capacitor to the device, it is clear that its capacity is 0.841 microfarads. If we take into account the error of ± 5%, then the capacity of the radio component is within normal limits, and it is not the reason why the cooler stopped working.
Engine malfunction
When repairing a fan with your own hands, you also need to “ring” the electric motor in search of a breakdown. If it is faulty, the device will not turn on and will make a humming noise. It is necessary to measure the resistance on the two stator windings, having first disconnected the wires going to them, as shown in the following figure.
As you can see, the resistance is also within normal limits, since its value is 1215 Ohms (1.2 kOhms). Otherwise, the device will buzz but will not turn on. In such a situation, the motor will need to be rewinded in a special workshop.
The exhaust fan hums, but does not turn on - Skillful hands
Fluctuations in the current consumption of the EM stator during its operation.
Cause: Poor connection in the circuit - for a wound rotor, for a squirrel cage rotor - poor connection between the rods and rings. Solution: ED repair (for large fluctuations - immediately, for small fluctuations - the sooner - the better).
Cause: Brushes are not sanded well. Solution: Sand the brushes.
Cause: Insufficient clearance for free movement of brushes in brush holders. Solution: Set the permissible gap within 0.2-0.3 mm.
Cause: Contaminated slip rings or brushes. Solution: Clean up and eliminate the source of contamination.
Cause: The slip rings have grooves and irregularities. Solution: Grind and grind the rings.
Reason: Weak brush pressure. Solution: Adjust the pressing force.
What kind of lighting do you prefer?
Built-in Chandelier
Cause: There is no uniform distribution of current between the brushes. Solution: Adjust the pressing force of the brushes and their free movement in the brush holders, check the condition of the Traverse contact group, and assess the condition of the conductors.
How to lubricate the power supply cooler and system unit cooler.
To begin, unscrew the cooler in the computer, disconnect the wires going to the cooler, clean the dust, and place it on the table. If this cooler is from a power supply or a cooler from the exhaust of warm air from the system unit, then carefully remove the sticker located on the opposite side of the blades. There should be a rubber seal or plastic cover that you need to open and use a syringe to drop a drop of oil.
Then rotate the cooler blades with your fingers so that the oil is distributed evenly over the entire surface. Next, close the sealing rubber plug and glue the sticker; if the sticker does not stick, then glue a piece of insulated material instead.
There are also non-separable coolers; they do not have a rubber seal behind the sticker; there is a plastic insert soldered in there. However, this type of cooler can also be lubricated, but this is more difficult. But some non-separable coolers do not have a fixed washer, so the impeller can come out with little effort with your fingers, we try to separate the cooler blades from the body without much effort, if the cooler blades are separated, then lubricate the shaft with oil and insert it back, if not, then read on. To lubricate a non-separable cooler, we need a drill or pliers and a not too large drill of 2-4 mm. We drill a hole in the center, just be careful not to overdo it and damage the shaft and bearings, remove the plastic shavings from the hole, then drop 1-2 drops of oil into the drilled hole, preferably using a syringe. After lubricating, rotate the cooler blades to distribute the oil evenly and cover the hole with electrical tape or something else of your choice, the main thing is to prevent the oil from running back out.
I advise you not to pour oil to the very edges as excess oil will still leak out.
How to repair the control unit?
The most common problem with blocks is broken worm gears. The fan owner will first have to remove the contact block. In this case, it is not necessary to remove the electric motor. Most models of electric fans are equipped with special pads that cover the control units. These pads should be removed. Then, using a screwdriver, you need to completely unscrew the shaft. Only after this is the control unit removed. By removing the back cover, you can see the condition of the worm gear. Below it is a contact shaft. The block resistance is checked by a tester. The resulting parameter should be up to 50 Ohms. If the readings are higher, then such a control unit should be replaced with a new one.
The device is very noisy
Since the propeller of the unit, the main task of which is to create air flow, is made of plastic (not always of high quality), there is a high probability of deformation of the latter. This usually occurs if the unit is left for a long time in direct sunlight, or near a source of high temperature. When deformed, the balance between the blades is disturbed, which causes strong vibration and noise during normal air flow.
Shaft vibration may also occur due to a sliding bearing sleeve that has become loose from long-term use.
Often, when the device falls and the blades spin, the protective grille becomes deformed. If a rotating propeller hits it, one of the blades may break.
To summarize, we can say that in different fan models, the main components and control elements may look different. But this does not change the principles of diagnostics and troubleshooting.
Possible breakdowns of Timberk fans
Timberk fans have proven themselves to be inexpensive and easy-to-use devices for creating comfortable climatic conditions and maintaining air exchange in an apartment or office. Despite their good quality, they are prone to breakdowns.
Fan Timberk
During operation, customers noticed the following malfunctions:
- drop in blowing force due to soft plastic blades;
- There are times when a capacitor fails;
- the appearance of extraneous noise during operation;
- electric motor failure;
- the rotor breaks;
- strong backlash appears;
- When working for a long time, the smell of burnt oil appears;
- the legs bend and change geometry under the weight of the motor;
- overheating of the power supply;
- mechanical failures at fastening points.
In terms of price-quality ratio, Timberk products are leaders in their segment. All devices have a manufacturer's warranty and can be replaced when contacting service.
Fan malfunctions in car cooling systems
The fan is turned on by a sensor located in the cooling system. Reacting to the signal, the cooler turns on and directs additional air flow to reduce the temperature of the fluid and engine. A number of failures are not associated with breakdowns of the fan itself, but with the operation of electronic sensors that are sensitive to changes in the system.
Fan relay clicks frequently
The fan relay often clicks in automotive cooling systems. The reason may be either oxidation of the relay contacts or temperature surges that cause it to operate. The following are subject to diagnosis:
A breakdown can cause engine damage, since incorrect operation of the sensors causes incorrect ignition timing.
Cooling fan
First of all, you need to go for diagnostics and ring the nodes with a scanner. If a damaged segment is detected, it must be replaced by installing a new one.
Cooling fan turns on frequently
The cooling fan turns on frequently. It is considered normal when the periods of fan inactivity exceed the duration of its operation. If this algorithm is violated, the reasons may be the following:
Cooling system clogged
It is necessary to flush the thermostat and radiator, add coolant, check the functionality of the water pump and replace it if necessary. Air plugs in the radiator are expelled by applying pressure of compressed gas. If the sensor malfunctions, if its switching temperature does not coincide with the passport values, the device must be replaced.
Air conditioner fan not working
The reasons why the air conditioner fan does not work may be the following:
Methods for reducing system noise
Fans, valves, ductwork and forced air dampers create certain sound vibrations that can be heard in a room. According to sanitary and building standards, the noise level should not exceed 30-40 dB. Violation of norms is indicated by chronic fatigue, headaches and other health problems.
Noise arising during operation can be aerodynamic or mechanical. In the first case, it appears due to poor depreciation, unsatisfactory condition of components, friction and violation of balancing parameters. In the second, it is the result of the operation of electric motors and fans.
The following measures will help reduce the noise of the ventilation system:
- installation of the fan on vibration-isolating bases;
- careful fitting of parts and balancing of rotating parts;
- strong fixation of the fan, valves and gate valves;
- installation of a removable soundproof casing;
- inserting rubber or canvas pads between the fan and the duct;
- lining the internal surfaces of air ducts with sound-absorbing materials (fiberglass, mineral felt);
- lubrication of moving compressor elements.
In natural ventilation, the noise is very noticeable in windy weather, since the wind entering the system at high speed creates a strong roar. A chamber, plate or tubular silencer can cope with it, reducing the sound pressure on the walls. It is installed at the top of the exhaust pipe.
For sound insulation of ventilation ducts, mineral wool from trusted manufacturers in rolls 5 cm thick is suitable. The insulation will not only absorb sound, but will also maintain optimal air temperature, prevent the formation of condensation and protect the structure from fires
Another way to dampen vibration is to install a concrete frame around the air duct on the roof. If technical reasons do not allow such an operation to be performed, the channel is wrapped with insulation.