Modern kitchens cannot do without a huge number of various household appliances, the operation of which requires a power source. In this matter, the main thing is not to overdo it and maintain the chosen interior style. Pull-out sockets for the kitchen are considered quite an interesting and unusual choice. Often such products are designed for countertops. They help organize your workspace rationally and correctly.
Possible options
Modules of this kind are considered an original solution in any kitchen. They are practical to use and often complement the design of the room. Currently, you can purchase a variety of models, unusual designs in the desired color.
A luxurious solution is the use of sockets built into the kitchen cabinet. This is an excellent analogue of an extension cord, which significantly simplifies the operation of household appliances.
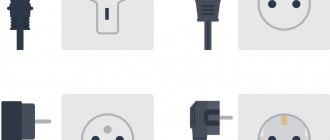
According to their design, sockets are distinguished between horizontal and vertical placement.
Vertical sockets are manufactured with different heights and have certain functionality. Particularly popular are low versions in which the connectors are arranged in a circle.
There are options for two, three, five or more blocks, placed one above the other. They are relevant not only for connecting kitchen appliances, but also, for example, chargers.
Horizontal blocks are made with different numbers of power connectors. Now you can even purchase sockets with integrated input for the Internet, HDMI and USB.
Depending on the design, built-in blocks are:
- rotary;
- away.
Sockets can change their position in space around an axis by 360 or 180 degrees, respectively.
A number of manufacturers equip their products with additional lighting, due to which the room acquires a special, mysterious atmosphere.
The greatest reliability and ease of operation are typical for rotary sockets. Disadvantage: difficulty in simultaneous use of several devices with an “L-shaped” plug.
Recessed socket blocks are usually located in various places in the kitchen area, including: the countertop; wall cabinet; baseboard under the apron.
They are considered universal, since installation of the same block is often possible in different parts and elements of the kitchen. This type of socket can be placed in almost any convenient place on the headset.
It is important to consider that when choosing furniture fittings, you must always pay attention to its degree of protection. It is desirable that the hidden modules meet the IP44 requirements, since the kitchen is considered a room with high humidity, as well as a place where there is a possibility of small particles, dirt, etc. getting into the working elements.
Types, device, pros and cons
Hidden sockets in the kitchen can be very different. They differ in the number of nests, method of extraction, and location. Of course, you should know about the main ones in order to be able to choose exactly the kind of sockets for the countertop in the kitchen that will be a good choice and definitely will not disappoint during operation.
First of all, they are divided according to the method of embedding. For example, there are retractable models - they are very elegant and attractive, they look like a small square of plastic in the corner of the tabletop. When lightly pressed, the socket slides out and you can connect equipment to it. When the work is completed, you only need to press lightly on the socket to hide it, flush with the countertop.
Pull-out sockets are almost always located vertically.
A simpler and more reliable option is horizontal, embedded. The sockets are located directly on the countertop, practically not rising above it. Most often, they are covered with a decorative panel - to connect equipment, the panel moves or rotates. When the work is completed, the panel is returned to its place and the socket is no longer visible.
Convenient horizontal socket
The number of sockets can be any, but in most cases it varies from 1 to 3. Indeed, this number is considered optimal - it is rarely necessary to connect more than three devices to such an outlet at the same time. And even three nests can be disguised and they will not stand out from the overall style. If there are more nests, then problems may arise.
Of course, when talking about sockets in the countertop in the kitchen, it would not be amiss to list the main advantages and disadvantages of such a solution. The advantages usually include:
- stealth:
- high level of protection against moisture;
- Ease of use;
- inaccessibility for small children.
Unfortunately, the solution also has disadvantages. The main one is the complexity of installation. Yes, not every home craftsman can install an outlet, which means you will have to pay a specialist. In addition, if it fails, you will have to partially disassemble the headset - an operation that can take more than one hour. Finally, it cannot be installed everywhere. For example, if you plan to place drawers under the countertop, then installing an outlet on it is no longer possible. Or you will have to use not the entire useful volume under the boxes, leaving some for cable routing.
Specifics of retractable blocks
Considering the comfort and ease of use of hidden sockets, the fittings can even be compared with built-in household appliances and corresponding cabinet kitchen furniture.
Thanks to their small dimensions, the blocks help to rationally use free space and simplify food preparation.
In fact, you can actually install them yourself, since you won’t have to install electrical lines and install boxes for sockets.
Hidden sockets can be chosen in almost any design and functionality. It would be good if they had grounding contacts.
The fittings are supplied with a 1-3 meter cord and plug, making it possible to connect it to household voltage. In some cases, units are produced without a plug, which allows you to further increase the cable length. An excellent choice are reusable collapsible forks.
The design of the retractable socket block is extremely clear. Initially it is hidden in the countertop or upper cabinet. To reach the sockets, you need to lightly press the top panel. After this, the block “moves out” by 10-20 mm, and you can manually move it to the required height or fix it in a given position - there is a corresponding button on the side. This way, you can do without carrying anything in the kitchen and not have to look for a free socket on the apron.
After finishing work with the retractable unit, it can be easily hidden in the tabletop by applying light pressure.
The vertical version can be equipped with additional ports for connecting audio, video equipment, devices with USB connectors, and others. There are also special blocks that are retracted into a niche along with the plugs of connected devices.
Rotary pull-out units with a mechanism activated by pressing on the surface of the lid are in great demand. The module moves out with a light touch - while the power sockets can be rotated to the required convenient position, at a given angle.
The angle depends on the selected model and can reach up to 180 degrees. This parameter is usually indicated on the product packaging.
The retractable rotary unit is often not equipped with a wire and plug, so do not forget to provide for this point.
Features of the built-in socket
It’s worth saying right away that hidden sockets do not differ in functionality from ordinary ones. Essentially, this is a standard surge protector or socket on an extension cord. The difference is purely decorative. They can be hidden or retractable. They are often embedded into the surface of the headset - this way they do not spoil the design and are always at hand.
All wires are located under surfaces (usually under countertops), so they do not get tangled underfoot. In addition, experienced designers place them directly near the places where they are used. Therefore, even if the mixer or coffee grinder has a short cord, this will not cause problems - you will not have to use additional extension cords.
Selection and installation of retractable units
There are no particular problems with how to remove a retractable socket from under the tabletop. The main attention should be paid to the model being purchased and its compliance with key requirements. The right choice allows you to subsequently receive positive emotions from using the right accessories. For an uninitiated buyer, understanding the variety offered on the market turns out to be difficult.
Consider how many power connectors you need in a hidden receptacle. Pay special attention to the total power of the equipment that will be used. Most often these are blocks designed for loads up to 3.5 kW. Relevant information can be found on the product packaging or instructions supplied with it.
Care and operation
When operating the product, the following rules must be observed:
- Power devices that are constantly in use must not be connected to retractable units. The coiled wires get hot, which is unsafe.
- Electrical wiring should not be pinched by furniture, come into contact with hot objects, or be strongly bent or strained.
- Do not connect the maximum load to the outlet. It may overheat and begin to melt.
- When turning plugs on and off, you need to hold the socket with your hand, especially if it is vertical.
Pull-out kitchen sockets are an excellent choice of additional sockets for connecting small appliances. The blocks are installed quickly, have a modern look and are invisible when switched off.
Some information about the manufacturers
When purchasing recessed sockets, you must place your bet on a trusted manufacturer. The most popular today are the products of the German company Evoline, the Swiss company Kondator, and the Italian factory Simon Connect. From the French it is worth highlighting Schneider Electric, the Poles - GTV, and the Russians - Ekoplast. Most often, submersible sockets are made from high-quality and durable materials.
Companies that have been in the kitchen accessories market for a long time try to monitor reviews of their products and guarantee their trouble-free operation. If a regular overhead socket is not suitable, and you don’t have enough money for a good brand, you can easily get by with “Chinese” ones, including Desc Socket or Displace. Mortise blocks are visually very similar to the original prototypes, but may be significantly inferior to them in manufacturing quality.
Chinese sockets, as a rule, are made from very cheap components, which is why their performance is limited to 6-12 months. Problems may arise gradually. At first, the integrated block opens on its own and does not lock in the specified position. After this, the contact weakens, the plastic begins to heat up, which ultimately leads to failure.
It is advisable to protect the corresponding power lines with good differential circuit breakers.
It is incredibly easy to find a suitable option that matches the kitchen interior and furniture design. Recessed, pop-up sockets are available in various colors. Particularly appreciated are options finished in natural gold, silver, bronze, polished stainless steel, with black, white and other coatings. Before purchasing, the selected item should always be checked for damage and completeness.
Layout of sockets in the kitchen
After choosing the wiring, you need to decide on the sockets.
Always plan the placement of outlets after the kitchen design is approved, otherwise there may be problems. For example, work area sockets can easily end up in the wrong place and end up hidden behind the refrigerator.
To ensure that your sockets and switches are in their places, take a plan for arranging your kitchen furniture.
After that, mark all the necessary sockets on it. You can even do this by hand.
On this plan, there is still no need to clearly assign installation locations and calculate dimensions and distances. Just count the number and purpose of each outlet.
More about brands
Products from the Polish company GTV (Werkpol) are well known to furniture production specialists. Most often you have to deal with high-quality fittings.
The production of electrical devices has also relatively recently begun under the same brand. The advantage of the products is their relative availability and reliability. The range includes horizontal and vertical electrical sockets.
Legrand is a leader in the production of electrical products. The main “headquarters” is located in France. The holding has mastered the production of 215 product models and received patents for 4,500 of its own projects.
The company's enterprises are located in 80 countries around the world, employing 36,000 people. The company's annual cash turnover reaches 4,500 thousand euros. The common man may be familiar with the following brands of the Legrand group - Vantage, BTicino, Cablofil, Estap.
The domestic market of the Legrand company is represented by electrical fittings, socket blocks of stationary and retractable versions. The products are available in the most popular color options, including white, gold, metallic, black and silver. Sockets are made modular, the total number of connectors in which can reach up to 8 units. Retractable samples are characterized by smooth operation and ease of pressing.
Another serious manufacturer of electrical accessories is the German company Evoline, known for its products since 1964. Today it is one of the European leaders in the development of innovative solutions. Over the entire period of its existence, the manufacturer has officially registered and patented over 300 different discoveries in the field of electrical engineering.
Evoline production facilities are located in Germany, the city of Lüdenscheid. It is here that more than 1,500 thousand units of products are produced annually. Among the built-in fittings, the modular model PortCuisine should be noted. One device can have standard grounded outlets, HDMI digital inputs, USB ports and telephone jacks.
It is also worth noting the production of the Swedish company Kondator, which offers built-in socket blocks with vertical placement. Unlike many other companies, it produces fittings in an aluminum case.
Particular attention should be paid to the SmartlinePopup line of three modules. There are options for different numbers of power contacts. Possible versions with Rj45, HDMI ports, connectors for VGA, USB, audio devices.
Manufacturers of built-in socket modules
When choosing a socket module built into a countertop, you should take a responsible approach to considering the products of well-known manufacturers of these products. I will show you which brands are worth paying attention to, whose products are of proper quality and meet high international standards. Companies from Poland, Germany, Sweden, Spain and among them are represented on the electrical materials market.
She will be the first in my short review:
- The Russian one has been on the market for 15 years. Engaged in the production of plastic products for electrical applications.
Built-in sockets from a Russian company
The products of this company have gained popularity not only among domestic consumers, but also abroad.
Model of built-in socket "Ekoplast"
Products with the Ecoplast brand have a quality certificate ISO 9001:2008.
- "GTV" is a company from Poland that produces products certified according to European standards. Their products are distinguished by high quality and excellent consumer properties.
Built-in retractable socket GVT
Review of GTV mortise sockets
- Two and "Evoline". The quality and design of the products of these companies have won the sympathy of consumers around the world. Naturally, there are certificates according to EU standards.
Pull-out socket block “Evoline”
- A company from Sweden, Kondator, produces built-in socket blocks. The models of this company use not only socket connectors, but also other types (HDMI, USB).
Pull-out sockets in the tabletop
- Simon is a Spanish company producing electrical devices. The catalog of this company contains many socket modules of different types and purposes. The products of this brand are famous for the quality of their products.
Products
Retractable sockets of the Russian and Polish “GTV” can be classified in the middle price segment.
Products manufactured by Schulte Elektrotechnik, Evoline, Kondator and Simon belong to the premium segment. These devices have impeccable quality components and materials used for finishing. Corresponding to this is the high price of this product.
In terms of price, the products of the Chinese companies Displace, GLS, and Desk Socket are of greatest interest. Although it so happens that the quality of Chinese goods is not considered to be of a very high level. But in recent years this opinion has begun to change. In terms of design and appearance, they can easily be compared with leading brands.
Selecting a socket and its installation location
Before choosing a specific model of a hidden outlet, you need to decide on the location of its placement. It is important that the installed unit is easily accessible and convenient for daily use. Based on these considerations, specific fittings are selected. But, as practice has shown, among the wide variety it is difficult to fix your gaze on just one model.
It is important to purchase a socket that has a sufficient number of connectors, taking into account all the expected household appliances. It is necessary to place the unit in the most convenient and accessible place for normal operation.
Safety rules: It is not recommended to place sockets near the sink and stove. The minimum permissible distance from the source of heat and fire must be at least 600 mm.
Basic errors and installation algorithm
In general, it is not recommended to install sockets, as well as any other equipment related to electricity, on your own - it is better to entrust the work to experts. But if the home master decides to build in the devices himself, you should talk about the most common mistakes in order to warn him.
It is advisable to connect the outlet to separately dedicated power lines to prevent overloads.
First of all, this is a bad location. Recommendations have already been given above that will allow you to avoid such mistakes. In addition, you cannot begin installation work before the kitchen design is finally approved or order a set before the overall design has been thought out, including details such as plumbing, sewerage, wiring - they are very often forgotten.
Simple and convenient
The installation work itself is not too complicated. Anyone can handle them, even if they haven’t worked with electrical wiring:
- Determine the location where the block will be installed.
- Wear insulating rubber gloves.
- Turn off the electricity supply.
- Using the template included in the kit, make a hole in the selected location.
- Secure the socket block in the hole made using fasteners.
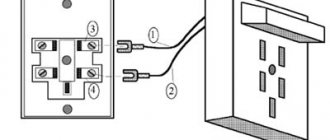
- Connect the built-in socket to the network.
Of course, hidden sockets are an excellent design solution - reliable, attractive and modern. So, you definitely shouldn’t neglect them when decorating your kitchen interior.
Can I install it myself?
Retractable sockets of any type, including mobile ones on a bus, are not difficult to install on your own. The work is performed with a minimum set of tools. The only difficulty that can arise is making holes in the countertop for placing sockets. They are usually done either by drilling or with a regular electric jigsaw (if it is chipboard). Many manufacturers make this kind of additive in production.
The unit usually comes with installation instructions. Often, all that needs to be done is to install the device into the hole in the countertop, secure it with a ring on the thread and connect it to one of the kitchen outlets. Can be connected directly to a power cable, for example, from an electric stove.
All work should be done when there is no voltage in the network!
Step-by-step installation instructions
For ease of installation, most recessed sockets are manufactured with a plug. Thanks to this, you can install them yourself.
To install the block you need:
- Prepare the necessary tools: a screwdriver, a drill, a milling cutter with a suitable attachment, a jigsaw with a wood file, a meter or a regular ruler, a Phillips screwdriver, construction glue, a file, a simple pencil.
- Determine the location of the outlet and clear it of unnecessary objects. The distance from a fixed outlet to a built-in one is determined by the length of the latter’s cord.
- Make the necessary calculations in accordance with the dimensions of the purchased network unit.
- Mark the outline of the hole with a simple pencil.
- Using a drill or hammer drill, make a hole in the tabletop according to the measurements. You can drill it with a margin of a few millimeters so that the device quickly falls into place.
- Sand any unevenness.
- Clean the drilling area from sawdust and dust.
- Remove the socket body by unscrewing the screws on the front part, leaving only the socket box.
- Turn off the power supply in the apartment/house for safety reasons.
- Wear thick rubber gloves.
- Take out the block and secure it in the hole using the elements included with the connector.
- Drill blind holes in the tabletop to attach the socket lugs.
- Secure the socket box using the lower screw fasteners. If necessary, you can use glue or construction clamps.
- Insert the sockets into the socket box and fasten them with screws. In this case, you can add silicone around the perimeter of the countertop to increase the sealing of the network unit. This will provide additional protection for the device in case of a water spill.
- Treat the cut ends of the slab with a water-repellent agent at the installation site of the block.
- Secure the wires of the network unit inside the furniture (for this you can additionally use a special corrugation for wires).
- Make a small hole on the back or side wall of the headset and pull the cord from the unit through it.
- Connect the device to the network and check its functionality.
The built-in socket should be installed at a distance from the sink and stoves (minimum distance - 60 cm). You also need to take care of grounding. The entire work of installing the socket takes from 10 minutes to an hour (depending on experience and the availability of the necessary tools).
Before you start using built-in network units, it is recommended that you familiarize yourself with the basic recommendations for their maintenance and operation
Advantages and disadvantages
Having studied the available offers on the market, looked at detailed photos of the fittings you are interested in, and decided on how to hide the socket, it is important to take into account all the existing positive and negative aspects of the fittings in question.
Hidden or, as they are also called, built-in blocks allow you to save free space and use it rationally. The main advantages include:
- possibility of vertical and horizontal placement;
- modern, interesting and versatile design;
- Availability of sockets with grounding and moisture protection;
- compactness and small dimensions;
- availability of options with additional connectors for a USB cable, Internet, television cable and telephone;
- Possibility of installation on a top cabinet, countertop made of natural, artificial stone or chipboard.
Significant disadvantages include:
- the need to make a special mounting hole, which may require the appropriate tool;
- overpriced relative to classic wall sockets;
- impossibility of installation on cases with drawers;
- shorter service life, low reliability relative to stationary options.
In addition, retractable sockets require careful handling during operation. When pulling out the plug, you must always hold the main unit so as not to damage it.
Conclusions and useful video on the topic
More detailed information about choosing a location for mounting the socket and about installing the network unit itself can be found in the following video:
The built-in socket is an ergonomic and multifunctional device. Such a network unit can be easily integrated into any interior. You just need to carefully consider its location relative to the main electrical appliances in the kitchen, taking into account maximum ease of use.
Following the step-by-step instructions, you can build a socket into the countertop with your own hands. The recommendations given in the video and article are relevant for network blocks of any brand. They can be used to install built-in sockets in the kitchen.
If you have already installed smart plugs in your kitchen and are actively using them, we and other visitors to our site would be happy to hear about your experience. Please share your impressions of use - the comment form is located below. Also here you can add original photos of your built-in socket, talk about what difficulties you encountered during installation and how you were able to overcome them.
Catalog
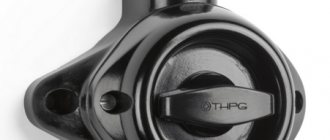
Mechanisms with automatic terminals have a specialized tooth that is bent inside the product. The wire is pressed against it by another spring. Installation using this automatic clamp is extremely simple.
To begin, the wire is stripped to the desired length and inserted into the clamp. The cable is fixed automatically. To get this wire back, you just need to press the button - and it will go out without any resistance. In this case, it is impossible to pull out the wire without pressing this lever.
Automatic terminals are easy to maintain and do not require periodic (once a year) wiring tightening. In addition, reliable contact between the terminal and the wire is guaranteed. Typically, copper wire options are used for these types of clamps.
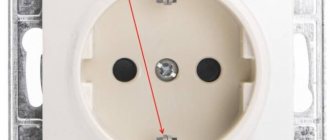
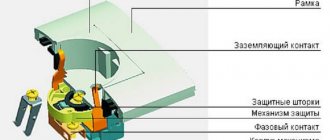
The curtains protect the openings from the entry of thin objects. As a rule, they are used in places where contact with children is possible. Can also be used in places with high dust content.
The IP44 index is an indicator of the degree of protection of the product from moisture and dirt.
The first number 4 is the indicator of protection against solid bodies. This means that the product is protected from the ingress of solid bodies with a diameter of more than 1 mm.
The second number 4 is an indicator of protection against water. Indicates that this product is protected from water splashing into the mechanism from any angle.
Application area: kitchen, basement, bathroom and other places with potential moisture formation.
Mechanisms with automatic terminals have a specialized tooth that is bent inside the product. The wire is pressed against it by another spring. Installation using this automatic clamp is extremely simple.
To begin, the wire is stripped to the desired length and inserted into the clamp. The cable is fixed automatically. To get this wire back, you just need to press the button - and it will go out without any resistance. In this case, it is impossible to pull out the wire without pressing this lever.
Automatic terminals are easy to maintain and do not require periodic (once a year) wiring tightening. In addition, reliable contact between the terminal and the wire is guaranteed. Typically, copper wire options are used for these types of clamps.
The curtains protect the openings from the entry of thin objects. As a rule, they are used in places where contact with children is possible. Can also be used in places with high dust content.
Mechanisms with automatic terminals have a specialized tooth that is bent inside the product. The wire is pressed against it by another spring. Installation using this automatic clamp is extremely simple.
To begin, the wire is stripped to the desired length and inserted into the clamp. The cable is fixed automatically. To get this wire back, you just need to press the button - and it will go out without any resistance. In this case, it is impossible to pull out the wire without pressing this lever.
Automatic terminals are easy to maintain and do not require periodic (once a year) wiring tightening. In addition, reliable contact between the terminal and the wire is guaranteed. Typically, copper wire options are used for these types of clamps.
Invite an electrician and order network wiring
When the kitchen design project is ready, you can invite an electrician - and, if necessary, adjust some details on the spot, based on his advice and the state of the electrical network in your home.
Preliminarily, the number of distribution boxes for the kitchen can be calculated as follows: all groups of sockets + high-power appliances (each separately) + overhead lighting.
Also check whether your home has a single- or three-phase network - the type of cable and ampere ratings of the RCD will depend on this (for a single-phase network in the kitchen, a 50 A RCD is sufficient).
There are a lot of appliances in the kitchen, and in order for it to fit perfectly, you need to calculate the location of the sockets in advance
As a rule, for electrical wiring in the kitchen, it is recommended to buy copper cables - they are more expensive, but more reliable (although residential standards allow the use of aluminum ones too). It is safer to choose sockets for the kitchen with a ceramic interior (this is the most reliable dielectric base). It is better to take smooth front panels of sockets and switches - it is easier to remove aggressive kitchen contaminants from such a surface.
In addition, all kitchen appliances must be grounded (in modern homes, the grounding is mounted inside the plug connection: these are metal “antennae” that are visible in the recess of the socket).
Stylish and functional addition
Blocks of built-in sockets are often supplemented with USB and HDMI connectors. This enhances the purpose of the kitchen, which means you can not only cook, but also conveniently use tablets, phones, laptops and other devices from which you can:
- Watch your favorite TV series;
- Conduct online negotiations with loved ones;
- Look for interesting recipes for preparing goodies for your household.
How to correctly arrange sockets for each type of household appliance
oven, dishwasher, refrigerator and washing machine
If an oven or microwave oven is built into a cabinet, that is, above the level of the countertop, then electrical sockets should be installed in height below or above the equipment, and in width, they must be behind the cabinet for installation.
It should be noted that sockets for built-in appliances can be mounted at the height of the headset legs, this will avoid cutouts in the cabinet walls. But the fact is that many household appliances simply do not have enough cord length for such an arrangement.
It is better to install the socket for the refrigerator to the left or right of the refrigerator, depending on its location relative to the kitchen unit, at a height of 91 to 132 cm from the floor to the bottom of the socket, in the “apron” area. In this case, the socket will not fall on the countertop or wall edge. At the same height it is convenient to install electrical sockets for small household appliances located on the countertop. You should not install an electrical outlet behind the refrigerator, as in this case it will protrude in front of the furniture, which is unsightly. It would be unlucky to locate the outlet for the refrigerator behind one of its side walls, since this outlet is inconvenient to use and “eats up” such valuable space in the kitchen.
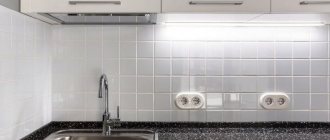
Sockets in the kitchen
It is important to remember that sockets should never be mounted directly above a hob or sink for safety reasons. The outlet for the hood is most often installed above wall cabinets, that is, with a standard kitchen height, at a level of 240 cm from the floor to the bottom of the outlet
Here again we should remember that the electrical outlet should not get behind the hood itself. Many electricians advise connecting the hood to the network directly, using wires, without installing sockets. This connection option has only one advantage - aesthetics.
The outlet for the hood is most often installed above the wall cabinets, that is, with a standard kitchen height, at a level of 240 cm from the floor to the bottom of the outlet. Here again we should remember that the electrical outlet should not get behind the hood itself. Many electricians advise connecting the hood to the network directly, using wires, without installing sockets. This connection option has only one advantage - aesthetics.