When to connect cables
Cable connections will be required in case of poor-quality wiring performed earlier, or due to errors made during installation work. To restore power to the house, you need to connect the electrical wires. You can make a connection in ways that are divided into 2 groups:
- For the first group, no special equipment is required.
- The second group already requires certain skills and professional tools.
Work on connecting cables must be carried out in compliance with safety regulations.
Why contact connections must be made correctly
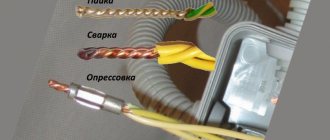
First of all, let's look at what the requirements for high-quality contact connections are related to. It is not without reason that clause 2.1.21 of the PUE separately stipulates methods for connecting wires, and allows only screw or bolt clamps, crimping, welding or soldering.
Poor contact is the main cause of fires
- This is primarily due to the fact that these types of connections can provide the required level of durability and reliability of the connection. After all, any electrician will tell you that more than 90% of all damage occurs at contact connections, and that is why so much attention is paid to them.
- After all, what is a poor-quality contact connection is a connection that has a high contact resistance. And since we have resistance, this means heating.
Dependence of resistance on conductor temperature
- As we remember from the physics course, any conductor in a heated state has greater resistance than a conductor with a lower temperature. Therefore, an avalanche-like process results. A poor-quality contact connection causes the conductor to heat up and its resistance increases even more. As a result, it heats up even more until it reaches the point where it simply melts.
- As a result, our main task is to ensure minimum resistance between the two conductors being connected. This is achieved by ensuring the proper area of contact between the two conductors, as well as by ensuring the maximum possible contact between them.
- Let's immediately look at why we will not consider the question of how to twist single-core wires or their multi-core counterparts. Indeed, with the right approach, and through twisting, it is possible to ensure a sufficient area of contact and compression of the conductors with each other.
Twisting is prohibited
- The fact is that in any case, the contact connection will be subject to temperature influences. That is, it will heat up and cool down. And as we know, heating leads to expansion of materials, and cooling, accordingly, to contraction. As a result, our contact connection, which is not fixed by any third element, can quickly become of insufficient quality.
Note! Surely each of you can give dozens and hundreds of examples where twisting has lasted for decades, and even now looks better than screw or bolt connections. But, as they say, exceptions to the rule only confirm the rule itself. According to statistics, twisted joints are damaged much more often than other types of joints.
Types of cables for connection
The most common cable for home electrical wiring is a PVA connecting cable, consisting of two insulating layers.
Copper strands, stranded, twisted along the central axis. The wire is flexible, making it great for a variety of connections. The voltage of connected devices must be up to 380 Volts.
The cross section is selected depending on the load:
- for a current of 6 A, PVA with a cross section of 0.75 mm is used;
- for 10 Amperes - the cross-section is 1 mm;
- for currents of 16 A – 1.5 mm.
In addition to the PVS wire, for connection there are multi-core cables ShVVP, PUGNP, PRS, KG. They are used less frequently for home wiring than PVS.
Review of Wago terminal blocks and how they work
Wago terminal blocks are often used to connect electrical equipment. They are ideal for connecting wires inside junction boxes and panels. Clamps can be used to secure both single-core and stranded wires. Depending on the purpose, many different series are produced, but they are all divided into disposable and reusable products.
Reusable terminal blocks
The 222 series indicates the reusable use of the clamp. This means that the wire can be inserted and removed from the socket. To fix or release the core, just turn the orange lever. 10 mm of insulation is removed from the end of the wire, the lever is raised and, after inserting the core into the socket, it is released. The spring mechanism will firmly clamp any core with a cross-section of up to 4 mm2. That's it, the connection is ready. To remove the conductor from the socket, just lift the flag and pull the core towards you.
Disposable terminal blocks
The 773 series indicates that the vago clamp is disposable. Moreover, it is intended only for single-core wires. To connect a stranded wire, you must first crimp it with a ferrule.
Disposable clamps can be filled with conductive lubricant. It prevents aluminum conductors from oxidizing. The presence of lubricant can be identified by the black body of the clamp, but it may also be dark gray.
To make the connection, the bare edge of the wire is inserted with slight force into the clamp socket, where the mechanism automatically bites it. Since the product is considered disposable, there is no working lever on the body.
Sometimes they manage to remove the core from disposable clamps by twisting with a certain force. However, after such actions, the clamping plate is deformed, which does not guarantee a high-quality next connection.
What is the best way to reliably connect two cables together?
Methods of connecting cables that require equipment and skills in the field of electrical engineering:
- soldering;
- welding;
- crimping with sleeves.
Simple connection methods that do not require tools or knowledge:
- connection using terminal blocks;
- spring clamps;
- PPE caps;
- bolted connection.
The choice of connection method depends on the characteristics of the wires. It is necessary to take into account the type and material of the core, the number of wires, and operating conditions.
With soldering
Soldering is a common method of connecting cables. To work you need a soldering iron, rosin, solder and sandpaper. How to connect wires by soldering:
- stripping of insulation;
- cleaning from oxides using sandpaper;
- the conductors need to be tinned - rosin is placed on the wire, it is heated with a soldering iron until the wire is covered with rosin;
- the conductors are assembled together, bubbling rosin must be applied to them and heated until the solder spreads;
- The soldering area is cooled.
The complexity of the process lies in the availability of professional skills. Do not overheat the solder area or twist it when heating, otherwise the insulation may melt. It is important to ensure high-quality and reliable contact of the wires. Soldering is used in low-current electrical applications.
No soldering
Wires are connected without soldering using special connecting elements. It is also possible to connect the wires by twisting. Twisting is the simplest method that does not require equipment, but this method is also the most unreliable.
It is prohibited to use only a twisted connection according to the rules of the PUE.
Copper
Copper wire can be connected using terminal blocks, Wago clamps (necessarily using special paste), using a bolt, or soldering.
Aluminum
Aluminum wires can also be connected using any method, but with some special features. When connecting, the metal must be manually stripped of insulation.
Copper and aluminum wires cannot be connected directly. The connection point becomes very hot and over time the contact weakens. Therefore, it is better to use terminal blocks, wago, bolt connection or special branch clamps.
Removing the insulating layer from the wires
I would like to immediately dwell on a question that will be common to any method. Before connecting the wires into a common electrical unit, they must be stripped of the top insulating layer.
This can be done using a mechanic's knife. This method is simple, but there is a high probability of damage to the conductor. To do everything correctly, you must strictly follow the step-by-step instructions:
- Place the wire on some flat surface (such as a table).
- Press it with your left index finger.
- With your right hand, take the knife and lightly press it into the insulating sheath of the wire. To avoid snagging the metal core, position it towards the cut at an angle. If the angle is right, there is a possibility of a circular cut in the core, as a result of which it may subsequently break.
- Hold the knife in this position. Using the index finger of your left hand, slowly twist the conductor one full turn, thus cutting the insulation around the entire circle.
- All that remains is to pull off the cut piece of insulation.
Professional electricians now necessarily have in their arsenal such a device as a stripper. This is a multifunctional tool that can be used to strip insulation from a wire or cut a cable. It can be simple, semi-automatic or automatic. The most important thing is that when stripping the insulation with a stripper, the conductor is not damaged. For each standard core diameter, such a tool has a calibrated hole with a cutting edge.
The length to which wire cores need to be stripped is different for each connection method.
Is it possible to connect cables by twisting?
According to the rules of the PUE, twisting is prohibited, as it does not provide reliable contact. It can only be used in conjunction with another connection method. It is also unacceptable to use twisting to join two different metals.
Stranded and single-core
When connecting multi-core wires, the following rules should be followed:
- strip the insulation by 4 cm;
- unwind the conductors by 2 cm;
- connect to the junction of untwisted conductors;
- twist the wires only with your fingers;
- You can tighten the twist using pliers;
- bare wires are insulated with special tape or heat shrink tubing.
Twisting solid wires is much easier. They need to be stripped of insulation, twisted by hand along the entire length, then clamped with pliers and insulated.
Twisting methods
You can do twisting in different ways. It can be made by branch, parallel or series connection. Also, to improve the reliability of contact, caps and clamps are additionally used.
Correct twisting of electrical wiring in a junction box
When twisting, you need to follow the following procedure:
- cut off power to a house or apartment;
- clear the wiring of 4 cm or more of insulation;
- unwind the wires by 2 cm;
- connect untwisted wires to the junction;
- twist the veins with your fingers;
- tighten the twist with pliers;
- insulate exposed wires.
Both single-core and multi-core cables can be connected.
Twisting of different sections
Do not twist wires with very different diameters. Such contact is not reliable and stable. You can twist wires of adjacent sections - for example, 4 sq. mm and 2.5 sq. mm. When twisting, you need to make sure that both wires wrap around each other. A thin wire should not be wound onto a thick one, otherwise the contact will be unreliable. Then you need to solder or weld the joint.
Twist caps
The caps help to reliably insulate the contact point.
The cap is made of fire-resistant material, inside it there is a metal part with threads. Making twists using caps is quite simple - you need to remove 2 cm of insulation and lightly twist the wires. A cap is put on them and turned several times until the metal wires are inside.
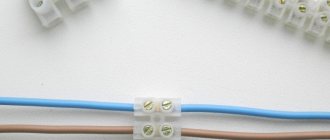
With terminal clamps
The contact clamp consists of a screw, a spring washer, a base, a current-carrying core and a stop that limits the spreading of the aluminum conductor. Making a connection using a contact clamp is simple - just strip the ends of the wires by 12 mm and insert them into the hole in the clamp. Contact clamps are used for both solid and stranded conductors.
How to brew twist
After twisting, the wires need to be soldered. To do this, the wires are tinned and rosin is applied to them before twisting. The heated soldering iron is lowered into the rosin; it needs to be passed along the stripped part of the wiring. After twisting, take tin on a soldering iron and heat the joint until tin begins to flow between the turns. This method takes a lot of time, but it is reliable and of high quality.
Welding
In order for the connection of electrical wires to be as reliable as possible, the considered twisting method must be subsequently secured by welding. It is similar to soldering, only now a welding machine is used instead of a soldering iron.
Positive sides
This method is most preferable to all others, since it meets all regulatory requirements in terms of reliability and quality.
The welding method is based on contact heating of the ends of the wires with a carbon electrode until a ball (contact point) is formed. This ball is obtained as a single unit from the fused ends of all connected cores, which ensures safe and reliable contact; it will not weaken or oxidize over time.
Negative sides
The disadvantage of welding is that such work requires certain knowledge, experience, skills and special equipment; you often have to turn to specialists.
Installation
In order to connect wires using welding, you will need the following devices, tools and materials:
- welding inverter with a power of at least 1 kW, its output voltage must be up to 24 V;
- carbon or graphite electrode;
- goggles or eye mask;
- welding leather gloves to protect hands;
- a mechanic's knife or stripper for removing the insulating layer from conductors;
- sandpaper (for cleaning the conductive surfaces to be connected);
- insulating tape for further insulation of the welding joint.
The sequence of work is as follows:
- Free each connected wire from 60-70 mm of insulation.
- Sand the exposed wires until they are shiny using sandpaper.
- Twist, after biting, the length of its ends should be at least 50 mm.
- Attach grounding clamps to the top of the twist.
- To ignite the arc, bring the electrode to the bottom of the twist and lightly touch the connected wires with it. Welding happens very quickly.
- It turns out to be a contact ball, give it time to cool, and then insulate it with tape.
As a result, an almost solid wire is obtained at the end, that is, the contact will have the lowest transition resistance.
If you connect copper wires in this way, then choose a carbon-copper electrode.
I would like to recommend that if you purchase a welding machine (it will be useful not only for connecting wires, but also for many other purposes), then choose the inverter option. With small dimensions, weight and electrical energy consumption, it has a wide range of welding current adjustment and produces a stable welding arc. And this is very important to be able to regulate the welding current. If you choose it correctly, the electrode will not stick and the arc will hold steady.
Watch how welding is done in this video:
We looked at the main types of wire connections. Now let’s briefly talk about methods that are used less frequently, but also guarantee quality and reliability.
Methods for connecting wires or cables to each other
The junction of two conductors must meet the following requirements:
- reliability;
- mechanical strength.
These conditions can also be met when connecting conductors without soldering.
Crimping
This method requires special equipment. Crimping of wires with sleeves is carried out for both copper and aluminum wires of different diameters. Depending on the cross-section and material, the sleeve is selected.
Crimping algorithm:
- stripping of insulation;
- stripping wires to bare metal;
- the wires need to be twisted and inserted into the sleeve;
- the conductors are crimped using special pliers.
Selection of a sleeve causes major difficulties. An incorrectly selected diameter will not ensure reliable contact.
Bolted connection
Bolts, nuts and several washers are used for contact.
The connection point turns out to be reliable, but the structure itself takes up a lot of space and is inconvenient to install. The connection order is as follows:
- stripping of insulation;
- the stripped part is laid in the form of a loop with a diameter equal to the cross-section of the bolt;
- a washer is put on the bolt, then one of the conductors, another washer, a second conductor and a third washer;
- the structure is tightened with a nut.
Using a bolt, you can connect several wires. The nut is tightened not only by hand, but also by a wrench.
Terminal blocks
The terminal block is a contact plate in a polymer or carbolite housing. With their help, any user can connect wires. The connection occurs in several stages:
- stripping the insulation by 5-7 mm;
- removal of oxide film;
- installing conductors in sockets opposite each other;
- fixation with bolts.
Pros - you can connect cables of different diameters. Disadvantages - you can only connect 2 wires.
Types of terminal blocks for multi-core and single-core cables
There are 5 main types of terminal blocks:
- knife and pin;
- screw;
- clamping and self-clamping;
- cap-shaped;
- "walnut" type clamps.
The first type is rarely used; they are not designed for high currents and have an open design. Screw terminals provide reliable contact but are not suitable for connecting multi-core cables. Clamp terminal blocks are the most convenient devices to use; their installation does not require special equipment. Cap-type devices are also often used, but unlike clamping devices, caps can be used repeatedly. "Nut" is practically not used.
Terminals in junction box (copper or metal)
Terminals are the most common connection method in a junction box. They are cheap, easy to install, provide reliable contact fixation and can be used to connect copper and aluminum. Flaws:
- cheap devices are of low quality;
- Only 2 wires can be connected;
- Not suitable for stranded wires.
Self-clamping terminal blocks WAGO
There are 2 types of Vago terminal blocks used:
- With a flat spring mechanism - they are also called disposable, since reuse is impossible. Inside there is a plate with spring petals. When installing the conductor, the petal is pressed out and the wire is clamped.
- With lever mechanism. This is the best connector option. The stripped conductor is inserted into the terminal and the lever is clamped. Re-installation is possible.
With proper use, Vago terminal blocks last 25-30 years.
Using Tips
For connection, 2 types of tips and sleeves are used:
- in the first, the connection is made inside the product;
- in the second, two electrical wires are terminated with different tips.
The connection inside the sleeve or tip is strong and reliable. There are also special sleeves for connecting copper and aluminum wires.
Soldering of electrical wiring lugs
The tips are connected to the wiring using a press.
If it is not there, contact can be ensured by soldering. The electrical wire and the tip inside are tinned, the stripped cable is inserted inside.
The entire structure on the contact must be wrapped with fiberglass tape and heated with a burner until the tin melts.
General installation requirements
The quality of connections and branches during installation is of paramount importance. When troubleshooting an electrical circuit, most often the problem occurs due to a lack of contact. Poor contact can lead not only to a circuit break, but also to overheating of the wires. This is often the cause of fire.
Therefore, strict requirements are imposed on them.
Regardless of which terminals are used for installation, the following rules must be followed:
- During installation, it is necessary to leave a reserve of wires before all connections (for reconnection).
- All connections must be located in accessible places.
- The location of the connecting elements must be protected from vibration and any other mechanical influences.
- The insulation of the connecting elements must match the insulation of the conductors.
- All connections must be made in junction boxes, cabinets and control panels, and special niches in building structures.
There are many types of terminal blocks available for different purposes:
- plug-in;
- hybrid;
- mini and micro terminals;
- fuse terminals;
- disconnect terminals;
- multi-pin;
- multi-tiered;
- checkpoints and others;
For all varieties, the installation rules are the same.
Connectors for wires and cables
Connectors are special devices that facilitate the connection of two or more conductors. There are screw and clamping mechanisms.
Screw terminals
Used to connect wires of different materials and different diameters. An exception is multi-core electrical wires, which are crimped with special lugs. Also, screw clamps can damage aluminum wires, so it is better not to use them for such material.
Screw terminals
Allows you to connect aluminum and copper conductors together. They are easy to connect.
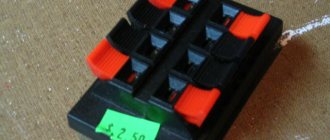
Power clamp
In such clamps, the stripped conductor is placed in the hole to the end. There it is automatically fixed by a pressure plate. Clamps can be used to secure copper and aluminum wires.
Clips
To install the wire, the clip clamp is placed in a vertical position, the wires are inserted inside, and then the clamp must be moved to a horizontal position. Plus, you can make adjustments.
Spring clamps
PPE caps are used as spring clips. Thanks to them, you can quickly make contact between two wires of similar diameters. It is important to choose the correct clamp, otherwise the contact will be unreliable.
Spring terminals
Wago spring terminals ensure reliable contact quickly and efficiently. However, over time, the spring may weaken or overheat.
Connection clamps
There are two types - electrical and electrical. The only difference is the current load. The connection takes place inside the device.
Couplings
It is made in the form of a metal tube. Used for conductors with a cross section of 0.25-16 mm. The wire is fixed by force crimping. Not used for single-core wires.
Application of spring clamps
Spring clamps for electrical wiring are popular connections for wires.
Connecting wires using special clamps with springs is considered quite controversial, since this connection method is unlikely to provide reliable, much less long-lasting contact. Basically, two types of spring clips are used - wago and PPE caps. It is not difficult to determine by appearance what type of connection you are dealing with. The operating principle is based on the use of a spring, which ensures reliable contact.
Naturally, experts are arguing about this spring. Some believe that the spring may weaken over time due to temperature, weakening the contact, which begins to overheat. Others believe that in any case, unless the operating conditions are extreme, these clamps work for many years without any complaints.
WAGO Clamps
This product appeared not so long ago, so this connection method can safely be considered revolutionary, since the connection is made quickly, ensuring high reliability. The manufacturer recommends using these clamps:
- Vago clamps are used to connect both single-core and stranded wires, the cross-section of which is in the range of 0.5-4 mm square.
- CAGE CLAMP clamps are used to connect wires with a cross-section from 0.08 to 35 mm square.
The reliability of the connection is ensured by a special metal plate located inside the clamp body. The parameters of the spring are such that it can provide reliable contact when connecting wires for a long time, without losing its properties, even if they heat up from time to time and then cool down. These indicators indicate the high quality of the products.
What's inside wago wire clamps
Despite the fact that the range of such clamps is quite extensive, for connecting wires, clamps of the 222 series, 773 and 273 series are mainly used. The series differ in that the 222 series is detachable, and the rest (773 and 273) are one-piece.
Removable clamps
Wago wire connectors - connection methods
Wago 222 clamps, which are intended for connecting wires, have several contact pads with locking flags. Before connecting the wires, the clamp flags are lifted up. The wires, stripped of insulation, are inserted into the holes, after which the flags are lowered, clamping the wire with force. That's it, the connection is complete!
The advantage of such clamps is that at any time, by raising the flag, you can pull out the wire and then clamp it again.
Wago 222 series range
Series 222 clamps are produced for the purpose of connecting from 2 to 5 conductors, both copper and aluminum, in various configurations, both single-core and stranded, with a cross-section from 0.08 to 4 mm square.
Permanent clamps
One-piece clamps are different in that they do not allow the connection to be made again if the wires are already connected. This type of clamp is not equipped with flags, so the stripped wire is simply inserted into the hole with force. The spring is placed in such a way that the wire itself pushes it aside, after which it is not so easy to pull it back out without damaging the clamp.
Wago contact terminals are not detachable
As a rule, such clamps are used to connect single-core wires with a certain rigidity. It is better not to use them to connect multi-core wires, since the connection is not so reliable.
In order for the contact to be reliable, the wires must be carefully prepared before connecting, stripped to a shine. To improve performance properties, it produces a special contact paste. This paste is placed inside the clamp, after which the paste composition eats away the oxide film and continues to protect the contact from future oxidation. When using such a paste, it is enough to remove the insulation from the conductors.
Types of mounting terminals for wago wiring
The manufacturer claims that if necessary, the wires can be pulled out of the clamps. To do this, take a clamp with a wire inserted into it and begin to rotate the wire from side to side at a small angle, while the wire is released from the clamp with force.
Lamp clamps
Such clamps are also called construction and installation terminals. With their help, connecting lamps is much faster and more convenient to use. These are Wago terminals of the 224 series. They are intended for quick and high-quality connection of various lighting equipment, in the form of lamps, chandeliers, sconces, etc. Such household appliances can be connected, regardless of the wires used, as well as their combinations. The clamps are designed for operating voltages of at least 400V and operating currents:
- For copper wires 24A.
- For 16A aluminum wires.
Methods for connecting wires in chandeliers and sconces using wago clamps
Recommended cross-section of connected wires:
- Single-core copper wires with a cross section of 1.0-2.5 mm square.
- Aluminum single-core wires with a cross-section of 2.5 mm square.
On the lighting side, the cross-section of the wires can be in the range of 0.5-2.5 mm square, and the wires can be single-core, multi-core, crimped or tinned.
Copper wires should be connected using a special paste, and aluminum wires should be cleaned to a characteristic metallic shine.
It should be noted that there are many fakes on the market, and the original clamps are not so cheap. Despite this fact, it is better to give preference to original products that guarantee a reliable connection.
Vago or twist. Which is more reliable?
PPE caps
PPE caps (connecting insulating clips) are a cylindrical plastic body, inside of which there is a conical spring. To connect the wires, just strip them of insulation and then insert them into this cap. After this, the cap is rotated several times around its axis clockwise, while the wires must remain motionless. When the cap stops rotating under the influence of external forces, we can assume that the wires are connected, forming reliable contact.
Naturally, manufacturers made sure that the caps could be selected for specific connection conditions, which is why similar products are produced in various sizes. To choose the right connectors, you need to know how they are marked.
After the letters “PPE” there are several numbers, the number of which depends on the manufacturer. For example, the designation SIZ-1 1.5-3.5 is deciphered as follows: 1 is a “regular” type of housing, with grooves located on its surface that provide better grip, and the following numbers indicate the conductors of what cross-section can be connected to each other. The designation SIZ-2 4.5-12 indicates that the body (2) has special protrusions to provide greater applied force. Well, the following numbers indicate that using this connector you can reliably connect wires with a cross-section from 4.5 to 12 mm square. It follows from this that there are no difficulties in decoding.
Using the same scheme, it is not difficult to determine the parameters of any PPE cap.
An example of marking of PPE caps and its explanation
The following table provides information when the PPE designation is followed by only one number from 1 to 5.
PPE caps and their parameters
Please pay attention to the following information. PPE caps are intended only for connecting copper wires, since aluminum wires have less mechanical strength.
Connection of wires. PPE caps.
Safety Tips and Rules
Only craftsmen with a qualification group are allowed to weld.
Persons who have skills in working with a soldering iron are also allowed to solder. Cables may only be connected in the manner permitted for them. Do not work with damaged wiring. All exposed parts must be insulated.
You can connect the cables in different ways. The choice of connection method is determined by the material, cross-section diameter and other parameters. For electrical equipment to operate correctly, the conductors need to be connected securely. In case of unreliable contact, there is a risk of fire.
Advantages and disadvantages of terminal switching
Using terminals, you can connect copper and aluminum wires.
To connect a power cable on the street or in the house, the simplest option is to use connecting terminals for leads. Main advantages of the method:
- constructive variety of connectors;
- possibility of dismantling and repair;
- simplicity, speed and accessibility of installation;
- electrical safety, dielectric housing protects against electric shock;
- resistance to mechanical load and vibration;
- possibility of switching metal conductors of different sections and materials.
Flaws:
- allocation of additional space in panels and distribution boxes;
- high cost for large-scale work.
Electrical clamps are durable and reliable; to install them, you only need a screwdriver.
Which terminals are best to use for connecting wires?
Table of the relationship between wire cross-section and current power.
Simple rules will help you choose suitable terminals for connecting the wire:
- Focus on the technical parameters of terminal blocks. The main characteristics include the rated current and conductor diameter. The marking is applied to the body of the product.
- If it is necessary to connect conductors from different metals, choose a block with a special filler. The paste prevents oxidation processes when connecting aluminum and copper.
- Select products from a material suitable for operating conditions.
When choosing connectors, the quality of materials and workmanship plays a role; it is better to give preference to well-known manufacturers. A low-quality wire terminal block from China may cause a short circuit or fire.
Isolation with PPE caps
Deciphering the product is not difficult, connecting insulating clips (PPE). They are ordinary nylon or plastic caps with an internal lock.
Connection with PPE caps
The simplest type of connection of wires, it is carried out after twisting the conductors themselves, the cores. Caps are often used to connect wires in junction boxes and to mark connections with the desired color.
Assessment of the use of such products: Quite low cost of PPE. The use of safe material prevents ignition of electrical wiring. Easy installation, put it on a twist of wires and you're done. These caps have a wide range of colors, which is convenient. Of course, if the wires are not color coded, colored PPE has the ability to determine or simply mark zero, phase and other necessary electrical routes.
There are also disadvantages: Insufficient level of fixation. Multicore wires can be installed only after soldering.
Installation of networks using sleeves
This option claims to be the most reliable connection method. Any load and quality of wires.
Crimping wires with sleeves
The conductive wires are inserted into a special tube - a sleeve, and crimped with a certain force. There is one thing, but. The cross-section of the wires should not exceed the cross-section of the mounted sleeves. Having inserted and crimped the clip, the sleeve is carefully insulated with heat-shrinkable tubing or other insulating materials.
Overall rating. A great way to securely connect wires. The direction of the conductors can be on different sides of the tube or on one side. The sleeves are quite inexpensive. A good way to reliably connect wires to each other.
There are also disadvantages. Disposable use of sleeves, they are not dismountable. To carry out such work you will need a tool: pressing pliers, which are also used as a special tool. They remove the insulation. They have a crimping device in their arsenal, and electrical installation work takes a little longer.
How to choose the right terminals for wires
Before purchasing wire connection terminals, you need to research the power cable. You will need the following information:
- section;
- number of cores;
- conductor material.
An important criterion is the rated current. This characteristic is indicated by the manufacturer. If it is insufficient, the connector will begin to heat up and melt. The material of the case matters. For household appliances, sockets and switches, products made of polypropylene and polyamide are suitable. It is recommended to install ceramic devices in power buses. The last criterion is terminal size. It should be compact to fit in limited space.