Selecting a controller for RGB strip
The selection of a control device depends on three factors:
- Power. It is calculated in the same way as the required power of a power supply unit - based on the total number of connected devices. Sometimes, as when choosing a power supply, it is advisable to purchase not one powerful RGB controller, but a smaller one and an RGB repeater.
- The desired set of functions. There are a lot of types of control devices, but, for example, to illuminate goods in a display case or an aquarium, you do not need a device with a large number of lighting effects, and for additional lighting of the room, it is desirable to turn on a timer or light music.
- Remote control. Just like selecting features, sometimes it's necessary and other times it's a waste of money.
When selecting, these points are taken into account so as not to purchase an overly expensive device, and at the same time its capabilities are quite sufficient.
Types of controllers
There are different types of controllers for controlling RGB LED strips: from the simplest, push-button ones, to those equipped with microprocessors and Wi-Fi.
Conventional devices can only select a specific color and provide simple lighting effects. Used to illuminate shop windows and other places.
More complex models can be programmed to change colors and effects on a timer. They can have a connector for flash memory and respond to lighting in the room and outside. There are also bluetooth controllers with a corresponding remote control.
The most complex devices can be connected to the smart home system.
Most bands have a remote control. It happens:
- on buttons;
- infrared;
- on radio signals;
- Bluetooth control;
- Wi-Fi control.
The last two can replace an iPhone or a mobile phone with Android.
In addition to conventional controllers, there are homemade devices that operate on the Arduino microprocessor board. Such homemade products control simple or chip LEDs and create light or color-music effects. Motion or light sensors are also connected to the Arduino-controller.
RGB controller operating modes
LED strips are installed in two types:
- simple, controlled by changing the supply voltage simultaneously along the entire length;
- chipped, with digital control of the color of each diode individually.
Accordingly, the controllers operate in two modes – analog and digital. These are different types of devices and are not interchangeable.
What is RGB backlighting
The abbreviation RGB stands for Red-Green-Blue, which in Russian means Red-Green-Blue. LED strips of this type contain three types of LED elements, in which a certain combination of glow modes allows you to create any color combination. RGB tape can also glow white, but in practice such lighting always has some shade of one of the basic colors.
For lighting engineers this is a disadvantage, but designers, on the contrary, consider this feature an advantage. If you need to get pure white, use a special type of tape, which is designated RGB+W (+White, with additional white color). As a rule, such strips are double-row and represent a combination of a regular monochrome white LED strip and an RGB lamp.
Modulation of the glow shade occurs by increasing the intensity of one of the base colors. If everyone lights up in maximum mode, then the entire tape will end up glowing white (with certain corrections). Both options - RGB and RGB+W - are controlled by a special microcomputer (controller), equipped with a remote control for easy color mode changing.
What you need to connect an RGB strip
Let's figure out how to properly connect an RGB LED strip. For a complete lighting scheme we will need:
- LED Strip Light;
- power unit;
- RGB controller with remote control;
- RGB amplifier (optional).
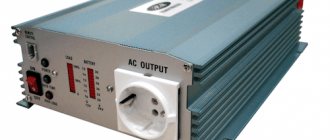
power unit
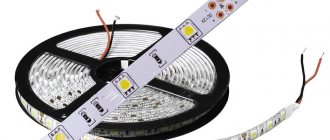
The power supply for the LED strip must be selected taking into account the expected load and its future location. Let's look at the example of SMD5050 60 led. Power consumption – 14.4 W/m.
With a length of 5 meters, the required power of the power supply will be:
5m * 14.4W * 1.25 (safety factor) = 90W
Types of power supplies for LED
If the length is 15 meters, then the power supply is accordingly needed 3 times more powerful - 270W. If the length of the tape is 20, 25 or more meters, it is advisable to install several power supplies of lower power.
The degree of protection depends on the location of the power supply. If located in a dry, closed room, IP20 is sufficient. If in a bathroom or other aggressive conditions, then no lower than IP67.
Read more about calculating the power supply for an LED strip.
RGB controller
Light control is carried out through a special controller. It connects between the power supply and the LEDs, and is equipped with a wired or wireless remote control.
RGB controller
The controller, like the power supply, is selected depending on the total power of the tape. With the difference that 25-30% of the reserve is added to the required power of the power supply, and the controller is selected closely according to power.
For example. You need to connect 10 meters of SMD5050 60 led. The power of 1 meter is 14.4 W, so we need a 144 W controller.
According to the control principle, they are distinguished: wired - often mounted on the wall; wireless controlled via:
- Infrared port (IR) – the remote control must be in line of sight;
- radio channel - allows you to use it within the home;
- Wi-Fi – allows you to control both from the remote control and from an application on your smartphone.
Lighting control from a smartphone
After installation and connection, you will be able to:
- Set color manually. Both pure colors and mixed shades are available.
- Adjusting brightness is similar to a regular dimmer (more about dimmers).
- Automatic modes. These include color switching, fast flickering, smooth changing, smooth fading and other algorithms.
What if the power of the RGB controller is not enough to connect all the lighting (more than 20 meters)? You can install 2 controllers, but you will have to control the light in one room from two remote controls, which is inconvenient and expensive. The second (correct) option is to use an RGB amplifier.
RGB amplifier (led amplifier)
This device allows you to amplify and transmit the signal from the controller further along the circuit. Thus, by using several amplifiers, you can assemble a lighting circuit of any length.
RGB amplifier (led amplifier)
The amplifier is installed in the gap of the tape and has a separate connection to the power supply (about connection below). We select the power based on the remainder of the tape, which does not have enough controller power.
A good example. You need to connect 20m SMD 3528 (14.4 W/m), with a total power of 288 W. We only have a controller with a power of 216 W and a power supply of 300 W. Accordingly, you need an amplifier:
288 W - 216 W = 72 W
The power supply is 300 W, which is enough to power the controller and amplifier. If the power supply is not enough (for example, 250W), you need a separate power supply for the amplifier.
LED multi-color RGB strip: color control thanks to the RGB controller
Multicolor tape can change its color: red, white, yellow, green, blue.
There may be significantly more colors, which depends on the functionality and, accordingly, the price of the control controller. To illuminate the ceilings in a house or apartment (as opposed to lighting nightclubs and bars), a conventional functional RGB controller with a remote control will be sufficient.
Remote control controller for RGB strip
Buttons of different colors allow you to control the color of the RGB LED strip. When you press the red button, the tape will glow red, the yellow button will glow yellow, etc.
The glow of an RGB strip can be of any color
The white buttons located in the top row allow you to adjust the brightness of the glow: the left button increases it, the right button decreases it.
You can easily change the lighting mode in the room. Eg:
– “Meditation” – suitable for doing yoga, meditation or just wanting to relax by turning on the green color, calm music and sitting in a comfortable chair. Green color has a calming effect;
– “Night light” – suitable if you have a small child who is afraid to fall asleep in the dark. Set the minimum brightness and light blue glow;
– “Romance” – suitable for a romantic dinner at home for two. To create the proper atmosphere, just set the color to light red and dim the brightness;
– “Dancing” – suitable for a dance party at home. You should select a mode with dynamic lighting, adjust the blinking speed;
– “Bright light” – white color, maximum brightness. The main mode is when it’s just light.
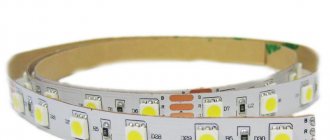
The peculiarity of the RGB strip is that there are 3 crystals inside the RGB LED: Red, Green, Blue - red, green, blue. By mixing light from such crystals in different proportions, different colors can be produced.
There can be an infinite number of shades. Essentially, here are 3 ribbons with different colors combined into one. Accordingly, the multicolor LED strip has 4 wires, not 2 (+ and –) - 1 common and 3 for each color.
Multicolor RGB strip SMD 5050
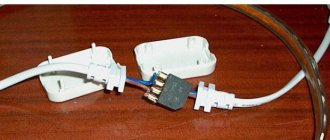
To control the glow color of a multicolor ribbon, you need a controller. It looks like a box, where a power supply unit (PSU) is connected on one side, and an RGB LED strip on the other.
Connecting each of the wires of the RGB strip to the required connector
This controller, together with the power supply and LED strip, is installed in a ceiling niche. To be able to control it remotely, it comes with a remote control.
Controller for LED RGB strip
The IR sensor picks up the signals transmitted by the control panel and ensures their transmission to the controller. And that, in turn, turns on the lighting mode that is selected.
The diagram for connecting the RGB strip looks like this:
Connecting an RGB LED strip
The controller and power supply should be selected taking into account how much power is consumed by the tape.
Power calculation is of great importance. If there is an error in the calculations regarding the power supply, its protection will work and it will not turn on. And if there is an error, the controller can fail within a few minutes.
It is important to note that the total length of the LED strip should be no more than 5 m. This is due to the fact that the current-carrying tracks on the strip are designed for a current of 2 A.
The length of the tape should be no more than 5 m
However, there are often situations when it is necessary to connect a longer LED RGB strip, for example, 9 m.
With 5 m everything is clear, but to continue you will need an RGB amplifier that looks like a box. On one side the end of the 1st tape (5-meter) is connected, on the other - the beginning of the 2nd tape (4-meter). Another power supply is also required.
Using an RGB amplifier to increase the length of the tape
Accordingly, thanks to the RGB amplifier and additional power supply, you can connect 2 strips (five and four meters) and obtain the total required length. This scheme makes it possible to create illumination of any length.
What does it take for an LED strip to work for a long time?
As you know, over time, LEDs degrade - they lose their transparency and brightness decreases. Under normal operating conditions and high quality crystals, this process takes decades.
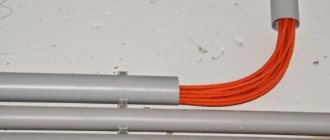
So why do LED strips sometimes deteriorate so quickly and produce much less light? This usually occurs due to overheating. For LEDs, the normal temperature is no higher than 40°C, and during prolonged operation they can heat up to 80°C or more. When overheated, they degrade many times faster. In just a week of operation at elevated temperatures, they can lose twice their brightness. So when installing LED strips, attach them to special aluminum profiles with a transparent cover. They are both protection from dust/moisture and work as radiators, removing heat from the LEDs.
There are a variety of profiles for mounting LED strips. This is an example of a furniture built-in
But aluminum profiles are not cheap. If necessary, they can be replaced with steel strips. Heat will not be dissipated as well (lower thermal conductivity), but still better than without a radiator at all.
LED strip "Economy"
Description. Service life 3-6 months. Loses brightness quickly. LEDs often burn out. The tape is weak and comes off easily. The light is unpleasant, there is no joy from it. NOT suitable for ceiling lighting (that's why we don't have economy class LED strips).
How to recognize? Low cost (50 - 100 rubles/meter). There is no manufacturer's name on the packaging or on the tape. And she herself is thin, like a rag.
Important! In our workshop, ready-made kits, tapes and Economy class components are NOT used. |
Step-by-step installation instructions
The first thing you need to do is degrease the surface to install the RGB strip. The metal base must be covered with a material that provides electrical insulation.
Sequencing:
- checking the integrity of the strip and compliance of its power with the voltage of the power source;
- gluing to the base (in order not to harm the system, the radius of bends should not exceed 2 cm);
- selection of the location of the control device and the power supply available for maintenance (if control is based on infrared rays, the controller must be visible during operation);
- cutting sections (if necessary) along the lines specified by the manufacturer, connecting and insulating;
- removing the protection from the adhesive layer, gluing the segments to the base;
- connecting the tape to the controller, the regulator to the power supply (polarity must be observed);
- supply voltage.
The segments are connected to each other using wires with a cross-section of 0.75 m2.
A red wire is connected to “R” on the controller, a green wire to “G”, and a blue wire to “B”. The fourth wire (can be of any color) is connected to “V+”. To connect power to the controller, the red wire is connected to “V+”, the black wire to “V-”. The system is connected to the household electrical network using a regular plug with a wire connected to the “L+” and “N-” connectors.
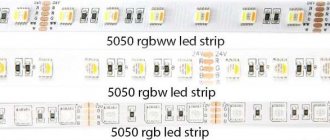
RGBW and RGBWW LED strips
To achieve better quality of white color with colored LED strips, in addition to three-color LEDs, additional white LEDs were installed on the strips, which were controlled via a separate channel. Such LED strips are labeled as RGBW. The white LED in such strips has a color temperature of about 6000K. Moreover, it remains possible to turn on white light by combining all colors or using a separate channel of white LEDs.
White LEDs can be installed alternately with RGB LEDs, but to achieve better quality, most often such strips have two rows of LEDs, one RGB, the other 5050 white LEDs. Recently, new LEDs have increasingly begun to be installed on RGBW strips, on which, in addition to three color crystals There is also a white LED crystal.
But they didn’t stop there, and added another LED with warm white light with a color temperature within 2900K. This LED strip is labeled RGBWW. The simplest implementation method is to install, in addition to a separate cold white LED, another warm white LED. Nowadays there are even combination white LEDs that can emit both white and warm white light, and combination LEDs with five crystals.
The use of white and warm white LEDs allows you to more accurately set the required shade of white light, and also obtain greater brightness.
What is RGB LED strip?
RGB LED strip is an LED strip based on a flexible printed circuit board on which three-color (color) RGB LEDs are installed, thanks to which the LED strip can emit almost any color and shade.
How are RGB LED strips different from regular LED strips?
RGB LED strips differ from conventional monochrome LED strips in the installed LEDs, connection and control method, as well as the ability to turn on any color shade at any time. To connect them and control color, you need to install a special control driver.
Where are RGB LED strips used?
RGB LED strips can be used on a par with conventional monochrome LED strips, while having a number of advantages over them. But in most cases, RGB LED strips are used for decorative lighting in rooms.
What are RGBW and RGBWW LED strips?
RGBW and RGBWW LED strips are the same RGB LED strips, but with some modifications. RGBW LED strips have additional white LEDs with a color temperature of about 6000K, which are controlled via a separate channel. RGBWW LED strips, in addition to cold white LEDs, also have warm white LEDs with a color temperature of about 2900K.
Diagram for connecting an RGB LED strip: connecting an RGB amplifier, an RGB controller
Connecting an RGB strip, like a regular monochrome (1-color), is essentially the same. The difference is that between the tape and the power supply unit (PSU) a device is installed to control its color - an RGB controller.
The controllers differ in appearance, in power, remote control (RC), and control programs. But the essence does not change - 2 wires go to the controller from the power supply, and 4 wires go to the RGB strip.
Connection for LED strip RGB controller
The controller is always connected according to the same type of circuit. The power connectors are designated “V+”, “V-”. The red wire from the power supply goes to the positive contact, and the black wire goes to the negative one.
The designations of the connectors for connecting the RGB strip are as follows:
R, G, B – respectively, control of red, green, blue. There is also a common “V+” wire (the designation may be different on different controllers, but it is unlikely to be confused with other wires).
If you mix up the wires of the tape, the colors will be mixed up accordingly. When you press a button with a red color on the remote control, for example, the green light may light up.
RGB strip control panel
In some cases, it becomes necessary to connect more than 5 m of tape. But this comes with some difficulties.
The LED strip's current-carrying paths are designed to be 5 m long. Therefore, the strips sold are 5 m long. It is simply impossible to connect 2 tapes in series - this system will only work for a very short time.
Extension is required, similar to a regular tape. There are 2 ways.
So, the first one.
Connecting RGB strips with one power supply
For such a circuit, you need an extension 4-core wire with a cross-section of 1.5 sq. mm, 5 m long. This circuit is suitable, for example, for connecting RGB strips with 30 diodes per 1 m. However, such a strip shines dimly ( due to the small number of LEDs).
You can use this scheme with RGB strips with 60 diodes per 1 m, but for this you will need a controller and a power supply with 2 times more power.
So, 2 RGB strips consume 140 W. A power supply of such power is quite large in size and heavy. It can be hidden in a niche in the ceiling, but then the appropriate location should be determined at the ceiling design stage.
You will also need an appropriate power controller. Some controllers may fail after a certain time, although the manufacturer may indicate that they are designed for a given power and are capable of operating 10-15 m of tape.
Therefore, it is recommended to take a controller with a power reserve of, say, 2 times. Accordingly, for the case under consideration it will be 280 W. However, its cost increases sharply here. Therefore, you can use a different scheme.
Connecting RGB LED strips using an RGB amplifier
An RGB amplifier and an additional power supply are used here. The end of the 1st tape is connected to the input of the amplifier (Input), and the beginning of the 2nd to the output (Output).
Each of the wires is connected to the corresponding connector. Wires from the power supply are connected to the power contacts.
Connecting an RGB amplifier
This scheme is somewhat more expensive and more complex than the first, however:
– almost all commercially available controllers can be used;
– any number of tapes can be connected;
– the dimensions of the power supply unit are significantly smaller.
It is important to remember that if one tape is needed, a controller and a power supply are used, if 2 or more, an amplifier should be added, as well as another power supply.
Connecting 2 RGB strips
Structure
Consider the scheme of a three-color ribbon. Initially, the product roll is 10 meters long. It is divided into sections consisting of three-color 9 LEDs: red, green, blue. Each section is highlighted with a copper pad for precise cutting.
LEDs are connected in series, 12V, 24V and 220V power is required. You can use 9V voltage, but the glow will not be as bright.
One Led line segment requires about 20 mA. When the three colors of red, green and blue are turned on, the power consumption can be 60 mA. For example, the tape has 5 sections (10 cm each). Power consumption with white color will be 60 mA (energy consumption of one section) * 5 = 300 mA.
The brightness of the strip depends on the number of installed LEDs. The quantity can be 30, 60, 120, 240 per meter.
Advantages of LED strip.
Most lighting fixtures can accommodate bulbs of different types and shades, which causes a lot of inconvenience and takes time. An LED strip in an apartment, on the contrary, can shimmer in any shade, be full of colors and dynamically play with colors without replacing diodes or unnecessary interventions. We pressed the button on the controller - the blue light came on, again - green, again - red. There is no need to get up from your comfortable bed and set up the device every time. Everything is done as simply and conveniently as possible.
The tape is a unique flexible ruler that can be mounted into any surface; special devices can even glow under water. Waterproof tapes can transform a pool, ponds, a home bath, and even a fish aquarium. A fabulous effect is created that captivates with its unusualness and attractiveness. The backlight can be either reduced or expanded. Therefore, you don’t have to worry that you won’t be able to decorate all the desired places: there is enough ribbon for everyone.
LED strip in the apartment:
- economical;
- easy to use;
- safe;
- universal.
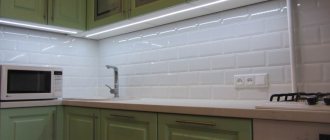
LED strip in the apartment - Kitchen.
If the only lighting in the kitchen is a lamp, you will damage your eyesight or even get injured. Why? If you stand with your back to the light source, a shadow will form in front. This causes you to strain your eyes unnecessarily and squint. It’s not very comfortable to work in such conditions, is it? However, LED strips will save every kitchen with their bright glow.
How to properly install LED lighting in the kitchen:
- We take measurements from the top cabinets, stove, sink and other dimly lit places.
- Cut the tape into small pieces equal to the measurements taken.
- Glue the resulting strips to certain places.
- We enjoy the result.
If there is still not enough light, add one more strip to make the glow brighter.
LED strip in the apartment. Kitchen-living room.
In the case where the kitchen is combined with a guest room, it would be natural to separate these 2 zones with a small bar counter equipped with LED strips. The scope for experimentation is limited only by the material of the stand. If it is glass, you can run LEDs under the counter, and the light will come from inside. Stands made of stone and wood are illuminated only from the outside, as they are not transparent.
LED strip "Lux"
Description. Compared to the Standard tape, the light is much more pleasant. Brighter, more saturated, diffuses well and spreads softly across the ceiling. I just want to sit on the couch and admire this beauty.
Rice. 5. The tape perfectly blends base colors and produces soft shades |
In addition to the basic colors (red, blue, green), the tape perfectly conveys halftones (pink, orange, yellow, blue, etc.). Due to good mixing, the colors are rich and rich.
| From personal experience. We ordered two sets. “Standard” for the bedroom, “Lux” for the living room. They installed the Standard - oh, what a beauty! Lux installed. Hmm... My wife looked and compared. I forced my husband to remove the Standard and replace it with Lux. He had to order another set. Conclusion: anyone who has seen the Lux tapes will not agree to others. The difference is obvious. |
The most important! There is candle light (very pleasant, everyone likes it). For this reason alone it is worth purchasing it. Remember how, when you were a child, sometimes the lights would be turned off and your parents would light candles. There was something magical about it... Ordinary LED strips either have no candle shade or are pale and not so atmospheric.
Rice. 6. Absolutely everyone likes the “Candle” mode |
In white lighting mode, the light is really white, there is almost no blue (in conventional tapes, instead of white light, there is blue). Service life 10 years.
Rice. 7. Packaging of Luxury LED strips |
How to recognize? The packaging looks premium. Manufacturer indicated. Inside there is a passport in Russian. The name contains the word "Lux". 2 year warranty. The tape is thick, the wires are thick. There is a BIN color code on the packaging and on the tape.
White Light Mode
All multicolor ribbons have a white lighting mode. However, the light is not pure white, but a mixture of red, blue and green. Because of this, it has a bluish tint. Here is a photo where we compared the white light from different LED strips.
Rice. 8. Comparison of LED strips in white lighting mode |
Multicolor Standard in white mode has a blue tint. Luxury is almost white. But she is significantly inferior to White Lux. White tape provides light that is closest to natural sunlight. In this light it is comfortable to read, write, and do business.
Conclusion:
For multi-color ceiling lighting, it is better to use a luxury LED RGB strip SMD 5060 - 30 LED (60 LED). Because:
- Service life 10 years
- Produces 60 pleasant shades and midtones
- Has candle light (everyone likes it)
- In white light mode, the light is almost white
- Causes joy and improves mood
Connectors for LED strip
A connector for an LED strip is a specially designed product that contains contacts for connecting to the current-carrying contacts of the LED strip. Connecting LED strips using connectors is much easier and much faster, since to do this you just need to take a connector and place the LED strip inside it. But this method is financially more expensive.
It should be taken into account that in this way it will be possible to connect only tapes with identical dimensional parameters. Connectors are selected for a specific tape width and tape type, for example, for a single-color tape with two contacts and a width of 8 mm, or for an RGB tape with four contacts and a width of 10 mm.
Types of connectors for LED strips according to the type of strip fixation:
With sliding clamps. This is the most compact version of connectors for LED strips. To connect the LED strip to the connector, you need to pull out the latch, usually black, and install the LED strip in the slot, then push the latch back, fixing the LED strip with this cut. Using this principle, cables in a laptop are connected to the motherboard. The disadvantage of a connector with sliding clamps is the impossibility of visually monitoring the quality of the connection between the LED strip and the connector contacts.
With side clamps. The most common type of connectors used for quickly connecting LED strips. To connect individual pieces of LED strips using it, you need to snap off the protective cover and install the LED strip into the grooves. In this case, the copper contact pads of the LED strip should be under the clamping terminals of the connector. The LED strip is additionally fixed when the lid is closed with a latch, due to the presence of special pins in it. This type of connector has one significant drawback. It cannot pass large currents and is highly susceptible to corrosion. Oxidized contacts significantly impair conductivity and, under heavy loads, can cause trouble in the form of a fire.
Piercing connectors. Such connectors are considered the most reliable of all, but they are also the most expensive. Their contacts are made in the form of pointed teeth, and pierce through the LED strip in the area of the contact pads. Piercing connectors require a lot of effort to install, so it is best to use pliers to close the cover. At the moment of closing, the teeth pierce the tape where the copper conductive paths are located and an electrical connection is formed.
Connectors for LED strips with sliding clamps and with pressing side latches require preliminary preparation of the LED strips themselves. The contacts must first be cleaned, if they have a protective coating, and cleaned of oxides for a better connection. Over time, such contacts oxidize. Piercing connectors do not require preliminary preparation, since, due to their design, their teeth cut through all protective coatings and oxides, ultimately coming into contact with copper traces.
Corner inserts for connecting LED strips at an angle
LED strips are flexible by design, but, unfortunately, they cannot be bent arbitrarily; their bending radius is limited. To connect LED strips at an angle, corner inserts are used, which, in combination with connectors for LED strips, allow you to connect LED strips at the required angle. Such inserts can be L-shaped, T-shaped, cross-shaped or with wires, for connection at any arbitrary angle. With their help, you can turn a wide variety of luminous designs into reality, almost any designer’s imagination.
Can LED strip be cut anywhere?
To maintain the functionality of all segments of the LED strip, you need to cut it only in the places provided for this purpose on the strip. If you cut the strips between the LEDs anywhere, the LEDs from the cut segment of the LED strip will not work.
Is it possible to connect LED strips?
You can only connect segments of LED strips into one long strip with the same supply voltage, and monochrome only with monochrome, RGB with RGB.
Is it possible to connect LED strips without soldering?
The most reliable connection of LED strips is done using soldering, but for quick connection of LED strips you can use special connectors.
LED strip “Standard”
Description . Good, reliable tape. It will serve you for 3 years and will not lose its brightness. The tape produces pure basic colors (red, blue, green). But, unlike expensive luxury tapes, it doesn’t mix them well. You will not get pleasant, soft undertones with this tape.
Rice. 3. LED strip Standard |
For example, there is no yellow color . Instead - green. There is no cozy candle shade (everyone likes it) and other pleasant shades. Therefore, for this tape there is no point in using an expensive 60-color controller. There is a white lighting mode. But the light has a blue tint.
| On a note! You've probably come across LED strips for 100 and 750 rubles. They look the same, but why such a difference in price? Two main reasons: lifespan and light quality. Quality is reflected in the way the tape blends the base colors. Either you will have a rainbow of shades, or 3 base colors and 3-5 pale undertones. It is because of this rainbow that the cost is high. But it’s very beautiful. |
Application. If 7 colors are enough for you. If you do backlighting for no more than three years. If you have a chandelier and white lighting mode you do not need it. Then feel free to purchase Standard tapes.
Rice. 4. The manufacturer is indicated on the “Standard” LED strip |
How to recognize? The manufacturer is indicated on the packaging and on the tape. There is a 1 year warranty. When you take it in your hand, there is a feeling of good quality. Those. This is not a “rag” that you are afraid of accidentally tearing.
Tape selection
Which tape to choose for the street? There is nothing complicated about this, the main thing is to pay attention to several parameters:
- Degree of protection against moisture penetration (IP).
- Supply voltage.
- Glow color.
Let's look at each point in more detail. The first thing you should worry about is that the selected device corresponds to the climatic conditions in which it will be located.
Therefore, when choosing external lighting, pay attention to the degree of ingress protection, that is, the IP rating. To use the LED strip outdoors, the IP65-IP66 protection level is suitable.
The first digit of the indicator means protection from external penetration - “6” indicates dust resistance. The second digit IP means protection against the harmful effects of water:
- “5” implies protection from water jets from any direction;
- “6”, respectively, protection from sea waves and strong jets of water.
Thus, depending on your decision regarding the location of the LED strip, you prefer one or another degree of protection. There are fully sealed LED strips with IP67 and IP68 protection, but their price will also be higher, so decide on your needs and make the best choice.
The next thing to think about is connectivity. The LED strip can be powered by DC voltages of 12 V, 24 V, 36 V and 48 V
But, I would like to draw your attention to the fact that there are tapes that operate on 220 V. This is implemented using a diode bridge (for connection you need one piece per 100 m of length)
This modification is very convenient, because for the first option, you will need to place power supplies somewhere every 5 meters, or additionally make cable wiring for parallel connection of lighting devices.
When installing an external LED strip, it is important to choose the right type of glow. They come in single color or RGB
This abbreviation means the possibility of a multi-color glow of the tape due to mixing three colors (red, green, blue) found in the LED. Therefore, based on your needs, choose the option that suits you, but rest assured, with the help of sealed RGB tapes, you can create at least the entire rainbow spectrum in absolutely any weather.
LED multi-color lighting of ceilings with RGB tape.
Thanks to the controller, the color of the LED multicolor RGB strip can change, and depending on the type of controller there can be more than 100 shades of different colors.
The price of a controller depends on how many colors it can create. Externally, an RGB controller for an LED strip looks like a small metal or plastic box.
The controller can be controlled using the buttons of an infrared remote control (television type) - a distance of up to twelve meters, a radio remote control - up to thirty meters, or a mobile phone via Wi-Fi or Bluetooth, however, the last of these types of controllers is significantly more expensive than the previous ones.
Controllers that can be controlled using a remote control (remote control) are optimal in terms of price-functionality ratio.
The RGB LED strip is connected to the RGB controller. The brightness of each color can be set using the controller's remote control.
In order to illuminate niches and ceilings in a house or apartment, an easy-to-use, relatively inexpensive controller and remote control will be sufficient.
Remote control controller for RGB strip
The “ON” and “OFF” buttons turn the backlight on and off.
Pressing the red button will make it red, pressing the yellow button will make it yellow, etc.
At the top left there are 2 buttons, each of which shows a sun: the one on the far left increases the brightness of the current backlight, the one located next to it decreases it.
Gray right buttons – dynamic modes – smooth change of backlight.
The RGB strip can glow in any color.
Color Changing LED RGB Strip
The following possible lighting modes can be distinguished:
– “Meditation” – green color to achieve relaxation. If you set the color to green, turn on relaxing music and lie down, you can feel a surge of new strength and a feeling of getting rid of problems;
– “Night light” – used if a small child is afraid to sleep in the dark. This is the minimum level of illumination, providing twilight with a relaxing warm tint. The child will be able to fall asleep peacefully, and at night there will be no need to turn on the light if he wakes up;
– “Romance” – provides a romantic atmosphere at home. For example, by dimming the brightness of the light and adding a red component, you can create the effect of a beautiful sunset;
– “Dancing” – if you want to dance, you can select any mode with dynamic lighting, adjust the speed of the dynamic scenario;
– “Bright light” – the brightness of the RGB strip is at its maximum level, and it is used as lighting in a house or apartment.
RGB tape is multi-colored because it essentially combines 3 tapes: red, green, blue. By mixing colors, these tapes can create many shades. Their number depends on the RGB controller, and not on the tape itself.
Because A multi-color RGB tape is 3 single-color tapes combined into one; it has 4 wires, not 2, like a single-color one.
Multicolor RGB strip SMD 5050
3 wires are responsible for red, green, blue colors and 1 wire is common +.
To control the RGB LED strip, you need a controller. On one side, it receives power from the power supply unit (PSU), and on the other, the RGB LED strip is connected.
Each of the wires of the RGB LED strip is connected to the corresponding connector
The red wire is connected to the connector marked with the letter “R”, from Red (red), the green – to the connector marked with the letter “G”, from Green (green), the blue – to the connector marked with the letter “B”, from Blue (blue). , connector.
The power supply of the RGB strip is connected to the V+ connector - the yellow wire. As a rule, the controller and power supply are installed behind a suspended ceiling or in a ceiling niche for aesthetic purposes. And to control the controller, a remote control is used.
Controller for LED RGB strip
The controller sensor receives signals from the remote control and controls the backlight color.
Connecting an RGB LED strip
Here the power supply input is connected to a 220 V network, and the output of this unit is connected to the power input of the RGB controller.
An RGB strip is connected to its output.
The power of the power supply should be calculated depending on which model of tape is used. You should also know the power of the controller outputs to which the RGB strip is connected. Because if you connect a tape that has more power than what the controller outputs are designed for, it will fail.
The total length of the LED strip that is connected to the controller should be no more than 5 m. If more than 5 m is connected, the controller outputs may burn out immediately, or it will work for a very short time and as a result will fail.
However, there is a solution for connecting more than 5 m of tape to an RGB controller.
For example, you need to connect 8 m to the controller. 5 m is connected as stated above, and to connect the remaining 3 meters of RGB strip you should use an amplifier. It is a box similar to a controller. The end of the 1st 5 m section of tape is connected to the input, and 3 m of the 2nd section is connected to the output. You should also definitely connect another power supply to the amplifier.
Using an RGB amplifier to increase the length of the tape
Accordingly, using an amplifier and an additional power supply, you can create a backlight of any length. Just keep in mind that for every 5 m of tape a separate amplifier and a separate power supply are required.
Second installation method
This method can be used by installing lighting in the interior, trunk and under the hood. Here you will need:
- LED strip with two contacts;
- wire having two different colored wires. The red one will be soldered to its “plus”, and the black one to the “minus” of the tape.
The preparation of the lighting device follows the same principle as in the first method. After installing the product, we perform the following manipulations:
- connect the black wire to the battery (to the negative terminal);
- We attach the red one to the toggle switch, and then connect it to the positive terminal of the battery;
Diagram of connecting wires to the battery
Then in the cabin we install the toggle switch in a place convenient for you.
That's all.
Ready backlight
If the product does not light up with this connection, then you need to check that the polarity of the wires is correct.
LED modules
LED strips are indispensable when you need to provide lighting or illumination over a long length. Only LED strips that are not protected from moisture can be cut into pieces, that is, only those that are intended for indoor use. It is unacceptable to cut waterproof and moisture-resistant LED strips without subsequent sealing.
To eliminate this drawback, LED modules have been created that allow interior lighting and illuminated advertising to be carried out easily, quickly and reliably. The scope of application of LED modules in practice is limited only by human imagination. Modules for lighting in a car are especially convenient. It is enough to connect it via a fuse to the on-board network and glue or secure the module with self-tapping screws inside the car interior or on the outside.
The design of LED modules consists of a shallow bed made of plastic or metal in which a printed circuit board with LEDs is installed. The top of the board is filled with transparent silicone. This ensures protection against moisture and splashing water. The LEDs are connected in the same way as in the LED strip above.
On the outside of the bottom of the crib there is a sticky layer, which can be opened by removing the protective film and the module can be fixed on any flat surface. It is possible to attach modules to the eyes using self-tapping screws. All lighting and electrical calculations given above on the page for LED strip are also valid for LED modules.
Rectangular LED modules are sold in the form of blocks; in the photo there is a block of 20 modules.
The modules can be easily separated from the block one by one or in groups. Electrically, all modules are already connected to each other. It is enough to supply power to any outermost one and the LEDs on all modules will light up. Blocks can be increased in any quantity by connecting them in parallel.
Protection class
Each tape is marked with information about its protection class. In accordance with this indicator, you need to make a choice of one or another device for certain operating conditions. In the marking, the protection class is indicated by the letters IP. Next come the numbers. They are the ones who talk about the degree of protection of diodes.
For RGB ceiling lighting in a clean, dry room, you can use products with class IP20. If the room is not heated, it is better to give preference to IP22 type diodes.
For outdoor lighting, you can use tapes with protection class IP44. However, such structures must be under the roof. They can withstand splashes of water and temperature changes. However, such tapes cannot withstand prolonged exposure to water. They can also be used to create lighting in the kitchen or bathroom.
In dusty environments, IP65 devices can be used. They are also not afraid of cleaning with a jet of water under pressure. This class of luminaires is also resistant to impacts. Therefore, the presented tape can be used for tuning cars.
The tapes are IP67 waterproof. They can be used for lighting inside swimming pools. The presented products are not afraid of prolonged exposure to water. This tape can also be used to illuminate fountains.
Stylish trendy youth
Aluminum profiles for LED strips will help you make LED lighting even cooler and achieve the desired “wow” effect. Profiles can be of completely different widths - from 16 to 80mm. They can be built into the wall or ceiling, be overhead, corner, or suspended. In addition, aluminum profiles can be interconnected into any fancy geometric shapes.
How does this happen? We simply mount the LED strip inside the profile, cover it with a matte diffuser, mount the profile where our heart or designer tells us, and voila - lighting in an ultra-modern style is ready! Using aluminum profiles, we open up enormous scope for creativity and imagination. In general, if the designer in you is dying, urgently revive it with the help of aluminum profiles for LED strips!