LED strips save energy, last a long time, look good, are easy to install and use, have compact sizes, create pleasant diffused light, and emit minimal heat during operation.
However, during operation, an undesirable effect appears - the lights begin to blink.
It is possible to determine why an LED strip is blinking on or off only if you know how it is equipped.
How the LED strip works and what can blink in it
LED lighting is not only LED strip and connectors.
The system includes:
- driver;
- controller (amplifier and remote control);
- Dimmer.
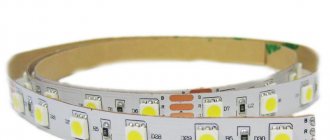
The standard length of a flat dielectric LED strip is 5 meters. On one side there are diodes connected by conductive paths covered with plastic. The traces are the same as on printed circuit boards, but are supplemented with ballast resistance (resistors) to prevent flicker. On the other side there is glue covered with a film. The film is removed for installation.
Light bulbs are grouped in groups of 3. with serial connection and 6-12 pcs. when parallel, which allows you to cut the strip if necessary (for this there are images of a dotted line with scissors). There is a separate track on the LED strip for each circuit. The groups are equipped with contacts and instructions regarding polarity and voltage. If the light bulbs are very small, they are soldered in pairs to increase the intensity of the glow. Multi-colored pins are soldered to the end intended for connecting to power:
- zero (black) and phase (red) - for a single-color strip;
- black, red, blue, green - for RGB (color) strip.
At the opposite end, soldering or connectors are used for connection.
During installation, it is important not to confuse phase and zero. If you swap the green and blue wires, the tape will not fail, the wrong tracks will simply turn on.
Reasons for LED strip blinking when turned off
Connecting the power supply through a switch with an indicator lamp leads to a constant glow of the tape, both in the off and on positions.
Switch with indicator light
The values of the resistance (resistor) in such a circuit are configured in such a way that the LED light bulb of the switch receives a working current, allowing it to glow when the switch is in the off position.
The same current value is enough for a slight glow of the SDL.
Connection diagram for an LED lamp via a room switch with an indicator
There are several options to fix this problem:
- connecting the board via a room switch without an indicator;
- disconnecting the contacts of the indicator lamp in the switch. The remaining ends of the wires are insulated.
Turning off the indicator light
- connecting the capacitor to the power supply. The capacitor is connected in parallel to the contacts of the board (lamp), to which the supply wires from the unit are connected.
Parallel connection of an additional capacitor to an LED lamp
Due to its “storage” properties, the capacitance does not allow the operating current to pass further to the board crystals, thereby preventing them from glowing.
Why is any voltage ripple in a light source harmful?
SNiP 52.13330-2011 determined the permissible pulsation of lighting fixtures for industrial premises within the range of 12-20%. Scientists believe that flicker is harmful already at 5-8%. The voltage in the household network can vary within 190-240 V. At the minimum value, the pulsation level of the incandescent light bulb is maximum (22%), but does not violate SNiP.
If the LED strip and driver are of high quality, the ripple factor does not exceed 4%. This indicator is achieved by supplying direct current. You should not buy strips that are powered by alternating current. They can create a ripple of 40% even without a dimmer.
Increased pulsation of flickering light in an adult causes a feeling of fatigue, tension, and difficulty concentrating. Children develop pain and dryness in the eyes and increased fatigue, their mood drops, and they develop problems falling asleep.
Inspection and repair
Let's start diagnosing the causes of the malfunction and eliminating them, for this we will need:
- Multimeter.
- Indicator screwdriver (220V).
- A small piece of a known-good LED strip with wires connected to it.
- Soldering iron, tin, passive flux.
- Connectors for tape.
All methods for repairing and diagnosing electrical circuits and diagrams consist in observing two common truths:
– Inspection of the integrity of all components, connections and assemblies.
– Checking supply voltages and their quality.
Depending on the specifics of your problem, additional diagnostic methods may be required, such as oscillography, etc. However, to check the lighting and backlight systems, the above mentioned are sufficient.
Does not burn
If you are faced with the fact that the LED strip has stopped turning on, follow the instructions:
Checking the supply voltage.
Start the repair by checking the presence of voltage at the input of the power supply; to do this, use an indicator screwdriver to check the presence of a phase in the socket where it is connected. Next, if the power supply is an open type with air cooling, you can check the power at the input terminals. This can be determined more accurately using a multimeter; to do this, turn on the alternating voltage (V~) measurement mode.
Checking the output voltage.
Now you need to determine: does the power supply supply the 12 V it is supposed to? To do this, you can use a small piece of LED strip as a control lamp. “Controls” are actively used in the repair of 220 V electrical circuits and auto electricians; to check the power supply, a light bulb from a car, or rather from its dashboard, can be used. First of all, check the voltage at the output terminals of the power supply, then at the contact pads of the tape. Each segment has 4 contacts - 2 for plus and 2 for minus; you can check the voltage either at one end of the tape or at a specific extinguished section. You can better estimate the voltage using a multimeter in DC voltage (V=) mode.
If voltage from the power supply is supplied to the tape, but it does not light up, then the problem is in the tape itself, or rather, in the integrity of the conductors of its first cut piece (usually 3 LEDs).
If the problem is in the power supply, and you have little understanding of electronics repair, do not despair, the problem may be obvious, for example:
- Broken path.
- The fuse has blown.
- The diode bridge has broken.
- Obvious failure of parts.
These problems can be easily identified visually and corrected.
If flashing
It happens that the LED strip flickers, and the flickering can be:
- Permanent.
- Periodic.
In this case, the light either becomes dim or disappears completely.
To check and repair the system, you must first connect a tester or control unit to the power supply, so you can make sure whether the power supply is working. Flickering can also occur due to surges in the mains voltage or poor contact between the power supply and the Tape. If a separate section flickers, there is obviously a problem with the LED, it has failed, or as they say “burnt out”, hence the flickering of the segment.
Flickering may occur due to incorrect installation. It is extremely undesirable to rigidly bend it at a right angle and wrap curves and pipes with a radius of less than 5 cm - this creates too much stress for the conductors on the flexible printed circuit board. At first, it may remain operational, but since the conductive tracks are damaged, their cross-section is disrupted, which creates additional resistance, heating and, as a result, breakdown.
You can localize a section and replace it, or replace the entire tape.
If it burns, but not completely
Have you noticed certain areas that are glowing or have gone out completely? There is nothing wrong with this; in this case, there is no need to replace the entire tape. As already mentioned, this may be a consequence of improper installation or local overheating, which, by the way, can also be caused for this reason.
There is some difficulty in such repairs when the tape is laid within sight. To quietly fix the problem, you will have to cut the lamp until you can secretly connect the new section to your installation with your own hands. Connectors for butt-joining LED strips can come to the rescue, but act according to the circumstances and, if you are unsure of your soldering skills, it is better to use connectors. When connecting to a moisture-proof tape, first remove the silicone from its surface.
power unit
The most important element of a lighting system with an LED strip is the power supply (driver). It includes a capacitor that accumulates voltage. When the maximum volume is reached, the lights begin to blink in the on and off states.
Another important part of the driver is the rectifier bridge. If it fails, alternating current is supplied to the lighting fixture, causing increased flicker. A high-quality driver provides a voltage sag rate of more than 20%. If this indicator is less, when the current in the network decreases, the LED strip begins to blink, but not when turned on, but after all the parts of the microcircuit have warmed up.
Important! When purchasing cheap products, you must take into account that the stated percentage of subsidence may not correspond to the real one.
The LED strip can be powered by 12 or 24 V. Compliance can be checked with a multimeter.
Poor soldering
Chaotic blinking always indicates poor contact on bolts or soldering. Most often, this malfunction occurs if acid is used in combination with flux during soldering. They remain on the contacts and corrode copper if not thoroughly washed off. The lighting fixture begins to blink.
Contact oxidation on connectors
If connectors are used to connect pieces of tape, their contacts oxidize in rooms with damp walls. Under the influence of oxides, the compounds overheat and burn out. Most often this happens in new buildings, so in a new apartment it is better to use soldering when installing the system.
Faulty LED
Strips with a power supply consist of modules, each of them has 3 diodes. If one LED burns out, three blink. In mains-powered tapes, the diodes in the modules are connected in series. Each module contains 60 light bulbs. If one fails, the entire 1 meter long module blinks.
Controller and remote control
The purpose of the controller is to change the intensity of the glow of one color. The controller includes a main unit and a remote control. It is mounted between the driver and the LED strip. For large footage, additional blocks are installed between the tapes.
There are mechanical mini-models controlled by buttons on the body. The most common cause of controller failure is high humidity. You should buy models with an increased level of protection.
If the LED strip flickers, the remote control is checked first. Its functionality is reduced if the battery is low. Another common cause is sticking buttons, resulting in shorted contacts.
Other Possible Problems
The LED strip may blink for other reasons:
- improper installation of the strip (without protection or removal of excess heat);
- violation of the connection diagram;
- resource development.
If the LED strip is simply glued, the power is greater with a long length. The absence of a metal mounting channel contributes to contact failure due to overheating. Over time, the lights begin to blink during operation.
The most common mistake during self-installation is mixing up phase and zero. The reason for the confusion is the lack of markings on the switch. If a zero is connected to it, the LED strip blinks both when the light is on and off.
Controller and remote control
If the backlight does not start at all after a long period of time or turns on “every once”, do not rush to scold your Chinese comrades. Perhaps this is due to a trivial reason - the batteries in the remote control are dead.
Therefore, this thing needs to be checked first. Most often, remote controls are used to control RGB controllers.
And if the multi-colored ribbon suddenly starts switching and changing colors by itself, check not the remote control, but the controller itself.
A working remote control should not make any independent switches. To make sure it has nothing to do with it, simply remove the batteries.
Another way to identify a faulty RGB backlight controller is to exclude it from the circuit and supply power to the strip separately for each color.
If individually all colors work properly, but together nothing lights up, or blinks once and immediately goes out, then the reason is damage to the RGB controller. Change it exactly.
Troubleshooting and Troubleshooting
Diagnostics of all elements is carried out using a voltmeter (12 V multimeter):
- input voltage must be 220 V;
- output voltage of the power supply – 12 (24) V (2 V deviation is allowed);
- voltage on the dimmer and controller (12 V);
- voltage at the connections of individual diodes (7-12 V);
- remote controller.
When used to connect connectors, they also need to be checked.
Before checking the power supply, it must be disconnected from the controller and LED strip. The parameters of the power supply specified in the instructions do not always correspond to reality; the consumer receives a flashing LED strip. If the manufacturer has saved on parts, you should buy a device that meets the needs of a specific system.
Before going to the store, it is advisable to calculate the power supply based on the length of the strip. First, the need is determined from the table (for example, for an LED strip 1 m long with thirty elements, this is 7 W). This figure is multiplied by the total length and 0.3 (safety factor).
Important! The power supply does not always need to be changed. First you need to check whether the malfunction is caused by its location. For some models, functionality is reduced when installed in limited space.
If the dimmer or controller is broken, they must be replaced.
The switch backlight is also an LED. After someone turns on the light, it begins to interact with the LED strip. The best option is to replace the switch.
How to find a fault
Once you have figured out the main reasons, it is worth understanding how best to identify and diagnose them. What will you need for this and where to start?
All LED lighting can be divided into separate functional parts:
- first comes the power supply
- next, RGB color control unit (controller)
- RGB amplifiers, if any
- the LED strip itself
- connectors or connectors
The main device required for diagnostics is a multimeter for measuring direct and alternating voltage.
First of all, measure the alternating voltage supplied to the power supply. Suddenly there is no necessary 220V (“+” “-” 10%).
Next, check the output. There should already be 12V or 24V (“+”/”-” 10%), depending on what source you are using. If the output voltage is lower or higher, do not forget that it can be slightly adjusted using a resistor.
Find the ADJ connector and tighten the screw with a screwdriver. When everything is fine with this, you move further along the chain.
Check whether power is supplied to the input of the RGB controller or dimmer. It should be the same as at the output of the power supply.
Gradually reach the tape itself. Apply the measuring probes to the contact pads and take measurements. They can have voltage from 7 to 12 volts.
If one area glows dimly, and not the entire tape, then measurements should be taken on it.
If there is an abnormal decrease in voltage or its complete absence, it is precisely the faulty area or backlight element that is responsible for the performance of the tape that is detected.
If all measurements show that the voltage at the contacts is normal or within its limits, you need to move on to searching for faulty LEDs.
Main conclusions
The LED strip can be mounted on a dry wall or ceiling in a metal mounting channel. It provides ventilation and removal of excess heat. It is also important to protect the LEDs from mechanical stress. If individual elements are faulty, the strip heats up, which is not safe from a fire point of view.
Recommendations for choosing and purchasing:
- Before paying, you need to ask the seller to provide a quality certificate.
- If the product is cheap, you should keep the receipt. If a defect is detected, he will help make a replacement.
- When determining the footage, it is worth adding 2-3 meters for repairs.
The frequency between repairs is reduced if the equipment has real value and is offered by a trusted manufacturer.
Blinking must be eliminated. It increases the level of irritability of family members and negatively affects not only the eyes, but also the body as a whole. In addition to decreased vision, headaches and sleep disturbances may occur.
The tape is on, but not completely, what should I do?
Now let's look at why the LED strip lights up in different colors, are some sections dimmed, or go out completely?
If you encounter such a problem, it is not necessary to change the entire installation; you can perform local repairs. Installation is carried out in two ways:
- Hidden - the tape is hidden in a box;
- open method - located on the surface.
When the light source is hidden in a special profile or on the back side of the structure, it is much easier to repair it. Just find the boundaries of the non-working area and cut the tape along the cut lines (how to cut LED strip correctly).
If the installation is visible, you have to cut off a larger section to hide the connector. Get to a place where you can quietly hide the connection and from there begin removing the non-working section of the tape.
Then replace the piece with a similar one in power, type and number of LEDs. To do this, you need to either solder, which may not always be convenient, or use connectors.
Basics of proper installation
In order to avoid situations where the LED strip is not fully lit, you need to consider the basic installation rules:
- The minimum bending radius is 5cm. When you wrap tape around thin tubes or corners, be prepared for the possibility of damage. Thin conductors at its base cannot withstand such deformations.
- Do not install near areas with high temperatures. Partial failure of the LED strip may occur because there is a heating battery or other heat source nearby.
- Dense installation of tape with a power of more than 10 W per meter is prohibited! Although LEDs have high efficiency, more than half of their power turns into heat.
You need to remember that when you assemble a lamp with powerful strips, for example white 5050 60 led/m, which has 14.4 W per meter, you should not glue it strip to strip or wind coil to coil. Make a gap at least the thickness of one strip. After installation, turn it on and let it run for at least a couple of hours, periodically checking the temperature. If your hand starts to burn, i.e. rose above 50 degrees - make the design less frequent. To achieve greater brightness, use a 5730(5630) rigid strip on an aluminum base or other high-power LEDs.
Must be eliminated
If possible causes are discovered that lead to the LED strip flickering in operating condition, there are several ways to solve the problem. It is worth remembering that blinking LEDs must be eliminated even when this does not lead to damage to the light source. First of all, this is due to the fact that such flickering causes a number of negative phenomena:
- the nervous excitability of all family members increases;
- There is a negative effect of flicker on the visual system. The eyes quickly begin to get tired and watery, which after a while can lead to a decrease in visual acuity;
- disturbances in the general functioning of the body may also appear. Your head may begin to hurt, your sleep may be disturbed, or you may feel weak;
- It is possible to heat up individual elements of the tape structure.
Product flicker
Therefore, you should get rid of the flickering effect in working or non-working condition in any case.
Separate neutral wire
If your switch is located in the same block as the socket or the neutral wire is also connected to the switch, then the backlight can be rigidly connected to the phase and neutral. It will be on constantly, but the light will no longer blink. The method involves laying additional wires and is not very convenient.
You can also use a pass-through switch instead of a regular one. In this case, the light will be on in one position, and the backlight in the second. The light will also not blink.
And no amount of interference will make it light up. True, here you also need to connect the neutral conductor to the switch. But this method allows you to get rid of blinking, even when the backlight is not the cause! (discussed below).
If you are not too bothered by the additional costs associated with purchasing a pass-through switch, and you do not want to go into the weeds of choosing suitable resistors and capacitors, then this method is the most optimal.
Why does the LED lamp blink when turned on?
This method is applicable for any number of LED devices in one chandelier - the voltage between them is distributed evenly.
Expert opinion
Viktor Pavlovich Strebizh, lighting and electrical expert
Any questions ask me, I will help!
Let's tell you a secret, but the light in any LED pulsates, and if in high-quality samples it is at the limit of 1-2, then in cheap ones the pulsation reaches 20, which is extremely critical for human health. If there is something you don’t understand, write to me!