The shield is a handy thing, no matter how you look at it.
Not all heroes suffer from prejudices that a shield is not cool. Many understand what it is really needed for, and actively use it for its intended purpose, to cover from enemy arrows and parry blows. But the hero will look really impressive if he learns not only to hide behind a shield, but also to counterattack himself using the same shield. Moreover, in reality, the shield in a duel was actually very actively used to push the enemy away, squeeze or push him into an awkward position, knock out a weapon, move the enemy’s shield for an easy strike, knock him down, or even completely wound or stun him directly with the shield itself .
The use of shields as weapons can be divided into two categories. Firstly, a line of warriors, covered with a wall of shields, can use them not only to protect themselves from arrows and blows, but also, acting amicably and harmoniously, push enemies with this wall, helping themselves with weapons and trying to knock them down in order to call them into the enemy ranks crowding and chaos. Secondly, if we are talking about less cramped conditions, when it is no longer rank against rank, but warrior against warrior, the shield can be used not only for pushing, but also for hitting itself - whether with a plane or an edge, depending on the type of shield . In view of this possibility, shields were often specially equipped with additional devices for injuring the enemy - spikes, blades and the like, see the “Real Life” section.
No. 7. Number of modules in the distribution panel
The fundamental difference between all panels is the number of modules.
Some people mistakenly believe that their number should be a multiple of 12, but this is not always the case: panels designed for 16 and 18 modules are used, there are even compact models in which the number of modules does not exceed 10. To determine how many modules are needed in your case, to begin with, it is best to draw up an electrical wiring diagram indicating all points of consumption, this includes sockets, lighting fixtures, and separate electrical appliances that consume a lot of energy (air conditioner, washing machine, boiler). Next, the groups are defined. For lighting wiring, circuit breakers with a current of 10 A are used, for socket wiring - 16 A. As switching and protective devices, you can use not only circuit breakers, but also RCDs, or replace these two devices with a differential circuit breaker. The number of RCDs, automatic devices and automatic devices must be known to correctly select the number of modules. It is also worth considering the presence of a counter and its size.
The width of one module is 18 mm, it is equal to the width of a single-pole switch. To connect a two-pole circuit breaker you will need 2 modules, a three-phase circuit breaker - 3, a single-phase RCD - 3, a three-phase RCD - 5, an electric meter - from 6 to 8 depending on its size (the width of the device can simply be divided by 18 mm).
For an apartment, in some cases, a shield for 12-16 modules is sufficient. If the meter is located in the panel, you will have to take a device with 16-24 modules. A large private house may require a shield for more than 24 modules. In large cottages, two panels are sometimes installed, since due to the large length of the wiring, in the event of an accident, one may not always work promptly, or may not work at all.
In addition, the panel may contain surge protection devices, photo relays or automatic light switches. If you are not sure that you can make the right choice of switchboard, then it is better to trust the specialists. Help will most likely be needed when assembling, installing the switchboard and connecting all groups of electrical appliances to it - it’s better not to joke with electricity.
Medieval shield
The project related to the production of steel shields led us to the point that we must carry out an explanation about the role of the shield in medieval society, its forms and types.
This article will be based on materials from a fundamental work: Wendalen Behaim’s “Encyclopedia of Weapons” .
Materials used in the production of medieval shields:
Drawing the internal structure of an early shield
As we will see below, the main material for the production of shields was:
– Wood covered with leather;
– Sometimes bronze plates were used;
– Early shields used metal umbos and metal strips to reinforce the shield and nails.
– a thin chalk primer was applied on top , onto which emblems with inscriptions were applied using tempera paint.
Occasionally, metal shields were encountered.
As V. Beheim points out, the first shields of medieval society, for example, among the Germans, were very simple. In general, they were similar to the shields used in the Roman legions, but with a quadrangular shape they were less curved. Made from willow twigs, they were covered with fur, usually from wolves. Fur-covered shields were used until the 13th century. From this custom comes the “heraldic fur” (French fêh) in the Middle Ages.51).
Der Mittelalterliche Reiterschild
Shields in the time of Charlemagne were mostly made of wood, covered with leather and reinforced with iron strips . The rider had a light, wooden, round or pointed shield with iron stripes on nails . A bulge was attached to the ]round shield[/anchor] - the umbon (German: Schildnabel). They wore a shield on the left hand, with a wide belt into which the hand was threaded.
The foot warrior wore a large, almond-shaped, more than a meter high, strongly curved wooden shield, which was reinforced along the edges and in the middle with crossed iron strips studded with strong nails .
The Norman shield was made of wood with a chalk primer , narrow, pointed at the bottom and rounded at the top, and can be considered as a prototype of the entire later form of medieval shields.
Shields of the 11th and 12th centuries were of considerable length. Concern for the strength of the shield led to it being made highly convex and equipped with iron plates .
XIII century: The shield became more and more flat, the umbons and overlays gradually disappeared .
Standing shield (German: Setzschild), or large pavese (German: große Pavese). These shields were made of wood and covered with leather; a thin chalk primer was applied on top , on which emblems with inscriptions were applied with tempera paint.
Wood leather – Pavesa
Boards and rivets are visible
Already in the 11th century, horsemen sought to free their left hand from holding the shield so that they could control the horse. This led to the fact that the tarch began to be hung around the neck and the chest was completely closed. This kind of tarch, although there are some made of iron, was mostly made of wood and covered with leather; they are quadrangular in shape, with rounded corners, and have a sharply protruding rib in the middle .
Adagra, inner side
The old Moorish adagra (detail) was made of strong tough leather, oval, in the shape of a heart or two trimmed ovals .
Kalkan shield
Light Arab cavalrymen, and from them the wars of the border lands of the Polish-Lithuanian Commonwealth kalkan in Turkish , with a top made of fish skin, which was either left rough or polished smooth . Such shields were often made of leather with beautiful embossed patterns. Finally, there were shields made of thin fig tree twigs, which were shaped in a circle, concentrically, and intertwined with silver braid or colored silk threads in such a way that they formed arabesques made with great taste . These kind of round shields with a diameter of no more than 60 cm had extraordinary resistance to a blow from a sword.
Fencing shield (German: Fechtschild), which was common in fencing schools. These very long and narrow shields were made of wood, covered with leather and painted . In the middle of such a shield there was a high rib, hollow inside, and along it there was an iron reinforcing rod. Long iron points with or without irreversible hooks protruded from the top and bottom of the shield. The total length of the shield was 2.5 meters.
In more recent times, shields become more complex and are integrated with various devices.
Half a creature, a wooden board served as the main materials from which medieval shields were made. The shield was covered with leather. Depending on the era, certain parts were added to the shield: umbons, radial steel strips to strengthen the shield, edging. I would also like to note that edging in medieval shields, such as tarch, was used extremely rarely.
Typology and history of medieval shields:
Typology and history of shields
Two circumstances led to the improvement of the weapons of the peoples who settled in Europe. Firstly, the relationship they entered into with Constantinople, where they received weapons at a trade crossroads, and secondly, the fact that in their raids on Rome they came into contact with countries in which iron had long been mined and weapons made. Those South Germanic peoples who were in contact with the Roman Empire at the beginning of imperial times necessarily adapted to the Roman way of warfare. From here arise first, borrowed from the Romans, and then purely Germanic, corresponding to national characteristics, forms of weapons.
Infantry Shield (Saint Denis)
Despite this, even in the time of Charlemagne (as can be seen on the chess set from the treasury of Saint-Denis), shields were made of wood covered with leather and reinforced with iron strips. The rider had a light, wooden, round or pointed shield with iron stripes on nails . In the center of the round shield was attached a bulge - an umbon (German: Schildnabel). They wore a shield on the left hand, with a wide belt into which the hand was threaded.
This round shield is the original shield of the Middle Ages (having Roman roots), as well as the formally influential infantry shield of the Romans, the scutum . Perhaps this is the reason for the free-standing, oval shield.
Infantry shield of a chess piece from a board from the treasury of Saint-Denis, from the time of Charlemagne
St. Gallen “Codex Aureus” (“Golden Psalter”), from the time of Charlemagne. Round shields with a umbo and radial metal stripes edging are clearly depicted
St. Gallen “Codex Aureus” (“Golden Psalter”), from the time of Charlemagne. The round shields with a umbo and radial metal stripes of the edging are clearly depicted. St. Gallen “Codex Aureus” (“Golden Psalter”) drawing of a round shield from the monograph by Wendalen Behaim “Encyclopedia of Weapons”
And I would like to separately note the elliptical shield as a separate special type of shield of the early Middle Ages. Perhaps it was precisely such shields that were the primary sources of almond-shaped (drop-shaped) shields.
Elliptical Shield(The Battersea Shield was found in the area around Chelsea Bridge)
Norman shield
A new milestone and fundamental basis for the development of most shields of the Middle Ages was: the Norman shield . Norman shields of the 11th and 12th centuries were of considerable length, since it was necessary to protect the rider from impact weapons from the legs to the shoulders. On the mentioned carpet from Bayeux, the shape of the shields of cavalrymen and infantrymen does not differ. They suit both. The infantry stand in dense rows so that their long shields, overlapping each other, form a solid wall that protects from arrows.
It was at this time that armor improved significantly. This significant result, learned from the experience of the Crusades, was the reason that during the 13th century the cavalry shield gradually became shorter. It now covered the rider from hip to chin. The side edges remained strongly curved, but the upper edge was made more and more horizontal, because previously it served to protect the face, but now, thanks to the new helmets, this was not so necessary. The shield became more and more flat, the umbons and overlays gradually disappeared.
Norman shield
It is curious (Beheim) that infantry shields before the 13th and even before the 14th century differed very little from cavalry shields. The reason for this is that the infantry was given little importance in the war and therefore it was not considered necessary to think about its special needs. This is how the infantryman used the cavalry shield, although in its shape it was designed for protection while riding. On foot, the triangular shield clearly did not cover the person enough. Only when the cavalry shield was so reduced that it became completely unusable for infantry was the difference in armament felt. The infantry retained the old long almond-shaped shields, which the cavalry abandoned.
From about 1300, the technical improvement of armor again made significant progress, and the cavalry shield became even less important. It becomes a small triangular tarch (German: Tartsche, French: petit écu) with straight edges, which more or less covered half the chest and left shoulder. The name “tarch” comes from the Arabic “dárake”, from which the Italian “targa” is derived, as the small rounded shield was initially called.
Towards the end of the 14th and 15th centuries, the form of tarchs underwent changes, but rather not of a military-technical, but of a stylistic nature. They become semicircular from below, sometimes, as in England and Northern France, quadrangular, almost square.
Since and equip it accordingly has become increasingly noticeable These aspirations led again to the most ancient infantry defensive formations, which were used with great success by the Romans and were often used in the early Middle Ages in Germany. The technique consisted of creating a solid wall of shields placed tightly one to the other , behind which the warriors took cover and could use their ancient weapons.
Depiction of the use of shields by infantry 1553-1556. Reliefs on the Sarcophagus of Maximilian I. Hofkirche. Innsbruck. Austria.
For such purposes, a new type of shield has appeared, originating from the tarch shield - a standing shield (German Setzschild) , or a large pavese (German große Pavese) .
The shape of these pavezas is generally a quadrangle. In the center there is a vertical groove, hollow inside, which ends at the upper end with a protrusion protruding forward (Fig. 183). Leather carrying straps were attached inside, below which there was a handle. In some foot detachments of the German army at the beginning of the 15th century, instead of paveuses [139], they used the best protecting, but difficult to transport, assault walls or assault shields (German: Sturmwande) , which have been preserved to this day in the Maritime Museum. Often such shields had a viewing slit or eye hole at the top and were equipped with iron spikes at the bottom.
If the large paveza was an effective weapon in defense, then there was inevitably a desire to provide the same effective protection to the attacking infantryman. a manual pavese arises (German: Handschild, kleine Pavese). It is mostly quadrangular, tapering downward and has a characteristic groove, the corners of which are sometimes rounded. The oldest of these shields have a groove with sharpened edges.
Already in the 11th century, horsemen sought to free their left hand from holding the shield so that they could control the horse. This led to the fact that the tarch began to be hung around the neck and the chest was completely closed. This kind of tarch, although there are some made of iron, was mostly made of wood and covered with leather; they are quadrangular in shape, with rounded corners, and have a sharply protruding rib in the middle. In order not to interfere with the rider's use of the spear, they had a deep recess on the right, into which the spear shaft was placed.
A special type of tarch was used in Hungary in the 15th century. These are trapezoidal shields, convex, so that they are pressed to the chest and cover the left side of the body. These tarchs found use not only in Hungary, but also in other countries that were to one degree or another under the influence of the East: in Poland and Muscovy. Apparently, such cavalry shields were also worn by the horsemen of King Mateusz Corvinus (1440-1490) and the Hungarian guard of Maximilian I. Some examples of such tarchs are still preserved in the Imperial collections of Vienna (Fig. 189). Where the Hungarians came into contact with the Germans, there was a tendency to combine the advantages of the German shields with the Eastern ones. Here the Tarchi keep a notch on the right side for the shaft of a spear. But in the middle of the 15th century, “Hungarian tarchs” .
Hungarian tarch
Hungarian tarch, among the troops of the Grand Duchy of Lithuania and the Kingdom of Poland during the Battle of Orsha in 1514
Hungarian tarch, among the troops of the Grand Duchy of Lithuania and the Kingdom of Poland during the battle of Orsha in 1514 Hungarian tarch, among the troops of the Grand Duchy of Lithuania and the Kingdom of Poland during the battle of Orsha in 1514
Another form of the eastern shield, adargue (Spanish adargue from Arabic dárake, like “tarch”), in the 13th and 14th centuries from the Moors came to the Spanish troops and further to France, Italy and even to England, where it remained in use until XV century. The old Moorish adagra was made of strong, tough leather, oval, in the shape of a heart or two cut ovals. They wore it on a belt over the right shoulder, and on the left they held it by the fist handle. These excellent shields were made in Fez and were used until the end of the 17th century by cavalrymen armed with lances in Oran, Melil, Ceuta and further along the coast of Granada. Their images can be seen on the frescoes of the Alhambra.
Adarga
Let us mention two forms of the shield of the 14th and 15th centuries, which were not intended for use in battle. This is the "old" fencing shield (German: Fechtschild), which was common in fencing schools. These very long and narrow shields were made of wood, covered with leather and painted. In the middle of such a shield there was a high rib, hollow inside, and along it there was an iron reinforcing rod. Long iron points with or without irreversible hooks protruded from the top and bottom of the shield. The total length of the shield was 2.5 meters. This form of shield is Italian in origin, like all fencing art of the Middle Ages.
"old" fencing shield
Further, there are a lot of options for shields, including fist ones, but I think we will move this topic to another article.
Added , dimensions of the shield are “tarch” or “ecu”, based on materials from the Terra Teutonica group 1360-1440
1st shield: height 86 cm, dated 1250
2nd shield: height 62 cm, dated 1300
3rd shield: height 60 cm, dated 1350
4th shield: height 82 cm, dated 1250-1300.
Added: Option for reconstructing the belt system of the knight's shield.
Reconstruction of the shield of a mounted warrior, Germany, 1190.
Option for reconstructing the belt system of a knight's shield
Additionally:
Rondash trench or lantern shield
Buy a knight's shield from workshop artisans
Automation panel (ASB)
This device will be responsible for monitoring complex systems. All elements here will be managed automatically.
Automation mounting panel
The automation panel can be equipped with many sensors and controllers that will monitor various indicators. Based on these indicators, the device can independently turn off and turn on individual systems. The device can be used for a variety of tasks. In this case, in each individual case, various models of shields can be used. For example, if you use a boiler for a boiler, it can also be used for a ventilation system.
Control panel (control panel)
This type of electrical panels is most often installed in industrial enterprises. Unlike its younger brothers, the control panel has a complex structure and is used for a variety of purposes (control of the ventilation system, remote control of the electric motor). Depending on the purpose, this type of shields does not have a specific standard size. As a rule, this is a cabinet of impressive dimensions with many switches inside.
Group and tree layout
The following two types of arrangement of devices inside the switchboard make the operation and maintenance of the switchboard more convenient.
I discussed them in detail in the video, which you can watch below.
The three options for switchboard layout considered are used both individually and in combination. They allow you to logically organize devices inside the switchboard and are easy to maintain and operate by unqualified personnel - owners of apartments and houses.
Distribution board. Internal layout of devices during assembly
I also recommend reading
Mounting options
An important classification feature is the location of the switchboard. Based on the installation method, it can be:
- External (overhead). This is the most common model, optimally suited for laying hidden and outdoor electrical wiring in wooden premises (houses, bathhouses). It is made of plastic or metal, has considerable dimensions, and therefore requires a certain space for installation.
- Built-in. It is mounted flush with the wall, does not stick out, and therefore has a more aesthetic appearance. The flange on the front side of the device makes the technological joint invisible. It is used in cases where the number of modules on the panel significantly exceeds the number of outlet lines.
Another option for installing a distribution panel - floor-mounted - is used extremely rarely in everyday life. The reason for this rare use is the very large size of the device, which makes it inconvenient to use at home. More suitable for industrial plants with high current loads.
Regardless of the installation method, the place where the electrical panel will be located must meet established standards. It should be well lit (preferably with natural light) and ventilated. The location of flammable and explosive substances near the device is unacceptable. Specialists servicing the electrical panel must have easy access to it at all times. Compliance with these requirements guarantees the safe and efficient operation of distribution equipment.
What types of electrical panels are there?
The panels differ primarily in the installation method. The most commonly used are wall-mounted and wall-mounted options ; in addition, shields installed in niches are becoming increasingly popular.
As for materials, recently they often combine metal with plastic, since such devices are the most functional, but sometimes shields are made exclusively of plastic or only of metal.
8000 items of NKU
24 months
guarantee
3 cities
representative
Leave a request for a calculation of the project, specification or technical assignment
Didn't find the model on the site? We will definitely help. Submit a request for calculation of your scheme!
No. 1. Why do you need a distribution board?
Electrical installation work in apartments, offices, garages and production facilities is not complete without installing a distribution board. Why is it needed, because previously many were content with distribution boxes alone? It's all about convenience and safety. If you continue to use only distribution boxes, then, for example, when replacing an outlet you will have to de-energize the entire apartment, and when connecting some powerful electrical appliances you will have to equip them with their own protective devices, and they also need space.
Installing distribution boards prevents the risk of electrical appliances burning out. Thanks to the shield, electricity is distributed evenly across all channels, eliminating excessive current flow through one of them
This device is especially important for large premises where huge loads occur, and for residential buildings, distribution boards are also necessary, given how many electrical appliances people use at home today
The distribution board is triggered not only when excessive voltage occurs, but also saves a person from electric shock.
What applies to the self-needs shield?
In-house needs include: heating and cooling systems for equipment, power supply for on-load tap-changers of power transformers, equipment control circuits, lighting, space heating, etc.
Switchboard - DC switchboard. Used in electrical installations of stations, substations, enterprises for receiving and distributing DC circuits. Direct current electrical energy is received from batteries, special charging units, and rectifier units.
Shields type ShchMP-01 are models with a mounting panel. Due to their small overall dimensions, they can be installed in a niche on the floor or in an apartment; they can also be used as an outdoor one for a summer house or private home. This wall-mounted electrical panel has a very high class of protection against the negative influence of the external environment. Additional equipment includes a special zip lock that will protect the device from penetration.
Their analogue is ShchRNM-2 - this is a hinged (external, street) panel with a mounting panel. The key difference from the model above is the ability to remove the mounting panels to install other automation. The high protection class IP-54 allows them to be installed on the walls of a building. The door is secured with a lock.
If you need to install a distribution board for installing smart home components, it is recommended to use a plastic low-current board of the Volta type. It is designed for 17 modules, the model has a built-in 4-row panel equipped with switches for controlling the “smart house” system.
ShchRN-12 – mounted distribution board ShchRN12 (internal), equipped with 12 modules. There are models on sale with a number of modules from 9. This is an ideal option for protecting a garage or cottage from power surges. Type - three-phase, rated voltage and current frequency - 380/70.
Mounted or built-in shield? Classification by method and location of installation
Main function
All protective and distribution electrical equipment is usually placed in special panels. Previously, their role was played by distribution boxes, but their use was not always convenient. For example, when repairing and installing a regular outlet, it was necessary to turn off the electricity in the entire house, and when installing powerful appliances, they had to be equipped with additional protective devices that had to be placed somewhere.
With the help of an electrical panel, it was possible to get rid of such inconveniences, as well as minimize the risk of burning electrical equipment. Thanks to the design features of the device, the energy passing through it does not flow in excess through one of the channels, but is evenly distributed over all
This scheme is of particular importance for residential buildings where a large number of household electrical devices are used.
What is an electrical panel?
This is a steel or plastic box in which equipment for inputting, accounting for quantity and distributing electrical energy consumption among sources is mounted. This is a necessary and mandatory attribute of the energy network. Another function of the metering and distribution board (MAB) is to protect operating personnel and equipment, as well as ensure safety from:
- threats of electric shock;
- fire caused by ignition of wires;
- short circuit in the electrical circuit.
What does an electrical panel consist of?
The device kit consists of standardized instruments, fastening devices and other parts. The electrical distribution panel consists of:
- mounting base (back wall of the panel);
- casing with lid (easily installed on the base);
- DIN rails (equipment is mounted on them);
- upper and lower insulators for zero busbars;
- input load switch;
- electricity meter;
- voltage relay;
- automatic circuit breaker (RCD);
- differential switch;
- blue (cyan) neutral wire;
- yellow-green protective ground wire;
- power phase wires (any other color);
- sockets
Features of metal distribution boards
A low-voltage installation used to provide electricity to all or part of a specific building is the main distribution board. Its presence is necessary at any facilities (enterprises or residential buildings), transformer substations.
It is located at special facilities where electricity is distributed and outgoing power lines are protected from unforeseen various situations, such as overloads or short circuits, and the automatic entry (if necessary) of a reserve. On its basis, an electricity consumption metering unit is installed.
The main purpose of the ASU is to receive incoming electricity, then distribute it among users of this energy, record its use and protect against emergency situations.
This unit is a complex of devices that are placed in a metal cabinet with removable panels of control and measuring instruments. This makes it possible to rationally use the material. Such devices differ in purpose and are divided into:
- purely introductory panels;
- distribution panels (distributed at consumer points);
- combined - devices that perform all three functions.
The ATS provides the ability to automatically switch power from the main input to a backup source in the event that the network voltage drops. The switching time is specified in advance (interval from 0.1 to 30 seconds).
This device is mainly used to power consumers of the first category (public, industrial and domestic premises).
Installation and device requirements
Electrical panel door grounding
The purpose of installing an electrical switchboard is to ensure electrical safety, therefore, when selecting and installing it, you need to pay attention to the requirements of GOST 51778-2001 and PUE:
- The product must be accompanied by documents with a detailed description and rated current;
- an electrical safety sign with a voltage limit is applied to the housing;
- a high-quality shield is made of non-flammable materials - heat-resistant plastic or metal with a polymer coating;
- Cables for connecting household appliances must be marked;
- the designation of busbars, grounding and neutral terminal blocks is carried out in accordance with the PUE standards;
- the doors and body of the electrical panel must be grounded;
- there are special places on the doors for installing seals;
- To protect against child access, a lock is placed on the shield.
Installation of electrical panel equipment is carried out near the entrance door of the apartment in a special niche. If it is impossible to arrange it, an external box is attached to the wall or the wall is tapped. The device is placed at a height of 1.5 m from the floor line. The row of top machines should be at eye level. In wooden buildings, mounted models with good dust and moisture resistance are preferred.
Stages of work
Pay attention to the installation height of the switchboard (to make it convenient to operate), its dimensions (for the size of the niche), as well as the material from which the wall is made (this is necessary for the correct selection of tools). Then we will work with the wires - adjust them to length, remove excess insulation. We will install the electrical panel, stretch the prepared wires and carry out the wiring.
Don't forget to connect the security device. When working, be sure to follow safety precautions. Give preference to shields with a transparent door, this makes it easier to monitor the condition of the machines.
Types of distribution equipment
For industrial and domestic needs, different types of electrical panels are used. Depending on the size of the area that needs to be secured, they are:
- The main ones. They have large dimensions, so they are well suited for large industries and transformer substations. They provide reliable energy supply to the entire facility, guaranteeing its protection from short circuits and overloads. They can automatically switch from the main power mode to the backup power mode.
- Introductory. They are installed in places where power cables enter multi-storey buildings, large office centers, and industrial premises. Effectively separates the supply lines of panels located on floors and in apartments.
- Storey. Most often they are installed in administrative buildings or residential buildings to distribute electricity to several apartments. They provide space for placing modular automatic devices and electricity meters.
- Apartment. They are attached to the place where the cable enters the apartment (in the hallway, vestibule, near the front door). They perform the function of protection against overloads and short circuits, distribution of group power lines and energy metering.
A special category is the electrical distribution panel, designed for the safe transfer of consumers from the main power source to a backup one in the event of an emergency. Called an emergency transfer switchboard, it is used in special cases for uninterrupted power supply (in hospitals, schools, etc.). Shields are also divided into separate categories:
- Lighting. Necessary in rare cases of turning on and off automation.
- Management. They control the operation of heating systems, ventilation and alarm systems in large shopping centers.
- Automation. They control the software equipment of various electronic systems.
https://youtube.com/watch?v=7sz6sf-gUPg
Lighting board (SHB)
As the name suggests, this type of panel is designed to control lighting fixtures. Such devices are very often used in large non-residential buildings. Examples include shopping centers, food hypermarkets, production workshops, office centers, etc. To greatly simplify it, a lighting panel is an analogue of a regular switch, and in most cases it is used for the same purposes. Just like in any other type of panel, fuses and power meters can be installed in the SCHO. The most common model in this category is a recessed lighting panel with a switch (UOSCHV) - a box built into the wall that can be easily disguised.
Which shield to choose?
The main distribution board, which can be purchased at the store, is a high-quality power unit with high voltage. It is essentially a simple mechanical/electronic system used primarily to provide electrical power to all available space.
An input-distribution device is a whole complex of many different components used for metering, as well as rapid reception of electricity. It is almost always made in a metal case, and its panels can easily replace each other.
Models of metal distribution boards are devices that are also used in factories and in homes for the correct distribution of electricity. Thanks to their work, you can protect yourself not only from overcurrents, but also from short circuits dangerous to life and health.
Automatic transfer of reserve - all devices of this type work flawlessly when it is necessary to transfer to a certain additional power source from the main one in cases where the voltage in the house drops or any emergency situation arises. Also, the premises are always safe from possible overloads.
Input switchgear (IDU)
This shield is a device containing devices for protecting outgoing load lines, devices for measuring and accounting for general house electricity, which can also include relatively simple automation. The main supply cable to the ASU, as a rule, comes from the main switchboard, and already inside the input switchgear itself, the electricity is distributed along outgoing lines, each of which has its own purpose. Typically, ASUs are installed at the entrance to residential buildings and public buildings, as well as in the workshops of industrial enterprises or factories. The place where ASUs are installed in residential and public buildings is most often the basement. Next, along lines protected by circuit breakers or fuses, the electricity is sent to electrical panels, which we will look at below.
Construction of a floor panel in an apartment building
The vast majority of electrical panels on floors are not locked and pose a serious risk of electric shock to residents, as well as a fire risk for the entire house. Misfortune can await residents even during inspection.
In the photo you can see some of the horrors of the internal structure of the floor panel. Practice shows that energy companies and management enterprises do not care about the technical condition of distribution boards.
These businesses are unwilling to do any major repairs or maintenance. The maximum that the residents of the house can count on is the replacement of the main cables running from the input panel in the basement of the building to the upper floor.
If wires burn out in the panel or electrical devices fail, you can count on the arrival of electricians on duty. They will replace failed devices or conductors in the floor panel diagram, but you cannot expect high-quality repairs from them.
The purpose of this article is to draw the attention of residents to their floor panels and the condition in which they are located. Most of them require immediate major repairs.
Don’t be lazy to go out to the site and look into them.
Switchboards located on landings usually consist of three compartments: subscriber, distribution and low-current compartments. Structurally, each compartment has its own door, and on the front side there are viewing windows for taking meter readings. A diagram of the floor panel should be marked on the door of the distribution compartment so that the electrician from the housing and communal services can understand what goes where. But as a rule, this is not always observed.
Electricity meters are located in the distribution compartment of the floor panel. And as in our case, batch switches. Automatic switches on a DIN rail are installed in the subscriber compartment. In order to turn off the machine or check its position, just open the door of this compartment (you do not need to open the entire panel).
The low-current compartment of the floor panel is located separately from the power section. It houses telephone and radio communication cables, Internet, intercom, security alarm, etc.
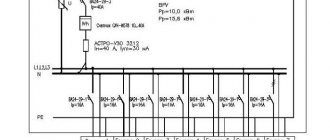
Basic standards defining conventional images on electrical wiring diagrams
Everything related to electrical engineering, electrical engineering, etc. is standardized by regulations of the International Electrotechnical Commission, IEC (International Electronic Commission, IEC).
The symbols on the diagrams are regulated by the IEC standard IEC 60027.
In the Russian Federation, symbols on diagrams are standardized by GOST 21.614-88 “Conventional graphic images of electrical equipment and wiring on plans”, from the section “Design documentation system for construction”. This standard came into force on 07/01/88 and completely replaced the now defunct GOST 2.754-72.
Also in the GOST section “Unified system of design documentation”, in GOST 2.721-74 “Conventional graphic symbols in diagrams. Designations for general use”, symbols for all products, including electrical ones, have been standardized.
The differences between these two standards are as follows. If you have to read a diagram, for example, of an input distribution device or an electrical panel diagram, then the symbols in these diagrams correspond to the GOST 2.721-74 standard.
The electrical wiring diagram in an apartment or house will be made according to the symbols of GOST 21.614-88. By the way, only this GOST standardizes the symbols of sockets, switches and other electrical installation equipment.
Assembly diagram of a distribution panel in an apartment
If you live in an old apartment that has only one room, then this diagram may look like the one below:
In this wiring diagram for the distribution panel there is no PE bus. It is missing due to the fact that old apartments simply do not have grounding. The diagram of this shield consists of the following elements:
- A circuit breaker that has two poles.
- Electricity meter.
- RCD.
- Group "packers".
The three machines shown in the diagram will serve separate groups. If your apartment has a ground loop, then the electrical diagram for assembling the distribution board in the apartment will look like this:
Now we need to look at this diagram in detail:
- Distribution box housing.
- Zero bus.
- Grounding bus.
- Comb for connecting switches.
- Single-phase RCD.
The bottom row of this photo shows all the items that will be served by this shield.
Sometimes you can also find spacious apartments. In this case, the electrical circuit of the input distribution panel will be more serious. Below is a diagram of the distribution board for an apartment with an improved layout.
With such a number of electricity consumers, there must be a three-phase network. There should be a 63 Ampere three-pole switch at the input. You will then need to connect a 40 amp RCD. Electrical panel wiring diagrams will help you complete the connection process. After designing your option, you can proceed to the connection. We have already talked about how to install wiring in a new building.
Designation of electrical elements on diagrams
Some experts, after carefully looking at the diagram, can say what it is and how it works. Some can even immediately indicate possible problems that may arise during operation. It’s simple - they know the circuit design and element base well, and are also well versed in the symbols of circuit elements. This skill takes years to develop, but for dummies, it’s important to remember the most common ones first.
Designation of LED, Zener diode, transistor (various types)
Electrical panels, cabinets, boxes
On the power supply diagrams of a house or apartment there will definitely be a designation of an electrical panel or cabinet. In apartments, the terminal device is mainly installed there, since the wiring does not go further. Houses can be designed to install an electrical branch cabinet - if there is a route from it to illuminate other buildings located at some distance from the house - a bathhouse, a summer kitchen, a guest house. These other symbols are in the next picture.
Designation of electrical elements on diagrams: cabinets, panels, consoles
If we talk about images of the “filling” of electrical panels, it is also standardized. There are symbols for RCDs, circuit breakers, buttons, current and voltage transformers and some other elements. They are shown in the following table (the table has two pages, scroll by clicking on the word “Next”)
| Number | Name | Image on the diagram |
| 1 | Circuit breaker (automatic) | |
| 2 | Switch (load switch) | |
| 3 | Thermal relay (overheat protection) | |
| 4 | RCD (residual current device) | |
| 5 | Differential automatic (difavtomat) | |
| 6 | Fuse | |
| 7 | Switch (switch) with fuse | |
| 8 | Circuit breaker with built-in thermal relay (for motor protection) | |
| 9 | Current transformer | |
| 10 | Voltage transformer | |
| 11 | Electricity meter | |
| 12 | A frequency converter | |
| 13 | Button with automatic opening of contacts after pressing | |
| 14 | Button with contact opening when pressed again | |
| 15 | A button with a special switch to turn off (stop, for example) |
Element base for electrical wiring diagrams
When drawing up or reading a diagram, the designations of wires, terminals, grounding, zero, etc. are also useful. This is what a novice electrician simply needs, or in order to understand what is shown in the drawing and in what sequence its elements are connected.
| Number | Name | Designation of electrical elements on diagrams |
| 1 | Phase conductor | |
| 2 | Neutral (zero working) N | |
| 3 | Protective conductor (ground) PE | |
| 4 | Combined protective and neutral conductors PEN | |
| 5 | Electrical communication line, buses | |
| 6 | Bus (if it needs to be allocated) | |
| 7 | Busbar taps (made by soldering) |
An example of the use of the above graphic images is in the following diagram. Thanks to the letter designations, everything is clear even without graphics, but duplication of information in diagrams has never been superfluous.
An example of a power supply diagram and a graphic representation of the wires on it
Picture of sockets
The wiring diagram should indicate the installation locations of sockets and switches. There are many types of sockets - 220 V, 380 V, hidden and open installation types, with a different number of “seats”, waterproof, etc. To give a designation for each is too long and unnecessary. It is important to remember how the main groups are depicted, and the number of contact groups is determined by the strokes.
Designation of sockets in the drawings
Sockets for a single-phase 220 V network are indicated on the diagrams in the form of a semicircle with one or more segments sticking up. The number of segments is the number of sockets on one body (illustration in the photo below). If only one plug can be plugged into the socket, one segment is drawn upward, if two, two, etc.
Symbols for sockets in electrical diagrams
If you look at the images closely, notice that the symbolic image that is on the right does not have a horizontal line that separates the two parts of the icon. This line indicates that the socket is concealed, that is, it is necessary to make a hole in the wall for it, install a socket box, etc. The option on the right is for open mounting. A non-conductive substrate is attached to the wall, and the socket itself is on it.
Also note that the bottom of the left diagram has a vertical line through it. This indicates the presence of a protective contact to which grounding is connected. Installing sockets with grounding is mandatory when turning on complex household appliances such as a washing machine, dishwasher, oven, etc.
Designation of a three-phase outlet in the drawings
The symbol of a three-phase outlet (380 V) cannot be confused with anything. The number of segments sticking up is equal to the number of conductors that are connected to this device - three phases, zero and ground. Total five.
It happens that the lower part of the image is painted black (dark). This means that the outlet is waterproof. These are placed outdoors, in rooms with high humidity (baths, swimming pools, etc.).
Switch Display
The schematic designation of switches looks like a small circle with one or more L- or T-shaped branches. Taps in the shape of the letter “G” indicate an open-mounted circuit breaker, while those in the shape of the letter “T” indicate a flush-mounted switch. The number of taps displays the number of keys on this device.
Conventional graphic symbols of switches on electrical diagrams
In addition to the usual ones, there may be pass-through switches - to be able to turn on/off one light source from several points. Two letters “G” are added to the same small circle on opposite sides. This is how a single-key pass-through switch is designated.
What does a schematic representation of pass-through switches look like?
Unlike conventional switches, when using two-key models, another bar is added parallel to the top one.
Types of equipment according to GOST
According to legislatively adopted documents, both small boxes for 2 modules and large distribution cabinets-stations belong to distribution panels responsible for connecting electrical groups. The standards can be found in the edition of GOST 32395-2013.
The panels are divided into apartment boxes and floor boxes - according to the place of installation. The next division is into distribution and accounting and distribution. The latter differ in the installation of the counter.
Thus, two broad categories can be distinguished:
- apartment – group and accounting-group;
- floor – distribution, accounting-distribution, accounting-distribution-group.
According to the installation method, all of the listed types can be wall-mounted or built into a specially prepared niche.
If the wall box is simply fixed with dowels on the wall or partition, then for the built-in box it is necessary to cut or hollow out a niche of a certain depth
Distribution boxes are protected from electric shock. According to this indicator, they can belong to class I or II.
Some floor products are equipped with special compartments for low-current equipment. Apartment boxes come with or without an input device, designed for single-phase or three-phase circuits.
How to open an electrical panel?
When operating a ShchUR, the problem of penetration into the device often arises. In such cases, the question arises of how to open the electrical panel without a key. The opening procedure is as follows (it should be remembered that independent penetration is fraught with dangerous consequences):
- Carefully inspect the lock and determine its type.
- If the locking device is of the tongue type, then you can press the door with a pry bar and lift or move the tongue with a metal plate.
- If the lock has English type inserts, then it can be opened with a flat screwdriver.
- If the lock is padlocked, then you can have a snack or saw through the shackle. However, the locking device will need to be replaced.
- If the electrical panel has lugs mounted on self-tapping screws, they can be cut off.
Basic criteria for choosing a box
The main task of the consumer is to find a durable, practical box that will withstand long-term service in outdoor conditions. The box should be convenient for installation and operation.
What is important about the design itself? The presence of holes of the appropriate diameter for the wires that come from the support and lead out to the building. It is desirable that these elements have rubber seals and plastic couplings
The electrical panel must accommodate all necessary outgoing cables and additionally leave space for upgrading or expanding the installation
A convenient detail is the window. It eliminates the need to open the visor to take readings and reduces the frequency of contact of the internal contents with air and moisture
Pay attention to the sealing tabs
Another important point is the degree of protection from dust and humidity. It is determined by the IP index and the number next to it
The IP20 index means that the box is protected from dust particles larger than 12.5 mm, but is vulnerable to moisture. The IP65 protection degree guarantees complete isolation from these negative factors. The higher the number, the more expensive the design. The optimal option is with a score of 54.
When choosing an electrical panel, you also need to look at the thickness of its walls, operating temperature range, number of doors, and type of lock. The box can be locked with one individual key or equipped with several identical ones.
Expert advice on selection and assembly
Taking into account the listed and other characteristics, choosing a suitable box even for setting up a network in a small apartment is not such a simple matter.
It is better to consult with a qualified electrician and, at a minimum, order a professional wiring project. Based on the diagram, you can assemble the electrical box.
Every little detail is important in the design of the future shield. As an example - ABB apartment box.
This is a box that is most suitable for installing machines without purchasing additional parts. It costs more than a metal box without tires and frame, but is much more convenient to install and use.
The base of the case even has squeeze-out wiring hatches and small grooves for more convenient distribution of conductors inside the box.
For installation into the wall, dowels are used, and the gaps between the niche and the frame are covered with plaster or plaster. If the frame with slats is removable, then all work on installing the housing can be done together with construction activities for finishing the wall, and assembling the box can be done later.
Experienced craftsmen advise not to skimp on electrical equipment that will last for decades, but to buy a durable, reliable, safe box that meets the standards
We recommend paying attention to the products of brands that have long proven themselves on the Russian market: ABB, Legrand, Viko, IEK, Makel, Schneider Electric
Types of electrical panels
They differ in purpose, installation method, and material. Depending on the purpose of application, they are divided into:
- Main distribution board
(MSB). Serves for input and metering of energy into a large object (group). Receives energy from power lines, transformer stations or individual transformers. - Input switchgear
(ISU). It can perform similar functions of the main switchboard, or serve to further supply power to smaller objects. Measuring instruments that monitor current parameters are additionally installed in it. - Emergency commissioning of reserve
. This electrical panel automatically switches to backup power sources in the event of an emergency. The latter can be batteries and transformer substations. - Floor electrical panel
(SHB). Installed on the floors of buildings in specially designated areas. Carries the functions of further distribution of energy throughout the floor. - Apartment panel
(AS). Can be installed both inside apartments and on the floor. This electrical panel is responsible for powering residential areas, accounting for electricity consumption and protecting against the negative effects of electric current. - Lighting board
. It is used as a separate device to provide on/off functions for lighting devices. - Control and automation panels
. The panel for electrical circuit breakers is mainly used in electrical installations, power plants, and substations. Often control and automation functions are combined.
Mounted electrical panel
Manufactured in various depths (side wall width). They are designed for installation on a wall, a special device or a support. For the manufacture of a non-separable body, sheet steel 1 mm thick is used. The rigidity of the structure ensures reliable installation of the equipment. An apartment electrical panel can be made of plastic and have a collapsible body, consisting of a rear wall (mounting base) and a casing with a lid. They are connected to each other with special fasteners. When the cabinet height is up to 800 mm, the panels are equipped with one lock, above - two.
Built-in electrical panel
Designed for installation deep into the wall. Comprises:
- body made of steel 1 mm thick;
- steel mask with a door hung on it.
The housing has technological holes for wall mounting. Powder painting is carried out in an electrostatic field. To install internal equipment, mounting panels or modular systems are used. The electrical panel in an apartment of this type has the ability to change the door opening. The generally accepted wall installation depth is 120 mm. Internal protection degree IP31.
Floor electrical panel
Can serve as a main board for power input and distribution. A welded frame made of 2 mm thick steel provides rigidity to the structure. The filling consists of removable components and assemblies assembled linearly. It can have either one or two doors. The locking device can block the door in 4 places. At the installation site it is mounted on a special base. An electrical panel in a private house, located outdoors, is equipped with increased protection from the influence of the external environment, type IP55, 65.
Classification by method and location of installation
There is a mounted and built-in distribution board. It's better to stick with the first option. It will be quite difficult to catch such a box or electrical panels and damage them during repair work. The ShchRN shield is often mounted in a wall niche. The equipment is classified as ShchRV. The structures can be of any size.
Electrical distribution boards according to the type of installation are:
- Invoices. They are attached to any vertical surface of the building. The peculiarity of this ShchR is that it is not hidden inside the wall, but is located on its surface. Such a distribution device must have a protective box in order to avoid damage to the equipment. The abbreviated name is shield ShchRN or ShchRV.
- Built-in. Electrical distribution boards are installed in pre-prepared niches. The equipment cover remains visible, and the shield itself is securely hidden inside the wall.
- Floor-standing. As the name suggests, this switchgear is mounted on the floor of the room. Sometimes installation is carried out on a floor stand, the height and width of which varies over a wide range.
- A portable electrical switchboard is a mobile device. Easy to transport from site to site.
According to the location where installation is carried out, electrical distribution boards are divided into external and internal. Equipment that is installed outdoors has additional protection from precipitation, wind, humidity, low or high temperatures. This is the only way an electric street one will work correctly.
Price
Mounted types of panels are inexpensive. Their cost can be about 700 rubles. These are panels for apartments, in which there is no possibility of expanding switching. But the most popular today are built-in structures. Their cost is only 1,500 rubles. They are popular among modern consumers, since, thanks to built-in structures, you can significantly save space in the room.
Proper distribution of electrical energy has always been a critical task. The efficiency of energy consumption, as well as the stability of the power supply to consumers, will depend on it. The range of household devices is constantly growing and increasing. You should only trust the installation of panels to specialists, as they have the necessary experience and will be able to make all the connections correctly.
We recommend reading:
Electrical panel design
Designing an electrical panel's electrical circuit is entirely dependent on all the building's wiring. That is, it is she who predetermines the number of automatic protective switches, their type, parameters, as well as other elements and their properties.
Since in each individual case there are a number of specific features, we will not dwell on the development of a schematic diagram, but will only consider the main, general structural elements.
First of all, a switchboard for a private home can be made of metal or plastic. Recently, plastic structures have become increasingly popular; they have an attractive appearance, lower weight and price, but the metal structure is more reliable, lasts longer and can withstand greater mechanical loads. The choice is yours.
The housing can be structurally built into a niche previously prepared in the wall, as well as installed directly on it.
Built-in structures are more convenient when installing hidden wiring, they take up less space, do not stand out externally, look aesthetically pleasing and fit harmoniously into the space. However, their installation and installation is much more complicated.
The internal structure of the electrical panel consists of the following main components:
- A special DIN rail; all circuit breakers and other control and protection devices are installed on it;
- A special kind of distribution current-carrying busbars for the neutral and pinch wires. The ground bus is designated “PE”, and the zero bus is designated “N”;
- Automatic switches, residual current devices and other automation and control devices, for example: lighting, hood, etc.;
- Electricity consumption meter;
- Wires connecting all elements of the electrical panel into a single circuit.
In some cases, for example in apartments, there may not be a meter in the electrical panel, and in addition, other, not specified, automation and control units may be installed. Fastening and installation of additional elements must be done in accordance with the instructions for these devices, which are supplied with them.
Switchboard installation process
This procedure is best carried out with an experienced specialist who will install the shield quickly and efficiently.
Typically the process looks like this:
- Preparatory activities, choice of shield type.
- Making fastenings using nails or self-tapping screws.
- Installation of the switchboard panel.
- Installation of pre-prepared wires.
- Wiring.
- Connecting residual current devices.
The distribution board must be installed in full compliance with safety regulations, since electrical networks are highly dangerous objects.