In this article we will look at two methods of insulating wires using vinyl insulating tape and heat shrink tubing. You will learn how to do it right and wrong, what tools are needed and some “company secrets”.
Situations requiring additional insulation
Insulating wires is usually necessary after making connections between individual lines to ensure safety from electric shock. In this case, the following situations occur when insulating material is needed:
- If a separate section of the cable line’s protective layer is damaged. This will allow you not to replace the entire conductor, but only to insulate the damaged protection layer.
- When located in close proximity to the electrical equipment housing, unprotected current-carrying conductors.
- For marking wires of the same color.
- For bundling separately lying thin wires.
Insulating joints of electrical wires
Insulation materials
Electrical insulating materials will protect a person from current. Examples of such materials:
- dry wood;
- plastic;
- rubber;
- ceramics;
- mica;
- polyvinyl chloride and other polymers.
They will also protect the wire from corrosion and short circuits that occur when the conductive lines of various wires touch. To insulate areas of interconnected wires or exposed wires, use blue electrical tape.
Types of insulating materials and their scope of application
Depending on the planned operating conditions and the type of connection of the conductors, various types of insulation can be used. Let's look at the most popular options.
Insulation tape
Insulating tape is the most affordable and popular way to protect current-carrying conductors. The scope of its application directly depends on the material of manufacture.
Polyvinyl chloride
The tape is available in widths from 10 to 20 mm. Adhesion to the protected surface is ensured by a special adhesive compound applied to the inner surface of the tape. Manufacturers produce products in various colors. The positive basic properties of PVC electrical tape include:
- strength;
- adhesion to many types of surfaces;
- ability to withstand significant temperatures - up to 120 degrees Celsius;
- withstand increased voltage;
- elasticity;
- high level of fire safety;
- resistance to external factors: moisture, alkali, acid.
Insulating the wire with PVC tape
Among the disadvantages, the loss of useful properties when used in subzero temperatures stands out.
PVC insulating tape is widely used in the electrical industry, as well as in everyday life. Electrical tape for wiring with voltage levels up to 1000 Volts can last a long period of time.
Note! If necessary, it is allowed to insulate high-voltage cables. According to the recommended performance indicators, one layer is capable of providing safety at a voltage level of 660 V.
In addition to these cases, the material is actively used for the repair of pipelines, household appliances and packaging of goods.
Types of PVC insulating tape
Cotton
The basis of the product is cotton material with the addition of rubber, on the inside of which an adhesive solution is also applied. Some manufacturers use fiberglass as the base material. Tapes are produced with a width from 15 to 50 mm. Positive characteristics include:
- high strength;
- increased wear resistance;
- thermal stability;
- low cost.
The negative aspects of cotton insulating material include:
- risk of ignition due to overheating;
- liquid absorption.
Fabric insulating tape TESA
The main area of application of CB electrical tape is the protection of electrical wiring with voltage levels up to 1000 Volts. It is recommended to use it exclusively in closed and dry rooms. In electrical installations of higher voltage it is used as an additional means to increase the frost resistance at the junction of conductors.
Types of connections
But before we look at the types of insulating materials and how to use them, let's look at the types of wire connections in everyday life. After all, the type of insulating material largely depends on this factor.
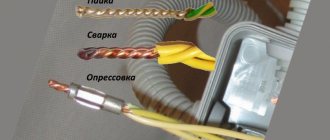
- Most often in everyday life we are faced with the need to connect several wires. But connection is different from connection. After all, according to PUE standards, wires can be connected by welding, soldering, pressing and bolting. Please note that the popular method of twisting wires is not on this list. And this is no coincidence. After all, twisting wires does not guarantee the quality of connections and its reliability during operation.
|
The essence of this method comes down to the fact that the conductive cores of the wire are twisted, and then, using a special welding machine for wires, the ends of this twist are welded into a single whole. The main limiting factor in the use of this method is the price of the welding machine, which, if you are not doing this professionally, you do not need at all. |
|
It has found wide application in low-voltage networks as one of the most reliable and easy-to-implement connections. At the same time, with large cross-sections of wires, this method is practically not applicable. Indeed, with large cross-sections, contact connections can heat up to significant temperatures, which can lead to destruction of the contact connection. |
|
It requires special equipment in the form of sleeves and presses. Of course, for small cross-section wires there are sleeves that can be compressed with ordinary pliers, but they are not widely used. |
|
Special terminals that already have insulation allow you to connect the wires quite reliably. The disadvantage of this method is the increase in the size of the contact connection, and their extremely low protection against moisture penetration. |
Thermal shrink tubes
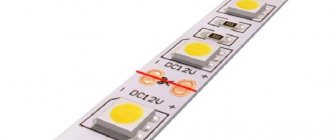
Heat shrinking is a modern and more reliable method of insulating conductors. Heat-shrinkable tubes are available in various diameters and lengths (up to one meter). They are not collapsible and not universal, so they must be selected for a specific conductor diameter. During the installation process, the original cross-section narrows almost in half. This ensures a secure fit to the protected surface.
Special polymers are used to make thermotubes: polyethylene, silicone, and so on. To improve the adhesion performance with current-carrying conductors, hot-melt adhesive is additionally used in the internal cavity of the tube. At the same time, they can be easily used in various climatic conditions, withstanding exposure to aggressive environments.
Heat shrink tubing for wire insulation
The operating temperature range of standard heat shrinks is from - 50 to + 125⁰С, but products are produced that can withstand up to 260⁰С. Thanks to the use of special polymers, manufacturers produce the following types of heat shrinks:
- heat resistant;
- with increased strength;
- semiconductor;
- corrugated;
- fluorescent.
The scope of application of thermotubes is very wide. With their help, cable insulation with voltage values up to 110 kV can be restored.
Computer
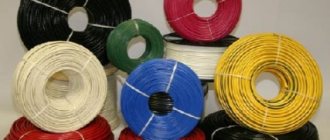
Computer cables and their varieties are manufactured to form computer networks, to connect a PC to the Internet or to connect machines with each other. The modification most known to many experts is twisted pair. It is made from a series of intertwined wires in pairs for efficient signal reception/transmission.
Computer cables
This type of wire is divided into 2 main structural types - copper and optical. The second has the highest throughput and stability with respect to external interference. At the same time, copper “twisted pair” is still more often used for home and office local networks.
Electricity is needed always and everywhere; without it, many appliances and devices that make the life of a modern person more diverse and interesting will not work. The transfer of electrical energy to consumers is carried out using an electric cable, and every competent electrician must be able to know and distinguish between the types of electrical wires and cables.
Liquid insulation coating
Liquid insulation for wires is used to restore the protective layer of conductors that are operated in conditions of high humidity or in direct contact with water. Polyurethane compound is used as an insulating material. It is poured into a pre-prepared coupling through a special bandage. In this case, rubber seals are installed at the ends of the coupling.
Liquid electrical insulation for wires
Errors when insulating wires
When carrying out insulation work, it is important to avoid common mistakes that inexperienced craftsmen often make:
- Absence or insufficient tension of electrical tape. In this case, the dielectric may not adhere well to the conductor. Over time, the quality of such connections decreases. The tape gradually unsticks. Moisture and foreign objects may get inside.
- Apply tape to 1 area, first in one direction, then in the other. The danger here lies in the increased risk of deformation of the protective layer.
- It is prohibited to use tape, plastic bags and other improvised means as insulating materials.
- Use electrical tape for cables located outdoors. Exposure to precipitation and sunlight leads to damage to the integrity of the coating.
Proper insulation of conductors is carried out while observing all safety measures. Installation errors or the use of low-quality materials can lead to emergency situations and cause harm to the life and health of people and pets.
Terminals for isolating wiring connections
The products are a contact part, which is placed in a dielectric housing. Available in the form of pads and caps. Fixation of current-carrying wires can be done with screws or clamps. This option is perfect for forming contact connections in a junction box with your own hands.
Insulated crimp terminal
The disadvantages of the terminal connection include:
- increasing the volume of wiring at the contact point;
- exposure to moisture.
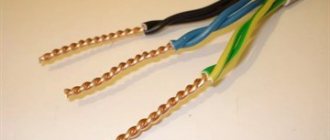
Wire and cable
One or many conductive wires connecting two sections of an electrical circuit are called a wire. They are produced with or without an insulating layer.
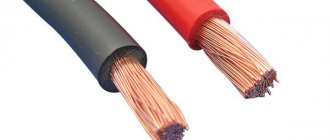
Current-carrying conductor is a segment of a wire through which electric current is passed. Wire is an integral part of the core. The cores consist of one/multiple copper or aluminum wires. Copper and aluminum are metals with high electrical conductivity. If you need a durable wire, then the wire is made of steel.
A wire with flexible conductors with insulation is called a cord. The cord is wrapped in a braid of cotton fabric or lavsan.
Cable - several wires covered with an insulating layer. They are in a hermetically sealed shell made of metal or non-metal.
Cables and wires according to technical purpose are divided into:
- power;
- control;
- telephone and computer;
- installation and other types.
An electrical network is laid using a power cable. To connect the equipment, use installation wires.
Preliminary stage of work
Before you start insulating wires yourself, it is recommended that you carefully familiarize yourself with safety precautions and work rules. This procedure can only be carried out when the power supply is de-energized. However, a disabled machine is not a guarantee of safety. Immediately before starting work, you should check the absence of voltage with a special indicator. In the future, you will need to clean the surface to be treated from dirt, dust, and so on.
De-energize the electrical network before starting work
Isolation using terminals
For this method, special terminals are used, complete with which a dielectric housing is sold. No additional insulation is required since the terminal blocks are already well insulated. It is necessary to follow the instructions and watch the manufacturer's videos to properly insulate the wires at home.
Working with electrical wires is a responsible and dangerous process. Therefore, before you start isolating yourself, carefully study this issue and watch the corresponding video.
If you have doubts about whether you can insulate electrical wires yourself, it is better to leave the job to a professional. Carefully study safety precautions when working with electrical wires.
Useful tips Connection diagrams Principles of operation of devices Main concepts Meters from Energomer Precautions Incandescent lamps Video instructions for the master Testing with a multimeter
Preparation of the treated surface
Not only the service life, but also the safety of operation depends on the quality of preparatory measures at the site where the insulating layer will be applied to the conductor. To remove damaged insulation, it is better to use a specialized tool. This will prevent damage to the protective varnish and the surface of the conductor itself, but its cost is quite high. It is not advisable to purchase such a tool for one-time work.
The following are the most affordable methods for stripping insulation at home:
- It is recommended to use a soldering iron to clean the protective coating of old wiring. After warming up the tool, the required surface is heated until the insulating shell melts. Later it is removed using gloves.
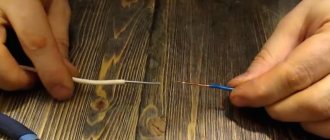
- Removing insulation using a knife with a sharp blade (a stationery knife is recommended). The knife must be held parallel to the current-carrying conductors, preventing it from being raised to a vertical position. After making a longitudinal hole, the insulation is carefully removed and cut off.
Stripping wires from insulation
Preparing to apply insulation
To insulate current-carrying conductors, it is necessary to first carry out a number of preparatory operations:
- turn off the electricity supply;
- remove dirt, oxides and remnants of old insulation;
- prepare tools for work.
To remove the remnants of the old dielectric, you can use a soldering iron. To do this, you need to warm up the desired area until thermal deformation of the protective shell begins. Then the remaining dielectric layer is cleaned off manually. In this case, you must use gloves.
In some cases, you can use a sharp knife. The blade is carefully drawn along the wires, cutting the protective sheath of the cable. Then a longitudinal circular section is made and a fragment of insulation is removed.
If the installation is carried out by a specialist for the first time, it is recommended to first view the video instructions, which are easy to find on YouTube.
The process of using electrical tape to form a protective coating
The procedure for applying the protective layer of electrical tape depends on the type of surface being treated. If you plan to insulate the junction of two conductive wires, it is recommended to adhere to the following sequence:
- Twist and solder.
- The electrical tape is applied at an angle, catching a small portion of the main insulation towards the end of the twist.
- At the next stage, you will need to carefully bend the twist so that it is parallel to the main protective coating.
- Another layer of electrical tape is applied, but this time towards the factory insulation.
- The applied electrical tape is pressed with hand force and the excess material is cut off.
To restore the protective coating on a solid conductor, it is recommended to perform the following steps:
- The tape is laid at an angle, capturing part of the main insulation towards another undamaged area.
- Next, the insulating material is applied in the opposite direction.
- The electrical tape is carefully pressed with your hands, followed by removal of excess material.
How to properly insulate with electrical tape
Suppose you need to isolate fragmented insulation. You don't need to wrap the entire section at once; apply the tape to the cable insulation next to the damaged part of the insulation onto the undamaged section. But before you do this, make sure that the cord is not dusty, damp or dirty (the glue cannot stick in this case).
Consistently moving the insulating tape towards the damage and slightly pulling, wind the tape until you reach the undamaged wire insulation on the other side of the damage.
If the tape is much wider than the frayed area, simply wrap it 3 times in one place so that the damage is in the center.
Insulating tape can be cut efficiently using side cutters, but this is not always possible or affordable.
You can do without tools at all and firmly grasp the selected area on both sides of the area, stretch the electrical tape and eventually tear it. Of course, the edge of a torn ribbon will not be very beautiful, but in many cases it will do.
It is important that the breaks occur quickly. By slowly stretching the tape until it breaks, we will reach the point where the tape will be greatly stretched and even more damaged.
The procedure for forming an insulating coating using heat shrinkage
The process of installing a thermal tube begins by putting it on one of the ends of the wires being connected. Only after this they are twisted. It is recommended to select the size of the heat shrink so that approximately one centimeter of the main insulation is covered.
Subsequently, the insulating tube is pulled over the connected area and heated. To do this, you can use a hair dryer or a lighter. It is recommended to heat from the edges to the center.
Note! The heat shrink should not be allowed to overheat, otherwise it will lose its insulating properties.
Precautionary measures
Before you begin insulating the wires of the electrical network and household appliances, you must make sure that the network is de-energized. It is recommended to turn off the voltage using a special circuit breaker. Next, use a flat screwdriver with an indicator to check the presence of voltage at the output - the place where the work will be carried out.
When performing work, the quality of the materials used matters. If a material is flammable and susceptible to thermal effects, this will inevitably lead to accidents or emergency situations in the future.
All wire connections must be properly insulated. First of all, human safety, reliability of contact, absence of current leakage to the ground and elimination of short circuit depend on this. Several strands (connections) are placed in one distribution box and contact cannot be allowed between them. Also, insulating wire connections protects against the appearance of traces of oxidation and corrosion on the surface of metals. There are several ways to insulate wires, which we will discuss below.
How to insulate wires?
This can be done with:
- heat-shrinkable tube;
- ordinary PVC electrical tape;
- isolated terminals.
1. Insulate wire connections using heat-shrinkable tubing.
Today, heat-shrinkable tubing can be purchased at any radio and electrical goods store, and recently it has become very popular. It is produced in different diameters, is non-toxic, does not support combustion, its operating mode is from -55 0C to +105 0C and the operating voltage is up to 1 kV.
Here you will need an industrial hair dryer to shrink the tube onto the cores. However, it is expensive and many cannot afford it at home. Therefore, they get out of this situation with the help of a lighter.
When connecting wires, it is often necessary to put on heat-shrinkable tubing in advance. Remember this, otherwise you will have to disassemble the connection.
We cut off the tube with a margin so that the free sections protrude from both sides of the exposed part of the wire at least one centimeter.
We put the heat-shrinkable tube on the twist. The photo shows that it is intended for use in networks with voltages up to 600 V and at temperatures up to 125 0C.
Using a hairdryer or lighter, place it in place. That's all - it's fast, reliable and inexpensive.
2. Insulate wire connections using regular PVC insulating tape.
Insulating tape is perhaps the most common material used in insulating twists and other connections. It is available and often inexpensive.
It is worth noting that any electrical tape is not suitable for reliable insulation of wires. Most duct tape sold is only suitable for wrapping around a shovel handle or putter, not for use on electrics.
If your twists are in a distribution box that will be plastered, then spend an extra 100-200 rubles on high-quality and reliable electrical tape, for example, 3M Scotch. One skein should be enough for you. This will allow you to obtain reliable wire insulation and avoid various emergency situations.
How I insulate wires using electrical tape:
I start winding the wires from the standard insulation at a slight angle so that the winding moves towards the end of the twist...
I continue to wind until I go beyond the twist and get an empty tube with a length equal to the width of the insulating tape...
Then I bend this empty section of twisted electrical tape and lay it along the twist in the opposite direction. Then I continue to wind the electrical tape at an angle, but towards the standard wire insulation...
At the final stage, I cut off the excess insulating tape. This method of winding lasts a long time and there are no problems with the appearance of the very tip of the twist being exposed.
3. Insulate wire connections using insulated terminals.
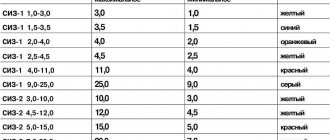
This insulation option involves the use of different connecting terminal blocks that have a dielectric housing. These are ZVI screw clamps, PPE connecting insulating clamps, and Vago universal self-clamping terminals.
If you connect the wires in the junction box using these materials, then you will not have to additionally insulate the connection point. All terminals listed are already well insulated.
Above we explained how and what to insulate the wires with. How do you do this?
Let's smile:
Worker: “I have perfectly studied this lathe, this cutter and electric sharpener. Now I know them like the back of my hand.
General understanding of insulation resistance
The determining indicator that influences the formation of leakage currents and the formation of single-phase or phase-to-phase short circuits of conductors is the insulation resistance. It shows how insulated the conductor is from the ground and neighboring conductors.
Depending on the brand of cable used, standard resistance values are provided. They may vary based on specific climatic conditions. A megger is used to record the readings. In order to identify weak points, the specified value is periodically monitored. The timing of the inspection is established in accordance with the PUE. Extraordinary insulation tests are carried out in the following cases:
- during commissioning;
- after repair work;
- in case of contact with the protective layer of water or when it overheats.
Measuring insulation resistance
For high-quality formation of a protective coating of current-carrying conductors, it is recommended to use appropriate types of insulating material. In this case, be sure to follow safety regulations. For short-term insulation of conductors, you can use tape.
Which electrical tape is best for wiring?
When connecting wires for minor home repairs or when installing electrical wiring, they use insulating tape - an insulating material that has been familiar to electricians for many years. But over time, the classics are replaced by many other devices and materials that have not only similar characteristics, but often surpass them. In this article we will tell you which electrical tape is best for wiring and consider its types.
- Two types of electrical tape
- What kind of electrical tape is best to use at home?
- Wire insulation methods
- Heat shrink tube (sleeve)
- Expensive brand duct tape
- Silicone insulating coating
- Using different terminals
- Temporary insulation with tape
- Insulating wires in a car
- Safety rules at work
- Review of electrical tape manufacturers
- FAQ
- Typical mistakes made by electricians
Insulation of wires of electrical devices
There are several ways to insulate wires in electrical appliances.
Insulating wires with electrical tape
First of all, you need to thoroughly twist all the wires together. If the wire has a large number of cores, it is preferable to simply solder them.
Next, take the insulating material and carefully wrap the entire cable
It is important that you end up with two layers. You should not allow even the smallest part of the wire to remain uninsulated, this will inevitably lead to a short circuit
Heat shrink insulation of wires
Heat shrink for wires
It's easy to insulate wires this way.
But it is important to put on the handset at the moment when all the wires are already securely connected to each other. Preferably used for insulating copper conductors
After all the wires have been connected, a cap is put on the wire, which needs to be warmed up. It is best to use a hair dryer for shrinkage, but if you don’t have one, you can get by with an ordinary lighter. In this case, the heat shrink must be completely tightened on the wire, since the resistance of the insulating layer of the wire will lead to an accident.
Coaxial cable processing
It is quite possible to remove insulation from wires on the coaxial version on your own. Although all the equipment for this procedure is not too expensive, we will show you how to do it with a knife and wire cutters. Typically, such models are used to connect television antennas.
Below is the sequence of actions to clean the coaxial model:
The wire must be taken vertically; Using a utility knife, press firmly on the cable at a right angle at a distance of 2.5 cm from the end. Do not press with the end of the blade, otherwise there is a risk of it breaking and rebounding into your eyes. Next you need to cut through the outer shell, braid, foil and dielectric foam (white). It is precisely these layers that this option has. As you press down on the knife blade, you will feel some resistance. Once the blade has penetrated halfway through the cable, the pressure must be reduced slightly to avoid damaging the central core. Then walk, cutting, around the cable
In this case, it is advisable to do everything carefully so as not to leave nicks on the central core. After trimming, twist and pull the edge. This will remove the cut end. If there are wires under the shell, simply cut them off with wire cutters so that they do not protrude beyond the boundary of the shell
Check for combs on the center core. If they are present, everything will have to be repeated. Dielectric foam may remain on the central core. It is simply removed with a fingernail. To connect the cable to the F connector, you must first remove a small part of the outer sheath. Measure 8 mm from the previous cutting point. Make a cut in the outer shell. Everything is exactly the same as before - perpendicular to the core. Be careful not to remove the braid. However, for connecting some F connectors, removal of the braid is necessary, but for others it is not. As a result, you should get a core in dielectric foam, wrapped in a winding (in the form of foil). When you have not yet decided whether you need braiding, it is better to leave it for a while. It is located around dielectric foam. The braid must be wrapped over the outer shell. After this, the white foam is exposed. Here you need to decide on the type of your F connector and the shape of the exposed wire. Please note that there should be no conductors between the central conductor and the braid. It will be visible. The F connector is placed on the end of the cable. After the connector is seated, the dielectric should not be at its bottom. It is unacceptable that it does not reach the bottom of the connector or peeks out. Please note that the F connector must not be allowed to come into contact with the tip. That's it, the coaxial cable is ready for use.
We recommend reading:
How to correctly draw up a wiring diagram in a house
Application of side cutters
Most novice electricians, when they decide to work with side cutters, do not use them correctly.
So, most often, this tool for removing insulation from wires is picked up at random and no attention is paid to the position of the cutting edges. But, by the way, if you took the side cutters incorrectly, then you will have to apply more force
In addition, there is a high risk of breaking or taking a bite.
The technology for working with side cutters is as follows: direct the cutting edges in the opposite direction to the movement of the tool. This is because with this arrangement the blade will cut even with minimal effort. As a result, you get the sheath removed by the tube and an undamaged wire.
Don't forget about frequencies
Sounds of different frequencies are absorbed by materials of different structures, masses and thicknesses. Lightweight designs, for example, are effective at high frequencies and fail at lower frequencies. Some acoustic panels work well with music, others with speech. This is not easy to understand, since manufacturers usually only indicate the result at operating frequencies. That is, the material can really reduce noise by three times, but not the one needed. Therefore, before you pay money for the material, ask to see the measurement results across the entire spectrum of audible frequencies.
Styrofoam won't help
Another material that has tricked its way into the soundproofing category is polystyrene foam. It, like foam, is light and not elastic, which means it cannot respond to sound vibrations. It is also incapable of absorbing sounds, since it does not allow air to pass through. Don’t be confused by the progressive phrase “extruded polystyrene foam”: from the point of view of combating sounds, this material is no better than its archaic ancestor. For walls, choose mineral wool, and for floating floors, choose fiberglass or polyethylene foam rolls.
And in general, keep in mind: manufacturers of thermal insulation materials sometimes attribute special acoustic qualities to them just for the sake of company. Request supporting documentation. Find data on the sound insulation of airborne noise (Rw), impact noise (Lnw) and sound absorption coefficient (NRC, or “alpha”). If they are not there, there is no need to take risks.
Resistance level
At the same time, we should not forget about possible current leaks that sometimes occur between the external environment and the cable cores. The main task of any isolation is to prevent this from happening. The indicator obtained by measuring the resistance level should characterize the level and quality of insulation. The higher this level, the better protected the cable cores, which are current conductors. Each model has its own designation for this indicator. Such indicators are clearly stated in GOSTs or other technical specifications. Measurements should be carried out at +20⁰С. A megohmmeter is used for this. If measurements are carried out in sub-zero temperatures, the resulting coefficient will be significantly underestimated, and in hot weather it will be overestimated. After the first readings of indicators, they will be entered into a special protocol, which will then be compared with current standards. This will indicate the suitability of the cable for further use. If the received data does not correspond to the obtained indicators, the wiring is completely or partially replaced.