Welding method
For more reliable contact, the connecting wires are welded in the junction box. With this option, the ends of the cores are fused and form a single whole, which is a guarantee of safety and reliability. Solid contacts do not oxidize and welded joints do not weaken over time.
The disadvantage of welding is that you must be able to handle special equipment, or you will have to invite a professional.
Required Tools
In addition to being able to cook, you will need:
- knife (to remove the insulating layer from the cores);
- sandpaper (to clean the surfaces to be joined);
- welding inverter;
- gloves (protect hands during welding);
- goggles or mask (protect eyes during welding work);
- graphite (carbon) electrode;
- flux to protect the melt from air.
Welding joint algorithm
- Remove 70-80 mm of insulation from the cores with a knife.
- Use sandpaper to clean the wires until they are shiny.
- Using the method described above, twist the wires; its length should be at least 50 mm.
- Carefully hook the grounding clamp to the top of the twist.
- Place the electrode at the bottom of the twist, lightly touch it to ignite the arc, and remove it. Welding of wires occurs literally in a few fractions of a second.
- After this, let the welding area cool down and insulate the connection.
Another important question is how many amperes to set on the welding machine? For conductors with a cross section of 1.5 mm2, 30 A of welding current will be sufficient, for 2.5 mm2 - 50 A.
Welding twists in a junction box is clearly shown in this video:
Protecting the soldering area from oxidation. Flux
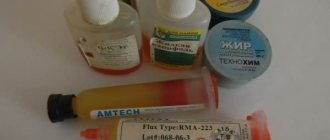
Flux serves to protect the soldering area from oxidation by atmospheric oxygen and the dissolution of thin films of oxides on the surface of the material. The most commonly used fluxes for soldering copper are:
Table of characteristics of the most common fluxes for soldering copper and its alloys
| Flux brand | Compound |
| Rosin | Pine rosin |
| Alcohol rosin | Rosin 30-40%, ethyl alcohol 60-70% |
| LTI-120 | Rosin 20-25%, ethyl alcohol 66-73%, aniline hydrochloride 3-7%, triethanolamine 1-2% |
The simplest, cheapest and win-win option is ordinary rosin. The only difficulty in using it is that it is in a solid state and requires skill when applied to parts to be soldered.
Alcohol rosin is much more convenient to use. It is a solution of rosin in ethyl alcohol. And it looks like a thick yellowish liquid with a peculiar odor. The ease of use lies in the fact that it can be applied to the soldering site with a brush or the twisted conductors can be dipped into a jar of flux.
Activated flux LTI-120 has wider capabilities. When using it, there is no need to strip new conductors. Only those that have a dark color due to surface oxidation need to be cleaned. Since there are certain difficulties in stripping multi-core wires, the use of activated flux is encouraged.
All of the listed fluxes do not require rinsing after soldering, since they are absolutely neutral with respect to the conductor material.
Preparing the connection
Unlike traditional methods of welding workpieces, which involve the formation of a seam joint, welding of conductors inside a junction box is possible only after they are twisted.
Before welding the twist, the ends of each wire must be thoroughly stripped. The outer insulation from the wires should be removed by 7-10 cm, which ensures a convenient length for the twist being formed.
The length of the bare parts obtained after stripping, according to the requirements of the PUE, should be about 5 cm, which eliminates excessive heating and melting of the wires during the welding process.
To better understand the features of welding wires with your own hands, it is advisable to familiarize yourself with the rules for choosing the equipment used. To do this, two important questions need to be considered: what types of welding equipment are applicable in the given conditions, as well as which welding electrodes are optimally suited for the stated purposes.
Advantages and disadvantages
When choosing a device for soldering radio components, you should pay attention to the technical documentation. You should not ignore the advice of a professional, because... Years of experience can help beginners choose the right device. The choice between a ceramic and a conventional device can lead to a dead end; an inexperienced craftsman should familiarize himself with the negative and positive sides of each product. Advantages of copper tips used with soldering iron temperature control equipment:
- the affordable price makes it possible for a novice master to purchase it;
- resistance to mechanical stress allows you to avoid breakdowns of the mechanism when the process has not yet been fully mastered.
Negative sides:
- Copper wire is not known for its durability due to exposure to high heat levels over a long period of time. It is possible to avoid overheating by pausing during the process; the method under consideration keeps even cheap models intact.
- Slow heating of the electrical connection.
Ceramic soldering irons, including a thermostat, have the following advantages:
- the integral system makes it possible to avoid device failure;
- the configured temperature readings are available immediately after connecting to the network, some models heat up in less than a minute;
- reliable unit subject to operating rules.
When using any device you are faced with a number of negative aspects, ceramic products are no exception. A destroyed tip is replaced only with the original one, due to the design features of each model. If dropped, the heating component cracks and loses its working properties.
Selecting the power of the soldering iron
For high-quality soldering you need a fairly powerful soldering iron, at least 65 W. Copper is a very good conductor of heat, so it effectively transfers heat away from the soldering area. A low-power soldering iron will not have time to heat the twisted area before the wire insulation begins to melt, and insufficient heating can lead to so-called “cold soldering.” Weakly heated solder has low fluidity and is not able to evenly cover the entire soldered area. When hardened, it will have a matte, grainy surface and low strength. Conductors soldered in this way will have a high contact resistance and, over time, will lose contact with each other. The soldering iron should warm up the soldering area in no more than 1 minute. The surface of the solder after hardening should be smooth and have a uniform shine.
Completing the soldering iron assembly
Of course, before I attached the cord, I put a handle on it. Next, all that remained was to screw in the body of the soldering iron
into the handle using his improvised carving.
After connecting the handle to the body
the place where the cord exits the handle is additionally reinforced so that the cord does not dangle in the handle and extraneous forces are not transferred to the connections located inside.
Finally the sting is inserted
,
soldering iron has been tested
. Everything worked out as it should. A soldering iron that is properly assembled from suitable materials does not smoke or emit odors. A little later I varnished the handle.
If the tip enters the heater
too loose, you can wrap it with a strip of aluminum foil.
It is better not to use copper foil, so as not to get scale in its place over time, making it difficult to remove the worn tip. After testing, I shortened the tip a little, bringing its outer length to about ten diameters. Reducing the length of the tip expands the capabilities of the soldering iron and allows even a thin tip
to perform not the smallest work.
Bolted connections
This connection is quite reliable, but cumbersome. It is not suitable for modern distribution boxes due to its dimensions, but for large old-style boxes it is just right. This method can be used to connect both homogeneous and dissimilar metals. The work is carried out as follows:
- A steel washer is placed on the bolt.
- The insulation is removed from the conductors and they are formed into a ring.
- The first ring is put on the bolt.
- Then comes another steel washer, which is placed on the bolt after the first.
- The second connecting wire is put on top.
- This entire “sandwich” is clamped with a nut.
- In the end, everything needs to be insulated.
It is this design that makes the contact bulky. If you need to connect several pairs of wires, then this option will not be the best.
What tools and materials will be needed?
The choice of tools and materials we need will be determined by our specific goals, as well as the soldering methods used. The main tool used is either an electric soldering iron or a gas torch. Well, then there will be, in general, a standard soldering kit. We will need:
- Knife for cutting wire insulation - do not forget to sharpen it or use a stationery knife. You can also make an electrician's knife with your own hands.
- Pliers for twisting conductors.
- Solder and flux. Flux is a substance with which we remove oxidation from the surface we solder. Solder is what is used to directly solder the wires.
- File – a fine file will do.
When soldering wires with a soldering iron or gas torch, different solders and fluxes can be used. So, for copper conductors you need solder based on a mixture of tin and lead - these are solders of the POS-40, POS-50, POS-60 brands. The following grades are suitable for soldering aluminum wires: P-250A (zinc and tin), TsO-12 (zinc and tin), TsA-15 (zinc and aluminum), A (zinc, tin, copper). Rosin is used as a flux - an organic material containing a mixture of resin acids from coniferous trees. Rosin is the most common and inexpensive option. There are also methods of soldering with acid as a flux, but it is not recommended to use them because they are harmful. In addition, acid causes corrosion on the twist over time.
Design
When choosing a tool, it is important to select the required setting sizes. It is important to pay attention to the adjustment element; a high-quality soldering iron has a switch with indicated minimum and maximum temperatures. The toggle switch is responsible for switching the voltage; a simple design may not meet the requirements when soldering material. Thermal stabilization allows you to avoid overheating of the tip when the tool is idle for a long time. A soldering iron with temperature control allows you to set the amount of heat generated by the tip during small jobs. Operating modes:
- Operating capacity can vary from 60 to 140 W, the average output voltage is 80 W.
- Power comes from a 220 V power supply.
- The heat range starts from 185 °C, for low-melting solders and soft materials, and reaches 450 °C for more refractory products.
Soldering iron circuit with thermostat
The adjustment is made using a special toggle switch; the format setting error is 10 °C.
Connecting wires
Before connecting the wires in the junction box, we advise you to study the rules for their installation.
After all, it is important not only to properly connect the wires to each other, but also to correctly insert them into the junction box, and also conveniently position them for possible inspection or repair
Rules for installing wires in a junction box
First of all, let's look at the rules for the arrangement and installation of wiring in the distribution network. After all, it is with this factor that any installation begins.
Standards for installing wiring in a junction box
- First of all, you should remember that no more than eight groups of wires can be laid in one groove, box or pipe.
- All connections must be made in accordance with clauses 2.1.17 - 2.1.30 of the PUE. These clauses provide for a whole range of restrictions. First of all, remember that the wire in front of any contact must have a reserve sufficient for at least one reconnection.
- Before connecting the wires in the junction box, make sure that they are free of tension. Or that this tension will not occur due to temperature changes.
- Any wire connection points must be accessible for repair and inspection. At the same time, these places should be organized so that inspection is not hampered by structural elements.
- Any connection must be insulated. In this case, this insulation must correspond to the level of the main insulation. To achieve these parameters, it is better to use electrical tape or heat shrink.
- The distribution boxes themselves must be made of fireproof or fire-resistant materials. like in the video. This is especially true for the installation of wiring on combustible structures, which are subject to additional requirements.
Options for connecting wires in a junction box
First, let's look at how to connect the wires in a junction box. After all, it is the contact connections that are often the most vulnerable point of any electrical network and any shortcomings appear very quickly.
According to clause 2.1.21 of the PUE, all connections of wires and cables must be made by welding, soldering, crimping, screw or bolt compression. Other connection methods, especially twisting, are not allowed. Based on this, let's look at each of the possible connection methods separately.
Welding connection
The most reliable connection of wires is considered to be the welding method. It has the lowest transition resistance, resulting in virtually no increased heating. In addition, over time, such a compound does not lose its properties.
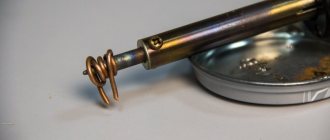
Welding of wires in the junction box is carried out using a special welding transformer and a carbon electrode. The cost of such products is high enough for a simple replacement of wiring in an apartment, so you can often find homemade devices. Typically these are transformers up to 600 W and voltage 9 - 36V.
The second place in reliability is the connection using the soldering method. This method is more accessible for home use because it does not require special equipment other than a regular soldering iron.
Connecting wires by soldering
Soldering of wires in the junction box is carried out using conventional technology and does not impose any special requirements.
The only point worth paying attention to is the quality of such connections. Indeed, if heated, the tin will heat up quickly enough and the contact will disappear
To prevent this, soldering is often combined with a twisted connection.
Wire crimping has recently become increasingly popular. After all, a large number of fairly cheap tools for crimping wires have appeared on the market, and the price of consumables for this method is quite low.
Connecting wires using crimping method
But the most common method is still the screw or spring clamp method. A huge number of buses and terminals currently on the market allow for a fairly reliable connection of wires.
Note! Screw terminals should be used to clamp single-core wires. If you use stranded copper wire, then you need to purchase special tips that will prevent the screws from breaking the strands of the stranded wire when clamping
These lugs are attached to the wire using the crimping method.
Materials for making a soldering iron
After first glance at the photo depicting the materials, it may seem that the contents of a trash can have been emptied and neatly laid out in front of the camera. Yes, the soldering iron described in this article is made from such “garbage”.
There was no need to think too hard about the choice of material for the handle. Soldering iron handle
made of wood. This is a readily available material, which is easy to process, quite durable, and has good thermal insulation properties.
Tin from a tin can is used to make a soldering iron body
.
This is a soft sheet of steel that is easy to cut and bend, and at the same time, rolled into a tube, it is strong enough for a miniature soldering iron
. I strongly recommend the condensed milk tin - it does not have polymer coatings, which is important for our case. Tin plate coated on the outside with varnish, like canned fish, or on the inside with something white, like various peas and corn, is not suitable because of this very coating. At high temperatures it will begin to release combustion products that we do not need. I especially want to emphasize that in the store you need to buy not “condensed milk”, but rather whole condensed milk with sugar. I will not describe the difference here - this is not related to the topic, but there is a difference between these products, and the quality of the tin can also be different.
Next on the list is silicate glue.
.
This is a very interesting substance. It does not contain organic matter, is not poisonous, and is not harmful to the skin - you can work without gloves. After drying, it turns into glass - a substance that can easily withstand high temperatures (more than enough for a soldering iron) and at the same time does not conduct electric current. When adding heat-resistant fiber, it forms a composite that also has high mechanical strength. This is what we need as insulation when making a heater
.
In Soviet times, silicate glue could be bought at any bookstore. It was the most popular adhesive for paper and cardboard. But, I must admit, it is not very good for paper. Apparently that’s why it’s not so easy to find it on sale now. Silicate glue has almost completely been replaced by more modern paper adhesives. It’s a pity, because it is indispensable when making a soldering iron
.
But it is still on sale today. The bottle of glue shown in the photo, among other materials, was purchased in 2016 for a symbolic price. Fifteen rubles. I admit, when I saw it at a newsstand located on the territory of a grocery store, I immediately thought about a new homemade soldering iron
, which would bring together all the accumulated best technological solutions.
The seller looked at me strangely, clearly not approving of my choice. I wanted to suggest a higher quality glue. But I assured her that silicate glue
is simply irreplaceable in some cases. She had nothing to object to such a powerful argument, and a profitable deal took place.
I will add that there is a lot of Chinese paper glue on sale now, and, it seems, also silicate. But I haven’t tried to use it, because I really doubt its composition. Most likely, it contains a large percentage of impurities that make the glue more suitable for paper, but absolutely unsuitable for the manufacture of high-temperature composites
.
When heated, these possible impurities can begin to chemically break down, releasing toxic substances. A significant reduction in the strength of the product is also possible. Therefore, when purchasing, it was important for me that this was a domestically produced glue, and very cheap, which means it was just liquid glass
without any additives.
Thin steel wire is used to tie the tin body, which allows you to secure the heater in it, as well as create a “thread” for the handle - a simple but very effective solution. In addition, two pieces of steel wire are required to make the heater leads.
You will need mild steel sheet about 0.5 mm thick. A small rectangle is rolled into a cylinder, which is then inserted into the body from the handle attachment side and provides the necessary strength in this place. Sheet galvanized iron is sold in building materials stores. It's mild steel, like the kind used in tin cans. It is also easy to cut and bend, but it is much thicker than canned material, and therefore parts made from it are stronger. There is no shortage, but stores only sell large sheets. One such sheet is enough for a thousand soldering irons. However, the material is good for many applications. In any case, you need to have it in the household.
For making a heater
a high resistivity alloy wire
will also be required .
You can obtain such wire in different ways. In the described case, the wire was taken from a wire-wound tuning resistor, which was once soldered from a domestically produced color TV. To level it, the wire can be pulled along the edge of the table. It is necessary to evaluate the thickness of the wire, its length and resistance. High accuracy is not required in this case. Just keep in mind that very thin wire reduces the reliability of the soldering iron due to the risk of burnout. Thick wire will be more difficult to wind, and the thickness of the product will be increased. with the wire resistance (and, consequently, with the supply voltage of the soldering iron
) - it is unknown how much of it will go to the heater. It’s easier to make an approximate version, and when the soldering iron is ready, select the voltage to achieve the required power. But too large errors with the heater resistance will lead to the fact that either a very large current will have to be supplied to the heater, which increases the requirements for wires and electrical connections, or to make a power source with a very “specific” voltage, for example, 50 volts. However, the power supply is from 50 When the resistance of the heater is too high, it is much better and more reliable than when the current is unreasonably high - when it is too low.
For making a sting
Thick winding wire with a diameter of 1 to 2 mm is ideal.
You can set aside a whole coil of such wire as a consumable, and in the future, as it wears out, make new tips. The design of the soldering iron
provides for the possibility
of replacing the tip
. It is inserted into the steel base of the heater and is held in place by friction. So you don’t have to worry about the tip burning out.
Asbestos is a naturally occurring fibrous mineral. Resistance to high temperatures is one of its most valuable qualities. In combination with silicate glue
makes it possible to obtain an excellent composite for
heater insulation
.
As you can see, the materials are mostly readily available. Difficulties may arise with the search for asbestos
. If you can’t find the cord, you can try crushing asbestos cardboard and mixing it with silicate glue to get a paste. It can be used to insulate the heater. But I haven't tried this method. I used a cord, separating more or less even sections from it and winding it around the insulated surface. Then it was impregnated with silicate glue. You could try using fiberglass. There is more about this at the end of the article. There was an idea about using gypsum or even clay, but I haven’t tried using these materials either, so I can’t guarantee anything. One way or another, you can find something suitable.
Connection according to PUE
When installing electrical networks, specialists are guided by the following documents:
- PUE 7 (Rules for the design and operation of electrical installations);
- SNiP 3.05.06-85 “Electrical devices”;
- GOST R 50571.5.52-2011 “Low-voltage electrical installations”.
In PUE 7 the following types of connections are indicated as permitted (chapter 2.1, section “Electrical wiring”, clause 2.1.21):
- crimping;
- welding;
- soldering;
- screw clamps, bolt clamps, etc.
In SNiP 3.05.06-85 ():
- welding;
- crimping;
- clamps.
GOST R 50571.5.52-2011 (section 526 “Electrical connections”, clause 526.2) recommends not using soldering for the reasons mentioned above (does not apply to switching circuits). If there are solder joints, the document states, then possible displacements, mechanical forces and temperature increases during a short circuit must be taken into account.
As you can see, only PUE allows soldering. Twisting is not mentioned anywhere at all: the use of this method due to its fragility and low reliability is officially prohibited.
Why increase power?
It is not advisable to purchase several options for performing soldering work of various types. Increased intensity is used for short-term exposure to elements; fragile parts may not withstand high temperatures and become unusable. Burnt tracks located near the controllers can affect the operation of the part being repaired.
Soldering station with thermostat
Less power output contributes to slow heating and low temperatures. With the presented indicators, during the soldering process it is necessary to act on the material longer before melting begins. Long-term heating can also have a detrimental effect on the board. To avoid serious consequences, you should correctly select the level of return through regulation. For example, to adhere massive objects, it is necessary to increase the intensity until the time of exposure to the elements is less than the melting point and provided that the appropriate solder is used.
Soldering with a soldering iron
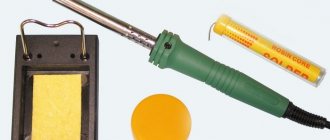
Soldering twists with a soldering iron
The method is very similar to welding, only in this case the wires are connected using solder. For these works you will need a soldering iron. To work you will need:
- soldering iron;
- fine sandpaper;
- rosin (flux);
- brush for applying rosin;
- tin-lead solder.
The operating procedure is the same as for welding:
- Removing insulation and cleaning with sandpaper.
- Twisting.
- Application of flux.
- Direct soldering. The soldering iron melts the solder, which should flow into the twist itself, reliably connecting the wires to each other.
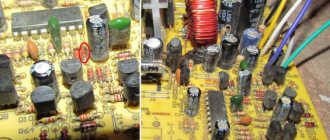
Soldered wiring in the junction box with a soldering iron
Often copper wires are soldered using this method, but if you purchase special solder for soldering aluminum, you can also solder copper from aluminum.
Soldering is quite reliable, but is not recommended in areas where there may be strong heat. Moreover, under mechanical stress, the connection may weaken.
Difficulties in soldering aluminum wires
The main difficulty when soldering aluminum wires, as indicated above, is the presence of an oxide film on the surface of the metal. Fighting it greatly slows down the soldering process.
And if you consider that aluminum wires are now used mainly for laying external power wiring, it becomes obvious that a regular soldering iron and sandpaper will not be enough in this case. Welding is increasingly being used to connect such wires.
The desire to purchase a soldering torch has a certain basis, that is, the need to do something using this tool. Someone decided to try themselves as a jeweler, someone mastered the specialization of an electrician and realized that one soldering iron is not enough, someone is simply used to fixing everything with their own hands, from a car radiator to household appliances.
Soldering wires
The procedure for soldering conductors is as follows:
- Removal of insulation;
- Stripping wires;
- Maintenance;
- Twisting;
- Soldering;
- Isolation.
Before you start connecting the wires, you need to decide on their length. The wires are cut so that when soldered they are outside the junction box and can then be laid in the desired manner. Do not lay the wires under tension. Excess stock is also inappropriate in limited space.
To remove the insulation, use a sharp knife or a special tool (Figure 1).
Figure 1. Tool for stripping wires - stripper.
When working with a knife, the process of removing insulation should resemble the movements of a knife when sharpening a pencil. Do not make a circular cut into the insulation or trim it with side cutters or pliers. A transverse scratch or scratch on the wire can cause a break. As a last resort, this technique is allowed only on multi-core wires. The length of the bare conductor for soldering should be 1.5 - 3 cm. The thicker the conductor, the longer the stripped part should be. The number of turns when twisting the wires can serve as a guide. There must be at least 2 of them.
Before tinning, the surface of the cores must be cleaned from traces of oxide using a knife or fine-grained sandpaper. After stripping the wires, it is advisable to tin them immediately so that an oxide film does not form on the surface. The oxide formed on the surface of the solder is loose and will not interfere with subsequent soldering, so a break in work after the tinning stage has no time limit.
The tinned conductors are twisted together using pliers or pliers. The twist should consist of at least 2 turns. The twist should be tight, but not too tight, so that the stripped ends do not break off. The ideal variant of twisting is when part of the wire with insulation gets into it. The end of the twist must be even. When working with thick wires, they are often directed to the sides at the end of the twist, so the protruding ends must be trimmed. The figure below shows various ways to twist solder wires (Figure 2).
The twisted wires are soldered using a soldering iron so that the twist is evenly covered on all sides with a layer of solder without gaps or sagging. The quality of the soldering directly depends on how well the stripped ends were tinned.
After the soldering area has cooled down, you can begin insulating it. For these purposes, fabric insulation or special heat-resistant plastic tips are used. Their length should be such that they partially extend onto the insulated sections of the wires (Figure 3).
Figure 3. Isolation of adhesions using plastic caps
You cannot use ordinary PVC electrical tape for insulation, because when the wires heat up, for example, when the load is exceeded, PVC easily melts and this can lead to a short circuit inside the junction box.
Sometimes it's easier to make than to buy
A good electronics engineer should have a wide variety of tools in his arsenal. This also applies to soldering irons. It is impossible to get by with one soldering iron for all cases. There are usually no problems with powerful soldering irons: there is enough of this stuff on sale for every taste. But with their “younger brothers” it’s more difficult. However, it is more correct to talk not about power (it should ideally be adjustable), but about the diameter of the tip and the distance from the tip of the tip to the handle. Power is often talked about as the main criterion, simply for the reason that soldering irons with a thick tip are designed to work with massive parts that have a large thermal capacity - to warm them up, the tool must develop quite a lot of power. And vice versa, for the smallest installation, soldering of SMD components
and microcircuits with small pin pitches require
a miniature soldering iron
with a very
thin tip
.
Such a soldering iron does not need much power, because the thermal capacity of the parts in this case is very small. Moreover, the shorter the distance from the tip of the tip to the handle, the more accurate the movements during soldering. This is especially noticeable under a microscope. But with a long soldering iron, the probability of making a mistake increases significantly, and, for example, “gluing” two closely spaced tracks or pins on a microcircuit, and then spending time eliminating such a defect. But in small installations
this can be very difficult.
That's all you need to make a soldering iron!
1 - wooden block (material for making a handle); 2 — condensed milk can (mild steel for the body); 3 - silicate glue (liquid glass - a binding component for a heat-resistant composite); 4 - a coil of thin steel wire; 5 - mild steel about 0.5 mm, often called galvanized iron; 6 — wire tuning resistor (source of high-resistance wire for the heater); 7 - a piece of copper winding wire for making a tip; 8 - asbestos cord (fiber for heat-resistant composite). The only thing not shown in the photo is the electrical wire, a small piece of fiberglass, as well as 10 centimeters of any thread and a drop of BF glue. All other materials used are shown in the photo.
Electronics are getting smaller and smaller. Today, a tip with a diameter of even 1 mm seems thick in some cases. In household supply stores you rarely find soldering irons with a power of less than 25 W and a tip diameter of less than 4 - 5 millimeters. For such products, it is better to contact specialized stores. You can also search in online stores. In general, you can find interesting examples. But even with these samples, as a rule, something is wrong. Not a single “spoon of honey” is immune from the “barrel of ointment”. For example, I don’t understand the fashion for stings with a conical working end made of some difficult-to-maintain alloy. Such tips (unless sharpened, and it seems impossible to sharpen them) do not have a working edge and are poorly wetted by solder. But I would like, as the poet said: “And the fingers ask for the pen, the pen for the paper.” Only in our case, instead of a pen, a soldering iron, and instead of paper, you know what. Yes, a soldering iron by its very appearance should inspire inspiration. And what? Technical creativity also requires inspiration. This is also a kind of art.
In general, you can look for a ready-made soldering iron and adapt to its shortcomings, or you can make a soldering iron yourself
, adapting it to your preferences.
Distribution box designs
The wires are connected in distribution (or junction) boxes, because this is the most convenient installation method. In case of any problems and the need to test a separate wire, you just need to open the box and identify the conductor to be tested. You can connect the wires in the box in several ways, which are described in the Electrical Installation Rules (ELR).
Electrical wiring in rooms is usually laid 15 centimeters below the ceiling. The distribution box is also installed at the same distance. They are most often placed one per room. By design, boxes are divided into external and internal. The internal ones are installed in a recess in the wall and covered with finishing material. Therefore, it can be difficult for a non-specialist to find them. If the thickness of the wall does not allow installing an internal junction box, then an external one is used. This type is often used in private wooden houses.
Distribution boxes come in two shapes: rectangular and round (semicircular). There are four outputs from the box, equipped with fittings for attaching cable ducts or corrugated hoses. The modern approach to cable installation always uses these products.
Switches and Dimmers
A simple type switch allows you to select a position in two directions. The unit is operated at minimum and maximum output values, allowing only to save energy. At the minimum level, the tip is maintained by the required degree of heating on the stand; pressing the switch warms it up. With a product equipped with the specified type of switch, it is difficult to perform high-quality fusion of metals, because There is no full parameter setting. Dimmable varieties of adjustable devices allow you to select important parameters.
Homemade dimmer for soldering iron
The device includes a dimmer, which is present in the grid between the power cable and the heating element. The adjustment is made by monitoring the voltage; these mechanisms are popular among beginning radio amateurs due to their low price.
Types of connections
Types of wire connections
What is the task when connecting wires? Ensure good contact between the cores so that the chain does not break and there is no risk of a short circuit. In order to ensure this, you can act in several ways:
- Twisting.
- Crimping.
- Welding.
- Soldering with a soldering iron.
- Use of screw terminals.
- Bolted connections.
- Self-clamping terminals.
These are time-tested methods that you can use to ensure reliable contact. Let's take a closer look at each of them. You will learn how to properly connect wires using any of these options.
Such twists in the junction box are officially prohibited. The seventh edition of the regulatory document PUE, chapter 2, paragraph 2.1/21 lists all types of permissible connections, but there is no twisting in them. And this is not surprising, since such a contact is sensitive to pulse current and has a high transition resistance. Over time, the contact will deteriorate and simply burn out. Due to the fact that the contact area is small, heating occurs under heavy loads and the contact is weakened even more.
It is not recommended to use this type of connection, although some craftsmen still use it. If you choose twisting, all responsibility falls on you.
This option is chosen because of its simplicity. It is enough just to strip 10–20 mm of insulation and twist the wires together using pliers. This is what our fathers and great-grandfathers did. But such a connection is often unreliable, especially if an aluminum core is used.
Method No. 1: From a PEV resistor
For such a soldering iron, you will need an old ceramic insulated resistor, which will be used as a heating element. You can use a resistor from old electrical equipment; the required parameters are calculated using the formula: P = U2 / R,
Where P is the power of the soldering iron;
U – supply voltage;
R is the ohmic resistance of the resistor.
This homemade soldering iron is designed to operate on low voltage of 12 or 24 V, which should be taken into account when calculating the power of the device. Thanks to this, it can be powered both from a step-down power supply and from a car battery. If necessary, you can select a resistor for a 220 V supply voltage, but in this example we will consider a low-voltage option.
In addition to the PEV resistor, for manufacturing you will need pieces of textolite, getinax or dry wood for the insulating handle, the main thing is that they can withstand high temperatures. Two copper rods of different diameters for making a heat sink and a soldering tip. Connecting wires or factory 12V power supply. You will also need elements for fixing, a file, a jigsaw, a drill, a tap, a drill.
The soldering iron manufacturing process consists of the following steps:
- A copper rod is selected for the current collector, which should fit tightly into the internal hole of the resistor. The quality of heat transfer from the heater to the soldering iron tip will depend on the density.
Rice. 1: fits tightly into the hole - For the sting, a copper rod or wire of smaller diameter is selected. Sharpen the edge of the rod to obtain the desired shape; the shape of a flat-head screwdriver is considered the most convenient for beginners.
- Drill holes on both sides and cut threads into them with a tap - one for the fixing bolt with a washer, the second for the copper tip.
- Insert the heat sink into the resistor and measure the depth of the location, make a mark on the surface. At the mark, make a radial groove using a file - a retaining ring will be inserted into it, which can be made from a spring or washer.
- At one end of the copper wire for the soldering iron tip, cut a thread and screw it into the heat sink.
Rice. 2: screw into the heat sink - Assemble the entire structure together, secure both copper rods with threaded connections and a retaining ring.
- Strip the ends of the power supply from insulation, if necessary, remove it and the plug will no longer be needed.
- Secure the ends of the copper wires from the power supply to the contacts of the resistor. To do this, use a bolted connection, be sure to tighten the nuts tightly to get good contact.
- Using a jigsaw, cut out a handle from the old board; in this example, it will consist of two halves, between which there is an electrical cord. You can also cut a groove for wires in it.
Rice. 3: Place the power cord into the handle - Assemble the handle - secure the halves with bolts or rivets.
The cordless soldering iron is ready, it can be used for soldering microcircuits, electrical contacts of automotive wiring, etc. If you don't have a ceramic resistor at hand, you can make a soldering iron from nichrome wire.
How to connect correctly?
Junction boxes with built-in terminal blocks are available. Connecting conductors to them is not difficult: the stripped conductors are inserted into the terminals and secured with a screw or spring.
But more often the box is just a body with a lid and performs only two functions:
- insulation of electrical contacts (potentially dangerous places) from building structures and finishes, usually consisting of flammable materials;
- providing quick access to conductor connections.
In such boxes, the installer connects the wires in any way at his discretion. There are a lot of connection options. Some use special devices, others do without them. For a complete understanding, it is worth considering this issue in detail.
In electrical circuits, direct contact between aluminum and copper is not allowed: both materials are quickly destroyed due to electrochemical corrosion.
Crimping with a connecting sleeve
Crimping copper wires in a section This
is a fairly reliable method, which will require the purchase of a connecting sleeve. You need to select it based on the diameter of the bundle being connected. Depending on the wires you connect, the material of the sleeve itself is selected. For copper wires the sleeve must be copper, for aluminum wires - aluminum. To ensure a reliable connection, the sleeve is crimped with a special tool called press pliers. This technology is quite effective and is included, along with other methods, in regulatory documents.
Crimping connection of aluminum wires
To connect this way you need:
- Remove the insulation, taking into account the length of your sleeve.
- Twist the wires into a bundle and insert them into the sleeve.
- Compress the sleeve using press pliers.
- Insulate the twisting area with heat shrink or insulating tape.
It is not recommended to use pliers in such work, since the connection will not be reliable enough. It is much better to buy press pliers or borrow them from good neighbors.
This method can be called the most reliable and safe, because the wires are connected using fusion and become one. Due to the fact that the welding will not oxidize, such contact will not weaken over time. But to carry out such work you will need skills in working with welding equipment.
In addition to skills, you must prepare:
- 24 volt welding machine with a power of more than 1 kW;
- welding gloves for skin protection;
- welding glasses or mask;
- sandpaper for stripping wires;
- stationery knife for removing insulation;
- carbon electrode;
- flux, thanks to which the melt will be protected from exposure to air.
Welding copper to aluminum
After all the tools and materials are ready, all that remains is to do the welding, which will not be difficult. The work can be divided into several steps:
- Remove 60–80 mm of insulation and clean them using sandpaper. The veins should shine.
- Connect the wires using the twisting method, twisting one onto the other so that the ends are level with each other. It is recommended to make the length at least 50 mm.
- Pour flux into the recess of your electrode.
- Place the ground of the device on the bare wire, turn on the welding machine and press the electrode to the top of the twist.
- Hold the electrode until a ball called a contact point forms. This usually takes 1–3 seconds.
- All that remains is to clear the point of flux and insulate the welding site with heat-shrinkable tubing or electrical tape.
This type of connection will last a long time. In some old Khrushchev buildings, such welding lasted 50 years and consistently performed its function.
Homemade soldering iron: complex design
List of required materials:
- copper wire (d=1.5 mm, l=40 mm);
- a small sheet of copper foil;
- precision alloy wire (d=0.1 mm, l=300 mm);
- tin tube;
- silicate adhesive mixture or liquid glass;
- talc;
- handle made of heat-resistant material;
- electrical wire with plug.
You will also need a few auxiliary things:
- source of thermal energy (a gas or electric stove is suitable);
- metalworking tools (pliers, files, tweezers);
- small wooden or plastic spatula;
- a rag for removing the insulating mixture from the device.
Step-by-step manufacturing instructions
- A pre-cut piece of copper rod is used to make a sting. In this case, it is advisable to sharpen one end at an angle of 45 degrees, but the choice of the shape of sharpening the tip remains solely at the discretion of the master. The treated area is tinned.
- An electrical insulating mixture is prepared, including talc and silicate glue. The kneaded mass should have a dough-like structure. When working with such sticky material, from time to time you will have to sprinkle your hands and tools with crushed talcum powder.
- Copper foil is tightly wrapped around the tip, while keeping the working area (10 mm) open.
- A thin insulating layer is carefully applied to the copper surface. To make it dry faster, the future soldering iron is held above a heat source.
- A spiral is wound from precision (nichrome) wire. It is worth noting that each turn should lie tightly. The straight end should ultimately be approximately 30 mm, and the turned end should be 50 mm.
- Now the winding is coated with an electrical insulating compound and dried thoroughly.
- The long end is placed on the tube so that between it and the short end there is a maximum gap approximately comparable to the diameter of the structure. The electrically insulating mixture is applied again, dried again, after which the preparation of the heating element with the tip built into it is considered complete.
- Each protruding end of the nichrome wire is half coated with an insulating compound and dried. It is important to carefully monitor the integrity of the coating during baking. If defects appear, they are eliminated by sealing with the mixture and drying again.
- At the final stage, all that remains is to assemble the structure. Pull the wire through the hole in the handle, connect the nichrome ends to the bare ends of the wire, and insulate the connection area.
- A protective casing is placed on the heating element. One end of it is inserted into the handle, and the other is fixed with an iron cap with a hole that prevents it from contacting the copper contents of the heater. Some are limited to a clamp.
Soldering wires
Stripping the insulation from the wire
Tinning and soldering of cables in the distribution box is carried out in several stages.
- Removing the insulating layer.
- Stripping the wires until the characteristic shine of the metal appears.
- Maintenance.
- Twisting.
- Soldering.
- Isolation.
Before you start connecting the current-carrying wires, you need to analyze what length is required. The wires are cut so that when soldering the ends are located outside the junction box. Upon completion of the work, they are laid in any desired way.
To remove the insulating layer, a special tool is used - a stripper or a sharp knife. When working with a sharp knife, the movements should resemble whittling a pencil. It is forbidden to cut the insulating layer with pliers or side cutters; you cannot make circular cuts. Transverse damage will cause a break in the near future.
For a wire intended for soldering, stripping ranges from 1.5-3 cm. The number of turns is at least 2.
Main types of solder wire connections
Before soldering, the wires are thoroughly cleaned and tinned so that oxides do not appear on the surface of the conductors, which interfere with normal conductivity and increase resistance. Already tinned conductors are twisted using pliers or pliers.
Soldering twisted copper wires in a box has a similar algorithm. The twist must be tight, but not tight, otherwise the ends of the conductive wires may simply break off.
Finally, the twisted wires are soldered with a soldering iron so that the solder is covered with an even layer on all sides. The quality of the work depends entirely on how well the ends were stripped.
How to use a soldering iron?
The essence of the process is to apply a drop of molten solder to the combined ends of conductors or leads of electronic components . Crystallizing, the solder firmly attaches to the metal and creates a permanent electrical connection.
In order for the solder to firmly connect to the cores or contacts, preparation is necessary. Contacts and wires are treated with special substances that destroy refractory oxide films and increase the miscibility of surfaces with liquid solder.
In addition, the soldering iron itself requires preparation. Its tip should be periodically cleaned with a file to remove carbon deposits and scale, and sharpened to give it the optimal shape.
The tinning operation is also very important . During this process, the surface of the tip and soldered contacts is covered with a thin layer of solder.
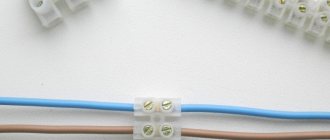
Using screw terminals
Connection of copper and aluminum wires
This method is fast, simple and effective. And most importantly, such clamps can combine dissimilar metals. For example, if you need to connect aluminum and copper conductors, which in itself, as you know, is contraindicated. These clamps are very simple and compact, and their cost may pleasantly surprise you.
To connect wires with clamps you only need to complete 2 steps:
- Remove 5 mm of insulation.
- Insert into the clamps and tighten the screw.
Melted terminal block contacts
That's all, as you can see, everything is very simple and fast
It is only important to control the force with which you clamp. If you tighten the screw too tightly, you can damage the wires
You need to be especially careful when working with aluminum wires.
The only disadvantage of a screw connection is that when working with a multi-core cable, it must be crimped with a special nozzle to ensure normal contact and integrity of the wire.
Soldering with crucible and torch
For large volumes of work, it makes sense to perform them using a crucible, which is a hollow metal cylinder with a handle filled with molten solder. The crucible can be used as an attachment to a powerful soldering iron or heated using a gas burner (Figure 6).
Figure 6. Electric and gas crucibles for soldering wires
The large volume of metal in the crucible does not allow it to cool quickly, so a heated crucible can solder several strands in succession. The main advantage of this soldering method is that tinning and soldering of the twist occurs almost instantly when the flux-coated conductors are completely lowered into the solder bath.
Mini soldering torches
1st place – mini gas burner with soldering attachment
Designed for both heating medium-sized parts and for contact soldering due to the heating of the tip from the flame. A kind of soldering iron without wires. The gas tank capacity is 8ml. The flame temperature when filling with butane reaches 1300 degrees Celsius, and the tip temperature – 450 degrees. The flame length is adjustable from 4 to 6 cm. The burner length is 13 cm and the diameter is 1.5 cm.
small and inexpensive, the refill is enough to solder several medium-sized parts, there is a nozzle for contact soldering, it is easy to refill.
2nd place – gas micro burner
There is nothing in it except a tank with a filling valve and a nozzle with a gas supply regulator. The ZC57100 does not have piezo ignition and it is supplied unfilled, so you will also have to buy a gas cartridge - it will be suitable for lighters. In general, to solder two wires or heat heat shrink without a soldering iron, such a torch is enough. The burner is also about 20 cm long and weighs 43 g.
This is the cheapest burner that can be found and the price of such a micro burner is 200 rubles.
the cheapest, easy to refill.
small flame, the filling runs out quickly, there is no piezo ignition.
3rd place – mini gas soldering iron KVT XZ-1
This remarkable soldering iron from the gas powered brand features piezo ignition and comes in a case with a set of 4 soldering tips, a spool of solder, and a tip cleaning sponge. Thus, the declared power of the soldering iron for contact soldering is 137 W - this is a lot for a soldering iron with a length of 21 cm and a weight of 120 g. Electric soldering irons have never dreamed of such weight and size characteristics. This soldering iron is not positioned as a torch, but it can be used as a torch - the flame is pencil-type.
This soldering iron is good for everyone, except for the price of 2300 rubles, which is why it landed in 3rd place.
burner from a famous brand, easy to solder, set of components, good case, high heat output.
4th place – gas burner IRIS BARCELONA
This torch is not only designed for soldering, welding, repairing electronic devices and jewelry. The flame of this burner is of course adjustable. Can be charged with a standard lighter gas cylinder. The flame length reaches 3 cm. The operating time is about 20 minutes. The flame temperature reaches 1300 degrees Celsius. The length of the burner itself is exactly 20 cm.
small size, piezo ignition, brand.
The length of the flame does not allow heating medium and large parts.
5th place – butane burner KVT X-220
It is positioned as a burner for construction and repair work. She looks very stylish. The knurled handle fits nicely in the hand. Has a piezoelectric flame ignition system. The capacity of the cylinder for highly purified butane is 22 ml. This amount of gas is enough for 110 minutes of continuous operation. The flame length is adjustable from 30 to 80 mm from a sharp wedge-shaped flame to a soft flame with yellow tongues. The weight was only 226 grams with a length of 14 cm.
a good option for desktop work, there is a stand, piezo ignition, and a comfortable handle.
It's bulky, you can't put it in your pocket, you can't fit it into a narrow place.
Solder selection
Choosing the right solder for soldering twists is the most crucial moment. The final result depends on the solder. In the process of using different brands of solder, I tried to identify a pattern between the quality of soldering and the percentage of tin. However, such a relationship could not be found.
The only thing that can be said with complete confidence is that the solder must have flux inside. This is not surprising: the soldering method does not require the application of flux to the twists, but flux is necessary.
It is most convenient to use solder in a wire 1mm or so thick. It is sold in spools or plastic tubes.
By and large, you will have to choose solder by trial and error; I don’t see any other method. Well, here are a few examples of solders from several manufacturers:
This solder is well suited for soldering twists. And it’s better not to take the one below - it solders thin strands of 2 wires 1.5 mm² well, but it will only ruin thicker strands.
Here's another pretty good REXANT solder:
When choosing solder for the first time, the best option would be to buy a small tube for testing. Well, remember which of the purchased brands soldered well and which ones poorly. Actually, this is such a simple science.
In addition to solder, it is good to have a cleaner on hand - regular alcohol. Many copper strands, even new ones, are covered with layers of oxides or other deposits that make soldering difficult.
A good cleaner option is TAGS flux - it perfectly cleans the surface of copper conductors and in addition helps the soldering process.
Design features of soldering torches
The main thing when working with a gas soldering iron is the flame itself: its temperature and the shape of the torch. The temperature is determined by the gas used; the shape of the torch is determined by the shape and size of the nozzle.
The most common burners use household gas, providing a maximum flame temperature of 1300 degrees Celsius.
There are also acetylene and gasoline (more precisely, gasoline-air). Both of them are rarely used at home. The former, due to the fact that it is difficult (but possible) to ensure a high level of security at the household level, the latter require the purchase or manufacture of additional equipment.
A device together with a reservoir is usually called a burner. A tube with a nozzle, regulators and a system for attaching to a cylinder is correctly called a nozzle for a gas burner, but often the seller presents the nozzle as a torch for soldering and indicates: without a cylinder.
Portable gas torches for soldering
Unlike a conventional electric soldering iron, soldering is performed not with a heated tip, but with a directed torch that melts the solder. Some torches provide the possibility of tip soldering due to additional equipment, as, for example, in the portable gas torch model Gas Soldering Iron Pen shown in Figure 1. The device is made in the style of minimalism, but it is suitable as an emergency or not often used device.
There are many variations in design, configuration with replaceable tips (nozzles of two or three sizes and a replaceable tip), presence or absence of piezo ignition, smooth adjustment of the torch, installation of additional buttons or levers for ease of use.
But all of them, thanks to their dimensions (length within 20 cm) and low weight, are united by the concept of pencil-type burners.
The body (including the refillable tank), also known as the handle, is made of plastic, of course, designed for repeated heating and cooling cycles. However, with active use (according to reviews from those who know a lot about soldering), over time the structure loses its rigidity and becomes slightly loose.
Torches for soldering on cylinders
You can purchase a burner in the form of an attachment for a gas cylinder. As an illustrative example, we can take Stayer MASTER MaxTerm (Figure 2). The model shown has a collet connection to the cylinder, has a piezo ignition and a flame regulator. The gas cylinder itself is not included in the delivery set and must be purchased separately.
When purchasing a nozzle, you should specify what gas the device is designed for. If it is simply written “gas” or “propane/butane”, then any (percentage) propane-butane mixture is suitable. Sometimes “butane” is indicated, which means you will have to carefully select a cylinder with the appropriate contents. Foreign burners are designed for MAPP gas, with it the flame temperature is higher, the cost is also higher, but the consumption is lower. Changing the gas, at best, will reduce output, at worst, it will lead to burner failure.
In the most advanced models, to ensure the desired mode and ease of operation, the following features (all or some) are available:
- piezo ignition,
- flame level regulator,
- flame retardant,
- ignition blocking,
- smooth adjustment of the nozzle angle.
The last of these options is not common, but the instructions for each burner mounted on a cylinder include a warning: during operation, the cylinder should not deviate from the vertical by more than 45 degrees.
Sometimes the type of flame is indicated - vortex or pencil type, and, if not indicated, then a pencil-shaped torch. The swirl flame allows you to work with carbide solders.