In almost every room of our home, lighting bulbs are used, which help to carry out some work in the dark or simply make spending time in the room much more pleasant. But there are situations when the lamp burns out and breaks. In such a situation, you get not only an unpleasant scattering of fragments on the floor, but also the remains of a light bulb in the socket. Most ordinary people who encounter this immediately look for a way to unscrew a broken light bulb from its socket.
The process of replacing a light bulb - which way to unscrew
Light bulbs have to be changed infrequently, so every time a simple question arises, such as the direction of unscrewing. If a person stands in front of the socket, then he can remove the light bulb by unscrewing it counterclockwise, and screw it in clockwise, respectively.
To dismantle, unscrew it counterclockwise.
It’s easier to remember how to do the work correctly using examples. Therefore, you should remember that the light bulb is unscrewed and screwed in exactly the same way as the cap from a bottle of water, alcohol, or sunflower oil.
The replacement shouldn't cause many problems. It is also important to replace the old light bulb with a new one of the same power. Difficulties begin when the light bulb cannot be unscrewed or it has burst. But even in such a situation there are effective methods.
Causes of damage
Any electrical appliance must be operated with the utmost caution. But not in every case this is ensured 100%. So why do light bulbs burst? There may be several reasons:
- Manufacturing defect. Violations can be made both on the flask itself and in the design of the base.
- Increased voltage in the network. Incandescent lamps can operate above the standard voltage, for example up to 230 V. But large surges can cause damage. This is especially true if deviations are regular.
- Problems in the contact part of the cartridge or in the switch. Often accompanied by extraneous sounds and flickering.
- Violation of the integrity of wire connections, violations made during wiring installation.
- Network overload with electrical appliances consuming a lot of electricity.
- Increased vibrations and mechanical damage.
- Operation in conditions of high humidity or temperature changes.
The result of such phenomena can be the situation shown in the photo, when a light bulb bursts.
Why do lamps become deformed and stick?
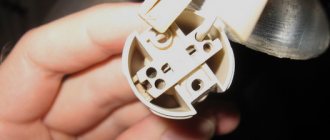
It happens that the light bulb gets stuck in the socket. If it is deformed, then the reason for this phenomenon may be frequent surges in voltage, expired service life, perhaps the element was already damaged before screwing in. When you can’t unscrew it even with force, you can try to pull out the entire cartridge. Usually this is a three-part design; after removal, the cartridge is disassembled; if the base can be removed, then good, but if not, you will have to buy the same part for replacement.
The cartridge is in disassembled condition.
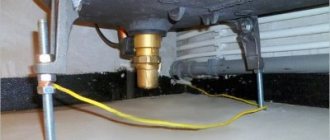
Another common problem is sticking. It appears when there is loose contact at the screwing point. The procedure is the same: you need to try to make an effort to unscrew or remove the cartridge. You can also lightly spray with a spray to dissolve rust; it often appears in the design of street lamps or in rooms with high humidity levels.
Before spraying or any other manipulations, be sure to turn off the machine. It is better to dismantle the lamp.
By the way, such problems can be avoided by adhering to certain rules:
- Before screwing in, the lamp must be checked for deformation and damage.
- You only need to work with clean hands so that no greasy stains remain on the base.
- The lighting element must be screwed tightly.
- Use only lamp models that are suitable for a particular luminaire.
For additional protection, you can apply a little graphite to the base; it will increase the density of the connection and eliminate the possibility of sticking.
A simple pencil is suitable for coating with graphite.
Options for solving the problem
There are several methods for solving the problem, which have their own disadvantages and advantages. The user chooses the optimal method based on the nature of the lamp destruction, available tools and the time available to correct the damage. Before the light source is de-energized, it is recommended to turn off the automatic fuse located in the distribution board. If fluorescent lamps filled with mercury vapor are destroyed, it is necessary to ventilate the room and wipe the floor with a solution of potassium permanganate.
Pliers
To unscrew the light bulb base with pliers, you need to carefully grab the metal edge with the jaws and turn the part counterclockwise. It is possible to install the jaws of the tool inside the base, carefully unclench the handles and unscrew the part. The remaining glass is carefully broken off; it is recommended to lay newspapers on the floor. To destroy the rust layer, WD40 liquid is applied to the joint line of the parts; it is allowed to compress the sides of the base into the cartridge, separating the contacting surfaces.
Plastic bottle
In order to unscrew a broken light bulb with a plastic bottle, you should heat the neck over the flame of a gas burner or lighter. After the material begins to melt, the bottle is inserted into the base and pressed by hand. The soft plastic gets caught in the rough surface of the metal sleeve and then hardens. Heating the base body additionally promotes the separation of rust particles; the joint line can be treated with WD40. Before starting the procedure, it is recommended to remove the remaining glass bulb and lamp stem.
Wine cork
It is possible to unscrew a broken light bulb with a plastic cap from wine bottles; the heated element is inserted into the inner cavity of the sleeve
Caution should be exercised when heating the product as melted or ignited plastic will cause thermal and chemical burns if it comes into contact with the skin. It is possible to use a wooden or cork plug with suitable dimensions, which is inserted into the hole and then unscrewed along with the base
Disassembly
To remove the remains of the light source from a collapsible carbolite socket, you need to carefully separate the halves of the product along the threaded joint. Since shards of glass may stick out from the lamp, it is recommended to use gloves and an additional thick cloth or first break out the remains of the bulb. After disassembling the unit, you can remove the base from the cartridge (using pliers, a screwdriver or another tool). The technique is not applicable when using solid ceramic or plastic cartridges.
Potato
When using metal tools or plastic products, it is necessary to remove any remaining glass parts that fall on the floor and get into the cracks. To reduce the labor intensity of harvesting, a potato cut in half, the diameter of which exceeds the diameter of the flask, is used. Half of the potato is carefully placed on the glass shards, the remains of the lamp are twisted out of the socket. The use of other vegetables is not recommended, since the pulp does not provide close contact with the lamp fragments.
other methods
There are also additional ways to remove the remains of the lamp from the socket:
- Using newspaper, thin cardboard or coarse burlap, tightly rolled into a tube, the diameter of the resulting product is slightly larger than the size of the hole inside the base. The tube is inserted into a metal sleeve and further crushed, then the user begins to rotate the product, while simultaneously removing the remaining lamp from the socket.
- To remove lamp residues, special plastic pliers with sponges that fill the internal volume of the base are used. After spreading the jaws with the handles, the sleeve is unscrewed. A special tray is installed on the instrument to collect glass fragments and compound.
- If the base is firmly stuck to the cartridge, it is recommended to destroy the side wall by bending the edges inward. Then the remains of the lamp are unscrewed with pliers or scissors, which rest against the resulting protrusions. If the method does not help, then all that remains is to crush the outer part of the cartridge with pliers or a similar tool. After removing the debris, it is necessary to repair the lamp by installing new parts instead of the broken ones.
Effective ways to unscrew a broken light bulb
When it was not possible to remove the light bulb safely, or it burst during operation, the task becomes more complicated. A base with the remains of broken glass sticks out of the socket. It is almost impossible to twist it by hand without cutting yourself. Improvised tools and various folk remedies will come to the rescue.
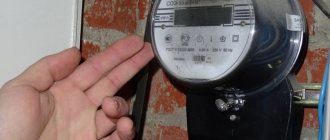
Remember! The first step will always be to de-energize the room, otherwise the work will become deadly.
First you need to turn off the power to the room.
Ways to remove the base without removing the cartridge
You can, of course, try to do this with your bare hands, but it’s still better not completely “naked,” but using protective gloves. It will be possible to get out the remains of the lamp only if it was not screwed tightly before and did not stick.
It's better to use tools. The simplest and most reliable option is to use pliers. If you don’t have them on hand, even a plastic bottle or half a potato can help.
Using pliers or pliers
Ordinary pliers can help in this situation, but even better are thin-nose pliers, which make it easier to penetrate inside the structure. With such a tool it is much easier to grab any small elements, including the base.
Step-by-step instruction:
- It is better to beat off sharp remains of glass for ease of work.
- Clamp the base with thin-nose pliers and twist counterclockwise. In this case, it is necessary to hold the lampshade, it may come off.
- If it is not possible to unscrew the base, then its sides are pressed with the “lips” of the tool or a screwdriver.
Unscrewing the base.
If it is not possible to grab the base, you can try the reverse method. To do this, thin-nose pliers are inserted inside the structure and pulled apart. It is important not to damage the cartridge when performing work.
Plastic bottle method
If you don’t have the necessary tools at hand, a plastic bottle will help you unscrew the stuck base from the socket. Oddly enough, the diameter of the neck of a standard small bottle (volume from 0.2 to 3 liters) coincides with the diameter of the base.
Instructions:
- First you need to remove all remaining glass.
- Heat the neck of a plastic bottle until it begins to melt. At home, a candle is suitable for this.
- Insert the bottle into the base and wait until the heated plastic sets.
- After fixing it inside the base, you can begin to unscrew the remains of the lamp.
Using a bottle with a fused neck.
In general, the method is simple, but requires accuracy and a little preparation. Hands should be protected with gloves, long sleeves, and at least a newspaper should be laid on the floor. This will protect against hot plastic getting on your skin or flooring.
Video life hack for unscrewing light bulbs.
Application of potatoes
When there are no pliers or a plastic bottle in the house, you can take regular potatoes. The method will be effective only if there are sharp remains of glass sticking out of the light bulb. They will allow you to get hooked.
Procedure:
- Large raw potatoes should be cut in half. It is important to keep the product dry for safety, so wipe it off.
- Place a potato on the sharp remains of glass so that they go deep enough.
- Start unscrewing the base.
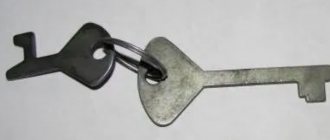
Successfully unscrewed lamp.
Because of its structure, potatoes are suitable for this purpose; they are soft enough for the glass to fit into it, and dense enough not to be cut when twisted.
Wine cork
Using a cork plug, you can also unscrew the base; to do this, the plug is cut to its size and inserted inside. When scrolling, you can remove the base. You can also use a cork in a similar way to potatoes, string it onto the remaining pieces of glass.
Inserting the plug into the base.
Disassembling the cartridge
Important! The method is only suitable for old type collapsible carbolite cartridges. Modern ceramic elements cannot be taken apart.
Carbolite cartridge of collapsible design.
The cartridge consists of two parts: a threaded connection and a core with contacts. First you need to separate the base. Use your hand or pliers to pull out the base. If the cartridge is not damaged, it can be collected and used again.
Measures to prevent such troubles
The first thing to note is that you should not install lamps that exceed the limit of the possible power of the socket or lamp so that they do not burst. The fact is that the more current a lighting device consumes and the brighter it shines, the more heat is generated during its operation. And this can lead to the situation described above.
Of course, the lamp must be screwed tightly into the socket, but still, during installation, you need to find such a tightening point so that you can then unscrew it. There is no point in pulling the lamp as far as you can. You can also pre-coat the base threads with graphite.
There is no need to leave greasy stains on the glass; it is advisable to carry out the work with gloves. In addition, your hands will be more protected if the lamp breaks.
You should purchase lamps only in trusted stores and do not chase after cheap goods, which are most often illiquid, i.e., should not have gone on sale at all.
By following simple rules, you can be sure that even if such a nuisance happens, you can easily get rid of it.
Features of unscrewing a light bulb from a suspended ceiling
When a light bulb in a suspended ceiling stops producing light, it needs to be replaced. But the design features complicate the task a little; you even have to completely disassemble the lamp.
Depending on the installed lamp, replacement occurs as follows:
- Filament elements. It’s not difficult to deal with, you need to turn off the machine, unscrew the old light bulb and screw in a new one in its place.
- Halogen and LED. In such a situation, the task becomes more difficult. As with any electrical work, first de-energize the room. Then the protective cover and ring are removed from the lamp. If the light bulb is too tight in the socket, it may be slightly loosened.
Removing the protective glass.
Advice! When working with halogen lamps, it is better to use a cloth or gloves, because oily skin secretions have a bad effect on the operation of the device.
There are suspended ceilings where a continuous device is installed, in which the light bulb and the lamp are components of one structure. They do not provide for the replacement of one of the elements; they will have to be changed all together.
How does a standard cartridge work?
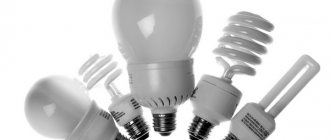
To replace the cartridge in a chandelier, you need to understand its structure and types. For a 220 V network there are 3 types of this product:
- E14;
- E27;
- E40.
Depending on the lamp base used in the lamp, you need to choose one type or another. There are such parts of the cartridge:
- cylindrical body;
- bottom;
- ceramic liner.
The first contains a sleeve with an Edison thread into which the lamp is screwed. The holder body, depending on the model and purpose, can be made of the following materials:
- plastic;
- carbolite;
- ceramics;
- metal;
- silicone
Older models were made of ceramic. But at high temperatures they crumbled and deteriorated. Nowadays the most common material is plastic. Products should be used according to the labeling, since exceeding the power of electric lamps during prolonged use will lead to a change in the properties of the plastic, and consequently, to its destruction. Even in modern ceramic cartridges, contacts burn out at high temperatures.
The most common types of holders used in everyday life are E14 and E27. Their differences lie in the method of fastening, which can be:
- suspended from the ceiling with threaded washers;
- with a straight flange, which allows you to fix the product on the surface;
- with an inclined flange for surface mounting.
When the lampshade is attached to the support, washers are used to mount and secure the holder. The holders for attaching to the nipple have clamps instead of screws. This allows you to connect conductors without violating their insulation. Although threaded holders are easier to use, they are less durable. This is especially true for cartridges used for a long time.
Safety rules when removing and replacing a light bulb
Working with electricity is unsafe, especially for a person without experience. You can always forget something by mistake or do it wrong. Therefore, before unscrewing and replacing light bulbs, you should adhere to the following rules:
- You definitely need to turn off the power to the room. If you plan to use liquid agents to corrode rust, it is better to first turn off the power and remove the lamp.
- All measuring and twisting tools should be at hand before starting.
- Screwdrivers, pliers and other tools must have rubberized handles. Other materials are covered with electrical tape.
It is safer to use tools with rubberized handles. - When screwing in light bulbs, the new element must be similar to the old one and be suitable for the lamp.
- Work must be carried out wearing rubber gloves and safety glasses.