Home page » Blog » How to replace an electric cartridge: causes of failure
The light bulb in the ceiling lamp stopped shining, and after replacing the diode, the lighting was never restored, the reason lies in the socket: burnt out contacts, broken housing. What to do in this case, how to replace the cartridge in the chandelier and return the required level of lighting? The fastest and easiest way is to call an electrician.
Finding the problem
First, they look for the source of the problem that caused the chandelier to become faulty.
Switch
If the lamps are working, but the lighting is not working, the first thing to check is the switch. Most often, the cause of failure is burnt out contacts, which prevents electricity from reaching the lamp sockets. After disassembling the switch, the conductors are inspected at both the input and output. The status of the contacts is also checked. During the repair, the contacts are cleaned to a metallic shine and the housing is reassembled in the reverse order.
Note! If some of the light bulbs in a chandelier with several lighting groups stop turning on, the problem usually lies in burnt-out contacts.
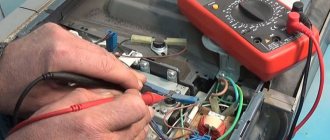
In addition to the external inspection, you should check the presence of current supplied to the housing. They also check whether there is voltage further along the chain - directly to the chandelier. The check is carried out using an indicator screwdriver. The lamp works normally when, after touching the terminal with a screwdriver, the light diode of the handle lights up.
Note! If the light does not light up after the first press, but turns on again, the problem is usually in the switch.
It happens that only one socket does not work. In this case, checking the switch shows its serviceability. The problem is the sockets or the quality of the wiring.
Light bulbs
First, the physical integrity of the tungsten filament is checked (we are talking about an incandescent light bulb). Take the lamp out of the socket and check it in the light for broken filaments. A whole thread indicates serviceability.
The continuity of the circuit should also be tested. For this you will need a multimeter. One of the probes of the device is installed on the thread, and the second - on the end of the light source. The movement of the arrow of the device indicates the serviceability of the lamp. An arrow that remains motionless indicates the need to replace the light bulb.
In the case of an LED lamp, a test is also carried out using a multimeter. It happens that one of the diodes in the series circuit has failed, which is why the entire chandelier does not work.
Wiring
The reason for the chandelier not glowing may be a wiring fault. Check for voltage. To do this, dismantle the lamp to gain access to the conductors removed from the junction box. The voltage is checked using an indicator screwdriver.
In the case of old aluminum wiring, a violation of the integrity of the wires often occurs. When the wire is broken, the contact breaks. Correct the situation by extending the old wire to connect it to the chandelier body. However, a more reliable option is to replace the wiring with a modern one.
Note! If the voltage from the junction box is confirmed, but after pressing the key on the switch the light bulbs still do not light up, the problem is in the lamp itself.
Product marking
Depending on the diameter of the threaded part of the assembly, the products have several varieties:
- Cartridge E14. The product is called minion. The diameter of the screwed part is 14 m. It is used not only in chandeliers, but also in microwaves or refrigerators.
- E27. The classic and most common chandelier socket. Installed in most lamps.
- E40. These are large incandescent lamps. They are needed for street lighting.
- Bayonet element. It does not have a thread, but is fixed in a special way. The reason is that it is resistant to strong vibrations. With its help, vehicles are illuminated where a threaded connection is not applicable.
Chandelier repair
To repair a chandelier, disassemble its body and check the joints between the wires. Also pay special attention to the condition of the insulating layer. A common cause of a malfunction is a short circuit, after which one of the conductors burns out.
In addition, lamp sockets are subject to mandatory inspection. Elements made in China especially often fail. If the reason is in the cartridge, it cannot be repaired, this part is replaced with a new one.
If the ballast capacitor fails, strip the wire coming from it and connect a multimeter. A normal voltage level indicates failure of the series lamp chain. If the voltage deviates from the norm, replace the capacitor.
Advice! If replacing the lamp does not give a positive result, it is recommended to treat the board with a degreasing solution.
If the chandelier does not turn on, the control relay may be the cause of the problem. The functionality of the device is checked with a multimeter with a conductor from the relay connected to it. If a fault is found, replace the relay with a new one.
Other problems
The most common faults are described above. However, those who decide to repair the chandelier themselves are faced with others:
- Incompatibility of new lamps with old chandelier models.
- Poor quality twisting of conductors. Insufficiently twisted conductors prevent normal contact, which leads to lighting problems.
- The power of the screw-in lamps does not match the needs. For example, a chandelier is designed for four 60-watt light bulbs, and four 100-watt light sources are installed. For this reason, not only power supplies fail, but also transformers.
- Fuses blown. In the housings of modern chandeliers, fuses are used to break the circuit in the event of a short circuit. Repair work in this case consists of finding the blown fuse, dismantling it and installing a new component.
- Broken chandelier. A break occurs due to mechanical impact on the device or in case of poor-quality hanging (weak fastening).
How to unscrew a light bulb if the bulb has exploded
Situations often occur when the bulb bursts during operation of a lighting device. The causes of this problem are poor quality of the light source, sudden changes in electrical voltage, prolonged use of the device, external influences and other factors.
Plastic bottle
If you don’t have a set of tools at hand, you can use improvised means to solve the problem. One suitable option is a plastic bottle. The instructions for unscrewing the light source are as follows:
- remove all fragments, as they will interfere and can lead to injury;
- take a plastic bottle of any size with a standard neck;
- remove the lid and heat the neck until the material melts;
- the neck is placed in the base and wait for the plastic to cool;
- gently pull the bottle to remove the base along with it.
Pliers
A more convenient way is to use pliers, which can be used to grab small components. To remove the base, pick it up with a tool and twist it outward. To prevent the lampshade from coming off, you need to hold it with your hands. When performing manipulations, it is important not to violate the integrity of the cartridge circumference.
If the base is firmly in place and cannot be rotated, you can try bending the sides inward and then continue unscrewing. When removing, the base may become deformed, but this will only simplify the work. The main thing is to make sure that the base does not damage the cartridge.
In a situation where it is not possible to conveniently grasp the part by the edges, you should place the pliers inside the base and push the ends as far apart as possible so that they rest against the side walls. Then the pliers are rotated counterclockwise.
Chandeliers with remote control
Lighting devices with remote controls often break down. The main signs of failure of such chandeliers:
- despite transmitting a signal from the remote control, the lamps do not light up;
- Some modes do not function, the chandelier switches off spontaneously;
- the same modes do not work when controlled from the remote control, but function when switched manually;
- flickering occurs that is not caused by any human action, and spontaneous switching between modes occurs.
The listed problems are the most common, but a combination of several of them is rare. Typically 1 or 2 components of a remote control chandelier need to be replaced.
The search for a problem in a lamp with a remote control begins with checking the batteries. If new ones are installed, but the chandelier still does not work, the next possible cause of the malfunction is the controller.
Different groups of lamps are most often connected in separate blocks. These elements are connected using a controller. A common situation is that it launches only some modules of the device. In this case, it will need to be replaced.
It happens that the light does not turn on either using the remote control or when pressing the switch. In this case, you should pay attention to the number of non-working components. One lamp may burn out. However, when all the bulbs do not work, the likely problem is in the electronic transformer. This element is replaced with a new one, while working with clean gloves.
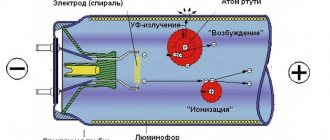
How does a standard cartridge work?
To replace the cartridge in a chandelier, you need to understand its structure and types. For a 220 V network there are 3 types of this product:
Depending on the lamp base used in the lamp, you need to choose one type or another. There are such parts of the cartridge:
- cylindrical body;
- bottom;
- ceramic liner.
The first contains a sleeve with an Edison thread into which the lamp is screwed. The holder body, depending on the model and purpose, can be made of the following materials:
Older models were made of ceramic. But at high temperatures they crumbled and deteriorated. Nowadays the most common material is plastic. Products should be used according to the labeling, since exceeding the power of electric lamps during prolonged use will lead to a change in the properties of the plastic, and consequently, to its destruction. Even in modern ceramic cartridges, contacts burn out at high temperatures.
Crystal chandelier repair
The most common problem with a crystal chandelier is the breaking off of structural elements due to mechanical stress. Ordinary glue in this case is not a solution to the problem, since the seam will be noticeable after gluing. Therefore, it is recommended to use a special silicate glue.
Before gluing the crystal fragment, prepare the surface to give it better adhesion. To do this, the crystal is washed with soapy water, and then dried and degreased. Another result of proper surface preparation is that the seam will be less noticeable.
Glue is applied to the crystal, after which the elements are connected and held for a while so that they set. Then, using a piece of cloth, remove excess glue from the surface of the lighting fixture. After a few hours, the parts will be completely glued together and the chandelier will be ready for use as usual.
How to replace
Installation of a new socket in a chandelier must be carried out according to sequential instructions. By following the basic rules, you will be able to avoid dangerous situations and common mistakes.
Turning off the light on the electrical panel
Before starting direct replacement, it is necessary to de-energize the room where the work will be performed. For convenience, you can turn off the power to the entire apartment.
To turn off the electricity, just switch the corresponding levers in the electrical panel.
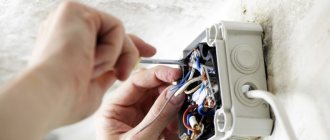
Disconnecting wires
Having turned off the electricity, you can proceed to unscrewing the fixing elements that hold the chandelier. As a rule, such elements are hidden bolts on the body or a hanging hook and a set of wires.
Dismantling the chandelier
It is possible to install a new cartridge without dismantling the lighting fixture, but this will be more difficult. For ease of work, you need to remove the chandelier by disconnecting the conductors, and then carefully lift it from the mount.
Analysis of the lamp
To disassemble the light source, you need to unscrew the lamp and remove the shade. In most situations, this will not require specialized tools, and it is possible to do the entire job by hand. When disassembling the lamp, it is important to be careful not to break fragile structural elements.
Setting the device to the desired mode for testing
A multimeter (tester) is a compact device that allows you to perform various electrical measurements. It is useful for identifying faults in electrical networks and power tools.
The testing procedure involves checking the integrity of the electrical circuit and the presence of direct contact. In most tester models, this mode is built-in initially. To activate it, you need to turn the switch in the center of the device to the appropriate position (towards the buzzer or diode icon).
In addition, it is necessary to connect the measuring probes correctly. The black probe should be inserted into the holes marked “COM” and the ground symbol. The red meter must be inserted into the connector marked “VΩmA”. Testing can begin immediately after placing the controls in the required position.
The metal tips must be closed, after which a beeping sound should be heard from the buzzer. The display will show zero values, which means there is no resistance or discontinuity. If the 220 Volt circuit is open, the number “1” will be displayed on the screen.
Is it worth repairing energy-saving lamps?
The decision of whether or not to repair a lamp largely depends on the number of faulty light sources. If we are talking about a single burnt out light bulb, you should not bother with the labor-intensive repair process. When there are a lot of lamps, repairs make economic sense. From parts of several lamps, it is possible to assemble one that will be operational. It is known from practice that to assemble one light bulb you will need parts from 3-4 damaged light sources.
You should know! Any lamp is designed for a certain service life and is characterized by a limited switching reserve. The service life is most often indicated in hours (for example, 10 or 20 thousand hours).
When deciding to repair a lamp, you should think about the upcoming costs. You will have to spend money on buying parts (if they cannot be taken from light bulbs that have burned out), on a trip to the store or to the market. In addition, the process of searching for reasons is quite labor-intensive, so time should also be taken into account.
Note! Repaired lamps often have a defect: the lighting is connected with some delay.
How to properly disassemble the cartridge?
To properly disassemble the holder, it is necessary to determine how the cylinder is fixed. If these are latches, they must be carefully bent so as not to break.
How to properly remove the base from the socket?
Sometimes it is difficult to pull the holder out of the chandelier because it is firmly fixed inside. When unscrewing, only the flask can be removed. To solve this problem, you need to unscrew the housing cylinder, holding it by the bottom. After this it will be much easier to remove the base. If the upper part of the product does not unscrew, you need to remove it with pliers.
Preparing the multimeter for work
We take the device out of the case or case.
First of all, we carry out a visual inspection. The case must be intact, the battery compartment cover must be installed without distortion. Visually assess the integrity of the wires and probes. The lack of insulation, which can simply crumble from time to time, is restored with electrical tape. Heat-shrink tubing, if available, will also help. The probes should also be inspected, and chips should be wrapped if necessary. Set the multimeter selector to ohm measurement mode, at 200 ohms. We plug the black cable with the probe into the Com socket. Red - into the socket with symbols of measured quantities named after Alessandro Volta, Andre-Marie Ampere and Georg Ohm - V, A and Omega.
The indicator should show one. If this is not the case, the device needs repair. We short-circuit the probes. The display should show zero. If this happens, the device is working properly. If the numbers change and are displayed dimly, try replacing the device’s battery with one that is known to be fresh and working. It didn’t help - the multimeter needs to be repaired. To check the light bulb, set the multimeter selector to the open circuit search symbol. A diode is shown schematically on the case in this place.
Switch fault
Another common cause of no light may be a faulty switch. Inexpensive mechanical switches have a relatively short lifespan and can fail quite unexpectedly.
As a rule, this situation does not arise immediately; the switch gradually works worse and worse , and then finally stops turning on the light.
In this case, repairing the switch is not recommended , since a faulty switch can cause a fire; the best solution would be to replace the switch with a new one.
Checking the incandescent lamp
220 V incandescent lamps operate on alternating current networks, so the polarity when connecting them is not important.
Checking in call mode
We close one of the probes to the central contact. The second is on the side of the base body, where the base has a thread. If the lamp is working, a beep will sound and the display will show resistance. As a rule, the lower limit is about 3 ohms, the upper is about 200 ohms.
Checking in resistance measurement mode
A continuity test in resistance measuring mode will help not only diagnose the performance of the light bulb, but also approximately determine the current consumed, which will lead to consumption. This can be useful when the lamp power can only be guessed due to the loss of markings.
It should be remembered that loose contact of the probes with the base increases the resistance. Therefore, when in doubt, the lamp power is lower rather than higher. To measure the lamp resistance, move the multimeter selector to the resistance measurement sector. We set it to 200 Ohm. The table below is valid for lamps with a nominal voltage of 220 V and E27 or E14 sockets.
| Resistance, Ohm | 150 | 90-100 | 60-65 | 45-40 | 35-30 | 25-28 | |||
| Power, W | 25 | 40 | 60 | 75 | 100 | 150 | |||
If during measurement the unit on the device display does not change to another number, the lamp is faulty, there is a break inside.
The red arrow indicates the measurement position within the range of up to 200 ohms
An example of how to ring or measure the resistance of an incandescent lamp filament. Using the above method, measure the resistance of the coil on the lamp. Without going into mathematical formulas for calculations, you can compare the ratio of resistance to lamp power using a pre-compiled table.
Table of the ratio of power to filament resistance of a 200 V incandescent lamp
| Ω | W |
| 150 | 25 |
| 85 | 40 |
| 63 | 60 |
| 48 | 75 |
| 38 | 100 |
| 27 | 150 |
Resistance error may be ±2-3 ohms.
Incandescent lamps in 12 V vehicles are checked in a similar way, only it must be taken into account that in some cases in the headlights they have two spirals, for high and low beam. You can check tubular fluorescent lamps, they also have two spirals at the edges between the electrodes.
Making your own probe
It is difficult to ring a small LED with a standard probe, so for comfortable use of the multimeter you can make it yourself. Several elements are used for this.
Sewing needle
You will need:
- housings from black and red handles for handles;
- plugs and cable;
- steel sewing needles 35-45 mm in length and 0.8-1 mm in diameter;
- scraps of copper wire (pair - 250-300 mm long and pair - 120-150 mm long);
- rosin or alcohol rosin.
The manufacturing process is carried out in stages:
- The wire is cut and tinned with solder.
- The needles are tinned with solder so that there is 8-10 mm left to the sharp parts.
- Conductors 0.3-05 mm in diameter are attached next to the ears of the needles, and then wound in turns to the tinned area.
- The winding is covered with solder.
- The tinned cable is bent in half around a screwdriver. The free sections are fastened together in a pigtail. The resulting loop is bent at an angle.
- The conductors are attached to the needles with a soldering iron.
- Plaque is removed from all joints using alcohol.
- A thread is wound in the center of the needles until bulges appear. They will need to be coated with Moment glue and inserted into the tips of the handle bodies, fixing them as evenly as possible.
- After the glue has dried, epoxy is poured into the cavities, which hardens for 24 hours.
- The ends of the probes are tinned and soldered to the plugs.
- To protect the shell from friction, problem areas are placed in a heat-shrink tube.
- Flexible conductors are made of red and black copper wires 1 m long.
- Tips with needles are connected to flexible conductors with a soldering iron. The handle pieces are fastened together. The optimal wire cross-section is 1.3 mm².
Plug
Dismountable plug
You will need:
- Soviet electrical plug with brass pins;
- old multimeter probes;
- plastic tube;
- wire with thick copper cores;
- banana plugs.
Making a probe from a plug
Progress:
- Removing the pins from the plug by unscrewing the top bolt.
- Removing the base from old probes - the pins can be removed with pliers.
- Separating the bent part of the pins with a file and turning them so that they fit with force into a piece of plastic pipe.
- Separating and stripping speaker wire.
- Tinning of cable ends and pin ends at soldering points.
- Inserting a wire into the base of the old multimeter leads and soldering a brass plug to it.
- Pulling the cable back and fixing the area where it enters the tube with heat shrink.