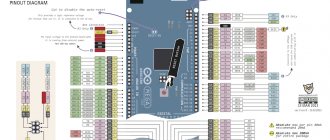
What kind of Arduino
Arduino is a programmable microcontroller. That is, this is a board on which you can write your program, and this board can control other things: for example, light a light bulb, make a sound, turn on an electrical appliance, measure temperature, send SMS.
At its most basic level, the Arduino simply sends and reads electrical impulses. For example, you can connect a thermometer to it, and the Arduino can read the temperature in the room. And then, depending on the program, send a signal to the device, which will turn on the fan.
Or you can connect a carbon dioxide sensor to the Arduino. Arduino can be taught to read the sensor every five minutes and, when the level of carbon dioxide exceeds the norm, beep, flash a light, or use a series of motors to open a window.
How to program Arduino
There are many expansion boards and sensors for Arduino. The board's applications are almost limitless: automation, security systems, smart home, music, robotics and much more. Here's what you can do on this smart Italian board and on its Russian and foreign clones.
Communication, interfaces
- GyverBus – communication using the GBUS protocol. Two-way communication of the Arduino network over one wire. Description
- Firmata is a standard library for communicating with a computer using the Firmata protocol. Description
- SoftwareSerial is a standard library for creating TTL Serial on any two pins, allows you to create an additional port for communicating with Bluetooth/GPS/GSM and other modules with Serial communication.
- AltSoftSerial – the best version of software Serial, uses a system timer
- SerialCommand - a lightweight library for communicating via a port using commands
- CmdMessenger is a powerful library for communicating via Serial port, with its own parser and a bunch of cool stuff. Description
- EasyTransfer – a library for communicating two Arduinos via a serial port
- Streaming – output to a port “in C++ style” using the < operator
- OneWire is a library for communicating via the one wire protocol, for example with DS18b20 temperature sensors. Arduino can be a “slave” for communication, read here
- SerialControl – a set of examples for controlling pin states using Serial commands. Description
- MiniPirate is a more powerful version of SerialControl, it allows you to use commands on the port to turn the servo, scan i2c and much more!
- MIDI_library – a library for working with musical devices via the MIDI protocol (via Serial, any Arduino is suitable)
- MIDI – MIDI library from the great PaulStoffregen (via Serial, any Arduino is suitable)
- arcore – another library for MIDI (USB-MIDI, only for Leonardo/Micro)
- MIDIUSB – another library for MIDI (USB-MIDI, only for Leonardo/Micro)
- HIDUINO – a set of tools for creating a USB MIDI device
- HID is a very powerful library for creating HID devices (mice, keyboards, gamepads and other USB controllers)
- ArduinoJoystickLibrary - another library for creating a full-fledged HID gamepad on Leonardo/Micro (ATmega32U4)
- CPPM – library for organizing communication using the CPPM protocol (for example, RC receiver Orange R615X)
- PPMEncoder – decoding and generating PPM signal for RC models
- PWMread – article + library for reading PWM signals from RC model receivers
- TVout is a library for outputting graphics to the TV screen via the AV input. Description
- X10 – library for communication using the X10 protocol via a 220V power line. Description here
- NicoHoodProtocol – universal wired communication protocol
Robot bartender with Bluetooth control
Complexity: 4/5.
Time: 5/5.
An indispensable device for any party: it runs on eight batteries, prepares a lot of cocktails and is controlled wirelessly. The mechanical bartender is based on an Arduino board, drives for positioning the shaker and serving drinks, and position sensors.
The main difficulty in manufacturing is engineering. You need to accurately screw all the parts and connect them together so that the container is exactly under the desired bottles.
Details: usamodelkina.ru.
Comparison with Arduino Uno, Nano, Mega
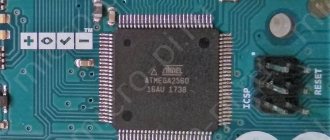
Unlike its predecessors, the Arduino Leonardo board runs on just this chip. An independent USB connector appeared here. It is based on the ATmega32u4 microcontroller, which has more functionality compared to Mega, Nano and Uno.
Additional differences:
- due to the lack of a separate chip for processing serial communication, serial ports are virtual in nature;
- when opening a serial port on a PC, an automatic restart does not occur;
- The device can be detected by the PC as a serial port, mouse, keyboard or HID device.
In the Leonardo model, the amount of RAM has increased and there are more PWM inputs. But the main change is the ability to connect the device via a USB connector, which significantly increased the ease of connection and functionality of the platform.
Glowing cube with 512 LEDs
Complexity: 3/5.
Time: 3/5.
A beautiful thing that can glow in time with music like a 3D equalizer and show 3D animation. It can also work as an unusual night light.
To assemble, you will need a wooden chassis with holes in it so that each tier is the same size and shape as the others. The number of LEDs in each face was not chosen by chance: 8 lamps = 8-bit logic, the easiest to program and control via a controller.
Details: instructables.com.
The smallest Arduino for your mini-projects + examples of the projects themselves
If you need small Arduino boards for DIY projects, this article is just the thing.
Do you want to create a wearable device based on Arduino, but the original board is too big? Or do you have another project in mind that requires a small board with a lot of features? This selection will help you choose what you need. It contains the smallest Arduino boards with different characteristics. They can be used to develop a variety of projects, from robots to wearable devices. There are also examples of projects.
Seeduino Nano
Let's start with the Seeeduino Nano.
This is a compact board similar to Seeeduino V4.2/Arduino UNO. It is fully compatible with Arduino Nano - both in size and pinout. Despite its small size, it is quite functional. We recommend using this board for beginners who want to start somewhere. Additionally, if you have codebase from a previous Uno project, it can be used with Nano. Specifications include 16 MHz 32 KB memory, 1 KB EEPROM, 2 KB RAM. The kit includes peripheral elements to expand the functionality of the project. There is also a Grove I2C connector that allows you to connect to hundreds of different sensors and actuators.
Why not just use an Arduino Nano? It's a matter of price. So, you can get Seeeduino Nano for $6.90. But Arduino Nano already costs $22. Seeeduino also has a larger number of peripherals.
If this is not enough, then you can purchase Grove Shield for Arduino Nano. The kit comes with 3 digital connectors, 3 analog, 1 L2C connector and 1 UART.
Characteristics of Seeeduino Nano
- Microcontroller: ATmega328
- Operating voltage: 5V
- Digital I/O Pins: 22
- PWM Enable Pins: 6
- Analog I/O pins: 8
- Flash Memory: 32KB
- SRAM: 2KB
- EEPROM: 1KB
- Frequency: 16 MHz
- Size: 45 mm x 18 mm
- Price: $6.90
Arduino MKR1000
And this is a board for those who need wireless WiFi communication.
Do you have a minimum skill in creating network devices? If yes, then Arduino MKR1000 is just for you! The Arduino MKR1000 is designed to be a practical and cost-effective solution for developers whose projects involve a wireless communication module. The basis of the board is Atmel ATSAMW25 SoC.
It consists of three main blocks:
- SAMD21 Cortex-M0+ 32bit low power ARM MCU
- WINC1500 low power 2.4GHz IEEE 802.11 b/g/n Wi-Fi
- ECC508 CryptoAuthentication
ATSAMW25 also includes a built-in antenna.
There is a module for connecting a battery, which makes it possible to work autonomously from 5V. The WIFi module consumes very little power, plus it is equipped with Cryptochip for secure data exchange. This board is also compatible with the Arduino IDE for easy use of the Arduino Software (IDE).
A USB port is used to supply power, so the system can operate with or without a battery.
Characteristics of Arduino MKR1000
- Microcontroller: SAMD21 Cortex-M0+ 32bit low power ARM MCU
- Operating voltage: 3.3V
- Digital I/O Pins: 8
- PWM Enable Pins: 12
- Analog I/O pins: 8
- Flash Memory: 256KB
- SRAM: 32KB
- EEPROM: –
- Frequency: 48 MHz
- Size: 61.5mm x 25mm
- Price: $34.99
Arduino Pro Mini
Of course, one cannot help but include Arduino Pro Mini in the selection of Arduino mini-boards.
It's effectively an Arduino Pro packaged into a much smaller form factor. In addition, some elements have been removed to minimize size. The small size of the board allows it to be integrated into any projects. True, to work with the software you will need not only a USB cable, but also a signal converter and an external board. For example, USB CP2102.
Arduino Pro Mini comes in two versions - 5V/16MHz and 3.3V/8MHz. In the first case, the board operates at the same voltage and at the same speed as the Arduino Nano and Micro. The 3V board is slower, but consumes less power, which makes it possible to increase battery life.
Arduino Pro Mini Specifications
- Microcontroller: ATmega328
- Operating voltage: 5V/3.3V
- Digital I/O Pins: 14
- PWM Enabled Pins: 6
- Analog I/O pins: 6
- Flash Memory: 32 KB (2KB reserved for Bootloader)
- SRAM: 2KB
- EEPROM: 1KB
- Frequency: 8 / 16 MHz
- Size: 33 mm x 18 mm
- Price: $9.95
Arduino MKR VIDOR 4000
Although it is not the smallest Arduino, it does boast a number of unique features that Arduinos typically don't have.
Plus, it is very small, which makes it possible to integrate the board into the smallest projects. If you're looking for something very specific that Arduino doesn't offer, something more complex, check out the customizable and powerful MKR VIDOR 4000 board.
With the MKR VIDOR 4000 you can customize everything you want. Here are the specs: 8MB SRAM; 2 MB QSPI Flash chip - 1 MB allocated for user applications; Micro HDMI connector; MIPI camera connector; as well as WiFi and BLE based on the U-BLOX NINA W10 series. The board also includes a classic MKR interface where all pins are driven by both SAMD21 and FPGA. There is also a Mini PCI Express connector with 25 user-configurable pins.
The FPGA contains 16K logic gates, 504KB of on-chip RAM, and 56 18×18-bit HW multipliers for high-speed DSP. Each pin can be configured for UART, (Q)SPI, High Resolution/High Frequency PWM, Quadrature Encoder, I2C, I2S, Sigma Delta DAC, etc.
The built-in FPGA can be used as an audio and video processor. This board is also equipped with SAMD21 chip. Communication between the FPGA and SAMD21 is seamless.
Characteristics of MKR VIDOR 4000
- FPGA: Intel® Cyclone® 10CL016 (datasheet)
- Operating voltage: 3.3V
- Digital I/O Pins: 22 headers + 25 Mini PCI Express
- PWM Enabled Pins: All Pins
- Analog I/O pins: –
- Flash Memory: 2MB
- SRAM: 8MB
- EEPROM: –
- Frequency: 48 MHz – Up to 200 MHz
- Size: 83mm x 25mm
- Price: $70.90
Arduino Micro
Another representative of the Arduino family is the Arduino Micro board.
It is slightly larger than Nano. But the board is equipped with ATmega32U4 - this is the main difference from Nano. Micro has more features than Nano. These are 20 digital I/O pins, 12 analog inputs and 7 PWM pins. Also, with a built-in USB port, you can easily use it as a mouse, keyboard, etc. However, the Micro bootloader can only be programmed from USB, which requires a special driver.
But no converter adapters are needed, everything works out of the box.
If you are familiar with the Arduino Leonardo, then this is a smaller version of it. Micro is the smallest board in the ATmega32U4 family.
Specifications
- Microcontroller: ATmega32u4
- Operating voltage: 5V
- Digital I/O Pins: 20
- PWM Enabled Pins: 7
- Analog I/O pins: 12
- Flash Memory: 32 KB (4KB used by bootloader)
- SRAM:2.5KB
- EEPROM: 1KB
- Frequency: 16 MHz
- Size: 48 mm x 18 mm
- Price: $18.90
Seeeduino XIAO
This is the smallest Arduino board of all that are presented in this collection. At the same time, its functionality is excellent; it has a lot of features and interfaces that developers need so much.
The board is equipped with Microchip SAMD21 Arm Cortex-M0+. All main components are placed under a metal plate. This board is compatible with Arduino Zero and can be programmed using the Arduino IDE or Arduino Create.
Specifications of Seeeduino XIAO:
- Microcontroller: Microchip SAMD21G18 ARM Cortex-M0+ 48 MHz with 256 KB Flash, 32 KB SRAM
- USB – 1x USB type C port for power and programming
- I/O expansion
- Two 7-pin headers with 11x analog inputs, 11x digital inputs and outputs, 1x DAC, SPI, UART and I2C
- I/O voltage 3.3V (not tolerant to 5V)
- Misc – 1x user LED, power LED, 2x serial LEDs, reset pins, SWD pins, 32.768 kHz crystal oscillator
- Power – 5V via USB-C port, power pins (VIN/GND) for battery
- Dimensions – 23.5×17.5×3.5 mm
Projects based on Arduino mini-boards
What can be done based on these boards?
Heart rate monitor based on Arduino Nano
This is a budget version of a smartwatch, the only purpose of the device is to measure heart rate.
What is needed for the project?
- Seeeduino Nano / Arduino Nano v3
- uECG element
- 2.4G wireless module NRF24L01+PA
- Grove LED Ring (16-WS2813 Mini)
- LiPo battery
Smart House
What is needed for the project?
- Arduino Micro & Genuino Micro
- Raspberry Pi Zero W
- Espressif ESP8266 ESP-01
- Suite software
- Apple HomeKit software
- Apply Siri software
- Google Now software
Miniature keyboard
This is not a keyboard, but, in fact, a single touch button that can be programmed to perform various operations in the Windows environment.
What is needed for the project?
- Arduino Micro & Genuino Micro
- Postings
- Resistor 1 MΩ
- Soldering iron
What did you like most from the selection? What do you use most often in your work and why? Tell us about it in the comments.
Code lock burglar
Complexity: 5/5.
Time: 4/5.
This project was developed by hacker Samy Kamkar and is provided for demonstration purposes only. For hacking, in addition to the Arduino board, the author took servo and stepper motors to try combinations and connected everything on a homemade aluminum chassis. The algorithm is based on a simple search of all combinations, but the robot does it faster than a human.
Details: YouTube.
Nod Bang - nod your head and make a beat
Complexity: 2/5.
Time: 3/5.
The idea is not just to nod to the beat of the music, but to generate the sound yourself with your nods. Andrew Lee made a special device that monitors the position of the head and plays the desired sound when tilted.
He built an accelerometer into the headphones, the buttons are responsible for selecting the sound, and the Arduino is responsible for playing the sound on the computer via a MIDI interface. To make everything look more impressive, the buttons are backlit, and they also make a beat.
Details: YouTube.
Beginning of work
Once the necessary equipment is prepared and the project is developed, you can begin to complete the task.
Stages
When organizing a Smart Home system based on Arduino, you should follow the following algorithm:
- Installation of program code;
- Application configuration for the device used;
- Port forwarding (for router);
- Carrying out tests;
- Making edits and so on.
The Internet has all the necessary software for the equipment used - just download it from the official website and install it (see link above).
The application allows you to see information about sensors. If required, the IP address settings can be changed.
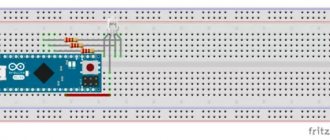
Sequence of actions when connecting to a computer
To get started with Arduino on Windows, follow these steps:
- Prepare the necessary equipment - USB cable and Arduino.
- Download the program from arduino.cc/en/Main/Software.
- Connect the board using a USB cable. Make sure the PWR LED lights up.
- Install the necessary set of drivers to work with Arduino. At this stage, you should start the driver installation and wait for the process to complete.
Then click on the “Start” button and go to the control panel. There, open the “System and Security” tab and select the “System” section. After opening the window, select “Device Manager”, click on the Arduino name and use the right mouse button to specify the driver update command. Find the line “Browse my computer for Driver software!”, click on it and select the appropriate driver for your board type - ArduinoUNO.inf (located in the drivers folder). It could be UNO, Mega 2560 or another. - Launch the Arduino development environment by double-clicking on the application icon.
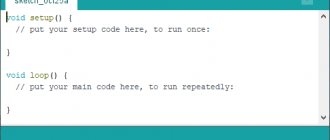
- Open the finished example (File - Examples - 1.Basics - Blink).
- Select a board. To do this, go to the Tools section, and then to the Board Menu.
- Install the serial port (you can find it by unplugging and plugging the cable).
- Download the sketch in Arduino. Click on “Upload” and wait for the TX and RX LEDs on the board to blink. Finally, the system shows that the download was successful. A few seconds after completion of work, LED 13 L should light up (it will flash orange). If so, the system is ready to perform tasks.
Working with a router
For the Smart Home to function properly, it is important to handle the router correctly. Here you need to perform the following steps - open the configuration, specify the Arduino IP address, for example, 192.168.10.101 and open port 80.
Afterwards you need to assign a domain name to the address and proceed to the project testing process. Please note that for such a system it is prohibited to use a public IP address, because in this case there is a high risk of hacking through the Network.
Singing plant
Complexity: 2/5.
Time: 2/5.
Essentially this is a theremin made in the form of a plant. All other operating principles remain the same: sound occurs when the hands move, and different movements generate different melody.
The board registers changes in signal amplitude, for which the author uses a homemade touch detector to analyze touches to a flower. In addition, we needed a Gameduino expansion board and the flower itself.
Details: Vimeo.
Remote control of a smart home
To connect the board to the Internet, you will need:
- Wi-Fi adapter configured to receive and transmit signals through the router;
- or a Wi-Fi router connected via an Ethernet cable.
There is also a Bluetooth remote control option. Accordingly, a Bluetooth module must be connected to the board.
There are several options for controlling an Arduino smart home: using a smartphone application or via the web. Let's look at each in more detail.
Management Applications
Since this design system is not a closed ecosystem, there are a lot of applications implemented for it. They differ from each other not only in the interface, but also in the performance of various tasks.
Blynk
The application for Android and iOS with an excellent design allows you to develop projects that have direct access to the event trigger on the Arduino board. But for the application to work, you need an Internet connection, otherwise it is not possible to interact with it.
Virtuino
A cool free application for Android that allows you to combine projects into one and control several boards at once using Wi-Fi or Bluetooth.
Allows you to create visual interfaces for LEDs, switches, counters, and analog circuit devices. It contains training materials and a library of knowledge about the process of working with the system.
Bluino Loader – Arduino IDE
The phone application is a software environment for Arduino coding. With its help, you can quickly and easily compile code into a file, and then send it via OTG adapter to the board.
Arduino Bluetooth Control
The application controls Arduino contacts and controls basic functions via Bluetooth. But, the program is not aimed at remote control, only monitoring.
RemoteXY: Arduino Control
Using the application, the user can create his own board management interface. The connection occurs via Wi-Fi, Bluetooth or the Internet via a cloud server.
Bluetooth Controller 8 Lamp
Created using Bluetooth modules HC-05, HC-06 and HC-07, the application provides eight-channel control. In this way, control and regulation of the Arduino operation is achieved, in accordance with each of the 8 LEDs.
BT Voice Control for Arduino
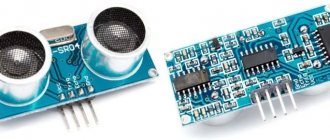
The application is specially designed for remote control of data from an ultrasonic sensor connected via Bluetooth via Arduino. Connections are made via the HC-05 module.
Once connected, the ultrasonic sensor will be able to transmit information about the distance to the object, which will be displayed in the application interface on the phone.
IoT Wi-Fi controller
An application with an interface that informs about the configuration of each input/output on the Arduino board. In the utility you can switch GPIO in real time and show the ADC value.
Web client
You can control the smart home board remotely by placing the receipt and processing of smart home data on a web server. Naturally, you need to create a server for the Arduino smart home yourself.
For these purposes, you will need an Arduino Ethernet Shield - a network extension for the Arduino Uno pins, which allows you to add an RJ-45 connector for connecting to the network.
When connecting remotely, it is necessary to provide external power to the board other than USB.
Then, connect the board via USB to the computer, and via Ethernet the board to the router, which distributes the Internet to the computer. When the connection is established correctly, you will see a green light on the port.
After that, you need to use the Ethernet shield libraries and write code in the IDE to create a server and send data to the server. An example of a homemade server is well described in this manual.
SMS notifications
Using the plug-in GSM library in the Arduino IDE you can:
- Work with voice calls.
- Receive and send SMS.
- Connect to the Internet via GPRS.
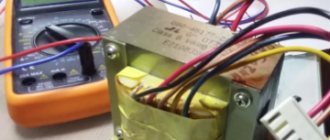
The circuit operates through a special GSM expansion board containing a special modem.
You can learn about creating a universal alarm system on Arduino, with sending SMS notifications to a smartphone, from the corresponding video instructions.
A lock that opens on a secret knock
Complexity: 3/5.
Time: 2/5.
An interesting thing for those who want to play spies or let only their friends into the room. The lock recognizes a knock on the door and compares it with the basic sound that the owner has set. If it matches, the drives move the lock and the door opens; if not, nothing happens, you can knock again.
To set a new knock on the opening, you need to hold the button on the handle and knock on the door in a new way. The piezo sensor recognizes vibrations and records them in the board's memory.
Details: grathio.com
DC interference protection
Separate food
One of the best ways to protect against power interference is to power the power and logic parts from separate power supplies: a good low-noise power supply for the microcontroller and modules/sensors, and a separate one for the power part. In stand-alone devices, they sometimes put a separate battery for powering the logic, and a separate powerful one for the power part, because stability and reliability of operation is very important.
DC spark arresting circuits
When the contacts in the power supply circuit of an inductive load open, a so-called inductive surge occurs, which sharply increases the voltage in the circuit to the point that an electric arc (spark) can jump between the contacts of a relay or switch. There is nothing good in an arc - it burns out particles of metal in the contacts, causing them to wear out and become unusable over time. Also, such a jump in the circuit provokes an electromagnetic surge, which can cause strong interference in the electronic device and lead to malfunctions or even breakdown! The most dangerous thing is that the wire itself can be an inductive load: you've probably seen how a regular light switch in a room sparks. A light bulb is not an inductive load, but the wire going to it is inductive. To protect against self-induction EMF surges in a DC circuit, an ordinary diode is used, installed counter-parallel to the load and as close as possible to it. The diode will simply short-circuit the surge, and that’s it:
Where VD is a protective diode, U1 is a switch (transistor, relay), and R and L schematically represent an inductive load. A diode MUST be installed when controlling an inductive load (electric motor, solenoid, valve, electromagnet, relay coil) using a transistor, that is, like this:
When controlling a PWM signal, it is recommended to install high-speed diodes (for example, 1N49xx ) or Schottky diodes (for example, 1N58xx ); the maximum diode current should be greater than or equal to the maximum load current.
Filters
If the power part is powered from the same source as the microcontroller, then power interference is inevitable. The simplest way to protect the MK from such interference is to use power capacitors as close to the MK as possible: electrolyte 6.3V 470 uF (uF) and ceramic 0.1-1 uF, they will smooth out short voltage dips. By the way, an electrolyte with a low ESR will cope with this task as efficiently as possible.
An LC filter consisting of an inductor and a capacitor can handle noise filtering even better. The inductance should be taken with a nominal value in the region of 100-300 μH and with a saturation current greater than the load current after the filter. The capacitor is an electrolyte with a capacity of 100-1000 uF, depending again on the current consumption of the load after the filter. It is connected like this, the closer to the load, the better:
You can read more about calculating filters here.
Flower pot with automatic watering
Complexity: 4/5.
Time: 3/5.
A useful pot for those who forget to water their flowers before leaving or simply don’t know how often to water them. All electronics, pumps and water container are located inside the pot. For each plant, you can program its own watering regime in each pot.
Main characteristics of the miracle pot:
- built-in water tank;
- soil moisture level control sensor;
- water supply pump;
- water level sensor in the tank;
- LED indicating lack of water in the tank.
Details: usamodelkina.ru.
Drum machine
Complexity: 1/5.
Time: 2/5.
A simple drum machine on Arduino. The project is interesting because this is not an ordinary search of recorded samples, but real sound generation using built-in hardware. There is also an audio spectrum analyzer: through the video output you can look at diagrams and frequency characteristics.
The mathematical basis of this device is the Fourier series expansion, which is solved by connecting the standard library.
Details: YouTube.
avr-libs
The Arduino IDE compiler includes a set of standard libraries for AVR microcontrollers (the so-called toolchain - a set of tools), you can simply connect them and use their capabilities. A complete list and documentation for all libs is here. Here I will list the most useful and interesting ones (the name will be a link to the documentation):
- math.h is a library with a bunch of math functions. Connected by default
- time.h – library for working with time. Accounting, conversion, time zones, etc.
- avr/eeprom.h – native library for working with EEPROM. Discussed in detail in this lesson
- avr/power.h – MK consumption control library: system frequency divider and peripherals on/off
- avr/sleep.h – library for controlling the power consumption mode of the MK
- avr/wdt.h – watchdog timer management
- util/delay.h – library with delays based on processor clock cycles (works without timer 0)
Walking robot
Complexity: 2/5.
Time: 1/5.
An easy-to-make four-legged robot that walks and independently overcomes obstacles a centimeter high.
To make it, you will need servos for the legs, some wire and any plastic from which the chassis is made. For power supply - a battery of any model, which is mounted on the back of the robot.
Details: xakep.ru.
Robot vacuum cleaner
Complexity: 4/5.
Time: 5/5.
Dmitry Ivanov from Sochi has assembled a real robot vacuum cleaner that does everything the same as industrial devices, only with the ability to fine-tune it to suit you and your apartment.
The main parts are an Arduino board, 6 infrared sensors, a turbine with a motor and brushes, and a battery. The robot also has collision sensors that help it avoid obstacles, and a battery controller that monitors the battery level and warns that the vacuum cleaner needs to be charged.
Details: habr.com.
Learning the basics of Arduino
Using the Arduino 2 Handbook application, you can master the material within two weeks. The application is completely offline and does not require an Internet connection. It describes the following information: functions, data, operators, Arduino libraries.
After mastering the basics, you can visit the Habrahabr resource, which contains 100 lessons on programming on Arduino.
For those who are accustomed to drawing knowledge from books, “Jeremy Bloom: Learning Arduino” will be a wonderful guide for theory and practice.
The most popular Arduino tutorial
The book provides basic information about Arduino hardware and software. The principles of programming in the Arduino IDE are described. The author of the book teaches the analysis of electrical circuits and reading technical specifications. The information from the book will help you decide in the future on the choice of suitable parts for creating a smart home.
The author gives examples of the operation of electric motors, sensors, indicators, servos, and various data transfer interfaces. The book contains illustrated components, wiring diagrams and program listings. Most importantly, the components for practice that the author works with are not expensive, not complicated and popular material for experimental assemblies at home.