To install an intercom in the entrance of an apartment building, you need to have knowledge of electronics, skills in electrical installation and an understanding of the principle of operation of the device. Let us note that if any technically competent person can do some work with his own hands, then for installation and connection, for example, of a controller or switching unit, it is advisable to also have specialized knowledge. In addition, such actions require agreement with the management company and residents.
What is a video intercom
What is a Video Intercom
A video intercom is a self-contained intercom system used to manage communications between the entrance to a building and the occupant inside the building. A characteristic feature of systems of this type is the presence of two communication channels:
- Audio communication - a person inside the house can hear the voice of a person asking to be allowed into the building. The audio channel can come from the main intercom or be connected separately. The first connection option is usually used because it is simple and reliable, and the owner of the house does not need to carry a separate audio cable.
- Video calling - a person can find out what the person making the call looks like. In the case of a multi-story building, the video channel is usually connected in two places - at the entrance to the entrance and at the entrance to the apartment. This allows you to significantly increase the reliability of the system (at night it is difficult to see the person at the entrance to the entrance).
Video intercom systems can have different designs and methods of organizing the signal. Typically, the video device is connected to an existing audio intercom, which is found in many modern homes. An intercom can be installed both in high-rise buildings and in private houses, which provides a high level of protection. If an intercom is installed, a person is allowed into the apartment according to the following scheme:
- A video camera is installed at the entrance to the entrance (usually it is built into the canopy). To organize a call, a person from the street dials the apartment number on the external panel of a conventional audio intercom. After this, the signal from the camera and audio device goes to the intercom panel inside the apartment, and the person can see the picture and hear the sound from the street.
- If a person in an apartment recognizes a person from the street, then he lets him inside the entrance. A separate audio and video communication system is installed at the entrance to the apartment (usually it is installed instead of a bell). To gain access to an apartment, a person on the street presses a button, and a person inside the apartment receives picture and sound. Audio communication is two-way, so people can talk freely. If a person in the apartment recognizes a person from the street, he presses a button and lets him into the apartment.
Note! A video camera may not be installed at the entrance to the entrance. In this case, negotiations are conducted only over an audio line. And the second step will be ordinary - a person approaches the apartment, presses the call button and negotiates using an audio and video communication system.
How can I connect a video intercom?
At first, audio intercoms were the most common; with their help, a visitor could call the owners of the apartment to whom he came. Thanks to audio communication, the owner had the opportunity to communicate with the guest to understand whether to let him in or not. However, now video intercoms are considered more effective, because with their help you can hear and also see the guest.
Now connecting an additional video intercom to the entrance intercom is no longer a problem and there is no need to completely change the system to improve it.
After combining the two systems, the signal will go to one monitor and there will be no need to install two subscriber devices: from a regular intercom in the entrance to a video panel on the floor. It is worth understanding in more detail the methods for implementing this task.
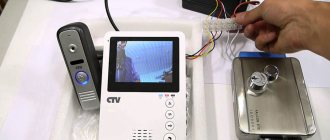
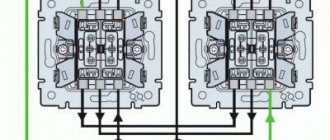
The picture shows a four-channel video intercom coordinated with the entrance intercom
Types of intercom systems
Today in Russia two types of intercom systems are used - audio intercoms and video intercoms. In addition, devices may differ in the number of subscribers that can be connected to the device. Below we will look at each communication option in more detail to understand their advantages and disadvantages.
Audio intercoms
Audio intercoms are good old systems that are installed in almost all modern homes. The device consists of the following structural blocks:
- External panel with dial . The device provides communication using the “one to many” model, and to call an apartment you need to dial the number of the corresponding apartment on the dial (other persons will not hear the conversation). The device is equipped with both an audio receiver and an audio transmitter - this allows people to fully communicate.
- Receiver block with tube . It is installed inside each apartment, and negotiations are carried out via audio communication using a handset. The device is also equipped with a special button - if a person wants to launch a person from the street, the person presses the button, which leads to the unlocking of the lock on the door.
- In addition, the audio intercom includes additional devices . These are an electromagnetic bell (locks the door), a rammer (automatically closes the door when a person enters), key devices (brought to the panel with a dial to open the door) and others. The individual components of the system are connected to each other (including the panel and the receiver unit) using wires.
An audio intercom is a simple, inexpensive device that has a simple operating principle, rarely breaks down and provides a high degree of protection. However, it does not allow you to see the person who enters the house. Therefore, an intruder can use tricks to get into the house. For example, he may introduce himself as a policeman or a neighbor from the top floor, but due to the lack of a video signal, it will be impossible to identify such a person.
Access video intercoms
Access video intercoms
Access intercoms are usually designed as an auxiliary device that is connected in addition to the main intercom. The connection is carried out on one (only at the entrance to the apartment) or two levels (at the entrance to the apartment and at the entrance to the entrance). The video intercom includes the following elements:
- Audiovisual call unit with integrated camera. Installed at the entrance to the apartment instead of a regular bell. With the help of this system, a person from an apartment can see exactly who is trying to get into his apartment. Video communication is one-way, but audio communication is two-way. This allows for full-fledged negotiations - while the person in the apartment remains completely incognito.
- Audiovisual signal receiver unit. It is a stand-alone panel that is installed in the apartment instead of a receiver unit with an audio intercom handset. Connects to the call block, which allows you to see and hear the person who wants to get into the apartment.
- Interface module (adapter). An interface module is a small device that allows you to assemble disparate elements of the system together (audio intercom, video call, electric lock control system). Without this element, a full-fledged video protection system will not work.
Note! The adapter is purchased separately and must be compatible with audio and video intercoms. Some audio intercoms are equipped with a built-in interface module.
By number of users
In addition, intercoms may differ in the number of users, communication between whom it can provide. There are two main categories of devices:
- Devices operating according to the “one-to-one” . In this case, communication is provided between two parties - between people on the street and people indoors. Devices of this type have a very simple design and are usually installed in private homes.
- Devices operating according to the one-to-many . In this case, communication is provided between the “street” and all subscribers who are connected to the system. When a person on the street wants to get in touch, he dials the desired channel (usually an apartment number). Devices of this type are more difficult to operate, but they can be installed on multi-story buildings.
Device Manufacturers
Video intercom VIZIT М427С and calling panel VIZIT
Home video intercoms from the famous Metakom brand are distinguished by their simple design, consisting of a handset and a control panel. The advantages of these products include:
- absence of mechanical contacts, which eliminates problems with their oxidation and blocking of buttons;
- entrance doors open only if the user knows the digital code;
- ease of installation and maintenance of the system, as well as the ability to reprogram it.
Inexpensive and high-quality Vizit brand products from domestic manufacturers are very popular in Russia. The outer panel of the device is designed to prevent it from being hacked. Such intercoms are able to work in harsh winters and in adverse weather conditions. Their configuration is selected according to the client’s order and may contain a video and audio path. At the request of the consumer, a control module is separately mounted, which automatically determines the number of connected subscribers.
Connecting a video intercom to a common intercom
Connecting a video intercom to a common intercom
The main way to install a video intercom in an apartment building is to connect the device to an already installed regular intercom. There is nothing complicated in installation, so you can do it yourself. To connect you will need the following devices:
- Working audio intercom . The device is installed on the entrance door and serves to control the entry of people into the house. We will connect a video intercom to this device.
- Video intercom . The device consists of a block for audiovisual calling (placed on the landing) and a block for receiving a signal (placed in the apartment). We will connect these devices to the audio intercom.
- Interface module (adapter). This device serves to synchronize the operation of the audio and video intercom, as well as additional devices (if any).
- Assistive devices . This could be an external surveillance camera near the entrance door, a lock for automatically locking the apartment door, and others.
Note! The presence of auxiliary devices (including an external camera) is not mandatory. But you can’t do without an interface module.
What is a system for combining an apartment video intercom with a general one?
The combined apartment intercom system consists of several autonomous elements:
- Audio intercom that was installed on the house by default. This device is used for negotiations over an audio channel. The device controls the entrance of people to the entrance.
- Video intercom, which will be placed next to the apartment door. The device is used for negotiations via audio and video communications. The device controls the entry of people into the apartment.
- Auxiliary elements. For example, you can place a video camera next to the entrance door, with which you can see all the people who press the audio intercom call button.
Adapter selection
To connect an audio and video intercom you will need to buy an adapter. What to consider when choosing:
- The adapter looks like a small box with a large number of connectors and electrical power. It can be mounted vertically or horizontally.
- If you will connect several video cameras to the adapter, make sure that the device has the appropriate number of camera connectors.
- There are adapters that can provide a video signal to several apartments on the same floor at once. In practice, such devices are rarely used, although their use allows for savings.
Connecting an entrance intercom via a video adapter
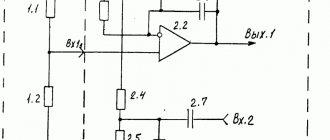
Selecting an interface module
Interface module
When choosing an interface module, you need to pay attention not only to functional, but also technical features:
- Galvanic isolation . The presence of galvanic isolation will be a big plus, as it will increase the reliability of the intercom system. Although in some cases you can do without it (depending on the audio intercom model).
- Audio intercom type. There are two main types of intercoms based on the type of addressing - MSC or MSC. The interface module must be selected in such a way that it is compatible with the intercom category.
- Some adapters are equipped with an audio amplifier, although such devices are more expensive. If everything is in order with money, buy an adapter with an amplifier - this will extend the life of the protective system.
In what cases is a video intercom connected to a regular intercom?
You can connect a video intercom to any regular intercom using an interface unit. But it is worth paying attention that adapters are not universal, so select the device individually. The adapter must be compatible with both a regular and video intercom for the system to function properly.
Criteria for choosing a video intercom and nuances
Before installing a video intercom in an apartment with a connection to an entrance device, you will need to decide on a model suitable for these purposes. When choosing, the following criteria are taken into account:
- presence of an intuitive interface;
- number of connected calling panels and video cameras;
- working screen size and picture quality;
- the presence of a handset or “Hands-free” function;
- quality of control buttons.
The availability of additional options is also taken into account. The symbols displayed on the interface should be understandable to all family members, including children and the elderly
In the standard configuration, the device contains only a calling panel with a video camera. If desired, select a model with an additional panel or with a separate input for connecting another review camera
The symbols displayed on the interface should be understandable to all family members, including children and the elderly. In the standard configuration, the device contains only a calling panel with a video camera. If desired, select a model with an additional panel or with a separate input for connecting another review camera.
What are the difficulties of connecting a video intercom?
The main difficulty with connection is that not all audio intercoms are compatible with video systems. Practice shows that today 90% of devices are compatible, but there is no guarantee that your home does not fall into the ill-fated 10%. You can find out about the possibility of connection by the marking plate, which is applied to the back of the device with the tube. Some other connection features:
- An electric door lock can be integrated with a video intercom system. But installation is not always easy - it is better to entrust this work to professionals.
- Chinese video intercoms are of low quality and often have unauthorized modifications made in Russia. Such devices are not subject to warranty service, so you should not buy them.
What to pay attention to when connecting
Other features of connecting a video intercom:
- Before installation work, be sure to study the operating diagram of the device. Installation must be carried out in accordance with the instructions, otherwise the operation of the system is not guaranteed.
- Pay special attention to the connection of wires. A four-core cable is usually used to connect the external and internal units - if the polarity is reversed, the system will not work.
- The adapter is often connected directly to the video intercom. But there are devices that operate from the mains or voltage panel (read the instructions for details).
How the intercom works, its modules, operating principle
Intercoms for apartment buildings consist of the following components:
- Call block. The part is located on the street, has several keys for communication with the owner of the apartment, a key reader and an auxiliary panel.
- Subscriber device. Necessary for convenient communication between residents of the house and visiting guests. With its help, the door to the entrance is opened.
- Castle. For intercom systems, electromagnetic locks and mechanisms with a special metal valve are used. In terms of reliability, the first type is considered more effective. The design works automatically, blocking the door after a person closes it.
- Switch module. Used to transmit a signal from an external device to a subscriber device.
- Exit keys. The part is located inside the entrance and operates by appropriate finger pressure.
When connecting equipment, only high-quality wires are used. If their length does not exceed 50 m, it is better to choose a model with a cross section of 0.6-1 mm. For a length of 50 m or more, you can choose a section of 1.5 mm.
All elements of the system are installed on the entrance door and inside the apartment. The external panel with keys is located at the entrance. A digital code is stored in the intercom memory, which is responsible for triggering the switch that transmits the signal. The operating principle of the intercom is quite simple:
- Owners of an apartment in a building can open the door using a special lock or by dialing a digital code on the panel.
- People who come to visit press the apartment number and the call key. The signal is sent into the room to the subscriber device, after which the owner makes a decision whether to open the door or ignore the call.
Purchase of a video intercom and a separate interface module for the system in the entrance
The device pairing module is purchased separately and connected to the video intercom before direct installation. Installation usually does not cause problems, since detailed instructions for connecting cables are included with the device. You can do the installation yourself, although if problems arise, you can call a specialist.
Built-in interface blocks - pros and cons
Video intercoms are often sold with built-in interface units. In this case, connecting the video system is carried out according to a simplified algorithm - because now there is no need to select and connect the interface unit. However, built-in interface blocks have a number of disadvantages - we list the main ones:
- Built-in interface boxes are usually installed illegally. They are usually installed by local craftsmen who attach their module to a purchased intercom. But if the video intercom breaks immediately after installation, then warranty service will often be impossible, since the design of the device has already been tampered with.
- Built-in interface blocks often fail. Such modules break 1.5-2 times more often due to poor build quality. Due to the impossibility of warranty repairs, this turns into a disaster - you buy an intercom with a built-in unit, install it, but the system does not work, and it will be impossible to exchange it for a working one.
Connection diagram of a video intercom to an entrance intercom
Scheme for connecting a video intercom to an entrance intercom
The entrance video intercom can be connected to the entrance intercom yourself or with the help of a specialist. The first option is cheaper, while the second is more reliable. Which option will be optimal for you - decide for yourself.
Step-by-step installation instructions
Installation of video intercom video
Installation work is recommended to be done according to the following algorithm:
- Remove the old telephone receiver from the audio intercom inside the apartment. Using a wall chaser, trace the recess in the wall where the new video communication unit will be placed.
- On the landing, also make a small recess in the wall where the panel for dialing into the apartment will be placed. Punch a hole for the wires. Another recess can be made inside the apartment for the adapter.
- Install an external (on the landing) and an internal unit (inside the apartment). Connect them using wires according to the instructions.
- The ends of the wires are connected by soldering or using electrical tape. Holes and unevenness in the walls are covered with a gypsum mixture.
- Install the interface adapter, connect it to all cables (audio intercom, video intercom, electric lock connection, external cameras).
Connection with electric lock
To increase the reliability of the system, you can install an electromagnetic lock on the apartment door, which will open/lock from the video intercom. The electromagnetic lock is attached to the door leaf, and it is connected to the adapter using wires. The optimal location for the wires is along the end of the sash. Two connection options are possible:
- Installing a lock in a cutout on a door. This option is simpler, but less reliable. The lock is fixed using screws or self-tapping screws.
- Installing a lock along the internal cavity. This option is more complex, but more reliable. Fixation is carried out with bolts. Some people weld the locking mechanism to the door, but this is not recommended.
Principle of operation
The device will work like this:
- A stranger on the street makes a call using an audio intercom. If there is a camera on the street, you can not only hear, but see him. You make the decision about admission yourself - if you agree to let a person in, press the appropriate button on the video panel.
- A stranger from the street approaches the apartment and makes a call using the video dialer. You see and hear the person, since the call unit includes an audio receiver and a video camera. If everything is fine, you let the person into the house (if there is an electric lock, you can press the corresponding button).
Attention! Some video intercoms allow you to record a short video or take several pictures of a person with the camera. Such data is stored in the device memory or on an external USB drive.
Materials, tools, connection
Optimal set of tools for connection:
- Video intercom wiring diagram.
- Wall chaser for wall grooves.
- Soldering iron and crimping device.
- Screwdrivers, screws, bolts, fasteners.
- Gypsum mixture for sealing walls.
- Pipe for mounting wires (recommended).
Difficulties
During installation the following difficulties may arise:
- The call block does not work after connection. To connect the external and internal units, a four-core cable is used, the connection diagram of which is specified in the instructions. It is recommended to test the connections in advance (that is, before covering the wall with plaster).
- The holes for the communication units are too large. The dimensions of the hole must correspond to the dimensions of the blocks + make small recesses for installation (extra holes can be sealed using plasterboard mixture).
- It is inconvenient to install wires . To get around the problem, install the wires in a small pipe. This will simplify installation and also reduce the risk of wiring deformation under the influence of the weight of the walls.
Installation stages and connection diagrams
Suppose you decide to install an intercom yourself. It doesn’t matter what caused this - inflated prices from installers or disagreement with the cost estimate as a whole. The whole process, for ease of implementation, is divided into separate stages.
These include:
- Connection with external calling panel. It’s better to start from the apartment, gradually moving to the switchboard on the site. The cable is laid in a special sleeve - plastic or metal. The task is to connect the wire to the switching module or directly to the outdoor unit located at the entrance to the entrance.
- Installation of the tube. The installation location is determined in advance, so that the owners can use it comfortably (on the side of the entrance door to the apartment). The holder is attached to the wall or door frame with self-tapping screws or quick-installation dowels.
- Direct connection. Opening the handset panel reveals the electrical contacts (clip terminals). If there are 2 of them, then installation of one terminal is provided; 4 contacts indicate the possibility of installing an additional handset.
This method describes the “long” path, which involves controlling the electric lock on the entrance door to the entrance. But there is also a simplified one. To implement it, the calling module is installed on the site, and the indoor unit is used for video (audio) communication with the visitor.
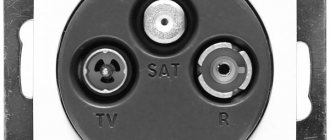
Exit and calling panel button
The calling panel is a special keyboard unit with a sensor for a magnetic key. It can be equipped with a display that simplifies dialing the code of the called subscriber. It is mounted outside the entrance and must remain operational in conditions of low temperature and precipitation.
Installation type: hidden, the panel is recessed into the surface. To do this, you will need to work with a power tool, creating the necessary recess. The exit button, on the contrary, is located inside the apartment. Often located on the handset holder panel (the handset itself). Sends a signal to the locking device (electromechanical lock) to open the door.
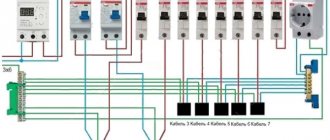
Switching and power supply unit
This device provides all modules with energy, transforming it from the 220 Volts received in the household network into those required for the operation of the device. Usually this is 12 Volts. And the performance of the system depends on the voltage in the intercom and how stable this parameter is.
The switching unit combines signals from disparate handsets and ensures their connection with the calling panel and electric lock.
Often placed on the site, in a special shield. When installing it, electrical safety requirements are observed.
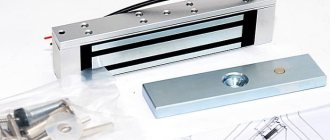
Electromagnetic lock
One of the system nodes that ensures the safety of residents. In normal condition, current is supplied to the coil, preventing the door from opening. Upon a signal from the calling panel (after exposure to the magnetic key) or upon a command from the apartment, the lock is de-energized, releasing the door plate.
The connection diagram for the magnetic lock of the intercom involves laying the power cable to the distribution panel (power adapter). The type of locks can be overhead or mortise, this affects the amount of installation work. The main condition is accuracy and precision. A fully assembled lock must ensure that the bolt is attracted, and after a control signal is given, it must clearly operate and open the door.
A tube
It belongs to standard equipment and has a unified design. Outwardly, it resembles a wired telephone of a simplified design, with a microphone, speaker, but without a dial pad. Installation of the tube comes down to choosing the placement location. It should also provide reliable fixation in the non-working position and ease of use.
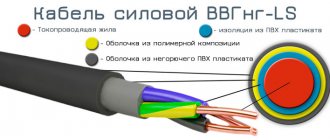
Cables
Since the operation of the intercom is connected to electricity, cables are used to connect it. This may be a complete product or purchased separately. Electric locks require a power cable with a cross-section of at least 2x0.75 square millimeters. For example, ShVVP. For switching, low-current twisted pair cables are used. Recommendations can be found in the intercom operating manual.
Connection
When connecting the intercom and handsets, the polarity is observed. If you ignore this condition, then, at a minimum, the device will operate unclearly and with interference. Otherwise he will refuse. For correct switching, follow the diagram and use a tester. All clamping and terminal contacts are finally tightened.
Commissioning works
After completing the installation, all that remains is to adjust the lock’s operation (set the gaps) and achieve a clear response to pressing the control button from the apartment.
Connecting an intercom to an entrance intercom with your own hands
Installing a video intercom is a simple task that you can do yourself according to the instructions above. If you have little experience, you can start working according to this scheme:
- Buy the necessary devices and equipment, try to complete the installation yourself. There is nothing difficult about this - even a person without experience can make recesses and holes in the wall, and connecting the wires can be done according to the instructions.
- If you suddenly make a mistake, it’s okay. Excess recesses and holes in the walls can be covered with plaster. If the wires cannot be connected correctly, they can always be re-soldered. If everything goes wrong, you can always call a specialist - he will finalize the installation and eliminate your mistakes.
Recommendations for laying and installation
Before starting work, you need to prepare work equipment and consumables.
- construction knife;
- self-tapping screws (their number depends on the number of connected devices);
- latex gloves;
- putty;
- insulating tape;
- cable (length, cross-sectional size and model are selected individually);
- perforator;
- wire cutters, screwdriver and pliers.
When all consumables and working equipment are prepared, we begin to familiarize ourselves with the recommendations and the algorithm for laying wires for the intercom:
- To implement two-way communication, you need to calculate the footage by measuring the distance from the intercom to the unit.
- The cable is selected depending on the length.
- If an intercom is installed in the entrance of a multi-storey building, a common riser is installed inside along which the wires will run.
The issue of careful masking of wires deserves special attention. This is required to create an aesthetic appearance and limit access to them. If the wires are not hidden, robbers will easily cut the cable and the owners of the living space will not respond to the potential danger in a timely manner.
Recommendations
To protect yourself as much as possible from uninvited guests, follow these tips:
- Only let people you know into the entrance. If a person introduces himself as a government official (for example, a police officer), ask him to show his identification when he arrives at your entrance.
- Many video systems allow you to record video or take photos. If a stranger comes to you, do not open the door for him, but be sure to take a photo/video in case you contact the police.
- If possible, try to negotiate with your neighbors to install a shared video system on the floor. This will save a lot of money and improve the security of the entrance.