Installing an air conditioner requires experience in such work, as well as theoretical training. In most cases, malfunctions in the operation of this system occur due to non-compliance with installation and connection rules.
Self-installation of air conditioning
Before installing an air conditioner, you should know the sequence of steps:
- Selecting a location for installation.
- Hang the indoor unit and then the outdoor unit.
- Laying communications.
- Setting up the correct operation of the system.
What you need to install an air conditioner yourself
In order to do all the work yourself, you will need a set of tools. For installation you will need:
- High power hammer drill. With its help, through holes are made that allow pipes and cables to be routed to connect the outdoor and indoor units.
- Pipe cutter It is useful for cutting copper pipes. You will also need a file, which can be used to remove burrs on pipes.
- A pipe bender or spring to give pipes the required shape.
- Drill and drill bits of different diameters.
- Flaring machine and calibrator.
- A wall chaser, which is useful when laying a groove in a wall. It can be replaced with a hammer or sledgehammer, but this will make the work much more difficult and time-consuming.
- Screwdrivers, hexagons, level, hammer and other tools that may come in handy along the way.
- Building level.
What may be useful for installing an air conditioner
In addition to tools, you will also need materials:
- Copper seamless pipes, which are necessary for the refrigeration and air conditioning system. Typically, the length of the pipe is equal to the length of the route in the wall plus 30-40 cm. The diameter will depend on the requirements of the air conditioner manufacturer.
- Electrical cable - its quantity is usually indicated in the instructions for the device, but it is better to take it with a reserve.
- Drainage pipe - this will require a special one or a polypropylene water pipe. Its length should be 80 cm longer than the track.
- Pipe insulation - a rubber sleeve is best suited.
- Plastic box - it will be needed to hide the route in the wall.
- Fasteners for the outdoor unit - usually ready-made corners and brackets are purchased.
- Bolts, fasteners.
Installation procedure and features of the work
There is nothing super complicated about installing a split system yourself, but there are a lot of nuances that can affect the durability and quality of operation of the equipment. First of all, before starting work, you should carefully read the installation and operating instructions that come with the equipment. You will compensate for the time spent by knowing exactly what and how to do with your air conditioner, because there are some nuances.
To make it easier to hang the indoor unit, practice hooking it onto the plate before starting installation
Getting started - installing the blocks
Before starting all work, it is worth looking for hidden wiring or heating pipes in the intended installation location. Getting caught in them while working is very no fun. Next comes the actual installation of the air conditioner yourself. You need to start with installing the indoor unit. At the selected location we place a plate for its fastening. The block must hang strictly horizontally without the slightest deviation. Therefore, we approach marking and fastening carefully.
We apply the plate, level it, and mark the places for fastening. We drill holes, insert plastic plugs under the dowels, hang the plate and secure it with dowels. We especially carefully fasten the lower part of the plate - there are latches that hold the block, so they must be firmly fixed. No backlash. Then we check the horizontality again.
We drill a hole for the route to install the air conditioner with our own hands
Having estimated where the route will be located (it must slope at least 1 cm per meter for normal drainage installation), we begin to drill a hole in the outer wall. We also drill the hole with a slope - again, so that condensation drains normally (the angle can be greater than that of the route).
The minimum diameter of the hole is 5 cm. If there is no drill of this size, you can make several holes of a smaller diameter, bringing out not a common bundle of communications, but each tube/cable separately. In any case, it is better to drill two holes - one for the copper and electrical cable, the second for the drainage pipe. It must be laid lower than the others so that it does not leak into communications in an emergency.
If two blocks are mounted back to back, the hole must be strictly aligned (measure on your own block where the connection ports are located)
Then we install the brackets for the outdoor unit. If we are talking about a high-rise building, you will need climbing equipment and skills to work at heights. This block must also hang strictly horizontally, so when marking the holes we also use a level. When installing brackets, we install fasteners in each hole, no matter how many there are - this is a prerequisite. Standard fasteners are 10*100 mm anchors. More is possible, less is highly undesirable.
Sometimes you can't do without mistakes
After the brackets are secured, the outdoor unit is installed. We also attach the block to all the fastenings that are available. This is the only way to guarantee that it will remain in place under any conditions.
Laying communications
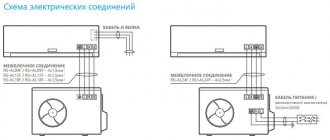
The two blocks are connected by an electrical wire and two copper tubes. There is also a drainage pipe leading through the wall. All these communications must be correctly selected, connected, laid and secured.
This is what the connected outdoor unit looks like
Copper tubes
We start with copper pipes. One is larger in diameter, the other is smaller. The dimensions are indicated in the instructions for the air conditioner. We cut off a piece of the required length with a pipe cutter, remove burrs from the edges with a special tool, straightening and leveling the cut. It is undesirable to use a regular saw, as well as a file to remove burrs - there will definitely be sawdust inside the pipe, which will get into the system and quickly destroy the compressor.
Heat-insulating tubes are placed on the prepared pipes. Moreover, the thermal insulation must be continuous and extend inside the wall as well. The joints of pieces of thermal insulation must be glued with metallized tape, ensuring a very tight fit of the edges. The quality of thermal insulation is important, since condensation will form on uninsulated sections of the pipes, and it can drain inside the wall, causing frozen streaks, destroying the wall.
Thermal insulation is put on the copper tubes, they are joined very tightly and the joint is sealed with metallized (aluminum) tape.
Copper tubes wrapped in thermal insulation must be passed through the hole in the wall. Before doing this, be sure to carefully seal the edge that will be inserted into the wall so that dust does not get inside the pipe (or better yet, securely plug both ends immediately after cutting and leave the plugs until the connection begins). This is a very important point, since dust will quickly damage the compressor.
Cable and drainage
The situation is simpler with an electrical cable. Each wire is terminated with special lugs, installing them on conductors stripped of insulation and crimping them with pliers. The prepared cable is connected according to the diagram in the instructions.
On the indoor and outdoor units, above the ports for connecting copper pipes, there is a removable plate, under which there are connectors for connecting cables. Before you start installing the split system yourself, remove the plates, consider what will need to be connected and where - it will be easier to work with later. Especially with an external unit.
This is what the port for connecting the electrical cable looks like
Connecting the drainage tube is generally simple: it is connected to the corresponding terminal on the indoor unit and brought out through the wall. The length of this tube should be such that it ends at a distance of 60-80 cm from the wall. The drainage pipe must be laid with a slope towards the exit to the street. The slope is at least 1 cm per meter of length. More is possible, less is not possible.
The tube must be fixed every meter so that there is no sagging in it. Condensation then accumulates in them, which may end up on your floor or furniture. When you pass the tube through a hole in the wall, it is also better to plug it with something.
What the route looks like from the street side (the pipes are insulated in the wall too)
Indoors, pipes and cables are usually wrapped with metallized tape into a single bundle. Then they are fixed to the wall in several places, and a plastic box is attached on top. Usually it is taken white or a color matching the finish.
If you wish, you can hide all the tubes in the wall - cut a route in the wall, lay it there and, after checking its functionality, wall it up. But this is a rather risky option, since in order to repair something you will need to dismantle the wall.
How to install air conditioning in an apartment yourself
First you need to decide on the installation location and its method. Air conditioners are installed in apartments, the external and internal units of which are connected by a pipe containing wires and freon.
Important! It is better to install an air conditioner yourself in the spring or summer.
To properly install the air conditioner yourself, you should first study the instructions. It lists the necessary materials that will be required during the work process. It is better to purchase them in advance.
The sequence of actions will also be indicated there; in almost all cases they are identical:
- The locations of the block, route and all other devices are marked on the wall.
Route for system devices
- It is necessary to mark the locations of the wiring in the wall. This can be done using a special device.
- Next, the plate of the indoor unit is attached. It should be horizontal (a building level will help to level it). Then the plate itself is applied and the places for drilling holes are marked. After that, they are drilled and fasteners are inserted there.
- Then the plate is put in place and carefully secured.
- The outdoor unit is installed using the same scheme.
- The evenness of the installation is checked and everything is carefully secured.
- Using a puncher, a through hole is made through which communications will pass.
After these steps, a route is laid in the wall.
Important! The number of fasteners should be equal to the number of holes in the block. Otherwise, the structure may not support its weight.
How to install an external unit
All work begins with the installation of the condenser; suitable brackets are selected that will support the weight of the air conditioner. It is better to attach them to the wall itself, and not to the insulation or cladding of the room.
Mounting the system on the facade of a high-rise building
To protect the system from adverse environmental influences, it is covered with a visor.
The drainage pipe from the external unit must be discharged into the sewer.
How to install the indoor unit
The distance between two units should be proportional to the power of the system. The smaller it is, the better the system works.
It is for this reason that the indoor unit is installed on the same wall as the outdoor unit. If this cannot be done, then the closest location is selected.
It is important to consider that:
- Air conditioners cannot be installed above the bed.
- The distance to the ceiling must be at least 10 cm.
- Do not place above windows or radiators, or in an unventilated area.
- The air conditioner should not be placed close to furniture.
You should ensure free access to the device, this will improve its performance and allow it to be cleaned in a timely manner.
Installation of the indoor unit is almost the same as the external one. First you should choose a location, then attach the brackets, and the evaporator on them. The only difference is that before installing the indoor unit, you need to drill a hole for the freon tube.
After installing the entire system, the two units are connected and the air conditioner is connected to the network.
Installation procedure
Before installation, carefully read the manufacturer's instructions. Make markings on the walls or balcony frame to install the blocks, taking into account safety standards and technical conditions. First install the inner and then the outer casing of the split system. Think over the route, places for attaching cables. With both cases secured and cables connected, check the system's operation. If there are no leaks, the units are securely fastened, you can use the air conditioner.
Installation of the indoor unit
Installation of the indoor unit is carried out according to the following algorithm:
- Using a drill, make holes for the dowel plugs;
- Insert them into the slots;
- Install the plate that will hold the inner housing of the air conditioner;
- Secure it with dowels;
- Check the correct position using a level;
- Pay attention to the fastening - it should be rigid, without gaps;
- Plan the route based on a slope for communications of 1 cm per meter of length (this installation allows for normal drainage).
Preparation of communication channels
Before installing an air conditioner, study the operating instructions for the equipment yourself. For safe operation of the system, pay attention to the rules for working with electrical cables. Do not twist electrical wires or connect different materials together - copper does not connect to aluminum. With an external connection type, the cable is closed with a box. The wire is fixed with special clamps every 50–60 cm.
For internal wiring, make a small recess of the specified length. The cables are laid in a corrugated pipe secured with plastic clamps.
The interconnect cable is selected 4 - 5 cores, with a cross section of 2.5 mm². When laying pipes outside, fix the cable on the wall every 30–40 cm. After installation, it is covered with a protective box. Secure it to the wall with special glue or screws.
Make a recess for communications according to preliminary markings. Use a corrugated pipe to protect the cable. The depth of the trench is equal to the diameter of the tube + 1 cm. Insert the cable into the corrugated pipe. Install it in the recess, after placing the internal cable, secure the pipe to the wall with clamps. When the wires are firmly fixed and connected, plaster the mini-trench, leaving open the areas of connections with the split system housings.
- Make a hole with a slope for the drainage system on the outer wall (the diameter of the nest should not be less than 5 cm);
- Make a hole for the electrical cable;
- Calculate the length of the cable and pipes for drainage.
When preparing the route for condensate drainage under the system, keep in mind that it should not have corners, bends, or sagging. Otherwise, drops of water will accumulate in it, which will reduce the efficiency of the system.
Outdoor unit installation
Installation of the external air conditioner unit is performed according to the following algorithm:
- Using a level, check the location of the block. It must be strictly horizontal.
- Install anchor bolts and fasteners according to the dimensions of the outer casing.
- Place the housing on the brackets and secure it. Check that the level is installed correctly. If there is a slight slope, it must be eliminated.
After fixing the outer casing, the split system is connected by communications.
Connecting blocks by communications
After installing the units outside and inside the premises, prepare communications for connection to the buildings. To do this, cut the copper tubes to the specified length. For work, use only a pipe cutter. If you cut pipes with a file, shavings will form during the work.
It gets into the pipe and leaves burrs on the cut. In the first case, normal circulation in the system is disrupted, which leads to equipment failure. In the second case, the sealing of the joints is broken. This can result in air entering the structure, reducing the efficiency of the engine and drainage system. In such a situation, expensive equipment repairs will be required.
Insulate the pipes. To protect against heat loss, use polyurethane foam hoses. It is not recommended to use foam rubber, as this material has a short service life. After placing the copper tubes in the heat insulator, seal the joints with metallized tape.
Strip the wires of insulation and press with pliers. After that, put a ferrule on each wire. Connect the wires to the housing following the diagram specified by the manufacturer.
Proceed to connecting the drainage to the equipment. To do this, connect the tube to the plastic tube located at the bottom of the indoor unit. Place a corrugated hose on it and secure the joint with a clamp.
After connecting to the indoor unit of the air conditioner, remove the drainage through the hole made in the wall. In the classic version, external drainage is installed in the same way as for internal drainage. But some consumers do not do this. If there is a polymer tube instead of a hose, you will need an adapter.
Condensate is discharged in 2 ways - to the street or to the sewer. The first method is the cheapest and simplest, so most users simply take the drainage outside and allow it to drain naturally. The second method is more complicated and requires a special diverter device. It is used extremely rarely.
Connecting copper pipes. Loosen the nuts and allow the nitrogen to escape from the system. Manufacturers pump it into the housing to avoid oxidation of parts. Remove the plug and remove the nut completely. Align the edges of the pipes and flare them. This is necessary for the tightness of the system. Place the edge of the pipe to the corresponding terminal of the block and secure the connection with a nut.
Note! When installing household air conditioners, sealants, gaskets and other devices must not be used. If the operations are performed correctly, the copper tubes provide a sealed structure.
Such actions are performed for all ports of the split system. After connecting the communications, remove air, moisture and argon from the system.
Vacuuming
Most craftsmen do not want to vacuum the split system, since it is a long process that requires expensive equipment. The procedure is carried out to remove air and water vapor from the system. If moisture is not removed from the tubes, it will accumulate, resulting in loss of engine power. In winter, the water collected in the drainage system turns into ice. This reduces the diameter of the tubes, in some cases completely blocking them. As a result, the split system may automatically turn off because the protective system is triggered or the engine may burn out.
Evacuation is carried out in the warm season, since the liquid solidifies at low temperatures and it is impossible to remove it from the system.
To independently pump out air and moisture from the system and fill it with refrigerant, you will need wrenches, a pressure gauge, and a vacuum pump. There is no point in buying a pressure gauge and a vacuum pump, since this is expensive equipment and will be rarely used. It's better to rent it. When choosing a pressure gauge for freon, indicate the type of refrigerant. Some types of devices work with certain substances.
First, you should pump out the air from the system.
Note! When the arrow drops below zero, turn off the pump and wait 30 minutes until the atmosphere in the line is completely cleared of moisture and air.
- Connect the blue hose of the pressure gauge station to the spool.
- Check that all manifold valves are closed.
- Connect the central (yellow) hose to the vacuum pump.
- Start the equipment.
- After all the air has escaped, monitor the pressure gauge readings. If the needle moves, there is a leak and needs to be fixed.
If it is impossible to use an expensive vacuum pump when installing a split system, perform the procedure manually. For this:
- Unscrew the plugs on the large port of the outer housing (use a hex key);
- Turn the valve 90 degrees for a few seconds and return it to its original position (this creates a lot of pressure and freon enters the system);
- Press the spool for a few seconds and release excess refrigerant;
- Once free of air, install the plugs.
After 30 minutes, start filling the refrigerant.
Freon filling
For long-term operation of the air conditioner, it is necessary to choose the right refrigerant. Manufacturers indicate the type of coolant on the external unit or in the equipment passport. Usually the brand and amount of freon used by a certain type of system is specified. When purchasing a refrigerant, add a reserve to the specified weight to correct leaks. They are inevitable when freon is pumped into the system. To install an air conditioner with your own hands, 1 kg of refrigerant is enough, taking into account losses.
Once air and moisture have been removed from the pipes, turn off the pump but do not disconnect it. Watch the pressure gauge reading. If it is stable, then there are no leaks in the system. After this, pump freon into the outer housing. The process will take 15–20 minutes, depending on the length of the route. For air conditioners, 2 refrigerants are used - freon R22 and freon R410a. The first is in a gaseous state, therefore, when pumped into the outdoor unit of the air conditioner, its position does not change. The second is in liquid form. When filling with freon, turn the bottle over.
To fill the outer casing with refrigerant, follow the algorithm:
- Connect the hose connected to the pump to a cylinder with freon.
- Close the left manifold tap.
- Open the cylinder valve a few turns and let the coolant into the system.
- Monitor the amount of gas supplied using a scale. When the mass of the cylinder decreases by 1 kg, the process is completed.
- Close the freon supply valve.
- Close the valve on the outer casing.
- Disconnect the pipe from the spool.
- Do a test run of the system.
If the equipment is working normally, you can start operating the air conditioner.
Filling with freon and purging the system are different procedures.
To check the tightness of the joints, treat them with soap foam. If it bubbles, there is a leak and needs to be fixed.
After installing the air conditioner yourself and a test run, the system is ready for operation.
How to connect blocks
The air conditioner units must be connected by copper pipes (2 pieces) and cable. They can be laid on the wall and hidden in a special box, or in a groove. In this case, you will need to make a groove. But first you need to drill a hole in the wall, which is made after installing the fasteners. Then the connection of blocks begins, for this you will need:
- Pipes with larger and smaller diameters on which thermal insulation is applied.
- They are then pushed through the hole in the wall and bent using a pipe bender.
- Special tips are put on both sides of the pipes to protect them.
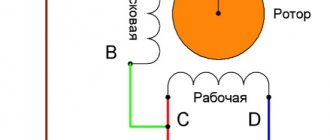
- The wire is also inserted into the hole and connected according to the instructions. Each block has terminal blocks to which the wires will be connected, according to their colors.
- Then a drain pipe is connected to a specific outlet of the indoor unit. Its second end is led out onto the street.
- The drainage must be carefully fixed to prevent it from sagging.
Connecting system blocks
If installation of a plastic box is required, then all communications should be tied into a bundle. This can be done using zip ties or metallic tape.
Which is more profitable: professional installation or DIY split system installation?
The price of installing an air conditioner depends on the complexity of the work, the power and size of the equipment. To make the comparison correct, as a basis, you can consider the cost of professional services for installing a small-power household appliance, for example, 3.5 kW.
This service includes:
- installation and connection of both units;
- laying the harness (up to 5 m);
- formation of through holes in the wall.
The cost of installing an air conditioner also includes the cost of consumables. On average, professional installation of low-power split systems costs the client 5,500-8,000 rubles.
Average prices for renting tools and purchasing materials for installing an air conditioner in an apartment with your own hands:
- Rotary hammer (“Makita”) – 500 rub./day.
- Two-stage pump – 700 rub./day.
- Installation kit + communications (5 m) – 2500 rub.
Self-installation of a split system saves from 1,500 to 4,000 rubles
In some cases, equipment is rented only on security. It is approximately 4000-8000 rubles. The amount of the deposit depends on the cost of the equipment leased. If pipe rolling is required, then to the specified list you will have to add tool sets designed for these purposes. The cost of their rental is 350-500 rubles/day.
The total amount reaches 3,700 rubles. To this value you need to add 10%, which will cover unforeseen costs and the purchase of consumables. The result will be about 4,000 rubles. This means that installing a split system yourself saves from 1,500 to 4,000 rubles.
It is worth noting that the minimum amounts for professional installation do not always include a complete list of work. The client may have to pay extra for some of them. Taking this into account, we can come to the conclusion that the savings are about 2500-3500 rubles.
Note! Economic benefits can only be achieved through proper installation of a split system with your own hands. Repairs and alterations will only entail additional costs.
The cost of installing an air conditioner includes the cost of consumables
How to connect an air conditioner to the mains
At the final stage of installation, the copper pipes and air conditioner drainage are connected to the electrical network according to the diagram. With the latter, things are much simpler; there is an outlet at the bottom of the indoor unit, and that’s where the drainage is inserted.
After this, you need to connect the copper pipes. You need to start work with the indoor unit. There are two ports on its side wall, one with large fittings and the other with small ones. You can start with anyone.
The whole work process is as follows:
- You need to remove the nuts from the copper pipe connection points.
- Then the plugs are removed and the edges are checked for evenness.
- Union nuts are put on the pipes. It is important not to confuse the direction of the thread.
- The edges of the pipes are flared and clamped in the holder.
- The roller is installed and the screw is tightened.
- Rolling should be completed after the cylinder stops descending.
- The flared edge is guided to the outlet of the indoor unit and connected using a union nut.
- The external unit is connected in the same way.
Connecting the air conditioner to the power supply yourself
The electrical circuit for connecting an air conditioner at home can only be single-phase. This can be done through an outlet or using a wire connected to the electrical panel.
Using a socket
First you need to lay the cable from the evaporator to the outdoor module. For this:
- A wire is laid to connect the blocks.
- A line is drawn to the electrical panel. This includes a cable and a circuit breaker for overload protection.
- If the devices have average power, then they can be connected without such a line. This is done directly into the outlet.
Important! The air conditioner can operate at different powers, so the circuit breaker should be installed on the connection line and near the outlet.
How to choose a socket
It must meet the following requirements:
- Have reliable grounding.
- Comply with the air conditioner manufacturer's specifications.
- All wires must be copper.
- The socket must be connected to the panel via a circuit breaker.
Socket for air conditioning system
Using a separate cable
This method is considered the most reliable and safe, especially if you install a shutdown protection device that will protect the system from voltage surges.
Requirements for this connection:
- Mandatory presence of a device or circuit breaker.
- All components must be copper.
- The diameter of the wires must correspond to the size specified by the manufacturer.
- A separate ground must be created for the entire line.
Then all cables are laid, and the operation of all components of the system is checked.
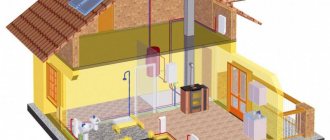
The internal structure of the air conditioner and the principle of its operation
Before installing an air conditioner in a house or apartment, you must become familiar with the operating principle of this device, as well as its structural structure. This knowledge will not only speed up installation work, but also perform it correctly.
The air conditioner consists of a compressor and an evaporation unit connected to each other by tubes
Split systems consist of an evaporator unit and a compressor. These elements are connected to each other by tubes. To mount the external unit or compressor, the plane of the outer wall is used, and the evaporator is placed indoors. Expensive models of climate control equipment may have several indoor units. All of them are connected to one compressor.
Operating principle of split systems:
- Under the influence of high pressure, refrigerant is supplied through the nozzle into the evaporator chamber.
- There the working substance expands and boils. The vapors formed during this process absorb heat.
- As a result of this process, water condensate is formed, which settles on the radiator in the evaporation unit.
- From there, the moisture enters a special tank and is removed from the room through a tube.
During operation of the air conditioner, the following occurs with the working substance:
- The compressor pumps out vapors and increases the pressure.
- The working substance is heated, which changes from a liquid state to a gaseous state.
- In the form of a dense fog, the refrigerant enters the condensate collection chamber.
- The fan cools the condensate vapor, which again turns into a liquid state.
- Then the working substance, driven by pressure, again enters the evaporator nozzle. The cycle repeats.
To install everything correctly, you should have an understanding of the structure and operating principle of the air conditioner
The efficiency of climate control equipment, as well as electricity consumption, depend on the conditions under which the air conditioner operates. If a heating device is installed nearby, electricity consumption will increase.
Note! If you want to install an air conditioner in an apartment, you must take into account the position of the heating devices. Their close proximity increases the load on climate control equipment, which can cause it to fail.
Height from air conditioner to ceiling
The most optimal height at which to hang an air conditioner is considered to be 10 cm from the ceiling. This will ensure the correct flow of cool air passes through the top. In this case, there will be enough space for air circulation. However, for more powerful air conditioners, this distance can be increased by 5-10 cm.
The distance is calculated from the baseboard
Connecting the air conditioning system
- the connection point is connected directly to the junction box. In this situation, they do without a socket and plug. But with this connection method, it should be taken into account that the electrical wiring used must withstand the load during the simultaneous operation of all household devices connected to it. The distribution panel is additionally equipped with a system that controls automatic shutdown in case of overload;
- If an air conditioning device is installed during general repair work, a closed structure is most often used during installation. A special channel is installed in the wall. It houses the cable. One end is connected to the distribution panel, and the other is secured to the outlet terminal. At the final stage, the channel is sealed. At the same time, the interior of the room does not deteriorate. The wiring is not influenced by external negative factors;
- Installation of the socket under the air conditioner can be done in an open way. This method is used if the repairs have already been completed and residents do not want to further damage the wall. One of the ends of the wiring is connected to the junction box. A socket is connected to the other end. The cable is located on the surface of the wall covering. It is placed in a decorative box.
How to install a mobile air conditioner
A mobile air conditioner is much easier to install than any other. But here, too, some work skills will be required. The following set of tools is also required:
- Dense plastic (thickness 10-12 mm). It will be needed to create a barrier between the cool air in the room and the warm air outside.
- Saw for plastic.
- Masking tape or tape used to secure the sheet.
- Polyurethane foam or any sealant that will ensure water and air tightness.
Mobile device installation option
It is best to place the mobile air conditioner near a window, while avoiding breaks in the air outlet hose. The installation sequence is as follows:
- All necessary measurements and the diameter of the air vent are taken.
- A hole is cut for it. It should be 3-4 cm smaller than the pipe itself. This will help secure it tightly.
- The plexiglass is being sealed. This can be done using adhesive tape, sealant or foam.
- You need to open the window frame and fix the plexiglass insert there. This can be done using the same tape or sealant.
- After this, you can install the monoblock itself. To do this, select a place for its installation, insert a drainage hose into the air vent, and insert it into the exhaust hole of the monoblock. The other end of the hose goes outside.
- After 2-3 hours you can turn on the air conditioner.
What types of air conditioners are there?
Today there are several types of air conditioners. The most common are:
- Window;
- Mobile;
- Split system;
- Multizone system;
Split system
The window air conditioner crashes into the window opening. This type of climate control technology was common more than 10 years ago, but now its popularity has decreased significantly. Such devices have more disadvantages than advantages. The advantages of such air conditioners are:
- Low cost;
- Ease of installation.
The disadvantages of such systems include:
- Low power, such a device cannot effectively cool the room, especially if it is of non-standard shape. And if the window is closed with thick curtains or curtains, then cold air will not enter the room at all;
- The noise level is too high due to the fact that the compressor is located in the middle of the room;
- Reducing the illumination of the room - the air conditioner blocks part of the window and reduces the access of sunlight to the room.
Mobile air conditioners are perfect for those people who often change their place of residence. They have also proven themselves excellent in country houses. To electrically connect such a device, a regular outlet is sufficient. To remove hot air, you need to remove a flexible pipe into a window or a special hole in the wall. The advantages of such devices include:
- Ease of movement;
- Ease of installation.
Mobile air conditioning system
The disadvantages of such air conditioning systems are many times greater, including:
- High cost - sometimes comparable to the cost of a stationary split system;
- Increased noise level due to the compressor indoors;
- Low power, such a device will not be able to efficiently cool a large area.
Split systems are the most popular today. They are presented in a large assortment in household and HVAC stores. You can choose based on design and performance characteristics. The advantages of such systems are:
- Large selection, making it easy to choose the desired design;
- Low noise level; the compressor in such systems is located outside.
Such split systems have only one drawback - they require the involvement of specialists in installation. Although there are home craftsmen who, without any problems, independently connect split systems in private houses and apartments located on the lower floors.
Multizone systems are more often used in office premises. With the help of one such air conditioning system, up to 30 rooms can be efficiently serviced. Moreover, for each of the rooms an individual indoor unit of a suitable design is installed. The advantages of such systems are:
- Possibility of servicing a large number of rooms without changing quality;
- Long service life, maintaining all technical characteristics at the entire stage of operation;
- Maintaining a comfortable temperature in each individual room.
Multizone system
There are only two disadvantages of multizone systems:
- High cost, which is not affordable for everyone;
- Difficult to install.
The type of air conditioning system must be selected based on the area of the room and its purpose. It will be important to familiarize yourself in advance with the technical characteristics of the purchased air conditioner and the intricacies of its connection.
Installing an air conditioner without a vacuum pump
If the length of the route is less than 5 meters, then the air conditioner can be installed without a vacuum pump. To do this you will need:
- Unscrew all plugs on the ports.
- Next, take a hex key, which is selected according to the size of the lower port.
- Next, the key is inserted into the port and rotated 90 degrees. At this time, freon comes out, which, together with air and freon, creates excess pressure.
- There is a spool on the port, which is compressed for a while. At this time, a mixture of gases emerges, which removes air and argon.
- Next, we repeat the previous steps. If the route is 4 meters, then this will be enough, if 3, then it should be repeated again.
- A plug is screwed onto the outlet with the spool.
- Using a hexagon, the lower and upper ports are opened, into which freon is admitted.
- The system is ready for use.
What kind of socket is needed for an air conditioner?
The main selection parameter is the rated load when connecting. It is recommended to buy a model with a power reserve of at least 10%. Rated voltage 220 V, 16 A. According to the installation method, models can be external, overhead or hidden. The first ones are mounted on the wall surface. They are rarely used if it is not possible to make grooves.
Overheads are similar in design, but are designed to connect to wiring coming out of the wall. Can be used as temporary or when it is impossible to form a recess for hidden installation.
Hidden - the most common models. Most of the body is located in a wall niche, the front part protrudes slightly flush. Installation is more complicated than the two described above, but these models have a better design and fit into the interior of an office or apartment.
Additional characteristics:
- must be connected to grounding;
- protection class – IP54;
- connection type – F or C.
The last parameter depends on the design of the plug (plug). If the air conditioner was produced for the countries of America, Asia, Great Britain or Switzerland, it is recommended to replace the plug with a standard European one. An alternative is to purchase adapters for your specific model.
Type “C” models are gradually going out of sale because they do not have a grounding function. To power a split unit, you need to buy “F” type models.
Installing air conditioning on high floors
Installation of air conditioning on the top floors of the house can be done on the roof. The distance between the blocks will be approximately 15-20 meters. This can be done using a crane and a sliding ladder.
If this option is not suitable, then the system can be installed on a balcony or under a canopy. In this case, the following points must be taken into account:
- The walls where the system is installed must be strong and able to withstand heavy weight.
- Installation should not be carried out on aerated concrete walls.
- Do not attach the system to a ventilated facade, as this will lead to noise and vibration.
- Everything should be installed smoothly and without distortions.
- The distance between the external unit and the wall must be at least 10 cm.
- You should not install the air conditioner on a glassed-in balcony, as this will impair its performance.
- Be sure to install a canopy over the external unit, which will preserve the integrity of the system.
Where to determine the outdoor unit
In fact, it is not the easiest task to choose a location for an outdoor unit. Not all buildings allow them to be placed on the walls. In this case, there are only two options: install the outdoor unit of the split system in a specially designated place - the air conditioner. If there is no such room, only a balcony or loggia remains. In such buildings they are usually glazed, so the placement of the block does not affect the appearance.
But in this case, it is necessary to provide a system for cooling the equipment and removing exhaust air. If the balcony is spacious enough, open the windows for ventilation or provide access to fresh air in some other way for the entire time it is open. The solution is simple and straightforward, but it leads to overheating of the equipment, and this is fraught with breakdowns and frequent replacement of the damaged outdoor unit.
Installation on the balcony is sometimes the only way out
Installing fans for more active air exchange can improve the situation a little. It is correct to fence off a small room, make it effective ventilation, separate ventilation ducts for air removal and supply. Moreover, they must be separate. This is done using air ducts that lead out instead of part of the glazing. In general, in this case, installing an air conditioner with your own hands is a problematic task precisely in terms of ensuring normal operating conditions for the equipment.
On the balcony or loggia
If there are no prohibitions on placing foreign devices on the walls of the building, usually the outdoor unit of the air conditioner is hung on the balcony railing (on the side or front) or on the wall, but so that it can be reached for maintenance - wash, clean, check, repair.
If the balcony is glazed, there should be an opening window sash above it. Otherwise it will be very difficult to maintain it. To protect against precipitation and objects that may fall from the window, a canopy is placed above the block. The choice of materials is something similar to finishing a balcony or a white plastic canopy, but full-bodied. It is better not to use hollow and metal ones (including corrugated sheets and metal tiles), since during rain they turn into a drum, and during hail they can generally deafen.
Standard methods for installing an outdoor split system unit on a balcony
If the block is placed on a loggia, of all the above options, only the one in the picture on the right remains. It is inconvenient to place it next to the wall, except perhaps under the window, but this already belongs to another section.
One more point: how to run the route - along the ceiling or along the floor? You will have to ditch in both cases, but in the case of the floor, it is possible that you will make it from boards, then the pipes and cables connecting the external and internal units can be laid on the surface, but better - in a box.
Under or next to the window
In those rooms where there is no balcony or loggia, the outer part of the split system is hung on the wall from the outside. It is more convenient if it is located under the window or to the side of it. Moreover, under or next to the opening part. In this case, service is possible without calling a climber.
The outdoor unit of the air conditioner can be installed under or next to the window
When installing the outdoor air conditioner unit with your own hands on the wall next to the window, consider the height of its installation. You can position the top surface of the block flush with the top edge of the window. In this case, leaning out of the window and securing yourself, you can carry out work while standing on the windowsill. The second option is to align the lower edge flush with the lower edge of the window opening. Here you can lie on your stomach on the windowsill, but you won’t be able to reach the exit point of the pipes. That is, you will still have to call industrial climbers.
Requirements for installing air conditioners
In order for the air conditioner to bring maximum benefit, you must follow some rules:
- Choose exactly the model that matches the parameters of the room (size, availability of equipment, etc.).
- Correct installation.
- Compliance with the rules of operation and prevention.
The air conditioner has two blocks, each of which is assigned certain functions. The outer one is the condenser, and the inner one is the evaporator. They are connected using wires and tubes in which freon operates.
It is very important to choose the right location to install the system. In this case, you should take into account the weight of the block, free access to it, etc.
The air conditioner should be installed closer to the window
The outdoor unit must be located on a strong wall that can support a weight of more than 60 kg. Installation should not be carried out on aerated concrete. The external unit must be protected from environmental influences. This can be done with the help of fences and canopies.
When installing the indoor unit, please consider:
- The distance from the external to the internal unit should be minimal. This will ensure higher efficiency.
- The evaporator must not be obscured by curtains, furniture, etc.
- There must be a distance of at least 3 meters between the furniture and the indoor unit.
- The system cannot be installed above batteries.
- Provide free access.
- The distance from the block to the ceiling must be at least 10 cm.
It is necessary to ensure tightness and reliability of the air conditioner mounting. If a line is used to connect the blocks, then vacuumization of the connections will be required.
Choosing a location for the indoor unit
Let's start with the simplest thing: choosing a location from the point of view of ease of use. The indoor unit must be placed so that the cooled air spreads throughout the room, but does not fall directly on the bed, desk, or chair. In principle, you can redirect the flow using movable blinds, but it is much better to think about it from the beginning.
Options for the location of the internal unit of the split system
The most correct solution in this case is to place the air conditioner above the head of the bed, above or to the side of the table. In this case, the flow of cold air will “flow around” the place of rest or work, which is much more comfortable and less dangerous to health.
In addition, there are technical issues that must be considered before you begin installing the air conditioner yourself. The indoor unit is connected to the outdoor unit using a route of copper pipes and a control cable. The outputs for connecting the route are on the right (if you look at the block from the front), but they can be bent so that they are on the left or bottom. These outlets are 30 cm long copper tubes.
Outputs from the outdoor unit of the split system (rear view)
A route is connected to them (by soldering or flaring), and the connection point must be accessible for maintenance. Therefore, this section of the route is not hidden in the wall (in the groove), but covered with a decorative box. In this case, the route can be positioned differently - depending on which wall the indoor unit is hung on and where the outdoor unit is located in relation to it.
Block to the left of the outer wall
If the internal block is located to the left of the external wall, and the routes come out smoothly, the minimum distance from the wall to the block is 500 mm (1 picture in the photo). It can be reduced to 100 mm if the route is wrapped onto an adjacent wall, but its total length should not be less than 500 mm. If this is not possible, you can remove the bends from the left and lay the pipes in the groove (picture on the right). In this case, this is possible, since the connection point between the leads and the route is located under the housing cover, so that it is accessible for repair and maintenance.
Options for laying the refrigerant route if the indoor unit of the air conditioner is located to the left of the outer wall
If cables, pipes, etc. cannot be pulled along the outer walls of the building. (so as not to spoil the appearance), you will have to lay the entire route indoors. A less expensive option is to place it in a corner, covering it with special boxes. This arrangement is convenient, since you can then close the box with curtains.
Installing an air conditioner with your own hands: if the route should take place indoors
The second option is more labor-intensive (it’s more difficult to make a groove), but from an aesthetic point of view it’s more advantageous - transfer the output to the left side panel and put everything in the recess made.
On the wall to the right of the outside
This option can be called typical - this is the standard solution when choosing such a location. Most often, the route in the box is led directly into the wall, but if necessary, it can be lowered in the corner (also covered with a box).
An example of installing an indoor air conditioner unit to the right of an external wall
If necessary, it can be placed in a groove (the connection point is in the housing). If the route cannot be laid outside the building, it can be laid in a groove indoors. The route may look similar to the last two photos in the previous chapter.
How to hide an air conditioner in the interior
Typically, an air conditioner is installed during renovation, so it is better to choose an option that will seamlessly fit into the interior. If this fails, you can try:
- Paint the air conditioner the same color as the wall.
- Place it above the front door.
- Purchase a built-in split system that can be hidden in a suspended ceiling.
- A floor-standing air conditioner can be hidden in decorative panels.
- Place the air conditioner in a shelf or cabinet where free air circulation will be ensured.
- You can make a niche for the block.
In this case, everyone decides which option will be more convenient. In any case, you should not heavily block the passage to the fan, as this can lead to overheating and rapid failure.
You can hide the air conditioner under the ceiling
During the hot season, air conditioning is a must. It is very important to install it correctly, otherwise the entire system will not be able to function and will quickly fail. If you do the installation yourself, you should follow all the rules, and before doing so, study the manufacturer’s installation instructions. This will help you get all the work done quickly and easily.
Review of the design of the external unit before connecting the air conditioner: diagram and structure
When installing an air conditioner with your own hands, it is useful to familiarize yourself with its structure. This will allow you to avoid mistakes during the work process and better master the technology.
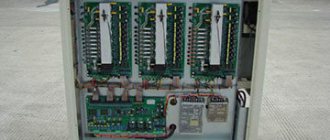
The design of the external unit consists of the following components:
- fan;
- compressor;
- capacitor;
- four-way valve;
- filter;
- control boards;
To install an air conditioner with your own hands, you need to familiarize yourself with its structure.
- fitting type connections;
- protective cover with quick-release design.
The fan generates air currents that blow across the condenser. In it, freon is cooled and condensation occurs. The air that is blown through this radiator, on the contrary, heats up. The main function of the compressor is to compress freon and maintain its movement within the refrigeration circuit.
There are two types of compressors:
- spiral;
- piston
Piston compressors have a lower price, but they are less reliable. Unlike spiral ones, they react worse to low temperatures during the cold season. When connecting an inverter air conditioner, the control board is usually located in the outdoor unit. If the model is not an inverter, all electronic components are placed in the part of the split system that is installed indoors. This is done in order to protect the control board from humidity and temperature changes.
The design of the external unit includes the following units: compressor, valve, fan
Four-way valves are usually found in reversible types of air conditioners. Such split systems operate in two modes: “heat” and “cold”. When the air conditioner is set to heat, this valve reverses the direction of refrigerant flow. As a result of this, the functionality of the blocks changes: the inner one begins to heat the room, and the outer one works for cooling. Union connections are used to connect copper pipes that connect the indoor and outdoor units.
The freon system filter prevents copper chips and other particles from entering the compressor. During the process of installing an air conditioner with your own hands, small debris is generated. The filter traps particles before entering the compressor.
Note! If the installation of climate control equipment is carried out in violation of the technology, a large amount of debris can enter the system. In this case, the filter will not cope with the contamination.
The quick-release cover is designed to protect the terminal block intended for connecting wires and fitting connections. In some models, it provides partial protection, covering only the terminal block.
Regardless of what structural type the split system belongs to, its outdoor module always has the same working units
General recommendations
The electrical circuit of an air conditioner for household services differs from the connection of a three-phase device, which is used in large offices for various purposes, business centers, and supermarkets.
It must be remembered that electrical installation is carried out in accordance with the Installation Rules and relevant regulations.
Before connecting the units to the electrical network, you should carefully prepare.
To do this you should:
- carefully read the diagrams and specifications for components and materials of the device;
- inspect the existing electrical supply system, including the location and cross-section of incoming cables;
- test the intended route with a detector for the absence of internal electrical wiring and metal elements of building structures;
- analyze the composition of the walls on the surface or inside of which electrical work will be performed.
Connecting the air conditioning system is impossible if there is old aluminum wiring in the house and there is no grounding.
Direct cable laying must be carried out taking into account the following requirements:
- the distribution box, switch, socket for a household air conditioner are located in an accessible place;
- the socket is installed at a distance of at least 50 cm from the floor and grounded metal elements (batteries, water and heat supply pipes);
- The wire is laid only horizontally and vertically;
- when laying horizontally they recede:
- from the cornice 5-10 cm,
- from the ceiling - 15 cm,
— from the baseboard – 15-20 cm;
- there must be at least 10 cm between the vertically stretched wire and corners, as well as window and door openings;
- laying parallel to gas pipes is carried out at a distance of 1 m from them;
- The electrical wire is protected from heating pipes with insulation.
In addition, the following rules must be observed for connecting devices to the electrical network:
- It is strictly forbidden to connect wires by twisting. Extension is carried out using terminal blocks or bolts;
- It is not allowed to connect a wire made of aluminum and copper due to their different electrical conductivity (for a copper cable this figure is one and a half times higher).
External wiring
If the method of laying on the wall surface is chosen, then the cables are fixed every 50-60 cm with plastic clamps, which in turn are secured to the wall with screws. When using boxes in which the wire is laid, they are secured with glue or screws.
Internal wiring
Cables hidden in the wall are laid in plastic corrugated pipes, having previously made a recess (groove) of the required length. Typically, the corrugated pipe is secured inside the wall with clamps. If the depth of the groove is 2 cm or more, then it is allowed to carry out work without a corrugated pipe.
Wires must not be laid in bunches and at a distance from each other of less than 3 mm.
Connecting freon pipes
We move on to the stage of connecting communications.
Connect the flared tubes to the indoor unit of the air conditioner using adjustable wrenches.
If you have a torque wrench, it is better to use it.
Here are the recommended tightening torques for freon tubes of various diameters:
- 1/4 – 16-20Nm
- 3/8 – 35-45Nm
- 1/2 – 45-55Nm
Next, take the interconnect cable and twist it all into a single unit with the freon line using reinforced tape or vinyl tape.
Do not forget to stretch the insulation of the required diameter onto the copper tubes.
To prevent dirt from accidentally getting inside the tube, wrap its ends with electrical tape.
Error No. 8 Under no circumstances should the thermal insulation of the tubes be left unprotected.
Otherwise, from the street under the influence of UV rays, within several seasons it all turns into dust.
If your thermoflex is lightfast and not afraid of the sun, then think about the birds. Crows peck very well and take away such material for their nests.
Error No. 9 Also, do not leave any area indoors without insulation. Especially the junction points.
Condensation will gradually form here and eventually a neat trickle of water will appear on your wallpaper.
The line itself, wrapped with tape, is hidden inside the room in a plastic box.
However, if you have a short area and there are old wallpapers left, then instead of using a box, the highway can be covered with them. The result will be an almost invisible picture.
Next, pass the line through the through hole to the outside.
Conclusions and useful video on the topic
Self-installation of an air conditioner is clearly shown in this video:
In the same video you can see the most common mistakes made when installing an air conditioner yourself:
Air conditioner installation can be done independently. To do this you need to have a little knowledge and skills. When installing air conditioner units, be sure to follow the instructions and safety requirements. However, when performing work, you cannot do without the help of an assistant - the weight of the outdoor unit can exceed 20 kg.
If, after reading the article, you still have questions or have installation suggestions based on personal experience, be sure to share them in the special comment block below the article. Here you can also add unique photos of your air conditioner installation.
Preparation for work
The decision to install a split system yourself usually comes after asking the specialists for prices. Incredibly high amounts for completing a job that takes 3 hours are justified by the presence of expensive tools and their wear and tear during operation. This is what makes up the bulk of the fee for the master’s services.
If the prices from split system installers are too high, you should do the installation yourself, having thoroughly studied the technology of this type of work
If you look at the recommendations of equipment manufacturers, the instructions often indicate that the preparatory work can be done on your own, but for the installation of pipelines, connecting to the electrical network, and carrying out the vacuum process, it is advisable to invite specialists with the appropriate tools.
Hardware Installation Tools
You can install the cooling unit yourself, because... Most of the tools are in the handyman's suitcase. An exception may be a vacuum pump, but it is not necessary to buy one - it will be possible to make such a unit from old parts.
Some teams of craftsmen do not even use this equipment when laying a route up to 6 m long.
If you couldn’t find a vacuum pump when installing the air conditioner yourself, an alternative option could be a powerful compressor from an old refrigerator or an aquarium blower
During the installation process, an important aspect is maintaining the horizontal position of the block systems. In connection with these requirements, each stage of work must be accompanied by a control check at the construction level.
If a tool is not available, you can rent it at a hardware store.
You will need to prepare the following equipment in advance:
- Hammer. It is used to make holes in the façade through which a route will be laid, connecting the external and internal blocks.
- Drill with a set of drills. Used for mounting fasteners.
- Pipe cutter for cutting copper pipes.
- A device for removing burrs after cutting pipes. You can use a reamer, a file and sandpaper.
- Copper pipe roller.
Some people believe that using a reamer does not make sense, especially if the pipe cutter is new and does not leave burrs or dents, but in vain.
Only after manipulations with the chamfer remover can the edge of the flared tube be pressed as tightly as possible with the nut, and accordingly, freon leakage is unlikely.
The operation of a device for flaring copper pipes is carried out by deforming the tube according to a selected template, as a result of which a cone is formed. At the same time, the original wall thickness and circular cross-section are preserved
According to the technical installation rules, a vacuum pump is required - the sealing of the air conditioning system is carried out with this equipment. After filling the route with refrigerant, the evacuation process is carried out.
Purchasing the necessary materials
You will need quite a lot of components, but all of them are easily available in any specialized store. Do not forget that the materials must be of the highest quality and selected exclusively for the device, functionally aimed at cold.
It is necessary to purchase a wire to supply power and connect the units. The required parameters are always indicated in the passport or equipment installation instructions.
The standard is a four-core power cable with a cross-sectional area of 2 mm2 or 2.5 mm2. The length is selected based on the distance of the route, taking into account a small margin.
You will also need to prepare thick-walled seamless pipes made of soft copper intended for cooling devices. Pipes are selected with smaller and larger diameters. More specific specifications are listed in the user manual.
The length is equal to the length of the route plus an additional margin of up to 30 cm. During the transportation of tubes, their edges must be sealed to protect from dust settling inside the product.
The pipes are selected exclusively for the cooling system; their soft copper alloy lends itself well to flaring and ensures proper tightness
Foamed rubber insulation is used to insulate pipes. They sell it in 2 m lengths. To implement thermal insulation measures, you will need a length equal to the length of the route. Synthetic insulation is used on two pipe diameters.
As a drainage tube, experts recommend installing a corrugated hose equipped with a plastic spiral inside. You can also use an alternative part - a polypropylene tube. Its length is equal to the length of the track with an additional 80 cm.
You will also need two L-shaped brackets to secure the unit from the outside. The suitable size of the parts is determined by its dimensions, and the safety margin for the load-bearing load should exceed its weight by 5 times. This increase in the maximum permissible stress of the part is required to compensate for wind and snow loads.
It is better to buy these components from a company that sells spare parts for household split systems.
After purchasing a bracket for attaching the outdoor unit of the air conditioner, you cannot make additional holes in it, because this significantly reduces the safety factor of the part
The following fastening parts are used: anchors, dowels and bolts. Their number, type and parameters are selected based on the type of brackets and mounting plate intended for the indoor unit.
The type of walls where the outer part of the system is to be installed also matters. To camouflage the laid communication line, you will need a plastic box of standard dimensions 60*80 cm.