Types of electrical circuits
In practice, several types of electrical circuits are used:
- simple;
- installation;
- single-line;
- multi-line.
The first type is the most common. The main components and the order of their connection to each other are indicated on simple diagrams (DS). In addition, they are used to check the correct assembly. Wiring diagrams (MC) show the location of parts on the board or inside the case. Multilinear diagrams are used to depict three-phase circuits.
Snowball
Many children want to have a snow globe at home. Such a product can be created with your own hands from an ordinary light bulb. You just need to prepare the composition correctly.
It consists of glitter, 70% water and 30% glycerin, although the proportions can be adjusted to your liking. This will result in the following:
- with a small amount of glycerin, the glitter will fall more slowly;
- If the amount of glycerin is exceeded, the glitter will remain in one place, no matter how much or how much you shake the flask.
How to read simple diagrams
The reading process for “dummies” is examined using the example of a simple project consisting of a power source, a bell, a non-locking button and conductors. The circuit is a closed circuit with components connected in series. This means that the strength of the current flowing through it will be the same at any point.
When voltage is applied and the button is pressed, the bell starts ringing. This is because current flows from the positive terminal of the battery to the negative terminal through all components. If the wires do not resist direct current, then the voltage at the bell terminals and the power supply terminals will be the same according to Kirchhoff’s second law.
Terrarium
A great craft for insect lovers. This product can be presented as a souvenir. Yes, this craft is not for everybody, but it looks great in any room.
A light bulb terrarium can be filled with pebbles, moss, toys and other little things that you like, after first removing the internal elements. Then place an artificial or stuffed insect there.
The product can be installed on a structure made of copper wire or mounted on any stand.
Learning to read circuits with transistors
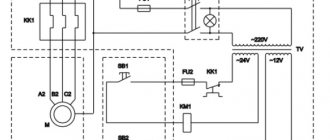
In this drawing we see transistor VT1 and motor M1. To be specific, we will use a 2N2222 type transistor, which operates in electronic key mode.
In order for the transistor to open, you need to apply a positive potential to its base relative to the emitter - for n–p–n type; for the p–n–p type, a negative potential must be applied relative to the emitter.
The SA1 button is fixed, that is, it retains its position after pressing. M1 DC motor.
In the initial state, the circuit is open by contacts SA1. When you press the SA1 button, several paths for current flow are created. The first path is “+” GB1 – contacts SA1 – resistor R1 – base-emitter junction of transistor VT1 – “-” GB1. Under the influence of current flowing through the base-emitter junction, the transistor opens and a second current path is formed - “+” GB1 – SA1 – relay coil K1 – collector-emitter VT1 – “-” GB1.
Having received power, relay K1 closes its open contacts K1.1 in the motor circuit M1. Thus, a third path is created: “+” GB1 – SA1 – K1.1 – M1 – “-” GB1.
Now let's summarize everything. In order to learn to read electrical circuits, at first it is enough just to clearly understand the laws of Kirchhoff, Ohm, electromagnetic induction; methods of connecting resistors, capacitors; You should also know the purpose of all elements. Also, at first, you should assemble those devices for which there are the most detailed descriptions of the purpose of individual components and assemblies.
Designations in diagrams
It is very important to emphasize that if you do not adhere to a certain focus when reading the scheme, you can waste a lot of time without solving anything. The entrance to the system is usually indicated by two arrows, and the exit by wires with two dots at the ends. You need to know how resistance, capacitor, transformer, disconnector, input and output points of the circuit, semiconductors, inductors are shown.
Schematics are not always read from left to right and top to bottom, it is better to go from the power source. Single-line and multi-line images are used to show winding terminals. In many cases, it requires deep knowledge, mastery of reading techniques and the ability to analyze the information received. Some electrical diagrams have a separate description of each block and the purpose of the wires connected to it.
Christmas decorations
The New Year tree can be perfectly decorated with handmade crafts made from light bulbs.
The lamps have different shapes, so you can make different toys from them: cones, icicles, images of animals and insects, and many other decorations for the New Year.
Of course, to do this you will need certain materials and tools, such as:
- energy-saving or standard light bulbs, almond-shaped;
- glue, good quality;
- glitter, different colors;
- suitable container.
New Year's crafts made from light bulbs are a wonderful and easy way to save on Christmas tree decorations. The process itself is quite simple, even children can handle it:
- pour multi-colored sparkles into bulk containers, it is advisable to choose brighter colors, but taking into account the overall decoration of the tree;
- Next, the glass bulb of the lamp must be coated with glue;
- Having dipped the light bulb in glitter, carefully cover it with decorations;
- let dry;
- After drying, tie a ribbon to the cartridge in order to hang it on the Christmas tree.
The toy is ready!
Snowman
It is possible to create crafts from old light bulbs in the form of some characters, for example a snowman.
To work on a snowman you will need:
- red material for the cap, mittens and scarf;
- a light bulb with a frosted glass part (you can also coat the transparent bulb with paint);
- acrylic paints;
- polymer clay or plasticine.
Next you need:
- form a triangle from the fabric with slightly loose edges to create a pompom;
- roll up the cap and glue it to the metal base
- light bulbs;
- mold a carrot from plastic material, which will serve as a nose, also mold hands in the form of twigs and circles - legs;
- Glue all parts to the snowman using glue;
- paint eyes and mouth;
- use beads as buttons (they can also be molded from plasticine or painted with paint).
Penguin
In a similar way, you can make an adorable little penguin out of a light bulb. The only thing is that the top part needs to be made in the form of a hat. The brim of the headdress can be cut out of cardboard and put on the base. Then paint the light bulb in the colors characteristic of penguins.
Children can make such Christmas decorations, but they definitely need supervision.
Piggy
Another character that is easy to make from a light bulb is a pig. It’s easier to create a pig using papier-mâché:
- first you need to prepare a paste from PVA glue and pieces of toilet paper;
- then lubricate the entire light bulb with the resulting mixture of species;
- let dry;
- then you need to prime the entire product with white paint;
- paint the dried craft pink;
- attach a tail, ears, hooves, snout and eyes to the pig (everything can be molded from plasticine);
- Dry it properly and the toy is ready!
In order to place the pig on the Christmas tree, you need to glue a loop to its back.
In addition to New Year's decorations, light bulbs can be used to create details for decorating your home space.