Home » Schemes » Switchboard assembly diagram
In order for the electrical wiring to be safe and able to withstand the load, you need to study the installation diagram of the electrical panel. The entire hierarchy must be indicated on the project. The distribution panel assembly diagram is quite simple.
In addition, all automatic equipment must display the full rating and protection class. Now is the time to study visual diagrams of the switchboard of a private house, apartment or cottage. If you are interested, then you can read about the connection diagram for a 380 Volt outlet.
What is required to assemble an electrical panel in an apartment?
To assemble a complete electrical panel in an apartment, you will need:
- Electrical wiring project.
- Suitable place to attach the shield.
- Assembly diagram of an electrical panel in an apartment.
- Selecting a suitable housing.
- Selection of optimal components.
- Correct installation.
- Proper connection to the electrical network.
In order for the equipment to operate safely, deviations from the electrical panel diagram in the apartment and installation errors are unacceptable. Otherwise, all household appliances, and even the home itself, will be at risk.
Production and installation of lighting panels (SC), apartment panels (SC), distribution panels (SC)
Installation of the power shield (PS) is carried out in the following sequence. First, the product itself is installed and secured. Then, through the places provided by the design, incoming and outgoing cables for high-frequency currents are introduced, after which an input switch is installed, to which the wires of the input circuit are connected. And then, in accordance with the specification, all the necessary devices and fixtures are installed, to the terminals of which the corresponding conductors are connected. The connection of the power supply can be carried out using the TN-CS or TN-S grounding systems.
For the installation of the ShchR (distribution board), both basic elements are used, such as a zero bus, a grounding block, a rail for connecting machines, and additional ones: shutdown protection, an electricity meter, meters, etc.
How to choose an installation location?
Choosing the installation location is the first stage of equipping the room with an electrical distribution panel. The most convenient point is in the hallway, next to the front door. This position reduces the length of the incoming power cable to a minimum.
In terms of height, the most convenient option for placing a housing with any electrical panel circuit in an apartment is at eye level for a person of average height, approximately 170 cm from the floor. It’s so convenient to look at the meter readings and turn off machines and other electrical equipment if necessary.
Since modern meters are usually hidden in a housing protected from outside penetration, there is no need to place them under the ceiling, as in the old days. Modern electrical panels with a durable housing are locked. And if you don’t throw the keys anywhere, then the children won’t fit in.
If we are talking about a cottage or a private house, then you should take into account the method of connecting the power cable to the house: does it go underground or is it an overhead line. For different options of eyeliner, different schemes for the shield in the apartment can be developed.
Assembly of power shields (PS)
The main function of any power panel is to provide high-quality, safe and uninterrupted or quickly restored power supply to the corresponding electricity consumer.
Power shield (PS) is a general concept. Depending on the specific purpose, there are:
- distribution;
- lighting;
- apartment;
- another modification of the product.
According to the method of location they are divided:
- wall-mounted (hung on the wall);
- standing (installed on the floor);
- and niche (built into walls).
According to the material of manufacture - metal and plastic. Certified devices are manufactured and installed in accordance with the existing regulatory framework, in compliance with fire and electrical safety requirements. They must not allow leaks, overloads or short circuits.
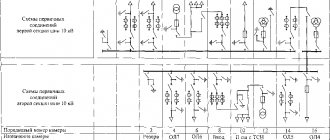
Examples of electrical panel diagrams in apartments
During electrical installation work, the electrical panel diagram in the apartment is not always used. However, to work with wiring and switchboard in an apartment without a diagram, you will need a master with extensive experience in performing such work. Professionals who do this constantly (assembling hundreds of panels per year) have a diagram of the electrical panel in the apartment in their heads. In any case, the shields are assembled according to the diagram, it’s just sometimes not on paper. But if you have a printout of the diagram of the panel in the apartment, then it will be useful to find out what kind of icons are drawn there.
A private house
A private house can have either a single-phase or three-phase electrical network. In the first case, the electrical installation diagram will be similar to the project for power supply of a one-room apartment. The simplest option for connecting a panel for a residential building will look like this:
In this diagram of a 220 V private house distribution board, there is a two-pole switch at the input, then an electric meter is connected, after it there is an RCD and a group of single-pole circuit breakers. Everything is quite simple and at the same time in accordance with GOST, PUE and the requirements of other documents. If a three-phase network is connected to your site, then the circuit diagram for assembling the panel will look different. Consumers from outbuildings - a garage, utility room or even a bathhouse - can already be added to it. The shield, of course, will be large and with many branches, so for the example we found a fairly suitable option. For information on how to assemble a three-phase shield, read the article:.
Distribution board diagram of a private house for 380 V, using an RCD:
I would like to add a small description to this electrical circuit:
- A separate line is allocated for the garage power supply, protected by a residual current device. The remaining two machines are installed on the group of sockets and garage lighting.
- If there are three-phase electricity consumers in the house, it is better to connect them through a three-phase machine and a four-pole RCD, as shown in the example above. If there are no three-phase electrical appliances, you can use the project provided below.
The last 2 380 Volt distribution board schemes can be used not only to power an individual residential building, but also to power a spacious country cottage! We also recommend checking out the article on how to wire your home!
Finally, we recommend watching a useful video that shows how to assemble an electrical panel according to the diagram:
Types of schemes and pointers to them
The electrical panel diagrams indicate all their components, the first of which is the input circuit breaker, and the last are the linear switches. In this case, all elements of the circuit are designated symbolically and must be written in words indicating the protection class and rating.
The electrical panel diagram in the apartment should be carefully stored, since when adding new modules or replacing worn ones, this paper can be used to find out exactly what you need. Next, let's look at what types of electrical panel circuits there are.
For old housing without grounded wiring
Reconstructed ancient buildings and houses built during the Soviet Union do not have electrical wiring grounded. Therefore, the circuit for the corresponding panel in the apartment does not contain grounding PE busbars. The most basic electrical panel kit for a one-room apartment includes:
- Housing with mounting DIN rails.
- 32-amp incoming circuit breaker with two poles.
- Electric meter.
- RCD 2p 40A/30mA.
- Three 16 amp single-pole circuit breakers, one each for the lighting circuit, socket circuit, and washing machine.
- Ren-bus is zero.
Attention! To ensure the safety of wiring in such circuits, the protective conductor in the cable and the working conductor 0 are separated on the ren-bus, even when there is no ground loop. To protect the network from overvoltage in the event of a burnt-out zero in dilapidated wiring, such a panel circuit in an apartment must be supplemented with a voltage control relay. If the phase and zero touch during an insulation breakdown, the device breaks the circuit, saving household appliances from breakdown and the home from fire.
In the case of 2-3-room apartments, this scheme is expanded with additional linear machines. Also, on each line serving large household appliances (such as a dishwasher), two-pole RCDs are installed to protect people from electric shock, device rating: 16-25 A/10 MA. This addition to the circuit provides sufficient safety for the operation of electrical wiring (for people) in the absence of a ground wire.
Panel diagram for housing with grounding and RCD
In new buildings, as well as in cases where grounding loops are installed, the electrical panel diagram also changes. For a 1-room apartment equipped with an electric stove, the following will be used in the distribution panel:
- Two rows of DIN rails.
- One 40 ampere 2-pole input circuit breaker.
- 1-phase electric meter.
- RCD 2R.
- 3 16A single-pole circuit breakers.
- 1 25A automatic for electric stove.
- The tire is zero.
- Grounding bus.
- Comb tire for automatic machines.
If the apartment has many rooms and powerful household appliances, it is necessary to include additional 16-25A/10 mA 2-pole RCDs in the circuit. They instantly respond to small current leaks and protect people from electrical shock. Washing machines especially require such an addition, since they have problematic internal wiring. It is especially dangerous for people with weak hearts and children to touch such household appliances with wet hands.
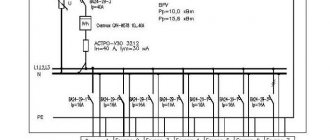
Distribution board diagram for housing with three-phase power supply networks
In new buildings, apartments are increasingly supplied with 3-phase electricity with a voltage of 380 V. For electrical panels in such houses, much more complex electrical panel circuits in the apartment are used, including both single-phase and three-phase devices. Usually the meter and the three-pole circuit breaker at the input (possibly with a switch) are placed separately on the site in the entrance.
Similar assemblies can be used in cottages, but there it is mandatory to install a common RCD for the house against fires. For apartments, it is not necessary to install this device if the RCDs are located on separate lines.
The 3-phase panel diagram includes:
- Housing with several DIN rails.
- Input machine 63 A three-pole.
- 3-phase meter.
- RCD 2-pole 40A and 30mA.
- A set of 1-pole linear circuit breakers with ratings of 16, 25, 40 amperes. For kitchen sockets and a hot tub, two-pole differentiated circuit breakers for 16 and 25 A are additionally installed, which can be replaced with a similar circuit breaker paired with an RCD.
- Protective tire.
- Zero bus.
- Comb tires.
This circuit can be supplemented with a separate RCD for an electric stove 2P 25 A / 30 milliamps.
Developing an electrical panel diagram in an apartment and installing it is a job for a professional electrician. But, having a printed diagram on your dashboard in your apartment and understanding it, you can always check the quality of its work yourself. This alone is worth understanding.
What it is
Preparing the wires First you need to approximately adjust their length.
This must be taken into account, knowing that painters and puttyers will be walking around at the same time. Dotted line 1 indicates the housing of the distribution board, 2 and 3 are the neutral and grounding bus. To prevent simultaneous operation of the input and group devices, it is recommended to install a selective RCD at the input. This could be a circuit breaker or a load switch. Photo - Main switchboard A group electrical panel is used to control individual groups of current consumers of lamps, household appliances, etc.
To protect the electrical system from overvoltage, circuit breakers are used to open the electrical network under load. Each specialist has his own opinion on this matter.
Letter designations in diagrams
Using a grinder, cuts are made along the perimeter of the niche. Professional electricians perform high-quality assembly of electrical panels, but if certain rules are followed, such work can be done independently. For these purposes, residual current devices (RCDs) or automatic circuit breakers with mA leakage current are installed. Upon approval, it will be necessary to carry out reinforcement according to the new project and carry out various works. That is why it is better for the shield to be equipped with a removable frame with slats.
Outdoor models are usually equipped with a glass window that allows you to read meter data. Three circuit breakers are planned in the shield, in three groups. It is better if the shield is installed in the vestibule. The wires can simply be flooded from above the apartment.
Next come single-pole group circuit breakers. Xn - connection terminals. A water heater, washing machine, and air conditioner can also be powered through ampere breakers. T 12.2 Assembly diagrams for a group apartment panel
Shields IP31 and IP54
These are the same shields, but with some protection from external factors, most often water and dust. They look exactly the same as regular ones, but are more expensive due to additional sealing in the form of anthers, etc. Most often you come across IP31 and IP54 versions, but there are also IP30, IP41, IP65 enclosures. A visual sign that explains the specific values of the IP protection degree is available on StabExpert.ru.
An example of a distribution wall panel from Schneider Electric ShchRN-P-4 with a degree of protection IP65.
Switchboard components
The distribution board consists of the following elements:
- introductory circuit breakers. This is a general circuit breaker for all electrical wiring in the room;
- RCD – residual current device. This element is designed to instantly break the electrical circuit in the event of a violation of the integrity of the cable insulation and current leakage;
- circuit breaker (differential). It is a device that combines an RCD and a circuit breaker;
- power protection circuit breakers (group lines);
- din rail. A metal plate on which automatic protection elements are installed. Mounted on the panel body;
- connecting terminal blocks or busbars (grounding busbars or working zero). With their help, wires of the same purpose are connected;
- distribution buses.