Like all products, two-key products are divided according to the following criteria:
Two-key light switches differ in the type of contacts; two types of contact designs are used. Screw-type, the bare end of the wire is clamped with a screw between two metal plates. A very reliable method, but it has one significant drawback: if the wire is loosely clamped or the wire cross-section is incorrectly selected, the contacts heat up.
This leads to a weakening of the clamping force; it is necessary to periodically tighten the screws. Otherwise, there will be a complete loss of contact or a fire in the wiring and other plastic elements of the light switch. In the clamping design, the end of the wire is fixed by a plate, which is constantly pressed by a spring, ensuring stable contact.
Light switches can be divided according to the material from which the housing is made, plastic or ceramic. They must be marked with the permissible value of current, power, volts. Ceramic products dissipate heat well and are designed for installation in high load circuits 10A, 220V, power up to 2300W. Plastic cases are designed for lower currents of 3-6A.
Wiring diagram for a double switch for 2 light bulbs, tips for beginners
Important! When examining the two schemes together, one can immediately see the difference not only in the number of connectors, but also in the functionality of the devices used.
Expert opinion
It-Technology, Electrical power and electronics specialist
Ask questions to the “Specialist for modernization of energy generation systems”
Connection diagram for a two-key switch: drawing, installation and wiring If you follow these rules, select a suitable diagram and step-by-step implementation of all work, there will be no problems, the problem can be solved without the involvement of a specialist. Ask, I'm in touch!
Criteria for choosing a two-pole switch and other circuit elements
Before choosing a suitable sample and assembling the circuit, decide on the network parameters, what kind of wiring will be, hidden or external. How much power the lighting fixtures will consume; use the current strength to determine the required wire cross-section. For a chandelier with two groups of lamps, one 100 W and three 40 W, the power consumption will be P = 220 W. We calculate the current:
With such a load, it will be enough to install a two-key element with a plastic case for 3A, wire cross-section 0.75 mm/sq.
What kind of lighting do you prefer?
Built-in Chandelier
When you need to illuminate a sports hall, where there are two groups of eight lamps, each lamp has 3 fluorescent lamps of 80 W each. Power of one group P = (80 x 3 x = 1920 W.
For such a lighting circuit, you will need to install a two-key switch in a ceramic housing with a permissible load current of 10A. The cross-section of the wire is selected according to pre-calculated tables, they are in the PUE (Electrical Installation Rules).
As practice shows, in most cases a three-core cable with copper wires of 0.75 - 1.5 sq./mm is used for lighting wiring.
The most affordable and frequently used cable brands:
- PUNP – flat installation wire, convenient for hidden wiring without grooves, attached to the walls with staples and covered with plaster. Double insulation, wires covered with a polyvinyl chloride layer, overall sheath made of PVC plastic.
Design and purpose of switches
A switch is a simple mechanical (less often electronic) device for contact closing/opening an electrical circuit to turn on/off lighting fixtures.
We will touch on the design features and installation of the simplest models - single-key switches.
They consist of 4 main parts:
- working unit - metal base with contacts and push-button drive;
- fasteners - legs or antennae made of metal connected to a metal plate;
- decorative design - panels or frames;
- dynamic part - plastic key.
Some parts, mainly internal ones, are made of metal, such as galvanized steel; external decorative trim is usually made of safe plastic. Ceramic elements are also available that can withstand loads of up to 32 A, while plastic is rated for 16 A.
Reasons for installing a single key switch include:
The external and internal structure depends on several factors, for example, functional tasks or potential load. As an additional device, some models have an LED that provides external illumination.
Switches are installed in all rooms where there are any lighting devices that are not equipped with a power cable (for example, it is not needed for floor lamps or table lamps).
These are most often ceiling or wall lamps, chandeliers, and complex lighting systems.
How to connect the device
The main rule that must be observed when installing all switching devices is the need to install them in such a way that when disconnected, the phase wire circuit is broken. This should be done, first of all, so that when replacing a light bulb it is enough to simply turn off the switch without resorting to using an input circuit breaker.
The fact is that a large number of cases of electric shock occur precisely when performing such work. Such cases, unfortunately, often occur, despite the fact that for a dangerous situation to arise it is necessary not only to mix up the wire on which the switch should be installed, but also to connect the light bulb socket incorrectly.
In order to correctly install such a device, you must adhere to the following procedure:
In practice, connecting a double switch turns out to be not much more complicated than connecting a single-key device.
Expert opinion
It-Technology, Electrical power and electronics specialist
Ask questions to the “Specialist for modernization of energy generation systems”
Connection diagram for a two-button switch for two light bulbs, installation of lamps. The neutral wire and protective grounding are laid in separate lines to the sockets and housings of the corresponding lamps. Ask, I'm in touch!
Connection diagram for a two-key switch for two light bulbs (video)
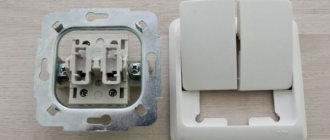
- Working part. Unlike single-key models that have two terminals, this switch is equipped with three contacts. One of them is incoming and two are outgoing. The input contact is designed to connect to it a phase wire coming from the distribution box. The output contacts of the working part are used to connect wires to them, which are used to power consumers. As a rule, markings are applied to the body of the working part of the switch, making it easier to determine the type of each terminal. This part of the device structure must be installed so that the common terminal is located at the bottom.
RCD differential automatic. switches
Differential circuit breakers Easy9 are one of the products in the new Easy9 line of protective and switching equipment from the recognized leader in the global electrical engineering market - Schneider-Electric. Along with automatic machines, the new Easy9 line includes:
Differential circuit breakers Easy9 combine the functionality of two protection devices at once - an RCD and a circuit breaker, thereby providing:
Protection of the electrical circuit from short circuit (circuit breaker function);
Protection of the electrical circuit from overload (circuit breaker function);
Protection of a person from electric shock (RCD function);
Protection against fire (RCD function).
Main features of Easy9 differential circuit breakers:
Reduced installation time. Diff. the machine provides the same protective functions as an RCD with a machine, while installing and connecting a differential circuit breaker takes much less time than installing and connecting the machine and RCD separately.
Saves space during installation. Differential machines 1P+ N are only 36 mm wide. This allows you to save at least 30% of space in the distribution board, in contrast to a circuit breaker paired with an RCD, which takes up 54 mm.
Simple, logical and large markings allow you to identify the Easy9 difavtomat among similar ones by reference, rated current, voltage and shutdown current. Also, each difavtomat has the corresponding certification marks, production date and barcode.
A convenient two-position latch makes installation/disassembly of the Easy9 RCD much simpler, more convenient and faster than installation of a conventional RCD, even with one hand.
The engraving of the neutral on the body of the difavtomat “N” prevents erasure of the designation and guarantees correct connection.
| Operating principle of RCD: | The RCD function must be checked regularly! | |
| By measuring the difference in current between the live conductor and the neutral conductor, a differential load switch actually detects the current flowing through the human body. | ||
| If this current reaches the 30 mA threshold, the differential load switch trips within a few milliseconds, thereby preventing personal injury or worse. | ||
Technical characteristics of Easy9 differential circuit breakers:
(1) — RCD type (or class) is a parameter characterizing the type of leakage current to which the RCD reacts. Today, there are RCDs with classes AC, A, Asi and B. RCD class AC is the most common and inexpensive type of RCD. RCDs of this class are used in general-purpose circuits without special characteristics. In such circuits there are only sinusoidal leakage currents, which RCDs of this type can easily cope with. If a load with single-phase power supply equipped with a rectifier (washing machine or induction cooker) appears in the circuit, then pulsating DC components appear. To protect against them, it is necessary to install a Class A RCD, because An AC class RCD may simply not work. Class A RCDs protect against larger types of leakage currents, but also cost about 20% more. Other types of RCDs are extremely rare.
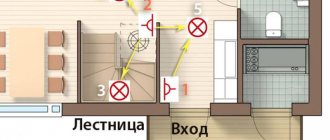
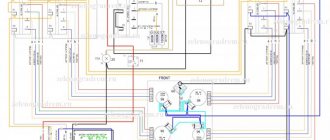
Connection diagram for two light bulbs
The connection diagram for a two-key switch is extremely simple and, subject to safety requirements and the availability of minimal tools and consumables, can be performed not only by a professional, but by anyone. The phase conductor from the power supply panel through the distribution box approaches the terminals on the switch.
Installation of a two-key switch is carried out in the following steps:
During the first hours after the start of operation, in order to avoid unpleasant consequences, it is recommended to monitor the heating of the machine responsible for the connected lighting device, and if it overheats, take measures to replace it.
It is important that connections in the required sequence are made not only inside the device, but also in the junction box and in the lighting device itself, since all links of the electrical circuit are inextricably linked with each other.
Lighting control schemes using different types of switches
How to connect a wire to a single-key switch?
How to install an electric doorbell - step-by-step instructions
How to connect a pass-through switch: lighting control schemes from two, three or more places
How to connect and configure a motion sensor to control lighting: electrical connection diagrams and sensor configuration
Expert opinion
It-Technology, Electrical power and electronics specialist
Ask questions to the “Specialist for modernization of energy generation systems”
Connection diagram for a two-key pass-through switch Since the design of a two-key pass-through switch provides 6 contact terminals, two 3-core cables will need to be laid from it to the switch. Ask, I'm in touch!
Schneider Electric switch connection diagram
For more comfortable use of lighting devices, they are often connected to several control points. This allows you to turn on and off the lights in the room from different points, which is convenient, for example, when passing a long corridor, at the entrance to which you can turn on the lighting, and at the exit - turn it off. Schneider Electric transfer and crossover switches are well suited for this task.
Why is it beneficial to use automation from Schneider Electric?
When installing lighting in an apartment, private house or office space, it is extremely important to use high-quality and proven electrical equipment from well-known manufacturers. Automation from Schneider Electric is easy to use, reliable, functional, sophisticated style and safe. The elegant and at the same time simple design of the switches of this brand goes well with any interior. Schneider Electric products are created from high-quality materials on modern equipment using new technologies. Photoinhibitors are used in the coating of these products, thanks to which the devices retain their original appearance, even after being exposed to ultraviolet radiation for a long time. One of the main competitive advantages of Schneider Electric is that the company, through competent marketing, managed to minimize the costs of production and sales of products, which makes them affordable even for the most economical buyers.
How to make lighting control more convenient
Lighting control in residential, office and other premises can be organized using conventional, pass-through and cross switches. Conventional ones are well-known switches, with the help of which the lights in the room are turned on and off from one point. This is the simplest way to control lighting devices, based on connecting and breaking an electrical circuit when pressing a device button. Pass-through and crossover switches are somewhat more complicated. It would be more correct to call these devices switches, since they do not simply connect and break an electrical circuit, but switch current consumers from one line to another. Pass-through switches allow you to adjust lighting from two points. By adding one or more cross models to the circuit, you can provide the ability to control lighting fixtures in a room from three or more points.
Schneider pass-through switches
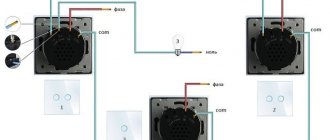
A single-key pass-through switch looks little different from a regular switch, but unlike the latter, it has not 2, but 3 terminals for connecting wires. To make connections in circuits with such devices, a three-core cable VVG 3 x 1.5 is usually used if the internal wiring is copper, or AVVG 3 x 2.5 if it is aluminum. In some cases, it may be more convenient to use two-key pass-through switches, which are two single-key devices combined in one housing. These switches have 6 terminals for connecting wires, so switching is performed with two three-core cables.
How to connect pass-through switches
The design of Schneider Electric pass-through switches provides two fixed contacts and one movable one, which switches the conductor connected to it with one of the contacts. Such devices always work in pairs. The circuit is closed when two series-connected contacts of both switches are in the closed state. In order to turn off the light, just change the position of the key of one of the switches. When the contacts are in different positions, the circuit will be broken. You can also turn on the light next time using any switch. This method of lighting control is often used in office spaces, but can also be convenient for a living room, such as a bedroom, when you do not need to get out of bed to turn off the light that is turned on at the entrance.
Schneider Electric Cross Switches
The circuit with two pass-through switches is effective, but not always advisable from an economic point of view. To implement it, you have to lay an additional two-core wire, and if the devices are located in a long corridor, such a solution can be quite expensive. A reasonable alternative to this connection option would be a circuit with a Schneider Electric crossover (or reversing) switch. With this device you can turn on lighting from three or more points. To operate such a circuit, in addition to the crossover, two pass-through switches are required. The reversing switch has four contacts - two input and two output: in the diagram shown on the device body, the input ones are drawn with arrows inward, the output ones - outward. The moving contacts that switch the lines between the pass-through switches are interconnected.
Where is the circuit used?
By installing a cross switch at the required point, for example near the front door, you can control the lighting from this additional point. As necessary, the number of such devices can be increased, thereby adding points from which the user can turn the lighting on and off. A cross switch circuit works well:
- for long corridors with entrances to separate rooms;
- marching spans between floors;
- children's bedrooms. The child will be able to turn off the light without getting out of bed;
- private houses when there is a need to modernize street lighting.
Other connection methods
There is also a simple, economical scheme for connecting pass-through switches when there are no connecting wires directly between the two devices. Each switch is powered from a separate distribution box. The number of lighting fixtures can be any. It can be advantageous to use this method of connection if distribution boxes are installed at the end of the corridor or, for example, on main flights (as is usually the case). This option is also appropriate when conventional lighting has already been installed, but there is a need to convert it for control from two points. In this case, making changes to the circuit will not require dismantling the wiring between the lamps. It is enough to stretch the phase wire from the nearest light bulb to one pass-through switch, and connect the neutral wire from the last lamp to another switch. The fixed contacts are connected to the phase and neutral taken from the distribution boxes. The sequence can be any, the main thing is not to connect the terminals of the moving contacts with one wire from the light bulbs.
How to properly install Schneider Electric switches
Installing an electrical point in the wall, such as a regular, pass-through or crossover switch, may seem like a less significant procedure than connecting equipment. However, not only the convenience, but also the safety of its further use depends on how correctly the switch is installed.
Installation box . Before installing the actual switches, installation boxes are placed in the wall. When starting this work, you should make sure that all electrical wiring in the serviced area is de-energized. Preparing the seat and installing the box is carried out using special tools - a drill or screwdriver, a crown for drilling a hole, Phillips and flat-head screwdrivers, mounting and electrical knives. For ease of work, the cable in the corrugation should have a reserve length.
Switch . Schneider Electric switches are installed in mounting boxes in one of the following ways: fastening with screws using a support (mounting plate) of the product or using mounting paws. The second option can be used as an additional mount. Before installing the switches, the cable cores are stripped and the wiring is done inside the boxes. Remove the key from the switch and remove the special adapter from the inside of the part (for the Sedna series). By pressing the buttons of the quick-release contacts with your fingers, the cable cores are inserted. The switch is inserted into the installation box and the product is fixed.
Where to order the service for connecting crossover and feedthrough switches
By contacting the Vivaset online store, you can order installation and connection of Schneider Electric automation, including pass-through and crossover switches. You can order delivery of goods from us in Moscow or to any region of Russia. When purchasing electrical goods from Vivaset, you receive many advantages, including the opportunity to choose the required product from a wide range of products offered from the world's leading manufacturers, as well as an individual approach to each client. We will help you choose the appropriate type of equipment and answer any questions related to its operation. To take advantage of a free consultation with company managers, contact us via online chat, by phone +7 (495)-1-504-504 or via e-mail [email protected]
How to connect a two-key switch with your own hands
- In the cramped conditions of a small apartment, a two-key switch is simply irreplaceable, because there is not always a free section of the wall to place several devices side by side.
- Can combine any two lighting groups. The cable of both groups can come from one lighting fixture, or from different ones, for example, from a floor lamp and a chandelier.
- Along with single switches, it is available in both the classic and walk-through versions, which is convenient when there is a long corridor in the premises, which requires the ability to turn on and off the lights at different ends.
- It can be made in a waterproof version, as well as with an IP protection level, which provides advantages when placing it outdoors, for example on the porch of a private house. One lighting group, which he controls, in this case is responsible, for example, for the light above the front door, and the second is for external lighting in the garden.
- Despite the fact that a two-button switch is slightly more expensive than a single one, its installation is more profitable, since there is no need to buy two devices and pay for double installation.
Useful tips Connection diagrams Principles of operation of devices Main concepts Meters from Energomer Precautions Incandescent lamps Video instructions for the master Testing with a multimeter
Installation of a socket and switch using the example of the Sedna series from Schneider Electric
Installing an electrical point (socket or switch) in the wall at first glance may seem like a rather simple and insignificant task compared to other operations performed when renovating a room (leveling, plastering, painting walls, etc.). However, when you understand all the intricacies of this operation, you begin to doubt its simplicity. Judging by the questions and reviews on the forums of those who are trying to do this work with their own hands, you understand that the ease of installation is priceless! Specialists from JSC Schneider Electric shared with us the secrets of the correct and safe installation of electrical installation products and mounting boxes, and also gave useful advice. The master class uses Schneider Electric installation boxes for drywall, as well as Sedna series sockets and switches.