I removed the two-key switch. I want to install a new one-key one. Three wires, which one should be inserted into phase and which one into zero, where is the third one?
2 comments
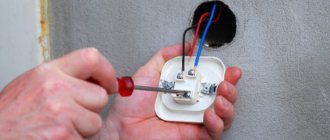
Hello! When connecting a light switch, you will not have a zero, the switch breaks the phase, the zero goes directly to the lamp. As for replacement, everything is simple. A two-key light switch has 1 input (wire supplying voltage from the network) and 2 outputs (groups of lamps). A single-key switch has 1 input and 1 output. You need to determine which wire has voltage from the network (using an indicator screwdriver), connect it to the input of the single-key switch. Connect one of the remaining wires to the output terminal, turn on the switch and determine on the ceiling which of the wires has voltage (connected to the lamp). You can disconnect the remaining phase wire and insulate it on both sides. Perform all work directly on the wires with the voltage turned off.
You can also do all this in a switch. Connect the two wires that go to the chandelier to one output terminal. And insulate any of the wires on the chandelier (from the switch).
When the time comes to replace the switch, many people fall into a stupor and don’t know what to do. The fear of getting an electric shock or doing something wrong in such a situation is understandable. But these fears arise simply from the fact that this situation is new to you and you have not encountered this yet. You can, of course, call an electrician, but, firstly, it is not so difficult to do it yourself, and secondly, an electrician, in most cases, will have to wait longer than to fix the problem yourself.
What do you need to know about replacement?
Although the process is fairly straightforward, certain precautions must be taken when replacing a light switch yourself. The most important thing you need to know when replacing a switch is the location of the electrical panel. Since the most important thing is to de-energize the wires coming to the switch.
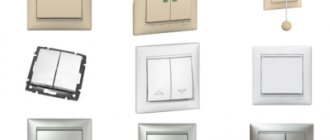
Let's classify switches according to several criteria:
- according to the method of fastening;
- by number of keys;
- by design;
- according to the design of terminals for fastening the ends of the wiring;
- according to the inclusion principle.
- According to the mounting method, switches are divided into two types: internal and external.
- External switches are used with open wiring, when the wiring runs directly along the walls, and the switch is also attached to the wall. This is very rare in ordinary apartments; it is more typical for wooden houses.
- Internal switches are used when the wiring is hidden under the plaster. In this case, drill a technological hole for the switch, attach a socket box to this hole, to which the switch is already attached.
- Depending on the number of keys, switches are single-key, two-key and three-key.
- Single-key switches are light switches that contain only one electrical circuit and a key. They are the easiest to install, but such switches turn on and off all the light bulbs in the chandelier at once.
- Switches with two keys consist of two electrical circuits. They can be used, for example, if you have a three-arm chandelier. In such a switch, you can divide it so that one button is responsible for one light bulb, and the second for two other light bulbs, so in such a chandelier you can turn on any number of light bulbs, starting from one and ending with all three.
- A three-arm switch has three electrical circuits.
- According to the method of fastening the wires, switches are available with screw fastening and screwless.
- Screw-mounted switches are the most common type of switch. The stripped end of the wire in such switches is fixed with a screw. The advantage of this type of fastening is ease of installation. The disadvantages include the need to periodically tighten the screw, since under the influence of vibrations it slightly unscrews.
- Switches with a screwless or quick-release fastening method are less common. The advantages of this type of fastening include the absence of the need to tighten anything. The disadvantages include the fact that this type of fastening cannot be used for any type of wiring; it is suitable for copper stranded wiring and is not applicable for old aluminum wiring.
- By type of activation, switches can be keys, push-buttons, dimmers, rotary, rope, touch, acoustic, with a remote control.
- Key switches do not need any special introduction. Almost everyone at home has such switches. The process of closing the circuit is carried out mechanically by pressing a key.
- In push-button switches, the closing process, just like in keyboard switches, occurs mechanically, only in a push-button switch the on and off process is carried out by pressing the same button. Very often such switches are found on table lamps.
- Dimmer switches are switches that can not only turn the light on and off, but also regulate its intensity. They are equipped with a rheostat. In addition to the fairly common switches, on the same table lamps with a wheel, there are also dimmer switches with push-button adjustment and even touch adjustment.
- Rotary switches are most often found in rooms with exposed wiring or in rooms with antique or loft designer interiors. They are not as multifunctional as dimmer ones. Switching them on and off is carried out by a rotary mechanism.
- Rope switches are also familiar to many; they are often used in bedside sconces. This type of switch is not fundamentally different from other types of switches. This is a purely decorative type of switch, there is nothing else special about it.
- Touch switches are the most modern of the entire list and have great functionality compared to others. Touch switches can have functions such as: timer, backlight, motion sensors, room temperature and others. Despite the fact that this type of switch is the most expensive, it is also the most in demand. Additionally, you can familiarize yourself with the above-mentioned types of devices - infrared, LED and backlit.
- An acoustic switch is equipped with a sound sensor, which is triggered when exposed to a certain sound signal, most often a clapping sound (we wrote about such a switch here). Unlike touch switches, there are cheaper models that are rarely of good quality.
Where to start?
Therefore, before replacing the switch, it is necessary to carefully study the process of connecting wires and observe safety precautions when working with electrical devices. Also, to replace the switch, you need to stock up on the necessary tools and, in fact, the switch itself.
- To select a new switch, you must first determine which switch is needed based on the type of mounting. Here it is enough to know whether your wiring is external or internal.
- Then you should decide what you want to get from the switch and select the required functionality.
- It is necessary to choose the principle of closing the circuit in the switch, whether it will be an expensive and fashionable touch switch or a regular key switch, with or without the ability to adjust the light intensity, with or without the function of illuminating the lamp itself.
- The backlight function should be chosen very carefully, since when using diode bulbs with this switch, the bulbs glow dimly in the dark.
- You also need to decide on the method of fastening the wires, screw or quick-clamp. If you have aluminum wiring, then there are no options, only screw terminals, but if you have copper wiring, then you can try modern quick-release terminals.
- Also, in certain cases, it is necessary to pay attention to the maximum load of the switch and the material from which its base is made. According to the maximum load, there are usually 10 A and 16 A switches. A 10 A switch can handle a maximum of 2.5 kW, that is, 25 100 W bulbs. Plastic or ceramic is usually used to make the switch base. Plastic can withstand 16A, and ceramic can withstand 32A.
- If you choose a switch for a small room with standard lighting, then these indicators are not so important, but if you have a room of more than 100 square meters. meters with powerful lighting, it is worth calculating the load and taking a switch with a ceramic base.
- And the last indicator: moisture protection. This indicator is marked with the letters IP and numbers corresponding to the degree of moisture protection. So, for an ordinary room a switch with IP20 is suitable, for a bathroom with IP44, and for the street it is better to take a switch with IP55.
To replace the switch you will need the following tools::
- Voltage indicator . Necessary for safe work. Before starting work, you must use an indicator to check the absence of current in the wires and protect yourself from electric shock or accidental short circuit.
- Screwdriver Set . Screwdrivers are needed to remove the old switch and then install the new switch.
- Pliers . They will come in handy in case the wire breaks while dismantling the old switch and needs to be cleaned.
- Electrical tape . May be useful if the wire insulation is frayed. It is not necessary to have electrical tape when replacing a switch, but it is best to keep some on hand just in case.
- Flashlight . It will be needed if insufficient sunlight falls on the switch.
Step-by-step instruction
Let's look at how to change the switch.
Dismantling the old
- First of all, it is necessary to de-energize the wires coming to the switch.
- To dismantle the switch, you need to carefully pry off the switch cover with a flat-head screwdriver (if you can’t pick up the cover from the bottom or top, then try to pick it up from the side; on some models of switches there are special latches there).
- After dismantling the cover, the interior of the switch is revealed to us.
- Now you need to unscrew the mounting screws.
- After this, you can remove the switch from the socket.
- Now that the entire internal space is in front of us, we should use an indicator to check the wires for voltage.
We suggest watching a video on how to dismantle an old switch:
Preparing for installation of a new
- Before further installation of the switch, it is necessary to inspect the wires for frayed insulation.
- If there are any, then it is advisable to cut off this section of the wire, if the length of the wire allows, otherwise wrap it with electrical tape.
- Also, if you have copper stranded wires and the bundle has become significantly thinner, you need to cut it and strip part of the wire for better contact.
Connection process step by step
- Study the location and purpose of the contacts; sometimes additional information about this is available on the back of the device. However, if it is missing, then it will not be difficult to figure it out: there should be 2 contacts with output in this type and traditionally they are located on the opposite side from the only input one.
- The phase extending from the distributor is connected to the input contact, and the contacts with the outputs are intended to control lighting sources, their number is equal to the number of keys, in this case there will be 2.
- It is advisable to connect the switch in such a way that the central contact is located at the bottom.
- Connect 3 neutral wires: from the distributor and from each of the lighting sources.
- The phase wire coming out of the distributor is connected to the only input contact in the switch.
- The switch has 2 phase wires, each of them is connected to a similar conductor coming from the lamp.
- Inside the distributor, these phase wires must be connected to groups of lamps or separate lighting sources that are planned to be controlled. After this, both conductors will be switched phases of two groups of lamps.
- In the distributor it is necessary to identify the neutral wire, which is connected to a similar conductor going to the lighting sources. The mechanism can exclusively switch phases of different groups of devices.
- After all connections, proceed to soldering and twisting with an insulating layer, but before that it is recommended to check all completed connections.
It is the phase and not the zero that is placed in the gap, that is, on the switch, because this method is the safest. When turning off the power, turning the switch to the “off” position, it would be correct if there is no voltage left on the lamp socket, and when connecting the zero to the gap, this is exactly what will happen, and simply replacing a burnt-out lamp can turn into every second exposure to the danger of electric shock.
The installation of a double type of switch should be carried out exclusively in a socket box, the diagonal of which is 67 mm. The old-style socket boxes have a diagonal of 70 mm, since the old devices were larger and do not fit well with modern models. In addition, they used to be made of metal, not plastic. And don’t forget to use cables of the required diameter, which was described in detail in the link.
Read also: Mixed connection of resistors formula
The article details several ways to update the BIOS on an Asus motherboard.
Now you can definitely choose the ideal laptop for work or study!
This article describes the benefits of SSD drives for applications and games. There is also a comparison between the advantages of this drive with its outdated counterpart.
The article talks about how to repair a plastic Chinese electric kettle.
Living comfort consists of many components, among which lighting system control plays an important role. It can be made more convenient by installing two-key electrical appliances.
Agree, it would be nice to learn how to do this kind of work yourself, especially if you have to do a major home renovation and update the electrical wiring. But before you connect a double switch to two light bulbs, you need to decide on the circuit and study the procedure.
We will help you achieve your plans. The article describes the nuances of implementing different connection schemes, and also provides step-by-step instructions for installing a two-key switch. The text material is supplemented with visual illustrations and video reviews.
Circuits and connections
Next, we will consider in detail the connection diagrams of different types of switches.
With one key
If you remember how the old switch was connected, then installing a new key switch will not be difficult. If not, don't worry. Take a closer look at the new switch. On the base of the switch there are 3 terminals marked L1 and L2. The phase, usually the red wire, is connected to terminal L1. And connect the wire from the chandelier, usually blue or black, to terminal L2.
Now all that remains is to secure the switch in the socket box and check its functionality. Turning on should be done by pressing the up key , if turning on is done by pressing the down key, then you have mixed up the wires. Turn off the voltage in the panel and swap the wires.
We suggest watching a video on how to properly connect a single-key switch:
Two-key
The principle of connecting a two-key switch is similar to a single-key switch, except that it has 3 terminals. Here the phase must be connected to terminal L3. And the remaining 2 paired wires are on terminals L1 and L2. Here it is difficult to confuse the phase with the wire that comes from the chandelier, since the phase is a single wire, and a double wire comes from the chandelier.
Double switch connection diagram
Three variants of circuits - all identical in function
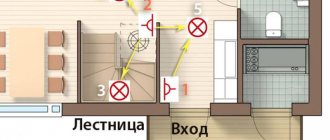
In their apartments they use a two-button switch to connect a chandelier with several bulbs or spotlights on the ceiling. One group of spotlights or lamps in a chandelier is controlled by one key, the second group by another. The number of spotlights or chandelier bulbs in each group can be from 1 to ten.
An example of connecting a five-lamp chandelier via a two-key switch
If one lamp is located in the corridor, and the second is in another room, there will be more outgoing wires, since each group will have its own wire or cable. The connection diagram will take a different form:
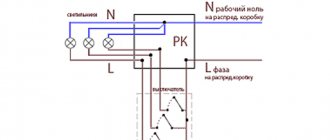
From the apartment electrical panel, power comes to the distribution box in the form of two wires: phase (red) and zero (blue).
- The phase (according to the red diagram) in the distribution box is connected to the wire (red) going to the common contact of the two-key switch. There are already two wires coming out of the double switch (according to the yellow and orange color scheme).
- The zero (according to the blue diagram), coming into the distribution box from the apartment panel, is connected immediately to the zero going to the groups of lamps. That is, the zeros immediately go to the lamps. And the switch switches only the phases of different groups of lamps.
What do you need to know when replacing a switch?
When replacing a switch with your own hands, you need to know that:
- Voltage in the electrical network poses a danger to humans, so you should not touch exposed, unenergized wires with your bare hands.
- Before starting work, you need to study the instructions for each specific model.
- For those who are replacing electrical appliances themselves for the first time, it is better to take photographs of key points. Even a slight deviation from the algorithm can lead to unpleasant results, such as damage to lighting or wiring due to a short circuit.
Types of switches
Switches differ from each other in:
- method of fastening to the wall;
- number of keys;
- design features;
- type of connectors for connecting electrical wires;
- inclusion principle.
The devices can be produced in a standard design or protected from moisture penetration. The latter are intended for use in bathrooms or outdoors.
By mounting method
According to the mounting method, switches are divided into:
- Internal type devices. They are installed in special recesses in the walls, often together with socket boxes made of metal or plastic. This is the most common type of device used in apartments in multi-storey buildings.
- External. Used in combination with exposed wiring and mounted directly to the wall.
By number of keys
Modern manufacturers offer switches with one, two or three keys.
By design
Depending on the purpose and design features, switches are:
- keyboards;
- push-button;
- rotary (slider).
The design of a simple switch with one key: 1 – a key with which the mechanism is activated; 2 – decorative frame; 3 – working part, which contains the electrical mechanism
According to the design of the terminals for fastening the ends of the wiring
Modern switches use two types of terminals to secure electrical wires:
- Screw. Connections where the clamping is carried out using screws weaken over time, which leads to an increase in temperature at the point of contact and burnout of the cable. They need to be inspected at least once every 2-3 years and tightened.
- Spring. Such terminals are more durable and provide reliable contact throughout the entire period of operation.
According to the inclusion principle
Modern switches based on the switching principle are:
- mechanical - elementary keyboard devices, easy to install and use (the function of a key can be performed by a lever, toggle switch, button, cord, rotary knob);
- electronic touch-sensitive, activated by the touch of a hand;
- with remote control, equipped with a remote control or motion sensor.
Photo gallery
Principle of operation
The operating principle of the switch is that there is a moving contact inside the element mechanism. When you press a key, it can take one of two positions. The first position is “on”, the second is “off”. In this case, the moving contact will either connect the circuit or disconnect it.
The moving contact closes the circuit, and the phase is sent along the wire core provided for it to the lamp lamp. As a result, the lamp begins to glow.
Two-key switch device
As can be seen in the photo of the two-key switch, its design includes the following elements:
Do-it-yourself installation of a double switch is done by analogy with conventional single-key models. But, in this case, each lamp or lighting group is connected to a separate key. Accordingly, lamps (groups) that must be turned on by different keys should be connected with separate wires.
If 2 light bulbs are connected with one wire, they will turn on simultaneously, and in this case it is not advisable to install a two-key switch.
To connect the device you need to get to the internal mechanism:
- Remove protective and decorative plastic elements. It is convenient to pry off the keys with a thin flat screwdriver. Some models have special grooves for ease of installation.
- Remove the frame. It can be secured with screws or latches.
After this, you can connect the wires to the mechanism. First you need to install the wiring for the light bulbs and mount the mounting box for the switch into the wall. The socket box must be selected for the specific model of the device.
Expert opinion
It-Technology, Electrical power and electronics specialist
Ask questions to the “Specialist for modernization of energy generation systems”
Connecting pass-through and cross switches According to the control principle, switches come with both classic keys, which are pressed from top to bottom and vice versa, and with touch buttons. Ask, I'm in touch!
Where to start?
To get started you need:
- decide what type of switch needs to be installed;
- Prepare the tools and materials that will be required.
Choosing a new switch
When choosing a device, you should pay attention to the following parameters:
- Maximum power. This device parameter is calculated using a simple mathematical formula. This indicator determines the permissible load, and it is especially critical when using conventional incandescent lamps. The total power consumption of the luminaire should not be higher than that indicated on the switch. If only the permissible current in amperes is marked on the case, you can calculate the maximum power by multiplying this value by 250. For example, 6 A × 250 V = 1500 W or 1.5 kW. To reduce energy consumption, it is recommended to use LED lamps.
- Case material. It determines the temperature stability of the device. Large rooms with powerful fixtures will require breakers that can handle heavy loads. The type of housing in which the contacts are placed is important here. It can be made of ceramic or plastic. Ceramic cases are immune to temperature changes; they work properly even if a large current flows in the circuit. For an ordinary apartment in a multi-story building, a breaker with a plastic case is suitable.
- Number of keys on the switch. The number of buttons is selected based on the type of lamp, existing wiring capabilities and connection diagram. In the kitchens of ordinary apartments, appliances with one key are most often used, and in living rooms - with two. Also, two-button devices are used in separate bathrooms.
- Mounting type. For internal switches, the housing is hidden in the wall, and on the surface there is only a cover with a socket. External switches are almost never used in modern apartments. Their distinctive feature is a thick body and open wiring connected to the device (not hidden in the wall). Illuminated switches are most often installed in the corridors at the entrance to the apartment, so as not to look for them in the dark.
Instructions for replacing the light switch
Before replacing a new light switch in an apartment, you need to dismantle the old keypad and make sure the wiring is in good condition.
How to remove the old switch?
Dismantling the old switch is carried out in accordance with the step-by-step instructions:
- Remove the key and top cover.
- Disconnect the wires using a screwdriver, unscrewing the bolts on the terminals.
- Apply power to the distribution panel and locate the phase wire using the indicator.
- Turn off the mains voltage.
- Mark the phase with insulating tape or another method.
- Loosen the screws holding the spacer tabs.
- Remove the device from the socket.
Scheme for dismantling the old switch
In some cases, the sequence will be reversed - the wires can be disconnected only after the switch is removed. This depends on the design features of the device.
Dismantling the external switch is carried out in a similar manner. The only difference is that instead of loosening the screws of the spacer legs, the screws that secure the device to the wall are unscrewed.
Video instructions for dismantling the old switch can be viewed on the channel “Guys from Stone. Do-it-yourself apartment renovation.”
We are preparing for connection
Before connecting a new device, you must complete the following preparations:
- Loosen the screw terminals so that the wires fit easily into the hole.
- Unscrew the screws of the spacer tabs so that the switch fits freely into the socket box (this operation is not required for outdoor devices).
- Strip the wires when replacing them (if the condition of the old electrical cable is good, there is no need to strip it).
Diagram and connection with one button
After everything is prepared, you can install a breaker with one key, following the detailed algorithm:
- Examine the markings on the terminals of the single-key switch. The phase wire must be connected to contact L, the second end of the cable to connector 1, respectively.
- Insert the bare wires into the contact holes and tighten the terminal screws. Do not apply too much force, otherwise you may break the thread.
- Install the switch in the socket box strictly horizontally without distortion.
- Secure the device with the sliding tabs by tightening the screws.
- Check the correct operation of the lighting fixtures by turning on the circuit breaker on the electrical panel.
- If the switch operates correctly, install the cover and keys.
Diagram and connection with two buttons
Algorithm for installing a switch with two keys:
- Connect the phase wire to contact L, the remaining two ends to connectors 1 and 2 in accordance with the markings.
- Tighten the fastening screws (this operation is not necessary on spring terminals).
- Place the switch in the socket box.
- Tighten the screws of the sliding legs, eliminating even minimal gaps.
- Make sure that the device works correctly by turning on power.
- Install the cover and both keys.
Step-by-step instructions for installing a two-key switch are given in the photo gallery:
Non-standard situation
There are often cases when the wire inside the socket box is too short. It is not long enough to connect a new switch. Such unusual situations arise in old houses, where electrical appliances have already been replaced several times, and the wiring has become unusable. In this case, the cable must be extended.
This will require additional tools and consumables, namely:
- hammer;
- chisel;
- putty knife;
- two-core wire 10–15 cm long;
- a little putty or plaster;
- insulating tape.
Only wires of the same types can be spliced together. A copper cable cannot be connected to an aluminum one - this can lead to oxidation in the contact area, decreased conductivity and burnout of the wiring.
Cable extension is performed in the following sequence:
- Determine in which direction the cable is laid in the wall.
- Carefully release a piece of wire about 10 cm long using a hammer and chisel.
- Cut off the damaged cable section with pliers.
- Strip the ends of the new and old cable, completely removing the insulation in a section of at least 2 cm.
- Tightly twist the protected wires together.
- Wrap the exposed areas tightly with insulating tape.
- Place the connected cable into the channel.
- Cover the damaged area with plaster or putty.
After the solution has completely hardened (after 15–20 minutes), you can continue to install the new switch.
Installation of a two-button light switch and connecting wires
There is nothing complicated in the connection diagram and in the process of installation, installation and connection of wires to the switch contacts. First of all, the switch needs to be disassembled. To do this, remove the keys themselves. If you can’t do this manually by simply pulling them towards you, use an ordinary screwdriver, prying the keys off from the side.
Next comes the insulating decorative backing; it can either be snap-on or screwed on. Remove this frame.
As a result, what you have in your hands is the body itself with the fastenings on the sides and the internal contact part. The main task is to supply voltage from the phase conductor to the common contact. Further, when two keys are closed, this phase will diverge into one or the other lighting circuit.
To find the central contact, look at the marking, since it may not always be located alone and along src=»https://stroyka-electro.ru/wp-content/uploads/2018/10/kak-s-odnoklavishnogo-vyklyuchatelya -sdelat-dvuhklavishnyy-10.jpg" class="aligncenter" width="596″ height="600″[/img]
What to do if you don’t understand the inscriptions or they are erased and painted over? Then you need to use a contact screwdriver with a battery-powered tester with a continuity test function. Insert any metal object (nail, screw) into the supposed common contact. You wrap your fingers around it and touch the other two contacts with a screwdriver.
When you press the keys one by one, that is, turn on one - check, then turn off the first and turn on the second - check, the screwdriver LED should light up each time. If this does not happen, then this is not a common contact.
When you have dealt with the contact part of the switch, take the three-core cable VVGng 3*1.5. It is desirable that the colors of the cable cores correspond to the color markings according to GOST. How to determine by color which conductor should be phase and which should be neutral by reading the article “How to distinguish wires by color.”
To connect the common contact, use the gray conductor phase coming from the junction box. Strip the end of the core, insert it between the contact plates and tighten the screw with a screwdriver.
Next, connect the other two wires in the cable to the outgoing contact connectors.
Connecting the conductors directly to the two-key switch itself is now complete. Insert the housing into the mounting box and tighten the mounting screws.
Then you tighten two spacer screws, which help the mounting fork with teeth to rest as much as possible against the walls of the box and firmly hold the switch body inside it. After this, you can return all the decorative frames and the keys themselves to their place.
How to replace a single-key switch with a two-key switch?
Independent dismantling of a switch with one button and installation of a device with two buttons is carried out in the following order:
- Turn off power.
- Remove the single-key switch by disconnecting the wires and loosening the screws of the spacer legs.
- Turn on the power. Find the phase wire and mark it.
- Prepare the new switch for installation by loosening the screw terminals and the screws of the spacer tabs.
- Shorten and strip the old wire if the ends are burnt or cracked.
- Insert the wires into the contact holes: the phase wire into terminal L, the other two into connectors 1 and 2. Tighten the screws.
- Install the 2-key switch in place of the old one, securing it with sliding tabs.
- Check correct operation and install decorative elements.
Replacing a one-button switch with a two-button one is possible if the wiring allows it. In other words, there should be three wires in the socket box. Otherwise, you will need to pull an additional cable from the transfer case. This can only be done by an electrician during a major overhaul.
How to make a socket from a switch
When renovating and remodeling an apartment, the question often arises: “How can I make a socket out of a switch and vice versa?” As you know, nothing is impossible, and if you want to perform such castling, then we will be happy to help you with this. After all, there is nothing complicated about this, the main thing is to follow our recommendations exactly.
We install a switch in place of the socket
Let's start with a simpler option of converting an electrical outlet with a socket into an electrical outlet with a switch for lighting. To perform such castling, we do not need to groove the wall for new wiring; we just need to make changes to the connection diagram.
Let’s make a reservation right away: there is no need to ditch the walls if the wires from the lamp and from the outlet are routed into the same junction box. Otherwise, you can’t do without gating.
Conversion for a single switch
First of all, let's consider the option of installing a single switch. It is simpler and will allow you to form a general idea of the nature of the necessary switchings.
- Before you make a switch from an outlet, you need to do some preparatory work. And the first of them is to relieve tension from those circuits in which you are going to work, as well as those adjacent to which accidental touch is possible. It is best to relieve tension from the entire apartment or house.
- After making sure that there is no voltage using the indicator, we remove the old socket. We only have two or three wires left sticking out.
- First of all, let's deal with these wires. If the wiring in your house is made in accordance with clause 1.1.30 of the PUE, then the blue wire is the neutral wire or zero, and the yellow-green wire is the ground. The third wire is phase and can be of any color.
Note! In Soviet-built houses there may not be a grounding wire. Therefore, if you have only two wires sticking out of the wall, then these are phase and neutral. If they are not marked with colors or you are not sure of the correctness of this marking, then you must find out. To do this, simply separate the wires and apply voltage. Touch the wires with an indicator screwdriver. When you touch a phase wire, the indicator will light up.
- At the next stage, our instructions involve opening the junction box. All further switching is done here. To do this, we first need to identify the wires going to the lamp and our outlet.
- If the lamp was connected to a switch, then disconnect this wire. We do not touch the neutral wire of the lamp and leave it connected. If the lamp was not connected, then connect the blue wire to the neutral terminal of the power cable.
- For wires going to the outlet, we perform the reverse procedure. We disconnect the neutral wire, but do not touch the phase wire.
- Now we connect together the former neutral wire from the socket and the phase wire from the lamp.
- All that remains is to install the switch in place of the socket and connect it. We have already discussed how this is done in other articles on our site and can be seen in the video, so we will not consider this again.
- Now all that remains is to apply voltage and get used to the location of your new switch.
Conversion for double switch
Let us immediately note that this option is only possible if there is a ground wire. Otherwise, it is impossible to do without installing an additional wire from the junction box to the former outlet and the price of this work will not be proportionately high.
Safety regulations
It is necessary to change electrical appliances yourself, observing the following safety requirements:
- All work on dismantling and installing new devices is carried out with the electricity turned off at the switchboard. The only exception is the search operation for a phase cable.
- You can make sure there is no voltage on the wires by touching the bare contacts using an indicator screwdriver. The LED will not light if there is no minimum current in the circuit.
- Do not use wires with damaged insulation, kinks or cracks.
- Switches that have visible defects must not be used.
Work principles
In order to replace switches and avoid mistakes that could lead to undesirable consequences:
- short circuit;
- failure of lighting fixtures;
- burnout of wiring in walls and junction boxes;
- worst case scenario – electric shock to a person
you need to familiarize yourself with the principle of operation of switches, safety precautions, remember the diagrams of their connection in the electrical wiring circuit, study the rules for dismantling, installation and connection, take into account design features when installing new switches of various types.