Home » Electrical wiring » Light switches » Do-it-yourself light switch disassembly: step-by-step process
Sometimes, many people may need to remove the light switch to replace electrical wires. A key switch is found in almost every apartment. Disassembling a switch is not a difficult process, but you need to know how to do it correctly. Also, sometimes disassembly may be required when replacing a light switch.
In this article we will show in detail how to disassemble a light switch. We described each process in detail. You will also find many photos of disassembling the switch.
Nuances when disassembling various types of switches
- To power a large number of spotlights, ceiling lighting and other lighting fixtures, three-key switches are often used. The design of such models is distinguished by fairly thin keys. But, as for two-key switches, dismantling a three-key switch begins with removing each of them one by one. To simplify this procedure, many models are equipped with a small rectangular hole at the bottom of the keys, into which a screwdriver can easily fit.
- If you want to disassemble the dimmer (adjustable switch with rotary knob). Its dismantling is fundamentally no different from the classic model. The only difference is that instead of keys, you first have to remove the regulator knob.
- The touch switch is disassembled by removing the outer panel. For this purpose, you can use either a regular screwdriver or a special holder, which you can make yourself from wire if it is not included in the kit. In this case, special care must be taken so that the glass does not crack.
- If the switch is paired with a socket, then to dismantle the first one you will need to remove the socket along with it. In this case, the socket cover will have to be removed, since one of the fastening bolts is often hidden under it.
- Pass-through switches have the same design as conventional ones, and, accordingly, the same disassembly procedure. The only difference is the number of wires, since the phase connection is made in several positions at the same time.
Troubleshooting procedure and safety measures
Indicator screwdriver
Before you begin repairing light switches in your apartment, it is advisable to thoroughly prepare for this procedure. First of all, you need to stock up on working tools that can be used to repair products of this class. The set includes the following items:
- indicator screwdriver;
- tester (multimeter);
- regular screwdriver;
- side cutters or platypuses.
Disassembling and cleaning contacts
Disabling automatic protection
Before you repair the light switch, you will definitely have to disassemble it to the point where the fault is clearly visible. It is recommended to start repairing a broken device in the following order:
- Completely remove the voltage from the linear branch of the supply line or from the entire apartment at once.
- Disassemble the switch, for which you first need to remove all the keys.
- After removing them, the switching mechanism with the rocker arm will be “exposed”, the condition of which is used to judge the nature of the breakdown.
Switch contacts
If at this stage of dismantling it is not possible to detect traces of a malfunction or the damage is too serious, it is best to completely dismantle the device from its installation location.
Before repairing a faulty switch, you will have to unscrew the mounting screws and pull the box with it out as far as the length of the conductors allows. If they are short, the fastening is loosened, and the device itself is taken out of the plastic case (first you remember which of the conductors was connected where).
After removing the device from its installation site and removing it from the box, it will be more convenient to inspect it for damage. During inspection, several types of faults may be detected:
- the axis of fastening the rocker arm has fallen out, which returns to its place and is slightly flattened along the edges with side cutters; after this the key will be pressed normally, without jamming;
- the contacts of the changeover element are slightly burnt from frequent switching, which can be corrected with the help of sandpaper;
- if the contacts are badly burnt out, the moving part of the mechanism will have to be replaced with a new part (from a spare working switch);
- if there is nothing to replace this part with, you will have to buy and install a new device.
After eliminating all detected faults, they begin assembling the repaired device.
Switch assembly
Setting the switch keys
To assemble the switch and install it in its original place, first its body is secured in the mounting box. After this, the dismantled conductors are carefully connected to the contacts, and the screws securing them are tightened with force. Then the plastic cup is installed back into the niche and fixed there with spacer screws. Next, all that remains is to return the decorative panel to its place and install the switch key back.
Repairing 3-key switches or their two-key analogues is no different from the process already described for a single-key switch. In this case, everything will repeat itself, only perhaps on a larger scale. After installation, the device is checked for functionality.
Restoring rotary and touch models
Touch switches must be repaired in specialized workshops
In rotary-type devices, characteristic malfunctions have approximately the same causes and manifestations as in keyboard analogues. In their working mechanism, the closing and breaking contacts also burn out and completely wear out, which is explained by their intensive use. In addition, by analogy with the samples already considered, it is also possible for them to loosen the contacts at the points where the phase conductors are connected.
Restoring switches of this class is similar to the approach already discussed for key products. Difficulties arise when the cam mechanism breaks down, which is unlikely to be repaired manually. In this case, experts advise completely replacing the device with a new product.
https://youtube.com/watch?v=DEHoQ9G6ffc
How to remove a switch from the wall?
Light switches, as a rule, have a significant operating reserve, so they do not have to be disassembled regularly.
However, if such a need does arise, then this should be done extremely carefully, and strictly following the sequence, so as not to damage the inside of the device, which is almost 90% plastic.
Removing the key
Disassembling the switch first involves removing the key. Removing the key from the switch is quite simple. If you do not remove the key, then you will not be able to complete the disassembly process.
Before removal, you will need to examine the mechanism of your switch. It may be different and therefore the removal process is also different. The easiest way to remove the button is to pull it towards you. In most cases, this method works great.
But there are also switches on which you will not be able to perform this process correctly. That is why you will need to find special connectors on its sides. Once you find them, you need to pry them off with a screwdriver.
When you remove a key using a screwdriver, be sure to calculate your efforts. If you don't do this, then you may damage it.
Removing the frame
Disassembling the switch also involves removing the frame. The frames may also be different. Here are the main types of frames you can find:
- Screw. They are usually attached to small screws that simply need to be unscrewed with a screwdriver.
- Clamping. This type of switch may have special clamps in its design. To remove the frame, you simply need to bend these clips. For greater convenience, it is better to remove one side and then the other.
Removing the switch mechanism from the socket box
After removing the frame, the stage of disconnecting the mechanism from the socket follows. To do this, you need to unscrew with a screwdriver the screws located on the sides that hold the mechanism in the socket.
Some mechanisms are mounted on “spacers”. They have legs installed on the sides, which move apart when the screw is tightened, thereby securing the mechanism in the socket box.
Also, some mechanisms can be mounted in a mounting box, then you need to loosen the screws on the box and remove it.
Disconnecting wires
On many switches, most wire connections are made using bolts. To turn them off, you simply need to loosen these fasteners and pull the switch towards you.
Now the entire disassembly process is complete. As you can see, you can disassemble the light switch with your own hands quite simply. You don't need a lot of knowledge to complete this process. You just need to study our article, which describes this process in detail. Do not turn on the electricity immediately, as the wires will immediately be energized. If the switch is not replaced immediately, then the wires simply need to be insulated.
Today, disassembling a switch involves removing its three main parts. When reassembling the switch, you will need to reverse this process.
Switch assembly process
When assembling or replacing a mechanism with a new one, the process is carried out in the opposite direction. First, you need to secure the wires. Then secure the mounting box in the socket box, then carefully put on the frame and insert the keys. If you are disassembling the switch during repairs and are not going to install a new one, you need to remember that after turning on the electricity, the exposed wires will be live, so they need to be insulated.
Be sure to watch how to disassemble the switch video
Power outage
Before starting disassembly, you will need to turn off the electricity in your house or apartment. This can be done using an electrical panel, which is usually located near the front door or on the landing. If you don't know which switch controls your room, then it's best to turn everything off at once. If this is not done, then you may simply get an electric shock when removing the switch.
The lever on the circuit breaker must be turned down. After a disconnection, you better play it safe and additionally check the presence of electricity using an indicator screwdriver. Before disassembling, study the main types of switches.
How to remove a socket with a switch
Universal designs that include a socket and switch, made in a single housing, are very popular. Such devices are quite convenient during operation, since it becomes possible to connect lighting fixtures and power the outlet from one incoming line. The disadvantage is obvious - if one of the elements breaks down, you will need to remove the socket from the wall along with the switch, regardless of the source of the problem. There is no need to worry, because this operation is performed very quickly.
Reasons for dismantling the circuit breaker
During repairs, it is often necessary to move the switch.
Switches, if treated with care, will last for more than one year, perhaps ten years. Most often, the need to dismantle the device appears during repairs. Switches and sockets are removed from the wall so that the latter can be puttied, leveled, painted, glued, etc.
The second common reason is device failure. Before dismantling the switch, it is important to make sure that the problem lies there.
There is a wide range of sockets and switches, which are decorated in different styles. Taking advantage of this, households are replacing traditional electrical appliances with new, more creative ones.
How to disassemble a light switch?
So, in the initial position you have a key switch securely fastened inside the groove. First, prepare a tool to quickly disassemble the case - an indicator screwdriver, which will be quite sufficient.
Instructions for disassembling a light switch in an apartment are as follows:
Disconnect the circuit breaker that protects the electrical wiring from network overloads and short circuits.
Make sure there is no electricity in the room using an indicator screwdriver.
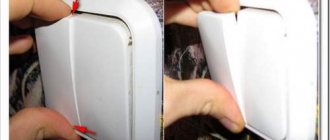
Remove the key(s). It doesn’t matter what type of switch you use: single-key, double or three-key. To remove the key, you need to squeeze it with your fingers on the sides (in the middle) and carefully remove it from the case (as shown in the photo). Sometimes the part “sits” firmly inside the case and in order to get it out you need to pry off one of the edges with a screwdriver.
Remove the decorative frame. In some cases, the frame is secured with two bolts from the inside; less often, the part is held in place by grooves that need to be lightly pressed with a screwdriver to disassemble the electrical accessories. Another option for fixing the frame is with the help of an additional element that is attached to the grooves of the caliper.
Remove the “core” from the socket. There are two screws on the sides of the case that secure the mechanism to the wall. All you need to do is unscrew them with a screwdriver. There is another option for holding the case in the socket box - with spreading legs. They need to be loosened by unscrewing the bolts on the sides that adjust the thrust angle.
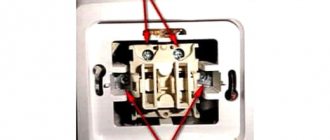
Disconnect the lead wires. Phase, ground and neutral can be secured with self-clamping terminals or a screw clamp. In the first case, you just need to press the locking levers and pull the wires out of the connectors. The screw terminals must be unscrewed with a screwdriver and the wires carefully removed.
That's all the instructions for disassembling the light switch. As you can see, there is nothing complicated in such an event.
Visual video lessons will allow you to see in more detail all the stages of unwinding:
As for repairs (for which it was necessary to disassemble the light switch), it all comes down to the following steps:
- If the effects of the mechanism melting are visible inside the case (the plastic has turned yellow, some areas are charred), you can throw away the product without hesitation and go to the store to buy a new one. Today, the cost of a key switch is not too high, but safety is much more important!/li>
- If there is no visible damage, try reinserting the wires and tightening them carefully, as Perhaps the contact simply loosened, as a result of which the switch stopped working. If it doesn’t help, most likely the reason is in the electrical wiring, try testing it with a multimeter, based on which you can draw conclusions.
After finding the cause of the breakdown, and most likely it is a weak contact, assembly is carried out in the reverse order. We hope that now you understand how to disassemble a light switch with your own hands!
Precautionary measures
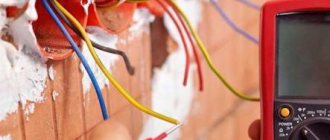
After turning off the electricity, use a tester to check the presence/absence of voltage at the output
What kind of lighting do you prefer?
Built-in Chandelier
When working on electrical devices, careful precautions must be taken to prevent injury from electric shock. You should completely de-energize the entire electrical appliance connection circuit and take measures to prevent accidental switching on of electricity.
Video
Before performing any actions with electrical devices, you need to make sure that there is no voltage in the network using an indicator screwdriver.
What to do with the rotary switch
Key switches are the most common and simplest models. With other options for such devices, some difficulties may arise. Sometimes you have to troubleshoot problems with so-called rotary switches, also called dimmers.
Disassembling the rotary switch begins with removing the round handle. You just need to pull it forward while holding the device body
Such devices are also sensitive to power surges and short circuits, just like their “brothers” with keys. Very often the triac in dimmers breaks. This element cannot be repaired, but it can be replaced. You need to start disassembling the rotary switch by removing the adjustment knob.
It is mounted on semicircular male-female elements or with special slots. You need to hold the switch body with one hand, and with the other, gently but forcefully pull the handle towards you. There is no need to twist it.
There is a fastening locknut under the handle; it also needs to be unscrewed. Sometimes fastening is done using a screw.
After the dimmer locknut or mounting screw has been unscrewed, you can remove the device body and gain access to its interior
Any of these elements should be unscrewed counterclockwise. Now you need to remove the plastic cover, as well as the frame, if necessary. Then you should loosen the elements that hold the dimmer mechanism inside and you can remove it from the socket.
First you need to check all contacts, connections and wires, clean off any deposits and oxidation that have appeared, restore damaged insulation, replace broken wires, etc.
If the rotary switch triac is broken, it must be replaced with another serviceable element with exactly the same dimensions and characteristics
The damaged triac must be removed and taken to an electrical store to find a new one, exactly the same. Reassembling the repaired device is performed in the reverse order.
As in the case of a key switch, before disassembling you need to de-energize the line, check the contacts with a tester and record the process in the form of a photo so as not to confuse anything during assembly.
Where to start
If the light does not light up when you press a key, the switch is not always the cause of the breakdown; you should not immediately start disassembling it. First, it doesn’t hurt to check the presence of voltage in the network, as well as the condition of the incandescent lamp. If there is no voltage, the switch is most likely ok.
You need to find out what is wrong with the network (short circuit, power outage, damage to the power cable, etc.) and fix this problem. With a burnt out light bulb it’s even easier - you need to replace it. If the network and the lamp are in order, it’s time to take a closer look at the switch.
First you need to find on the distribution panel the circuit breaker through which this particular switch is connected, and move the levers to the “down” position, i.e. turn it off. After this, you should use a tester to check the presence/absence of voltage at the output.
The procedure is simple and does not take much time; you should not neglect it, even if you are completely sure that the device is definitely disconnected from the power supply.
You can make an assumption about the nature of the breakdown even before the repair begins. A common problem is oxidation of contacts inside the device. If the switch does not work only sometimes, most likely the reason is bad contacts, which will simply have to be cleaned.
In addition to the “shell” of oxidation, carbon deposits can also accumulate on the metal switch plate. It can also be cleaned of accumulations to restore the operation of the device.
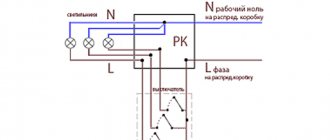
Serious damage can be caused by improper installation of the switch. Due to inexperience, some amateur craftsmen connect not a phase to the machine, but a zero wire. As a result, the switch seems to work, but all lighting wiring connected in this way remains energized.
It happens that simply replacing a burnt-out light bulb in such a network can result in an electric shock. It is enough to correct the circuit for everything to work correctly.
Before disassembling the switch, you need to de-energize either a separate line through which power is supplied to the device, or the entire apartment
Such installation errors can lead to the fact that after the machine is turned off, the line will still remain energized. This is one of the reasons why you should always check even when the device is turned off.
If there is voltage, you need to turn off the power to the apartment or house. If sparks appear inside the switch every time you turn it on and off, this usually indicates that the contacts of the device are of poor quality.
In some cases, it is necessary to replace the entire switch with the same one, just a new one. Usually, for replacement, they select exactly the same model that matches both the socket box and the interior.
If for some reason you need to install another model, you should make sure that the existing opening is suitable for it. Otherwise, you will have to re-install a new socket box.
The reason for frequent voltage drops in the network can be not only the general condition of the electrical network, but also a large number of powerful electrical appliances that are connected at the same time. On this matter, you can consult with an experienced electrician; you may need to make adjustments to the existing circuit.
Fault diagnosis
Has the light gone out in your house, garage or shed? Before you take a screwdriver, you need to find out the possible cause. There may be several of them, identifying them is not difficult:
- Burnt out incandescent lamp. Sometimes in such cases, when turned on, it may flash, blink or burst, and only then go out. If this happens, then there should be no doubt - the lamp requires replacement. You should turn the switch to the “off” position, carefully unscrew and replace the burnt out bulb with a working one. If the lamp simply does not turn on, then to diagnose it you will also have to unscrew it from the socket, see if the tungsten filament is intact, or simply try to insert a new lamp in its place. If after the manipulations the light turns on, then everything is in order and nothing else needs to be done.
- If replacing the lamp did nothing and the light still does not want to turn on, the socket may have failed. To check this assumption, you need to unscrew it and put another one in its place.
- If there is no response, there are no options left - the switch itself is faulty.
If you have spare electrical accessories and several screwdrivers at home, you can immediately begin repair work. The only difficulty is to correctly locate the mounting points and not damage the appearance of the switch when removing it from the wall.
The fact is that the reason for the inactivity of the on/off mechanism can be easily eliminated using home methods, and replacement will not be required, then it will be possible to put the repaired switch back in place. And given that manufacturers now pay great attention to the design of their products, all screws, clamps and other fasteners are usually hidden under the frame. Therefore, when dismantling, without knowing the detailed structure of the fittings, you can easily damage the keys or frame, and this will significantly worsen the external data.
How to prepare wiring
Before making a replacement, you should make sure that the electrical wiring is working and prepare it. There are two types of wiring
Before starting work, be sure to do the following:
- Check the socket of a non-working lamp. The problem may not lie in the switch, but in the lighting device itself. Then you won't have to replace the device.
- Check for light in other rooms.
- If other lamps in the house work, you need to dismantle the switch.
Work to replace the light switch is carried out only during a power outage. After turning off, you need to use an indicator screwdriver to check the absence of power supply.
It is necessary to warn the residents of the apartment about the work so that they do not use the light until it is completely replaced. It is recommended to post a sign on the distribution panel warning of repairs to prevent neighbors from losing power.
Recommendations for repairs
Problems with contacts are easily resolved. They need to be inspected first. If there is a layer of oxidized metal on them, you should remove it and then install the contacts in place.
If the contacts are not just oxidized, but have pronounced traces of melting, they usually cannot be repaired and the device will have to be completely replaced. Removing carbon deposits from the contacts is very simple; you can use a knife or the end of a flat-head screwdriver to do this.
A visual inspection of the wires both in the electrical outlet and in the junction box will help identify and eliminate the cause of the breakdown. It is necessary to restore damaged elements or replace them completely
When working with wires, you need to pay attention not only to the condition of the bare ends, but also to the quality of the wires themselves. For example, fragile wires can easily break, break, etc. In this case, part of the wiring will have to be replaced.
Removing the frame
Removing the switch housing
The next step in disassembling the electrical structure is removing the frames. They can be attached to the base in two ways - clamping or screw.
In the latter case, the frames are secured with miniature screws, which can be unscrewed in a matter of seconds using a Phillips or flat-head screwdriver. In the first case, the frames are secured using special clamps; to dismantle them, you just need to bend them. To speed up the process, first remove one clamp, and then proceed to the second.
How to remove a switch or socket before wallpapering walls
If you want the wallpaper to look beautiful on the wall, then before pasting the surface, remove all sockets and switches from it. No amount of precision will help you get around the fixtures without removing them - the wallpaper around the perimeter will be uneven, and after the repair there will be a bitter aftertaste.
Below is a brief instruction with a photo; after spending 5 minutes on it, you will not receive an electric shock, and the wallpaper will look beautiful in the interior of your apartment.
Step one - preparation
Sockets/switches are removed immediately before wallpapering; there is no need to do this in advance, as you can get an electric shock when turning on the lights or, as an alternative, sit in the dark with electrical appliances turned off.
We recommend removing old wallpaper without removing switches, except if the walls need to be heavily wetted and water may get on live wires. Typically the algorithm looks like this:
- Removing old wallpaper
- Prepare the wall (if necessary),
- Prepare glue and cut new wallpaper,
- Turn off the light on the meter,
- Removing sockets
- Wallpaper is being glued.
This way you can avoid some inconveniences and the use of swear words when becoming closely acquainted with the discovery of Alexander Volta.
The tools you will need are a flathead and a Phillips screwdriver.
Step two - removing the switch
Let us remind you that we remove, not dismantle, sockets and switches, so it is important to keep them intact unless replacement is planned. Using the example of a one-button model of a Legrand Etika switch, the essence remains the same for other mechanisms.
First, remove the button, for which we use a flat screwdriver or a sharp knife. We insert the screwdriver into the gap between the button and the switch frame, pressing the pressure panel until the fastening tendril comes out of the side hole. Do not overdo it - you need to press the button until the tendril comes out - no more, no less.
Now we remove the protective panel, which provides access to the wires and the main fasteners of the switch. To do this, unscrew 1-2 screws at the top and bottom and hook the protection with a screwdriver. The protective panel presses the switch frame to the wall; after removing the first one, the second one is automatically released and removed.
If the switch or socket has been standing for a long time and has begun to wobble, then at this stage the mechanism is secured. To do this, after removing the protective panel and frame, tighten the two main fastening screws. They are located on the sides of the push mechanism in the switch or to the right and left of the plug input in the socket. Tighten the screws sparing no effort – it is difficult to remove them.
There is no need to completely remove the light switching mechanism - just remove the button, protective panel and front frame!
Now all that remains is to glue the wallpaper, cutting the wallpaper sheets on the switch so that they extend 1 cm inside the perimeter of the switch, and install the mechanism back in the reverse order - the outer frame, fastening the protective panel with two screws and installing the button until it clicks.
Removing the device key
Disassembling the light switching device begins with removing the key, since it is impossible to continue work without dismantling it. Removing this structural element is almost always quite quick and easy. Before removing the key, you must carefully examine the mechanism of the existing device. It is produced in various types, and therefore the process may have fundamental differences.
The easiest way is to press the key towards the wall with your thumb, grab the ledge with your other fingers and, with not too much force, pull the key towards you. Some people are often afraid of damaging a key by applying too much force to a tightly seated element. In this case, you can use a flat thin screwdriver or a knife, slightly prying the key. But it’s still better to try to remove it manually - the risk of scratching or damaging the element is minimal.
To remove the key in most switch models, it is enough to use your fingers
There are models of switches, for example, Lezard, in which there are special holes on the sides of the key. By prying them off with a screwdriver, removing the key is done without much effort. If the switch is two-key, then the second element is removed after removing the previous one according to the same principle.
Common mistakes and their consequences
The main thing is to act carefully so that the plastic structure does not crack. The switches cannot be repaired; if the integrity of the housing is damaged, you will need to purchase a new device. This mistake is the most common when removing switches from walls.
The second mistake is the most dangerous; its meaning lies in neglecting the rules of personal safety, which poses a threat to human health and life. Before starting work, you need to turn off the power supply to the apartment and check the voltage at the output in the work area. If it is missing, you can safely get to work.
If you have no skills in such matters and the master is not sure that he can cope with the task, you can turn to a qualified electrician for help.
Tools and materials
Tools for replacing the switch
Before removing the switch from the wall, you need to prepare the required working equipment. For repair you will need:
- knife for removing the insulating layer;
- indicator screwdriver equipped with a rubberized handle;
- sandpaper;
- Phillips screwdriver;
- insulating tape.
When working with electrical appliances, it is important to observe personal safety precautions. Dismantling is carried out wearing personal protective equipment, after checking the voltage in the work area.
Power outage
Before removing an outlet or light switch, first turn off the electricity. In the room, the electrical wiring branches into several lines: sockets, lighting and leads to the electric stove. At the switchboard, the lighting power is turned off automatically, and then the absence of voltage is checked at its output.
Sometimes it turns out that it is not the phase wire that is connected to the machine, but the neutral wire. This can be done by an unqualified electrician who assembled the panel circuit. The circuit will work, but the lighting wiring will be constantly energized, regardless of whether the circuit breaker is turned on or not. If such an error is found, it should be eliminated by making the necessary changes to the circuit.
If you have difficulty choosing a line, you can turn off the input machine, turning off the power to the entire apartment.
Types of sockets
There is a wide variety of sockets. For example, they can be single or combined under one cover with a switch. There can also be two, three and four sockets in one module. Accordingly, all sockets are mounted on the wall in one row and combined with one module, as well as a decorative cover. Moreover, a modular socket may contain signal sockets, for example:
- Internet.
- Television.
- Telephone.
- Timer and so on.
Such sockets require special boxes, the installation of which should also be carried out in accordance with all requirements.
Wallpapering near sockets
The next stage is the actual gluing of the walls.
On the cut panel and it is attached to the wall over the technical hole. The strip is carefully rubbed in with a roller or rag, after which the contours of the socket box become clearly visible on it. Now you need to cut the panel crosswise in the designated place with a sharp wallpaper knife. The resulting valves are carefully tucked into the hole. We glue wallpaper in difficult places without mistakes
For round electrical appliances, the cuts should be made in a star shape to make wrapping the scraps more convenient. Particular scrupulousness when performing this technological operation when bypassing sockets and switches is not required, because after installing the decorative panel, the flaws will become invisible.