Lighting system in a smart home: design and operating principle
The point of a smart lighting system is the ability to control light using voice or automated scripts. The system allows you to control the operation of lighting fixtures installed inside and outside the house.
You can immediately purchase smart lighting devices. For example, Sber E14 or Sber E27 lamps. However, ordinary devices can also be easily turned into smart ones. It is enough to combine them with smart sockets and switches. LED strips, recessed and local lamps are suitable for this purpose.
Let's move on to the components of the light control system. This:
- Power light control unit that receives commands and distributes them.
- Controllers.
- Control panels, remotes.
- Smart switches.
- Dimmers for adjusting light levels.
- Motion sensors that respond to the presence and absence of a person in a room or in a local area.
Important! Sometimes household appliances whose operation you want to automate are connected to a smart lighting system.
To connect devices to the electrical network, special devices are used - controllers. Detectors and sensors are used to record processes. They detect changes in light levels and react to the movements of the inhabitants of the house, after which they transmit signals to the controller. The device automatically processes the information and turns on the lights.
For even greater convenience, you can set up voice control of the system. For example, through virtual assistants - Siri, Alice and Google Assistant.
Smart light system in the house
Installation
When choosing a device, think about what purposes it will serve and how to install it.
Socket relays
The use of socket relays is possible with lighting fixtures that have a standard plug for connecting to a household AC network.
The undeniable advantages of this type of equipment:
- compactness;
- mobility;
- ease of installation and operation;
- installation without connecting wires.
However, they are unsuitable for controlling the apartment lighting system as a whole and are not designed for significant power; in this case, you can pay attention to programmable sockets with Wi-Fi.
Stationary timers
If the consumer is faced with the task of managing not individual devices, but the lighting network of a home or business, then it is necessary to choose stationary devices.
They are mounted in a mounting box or on a DIN rail of a distribution board. Requires additional, in comparison with rosette ones, effort and material costs.
But it provides unity of system control and the ability to connect large capacities.
Applications and benefits of smart lighting
Smart lighting is widely used both in large private houses and in city apartments, as well as in industrial premises, offices and hotels. Advantages of the technology:
- The ability to control the lights on and off even when you are away from home is convenient if you are worried that you forgot to turn off the lights or electrical appliances.
- Reduce utility costs by reducing energy consumption.
- A simple and intuitive lighting control system that any family member can handle.
No more searching for switches in the dark and wondering if you turned off the lights before leaving. All processes will be automated. All you have to do is enjoy the comfort and try out the advanced features.
Controlling a smart lighting system
What is a timer for turning electrical appliances on and off?
The device that controls the supply of electricity to devices looks like a regular outlet. It differs from the standard connector by the presence of a built-in timer. There are models with a mechanical principle of operation or with electronic control. The latter have control buttons and a digital display. There are electric timers on sale that are not part of the sockets. These devices are installed directly into the wiring system or connected to a group of devices. They control the operation of fans, pumps and other types of equipment.
According to a given schedule, the timer turns off/supplies voltage to the outlet
Scope of application of sockets with on/off timer
The timer was primarily designed to save electrical energy. It ensures that heating devices are turned off for periods when the occupants of the house are absent and there is no need for heating. Before the owners return, the system starts up. The timer activates the devices several hours before the residents arrive, so that during this time the temperature in the rooms reaches a comfortable level. This principle is used in modern smart home systems. They not only carry out climate control, but also regulate the operation of lighting, alarms, etc.
Note! Not all manufacturers of sockets with a timer for turning lights on and off recommend controlling the operation of heating devices in automatic mode. Before purchasing, be sure to read the manufacturer's instructions.
Cycling timers are suitable for outdoor lighting that will turn on and off on a specific schedule. This type of device allows you to automate the operation of the irrigation system at your summer cottage, providing regular care for your garden, vegetable garden, and lawn. Timers are of particular importance for aquariums where the following are installed:
- lighting lamps;
- compressors;
- filters.
Timers are used to control lighting, fans, heating devices, aquariums, etc.
All these devices provide the necessary conditions for keeping animals in a terrarium or aquarium, so their operation must obey a strict schedule. Timer capabilities allow you to control even equipment installed in the pool.
Sockets with a cyclic timer to turn electrical appliances on and off are used to create the illusion of people in an empty house. To some extent, such devices provide protection against hacking, making it clear to intruders that the owners have not left, even if this is not the case. In this case, the outlet is adjusted so that the schedule for turning off and turning on the light is not too strict, but with some deviations. Thus, it seems that the system does not work automatically and the lighting is turned on by people.
Sockets with a switch-off timer, called interval sockets, operate on the principle of devices installed in electric stoves and washing machines. By turning the knob, you can set a specific period of time. After it expires, the relay automatically turns off the current supply to the device.
How sockets with a built-in timer work: operating principle
Sockets equipped with a timer are intended solely to control the operation of household electrical equipment. To understand the principle of operation, it is enough to consider one of the simple examples involving a conventional heat fan. On the control panel you can set the time when it turns on and off. For example, if residents leave the house in the morning at 9:00, then at that moment the supply of electricity to the device automatically stops and is resumed only in the evening, when they return from work at 17:00.
Using a timer, devices can be disconnected from the network while the owners are away
Helpful advice! If you set the device to start about 1 hour before people arrive, the timer will turn on the fan at 16:00, and during this time the room will completely warm up. By the time the residents return from work, the house will be warm and comfortable.
The socket can be configured not only for a few hours in advance, but also for a day, and even a week. By installing the appropriate program, you can forget about manual control for a long time, because the heat fan will work independently. Connectors equipped with a timer can be used to regulate electric heating. This is possible under certain conditions. Installation of a socket is allowed only if the system is assembled from electric convectors that are independent of each other.
According to the instructions, sockets with a timer can be used to control any electrical appliances as part of a modern smart home system. If you slightly modernize the circuit and include a timekeeping device in the common circuit, you can fully control the operation of outdoor lighting. The socket is programmed so that the park lights turn on, for example, at 20:00, and turn off at 05:00. This system eliminates wastage of electricity. This is an approximate example of setting the light timer, the exact time depends on the season. In winter, the sun sets much earlier and rises much later.
You can set appliances (for example, heaters) to turn on when household members arrive
Smart lighting functionality
A smart lighting system gives new opportunities that are very useful in everyday life. Let's look at five important functions.
Turning lamps off and on using a timer
Lighting automation involves the use of timers. You can set certain time intervals in the program when the light turns on and off.
It is not necessary to set the same time for all lamps. For example, in the late afternoon you can automatically turn on the main lighting, and at a later hour - sconces, floor lamps and night lights. In the morning, the timer function is also indispensable - turning on the light will help you wake up without an alarm clock.
Automatic light control
The smart lighting system has several control options. You can use remote controls designed separately for each room. The buttons on the device are programmed to control all the lighting fixtures in the room. You can control the light using the remote control from any corner of the house or apartment.
The second method is to install special devices for complete automation of control. The most common option is motion sensors that respond to the appearance of a person. The light will turn on as soon as you enter the room and turn off a few minutes later when you leave.
Motion sensors have one drawback. If you enter a room and want to be there without light, you still have to go to the switch. However, this minor drawback does not detract from the convenience of the design.
Changing the brightness of the light
The smart lighting system allows you to easily adjust the brightness of lamps using special devices - dimmers. They allow you to manually change the lighting power.
There are four ways to change settings:
- Using buttons on wall panels.
- Setting the automatic brightness change mode after a certain time.
- Control using remote control.
- Manual setup.
Lighting depending on the time of day and amount of natural light
You can install special sensors that will record changes in light levels in different rooms. When the room becomes dark, the lamps will immediately turn on. The sensor also reacts to light saturation. The darker the room, the brighter the light is.
This lighting system is used not only inside the house, but also outside. Smart lamps are often placed in areas near light-loving plants so that plantings do not suffer from the lack of sunlight.
Creating lighting scenarios
Using the light scenarios function, the program remembers certain combinations of lamps turned on at the same time. If necessary, the system can repeat them - just press a button on the control panel.
Managing the functionality of the smart lighting system
Control devices and time relays
The equipment we offer is designed to work as part of a variety of monitoring and dispatching systems. Control devices carry out the process of working with m2m systems: they control microclimate systems, implement cyclic switching of electrical networks at unattended facilities.
- time delay relay;
- data collection devices;
- controllers BRKV (rotation unit for air conditioning and ventilation);
- sensors;
- and other auxiliary elements.
In addition to the indicated control and automation devices, auxiliary elements for them are available. For example, a bracket for a transmitter. All control devices and time relays are made of high-strength materials that are not subject to fire and corrosive influences.
RVs are used where there is a need:
- execute commands with a certain selectivity, i.e. selectivity;
- turn on and off the load at a certain time, i.e. use RV as a timer;
- perform a series of sequential (programmed) actions or commands spaced over time;
- execute a command for a specified period of time.
Thus, the functions of the time relay are extremely diverse, and the time delays that can be used range from tenths of a second to tens of hours or days. The upper limit of shutter speed is limited only by the imagination of the author of the device.
Selectivity is used most often in relay protection devices. For example, there is a power line fed by a switch at the head and sectioned by a switch in the middle. The protection is mounted on the head switch. A short circuit (short circuit) occurs on it. How does line protection behave? Since the protection itself cannot determine the location of the short circuit, it is made selective using a time relay. With the first time delay, say 0.5 seconds, the sectional switch is turned off. If the short circuit is not eliminated, then it is closer to the power switch, then with a second delay, say, 1.0 second, the main circuit breaker is turned off. KZ has been eliminated.
The load switch function is widely used to control, say, object lighting. They turn on and off at a certain time. The program action function is widely used in industry when it is necessary to perform a series of actions, for example:
- turn on the boiler furnace ventilation at time X for Y minutes;
- allow fuel supply to the burners during X + Y.
This is already program work of the radio and work for a given period of time.
Lighting controller
The controller in a smart home is a microprocessor that contains the “intelligence” of the system. The device evaluates incoming commands and selects the appropriate algorithm to perform the action.
Controllers can be installed directly into luminaires. Designers call this a distributed intelligence system. This scheme is considered more flexible and convenient to manage.
You can install one controller for the entire system. This scheme is called centralized. This solution is suitable for houses and apartments where there are not many rooms.
Controller for smart lighting system
Smart socket with timer
A smart timer is a compact device that looks like a regular adapter. It needs to be integrated into the outlet, and then connect the household appliance there.
Features of socket timers:
- Power off after a specified period of time.
- Turning on the power at a specific time.
- Remote control over the operation of electrical appliances.
- Calculation of energy consumption.
A socket with a timer is very useful in everyday life. Having installed even the simplest device, you no longer have to worry whether the iron is turned off. Even if you forget about it, the smart system will react and block the power supply.
Using a socket with a timer, you can set the appliances to operate at a certain time. For example, program the coffee maker to turn on in the morning.
Timers on the socket will also come in handy during the holidays. Before the New Year, garlands and other lighting decor appear in homes. Many people forget to turn off their devices before going to bed, which can result in the devices burning out. Smart plugs can help you avoid this fate.
And the main advantage of the system is the ability to compare energy consumption indicators for different devices. It is enough to plug one device into the outlet first and record the measurements. Then you can do similar actions with another device. As a result, you will know which household appliances consume more energy and increase your electricity bills.
Smart socket with timer
Types of light timers
Based on the operating principle:
- electronic;
- electromechanical.
By frequency of work:
- daily allowance;
- weekly;
- astronomical;
- countdown;
- random on/off;
- universal.
By installation method:
- rosette;
- stationary, installed on a DIN rail in an electrical panel or in an installation box.
According to operating conditions:
- according to the permissible power of consumers;
- according to the degree of protection from external factors.
Let's look at each type in detail.
Smart switch
A smart switch is a highly technical device that can function automatically. Device design:
- Receiver: a silent pulse relay that records received signals and opens the electrical circuit. The device is controlled using a remote control or smartphone. The miniature receiver can be mounted directly into luminaires or distribution panels.
- Transmitter: design equipped with a compact electric generator. After sending the command, the device generates an electric current, which is transformed into a certain signal. After completing the action, the transmitter transmits information to the smartphone or controller.
A smart switch is a convenient replacement for the usual one. The smart light control lever looks almost the same as a regular one. It does not require connection to a dedicated electrical wiring branch, so it can be located on any surface.
Important! Most models have a dimming function - the ability to change the brightness of the lighting.
Popular brands that produce smart switches: Sonoff, Xiaomi, Vitrum, Delumo. In the assortment of these manufacturers you can find devices that meet the optimal ratio of quality and cost. For example, a budget switch from Xiaomi/Aqara is in great demand.
To install some models of smart switches, you need a neutral wire in the socket box. If it is not there, it is better to give preference to a product that receives power from lamps.
There are versions of voice-activated light switches that do not require a neutral wire in the socket and operate via WiFi. If you choose this option, make sure that the Internet always works smoothly. However, there is a possible inconvenience - turning on the light with a slight delay.
Smart switch option
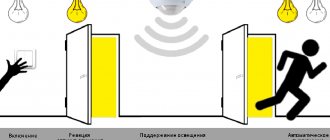
Motion sensor to turn on the light: installation diagrams
In the simplest case, the motion sensor is connected to the break in the phase wire that goes to the lamp. If we are talking about a dark room without windows, this scheme is workable and optimal.
Scheme for connecting a motion sensor to turn on the light in a dark room
If we talk specifically about connecting the wires, then phase and zero are connected to the input of the motion sensor (usually labeled L for phase and N for neutral). From the output of the sensor, the phase is supplied to the lamp, and we take the zero and ground to it from the panel or from the nearest junction box.
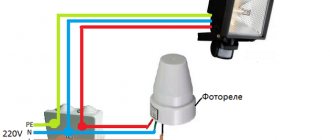
If we are talking about street lighting or turning on the light in a room with windows, you will need to either install a light sensor (photo relay) or install a switch on the line. Both devices prevent the lights from turning on during daylight hours. It’s just that one (photo relay) operates in automatic mode, and the second is turned on forcibly by a person.
Wiring diagram for a motion sensor on the street or in a room with windows. There may be a photo relay in place of the switch
They are also placed in the break of the phase wire. Only when using a light sensor, it must be placed in front of the motion relay. In this case, it will receive power only after it gets dark and will not work “idle” during the day. Since any electrical appliance is designed for a certain number of operations, this will extend the life of the motion sensor.
All the schemes described above have one drawback: the lighting cannot be turned on for a long time. If you need to do some work on the stairs in the evening, you will have to move all the time, otherwise the light will periodically turn off.
Connection diagram for a motion sensor with the ability to turn on the lighting for a long time (bypassing the sensor)
To make it possible to turn on the lighting for a long time, a switch is installed in parallel with the detector. While it is turned off, the sensor is in operation, the light turns on when it is triggered. If you need to turn on the lamp for a long period, flip the switch. The lamp stays on until the switch is turned to the off position again.
Dimmer switch
Dimmers are responsible for the brightness of lighting in rooms. With the help of such switches it is easy to achieve both dim and very bright light. To create a spectacular backlight, you can activate the artistic flicker function.
Modern dimmers for a smart home system differ significantly from electromechanical models. If conventional devices only allowed you to adjust the brightness, then new ones are capable of more.
Device advantages:
- Possibility of control using a remote control or voice commands.
- Work on a timer.
- Different algorithms for changing the brightness of the glow.
Some dimmer models are responsible not only for brightness, but also for color rendition. With their help, you can make streams of light warmer and cooler.
Smart Dimmer Switch Option
GuyverTimers Library
GyverTimers library allows you to generate timer interrupts with a given frequency on a selected timer channel or on several channels at once with a phase shift: interrupts will occur with the same frequency, but “shifted” relative to each other. You can also set the action for the timer output: turn on/off/toggle: the timer will control the selected pin regardless of the MK’s computing core, thus it is possible to generate a meander (square signal), both single-cycle and two- and three-cycle with an adjustable phase shift . There are three timers available for Arduino Nano/UNO/Pro Mini: Timer0 , Timer1 , Timer2 . For Arduino MEGA there are five: Timer0 , Timer1 , Timer2 , Timer3 , Timer4 , Timer5 . In the library, timers are described as objects; access occurs as usual through a dot. For example Timer1.stop();
ATmega328p Timer Table
| Timer | Bit depth | Frequencies | Periods | Exits | Arduino pin | Pin MK |
| Timer0 | 8 bit | 61 Hz.. 1 MHz | 16 384.. 1 µs | CHANNEL_A | D6 | PD6 |
| CHANNEL_B | D5 | PD5 | ||||
| Timer1 | 16 bit | 0.24 Hz.. 1 MHz | 4,200,000.. 1 µs | CHANNEL_A | D9 | PB1 |
| CHANNEL_B | D10 | PB2 | ||||
| Timer2 | 8 bit | 61 Hz.. 1 MHz | 16 384.. 1 µs | CHANNEL_A | D11 | PB3 |
| CHANNEL_B | D3 | PD3 |
ATmega2560 Timer Table
| Timer | Bit depth | Frequencies | Periods | Exits | Arduino pin | Pin MK |
| Timer0 | 8 bit | 61 Hz.. 1 MHz | 16 384.. 1 µs | CHANNEL_A | 13 | PB7 |
| CHANNEL_B | 4 | PG5 | ||||
| Timer1 | 16 bit | 0.24 Hz.. 1 MHz | 4,200,000.. 1 µs | CHANNEL_A | 11 | PB5 |
| CHANNEL_B | 12 | PB6 | ||||
| CHANNEL_C | 13 | PB7 | ||||
| Timer2 | 8 bit | 61 Hz.. 1 MHz | 16 384.. 1 µs | CHANNEL_A | 10 | PB4 |
| CHANNEL_B | 9 | PH6 | ||||
| Timer3 | 16 bit | 0.24 Hz.. 1 MHz | 4,200,000.. 1 µs | CHANNEL_A | 5 | PE3 |
| CHANNEL_B | 2 | PE4 | ||||
| CHANNEL_C | 3 | PE5 | ||||
| Timer4 | 16 bit | 0.24 Hz.. 1 MHz | 4,200,000.. 1 µs | CHANNEL_A | 6 | PH3 |
| CHANNEL_B | 7 | PH4 | ||||
| CHANNEL_C | 8 | PH5 | ||||
| Timer5 | 16 bit | 0.24 Hz.. 1 MHz | 4,200,000.. 1 µs | CHANNEL_A | 46 | PL3 |
| CHANNEL_B | 45 | PL4 | ||||
| CHANNEL_C | 44 | PL5 |
Maximum period
The table above shows the ranges for 16 MHz clocking. For another system clock, the maximum period is calculated by the formula, where F_CPU is the system frequency in Hz:
- 8 bit timers: (1000000UL/F_CPU) * (1024 * 256)
- 16 bit timers: (1000000UL / F_CPU) * (1024 * 65536)
Frequency/Period Setting
- setPeriod(period); – setting the period in microseconds and starting the timer. Returns the actual period in µs (accuracy limited by timer resolution).
- setFrequency(frequency); – setting the frequency in Hertz and starting the timer. Returns the actual frequency in Hz (accuracy limited by timer resolution).
- setFrequencyFloat(float frequency); – setting the frequency in Hertz and starting the timer, decimal fractions are allowed. Returns the actual frequency (accuracy limited by timer resolution).
Timer operation control
- pause(); – pause the timer counting without resetting the counter
- resume(); – continue counting after a pause
- stop(); – stop counting and reset the counter
- restart(); – restart the timer (reset the counter)
Interrupts
- enableISR(channel, phase); – run interrupts on the selected channel with the selected phase shift. If you do not specify anything, channel A and phase 0 will be selected Channel - CHANNEL_A, CHANNEL_B or CHANNEL_C (see table above!)
- Phase – numerical value 0-359
The library gives direct access to the interrupt without Arduino’s attachInterrupt , which allows you to reduce the time it takes to call the interrupt handler function. An interrupt with a configured frequency will be processed in a block of the form ISR(channel) {}, example:
ISR(TIMER1_A) { // your code } ISR(TIMER1_B) { // your code } ISR(TIMER2_B) { // your code } ISR(TIMER0_A) { // your code }
Hardware outputs
- outputEnable(channel, mode); – enable control of the hardware timer output Channel: CHANNEL_A or CHANNEL_B (+ CHANNEL_C for ATmega2560, see timer table).
- Mode: TOGGLE_PIN, CLEAR_PIN, SET_PIN (switch/disable/enable pin when the timer is triggered)
- Channel: CHANNEL_A or CHANNEL_B (+ CHANNEL_C for Mega2560, see timer table)
- Channel: CHANNEL_A or CHANNEL_B (+ CHANNEL_C for ATmega2560, see timer table).
Important: when generating a meander, the actual frequency will be two times less than the specified one due to the peculiarities of the timer itself. See examples with meander.
Phase shift (from 1.6)
Using phaseShift(source, angle) you can shift interrupts or switching pins on the selected source channel by phase angle - the shift angle in degrees from 0 to 360.
- For 8-bit timers, you can set the shift only for the second channel (CHANNEL_B)
- For 16-bit, you can move all three channels
Default setting
Using the setDefault() method, you can reset the timer settings to the “Arduino” defaults: frequency and operating mode.
Lamp control panels
Remote controls are devices for remote control of lighting devices. In terms of functionality, they can be single-channel or multi-channel. The former work only with a specific lamp, the latter - simultaneously with several devices.
Types of remote controls by design:
- Overhead: A panel with a touch screen or keys mounted on the wall.
- Portable: a design that looks almost no different from the control panel for household appliances.
The remote control indicates all possible functions of the selected system. To activate the desired lighting mode, simply press the desired key. A few seconds after this action, the command will be executed.
Remote control for smart lighting
Setting up analogue relays of electronic-mechanical type
Both industrial and domestic modules are in many cases equipped with electromechanical relays, which are adjusted using potentiometers. The front panel of such devices is equipped with one or more rods, which have a slot for a screwdriver blade. Around the rod, around the circumference, there is a scale installed or drawn with the markings of values that you need to focus on when setting the parameters. The slot into which the screwdriver is inserted has another function - it acts as a pointer. By turning the rod and setting it opposite certain values marked on the marking, the necessary adjustment to the desired parameter is achieved. Electronic-mechanical devices are actively used in circuits responsible for controlling ventilation systems, heating modules, and lighting devices.
Sensors in a smart system
Sensors for smart lighting perform an important function - they activate the automatic switching on of lamps. Let's consider two types of devices that are widely used in the system.
Motion sensors for outdoor lighting
Thanks to motion-sensing devices, the lights will turn on as soon as a person enters the area. A similar effect occurs if a vehicle enters the area. The lighting will turn off a few minutes after the movements stop.
Occupancy sensors for interior light
Internal sensors work the same way as external ones. They also react to human movements and presence. The light will turn on when you enter the room and will remain on until you leave. This is an ideal solution for any room in a house or apartment.
Motion sensor in a smart light system
How to make a timer yourself: diagrams and recommendations
Electrical devices for controlling current supply have different designs. Relays are considered the most reliable. Triac and thyristor are also found. The connecting element on the general diagram can be located in several places:
- front;
- side;
- behind;
- connect using a separate connector.
To set the time, a potentiometer, switch, or buttons can be used.
How to create a time relay in a 220V socket with your own hands
If the device is intended to be operated under a 220V load, you need to take diode options that are equipped with a magnetic starter. The controller is assembled from the following elements:
- thyristor;
- diodes (4 pcs.), 1A and 400V output;
- resistance (3 pcs.);
- start button;
- capacitor with a capacity of 0.47 mF.
Relay circuit with one transistor
The operating principle of this scheme is quite simple. After pressing the start button, the network closes and the capacitor begins charging. At this moment, the thyristor is in the open state. When the charging of the capacitor is completed, it closes. As a result, the power supply stops and the device turns off.
To adjust the operation, you can select the appropriate capacitor power and resistance resistor (R3).
Note! For low-power electrical appliances, you do not need to install a magnetic starter. In this case, the voltage can be converted by the thyristor and diode bridge present in the circuit.
You can also use this option:
- Connect one of the contacts of the diode bridge together with the switch to 220V.
- The second contact of the diode bridge is connected to the switch.
- Thyristor VT 151 is connected to resistance resistors (1500 and 200 Ohms), as well as to a diode.
- The remaining contacts of the diode and 200 Ohm resistor are connected to the capacitor. In parallel with it, a resistance of 4300 Ohms is switched on.
Relay on a chip
Smart light control systems
Many people confuse tools and control systems. We have already talked about the first ones above. We now move on to discuss three possible lighting coordination systems and control tools.
Centralized
Such a system allows you to control all devices in the house and on the site. All lighting devices are united by a “brain” center - a processor. It receives signals and distributes commands between circuit elements. Most often, control is carried out by voice or through applications.
Wireless
If a wireless system is selected for lighting control, the lighting fixtures will be activated using the remote control. The “heart” of the circuit is the radio transmitter. After you press the desired key on the remote control, signals will be sent through it to certain devices.
Hybrid
This control system combines wireless and wired devices. Signals from sensors can be seamlessly transmitted from one device to another. The main thing is to build the scheme correctly.
Smart backlight control
Exploitation
When choosing a device, take into account the operating conditions: think about what equipment you will connect to it and in what place you will install it.
Permissible power of consumers
Strictly follow the rule: the total power of consumers connected to the timer should not exceed its own power.
The necessary data is in the technical documentation of the equipment and on the package labels.
Protection of time relays from external factors
Adverse effects of external factors (water, dust) can adversely affect the operation of the timer. Therefore, the degree of its protection (IP - Ingress Protection Rating) must correspond to the operating conditions.
Outdoor automatic lighting control
Intelligent smart light technology is widely used for outdoor applications. Special sensors are installed that control the operation of street lamps and record changes in natural light. As soon as it gets dark, electrical devices automatically turn on.
The level of illumination depends on the time of day. The darker it is outside, the brighter the lamps will burn. You can “mute” them by changing the setting in the program. If there is no need to illuminate the area in the absence of people, it is enough to set the night mode. In this case, the sensors will react only when a person approaches the house.
Smart outdoor lighting
This is interesting! Thanks to the external control system, the effect of the presence of the owners in the house is created. This discourages intruders from entering private property.
How to choose
When choosing a device, first of all, identify the goals you want to achieve. In accordance with them, you can determine the required set of options and the accuracy of the work.
There is no need to chase multifunctionality and raise the bar when there is no need for it: there is no need to use an astronomical timer to maintain a home aquarium with a daily cycle and on-off periods of at least half an hour.
Do not forget to check the relay power: it cannot be less than that of the consumers planned to be connected. And, of course, the IP (degree of protection) must correspond to the operating conditions.