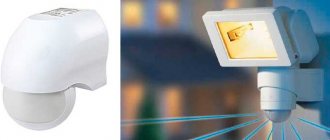
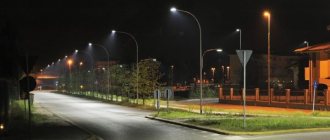
It is unwise to turn on lighting in some rooms or outdoors for the entire dark period. To ensure that the light turns on only when needed, a motion sensor is installed in the lamp’s power circuit. In the “normal” state, it breaks the power circuit. When a moving object appears in its coverage area, the contacts close and the lighting turns on. After the object disappears from the coverage area, the light turns off. This operating algorithm has proven itself excellent in street lighting, in lighting utility rooms, corridors, basements, entrances and stairs. In general, in those places where people appear only periodically. So, for savings and convenience, it is better to install a motion sensor to turn on the light.
Types and varieties
Motion sensors for turning on lights can be of different types, designed for different operating conditions. First of all, you need to look at where the device can be installed.
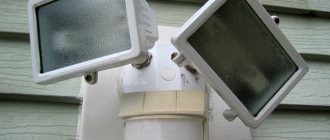
A motion sensor to turn on the lights is needed not only on the street
Outdoor motion sensors have a high degree of housing protection. For normal use outdoors, take sensors with an IP of at least 55, but better - higher. For installation in a home, you can take IP 22 and higher.
Power type
Next, you need to consider what source the light sensor is powered from. There are the following options:
- Wired sensors powered by 220 V.
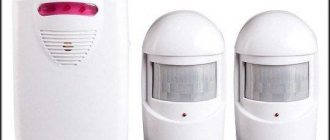
- Wireless, powered by batteries or rechargeable batteries.
Motion sensors are wired and wireless
The largest group is wired for connecting to 220 V. There are fewer wireless ones, but there are also enough of them. They are good if you need to turn on lighting powered by low-voltage power sources - rechargeable batteries or solar panels, for example.
Method for determining the presence of motion
The motion sensor for turning on the light can detect moving objects using various detection principles:
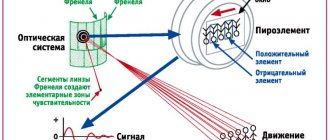
- Infrared motion sensors. They react to the heat generated by the body of warm-blooded creatures. They are classified as passive devices, since they themselves do not produce anything, they only register radiation. These sensors also react to the movement of animals, so there may be false alarms.
- Acoustic motion (noise) sensors. Also belongs to the passive group of equipment. They react to noise and can be turned on by a clap or the sound of a door opening. They can be used in the basements of private houses, where noise occurs as soon as someone enters there. Use elsewhere is limited.
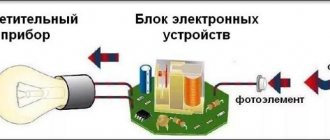
The operation of infrared motion sensors is based on tracking the heat generated by a person - Microwave motion sensors. Belong to the group of active devices. They themselves produce waves in the microwave range and monitor their return. In the presence of a moving object, contacts are closed/opened (there are different types). There are sensitive models that “see” even through partitions or walls. Typically used in security systems.
- Ultrasonic. The principle of operation is the same as that of microwaves, but the range of emitted waves is different. This type of device is rarely used, since animals can react to ultrasound, and long-term exposure to humans (the devices constantly generate radiation) will not bring any benefit.
Various designs, but the color is mainly white and black - Combined (dual). Combines several motion detection methods. They are more reliable, have fewer false positives, but are also more expensive.
Most often, infrared motion sensors are used to turn on lights on the street or at home. They have a low price, a large range of action, and a large number of adjustments that will help you customize it. On stairs and in long corridors it is better to install a sensor with ultrasound or microwave. They are able to turn on the lighting even if you are still far from the light source. Microwaves are recommended for installation in security systems - they detect movement even behind partitions.
Possible problems and their solutions
If the sensor turns on the light properly, but there are problems turning it off, the first thing you need to check is the light delay switch. Perhaps the TIME regulator is set to the maximum operating time, which is why the intervals between operations are too short: the lamp does not have time to turn off.
Advice! It is possible that the detector sensitivity is insufficient or the LUX parameter is incorrectly configured. You need to unscrew the knobs to the maximum and check the serviceability of the device.
TIME and LUX layout option
Incorrect installation location selected
To install the device correctly, it is necessary to take into account the principle of its operation: the IR sensor responds well to “past” movements, but may not work when moving towards it, while ultrasonic and microwave sensors perceive movement “towards themselves”.
If there is any object between the device and the coverage area, this also causes misfires: it is necessary to remove obstacles in front of the emitter. Sometimes electrical appliances give false alarms when they are close to the lamp. If such a problem is noticed, you need to place the lamp a little further away.
Advice! Infrared detectors respond to any object that emits heat. Therefore, it is worth inspecting the room for the presence of heating devices.
Motion tracking technologies
Lamp burnout
If the device does not react at all to an object entering the zone, the cause most often turns out to be a normal lamp burnout. Before installation, you should test the bulb in another lamp.
Wiring faults
When all possible causes of problems have been checked, but the sensor still does not start, you need to test all sections of the circuit with a multimeter. If the problem is in the wiring, you need to de-energize the system and reconnect the device.
Important! Sometimes the problem lies in the connection of the wire to the terminal block. Due to dust and debris, the wire oxidizes and the detector stops working.
It is necessary to clean the cable from oxidation and crimp the end with NSHVI.
NShVI tips
Defects and incorrect operating conditions
It happens that the cause of problems lies in the device itself: a manufacturing defect or damage during transportation (typical of cheap devices with a low degree of protection). If the sensor does not have good protection from moisture, but it was placed in a place open to water (outside a protective canopy, in the bathroom), then water could get inside, causing the electrical appliance to fail.
Advice! Before purchasing, you should always inspect the detector for visible damage; if possible, it is better to check its functionality in a store. You cannot throw away warranty cards and boxes from equipment: if there is a problem, you can replace the device under warranty.
Motion sensor packaging
You don’t need to be a master to understand how to properly connect a motion sensor to automatically turn on the light: just follow the simple instructions for operating and setting up the device. A motion sensor can save up to 50% of electricity, which, coupled with ease of use, will pay for the cost of the device many times over.
Specifications
Once you have decided which motion sensor you will install to turn on the lights, you need to select its technical characteristics.
The technical characteristics of wireless models also include the frequency at which they operate and the type of batteries
Viewing angle
The motion sensor for turning on the light can have a different viewing angle in the horizontal plane - from 90° to 360°. If an object can be approached from any direction, sensors with a radius of 180-360° are installed, depending on its location. If the device is mounted on a wall, 180° is enough, if on a pole, 360° is already needed. Indoors, you can use those that track movement in a narrow sector.
Depending on the installation location and the required detection zone, select the viewing radius
If there is only one door (a utility room, for example), a narrowband sensor may be sufficient. If the room can be entered from two or three sides, the model should be able to see at least 180°, and better yet, in all directions. The wider the coverage, the better, but the cost of wide-angle models is much higher, so you should proceed from the principle of reasonable sufficiency.
There is also a vertical viewing angle. In ordinary inexpensive models it is 15-20°, but there are models that can cover up to 180°. Wide-angle motion detectors are usually installed in security systems, and not in lighting systems, since their cost is considerable. In this regard, it is worth choosing the correct height for installing the device: so that the “dead zone”, in which the detector simply does not see anything, is not in the place where the movement is most intense.
Range
Here again, you should choose taking into account whether a motion sensor will be installed indoors to turn on the lights or outdoors. For indoor environments, a range of 5-7 meters is sufficient.
Choose range with reserve
For the street, it is desirable to install more “long-range” ones. But look here too: with a large coverage radius, false positives can be very frequent. So having too much coverage can even be a disadvantage.
Power of connected luminaires
Each motion sensor for turning on the light is designed to connect a certain load - it can pass a current of a certain rating through itself. Therefore, when choosing, you need to know the total power of the lamps that the device will connect.
The power of the connected lamps is critical if a group of lamps or one powerful one is turned on
In order not to overpay for the increased capacity of the motion sensor, and even save on electricity bills, use not incandescent lamps, but more economical ones - gas discharge, fluorescent or LED.
Installation method and location
In addition to the obvious division into street and “home”, there is another type of division according to the location of installation of motion sensors:
- Case models. A small box that can be mounted on a bracket. The bracket can be fixed: on the ceiling;
- on the wall.
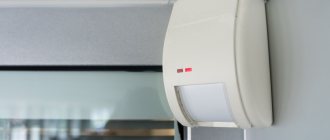
The type of motion sensor cannot be determined by its appearance, you can only understand whether it is installed on the ceiling or on the wall
If the lighting is turned on only to increase comfort, cabinet models are chosen, since they are cheaper with equal characteristics. Built-in ones are installed in security systems. They are miniature, but more expensive.
Additional functions
Some motion detectors have additional features. Some of them are obvious overkill, others, in certain situations, can be useful.
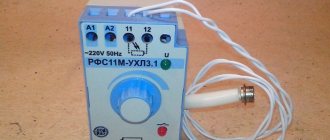
- Built-in light sensor. If a motion sensor to turn on the light is installed on the street or in a room with a window, there is no need to turn on the light during daylight hours - the illumination is sufficient. In this case, either a photo relay is built into the circuit, or a motion detector with a built-in photo relay is used (in one housing).
- Protection from animals. A useful feature if you have cats or dogs. With this function there are much fewer false positives. If the dog is large, even this option will not save you. But it works well with cats and small dogs.
For many, a useful feature would be protection against triggering when animals appear. - Light off delay. There are devices that turn off the light immediately after the object leaves the coverage area. In most cases this is inconvenient: light is still needed. That’s why models with a delay are convenient, and even more convenient are those that allow you to adjust this delay.
These are all features that may be useful. Pay special attention to animal protection and shutdown delay. These are really useful options.
Optimal performance for an all-weather sensor
It is more convenient to choose a device when there is a general understanding of the characteristics. For an all-weather outdoor sensor it is:
- mains voltage within standard 220–240 V;
- after activation, the lighting device can burn for up to 10 minutes, but in order not to waste electricity, it is optimal to choose about 3 minutes;
- the range of the capture zone in different types of sensors ranges from 12 to 15 meters;
- the device’s response speed is from 0.5 m/sec - the lower the speed, the greater the likelihood that the sensor will be able to detect a fast-moving object;
- The viewing angle can be up to 360 degrees if a ceiling device is used for lighting;
- all-weather operating mode;
- switched current fluctuates between 1.0–1.5 A.
Sensitivity can be adjusted during installation to suit the individual needs of the client.
Where to place
You need to install the motion sensor correctly to turn on the lighting - for it to work correctly, follow certain rules:
- There should be no lighting devices nearby. Light interferes with correct operation.
- There should be no heating or air conditioning units nearby. Motion detectors of any type react to air currents.
As the installation height increases, the detection zone increases, but the sensitivity decreases - There should be no large objects. They obscure large areas.
In large rooms it is better to install the device on the ceiling. Its viewing radius should be 360°. If the sensor must turn on the lighting from any movement in the room, it is installed in the center; if only some part is monitored, the distance is selected so that the “dead zone” of the ball is minimal.
Cotton sensors
So-called clap switches are a more “advanced” version of noise sensors. Their main feature is that they are triggered exclusively by the sound of clapping, which a person performs with the help of his palms. Such “advanced” devices are completely immune to numerous extraneous noises in the room: the sounds of music or operating power tools, as well as human speech. These devices use special bandpass filters to ensure that the sensor only perceives pops, the amount of which in many models can even be programmed. So, for example, you can install several acoustic sensors in one room, and they will turn on/off independently of each other:
- Ceiling chandelier. To do this, you program the device to sound three times.
- Table lamp. You need to clap your hands four times.
- Interior lighting of the room. The sensor is triggered by five claps.
Such acoustic sensors are much more expensive (compared to noise analogues). For example, the popular “Claps Max” model from Russia can currently be purchased for 2,500 rubles. The device allows you to control loads up to 1100 W! The connection diagram for such a device is quite simple and does not cause difficulties for users who do not have certain electrical knowledge.
Pre-setting “Claps Max” to be triggered by a certain number of claps (3,4,5 or 6) is quite simple: to do this, just remove the top cover of the plastic case and install a jumper on the metal pins in accordance with the operating instructions.
Motion sensor to turn on the light: installation diagrams
In the simplest case, the motion sensor is connected to the break in the phase wire that goes to the lamp. If we are talking about a dark room without windows, this scheme is workable and optimal.
Scheme for connecting a motion sensor to turn on the light in a dark room
If we talk specifically about connecting the wires, then phase and zero are connected to the input of the motion sensor (usually labeled L for phase and N for neutral). From the output of the sensor, the phase is supplied to the lamp, and we take the zero and ground to it from the panel or from the nearest junction box.
If we are talking about street lighting or turning on the light in a room with windows, you will need to either install a light sensor (photo relay) or install a switch on the line. Both devices prevent the lights from turning on during daylight hours. It’s just that one (photo relay) operates in automatic mode, and the second is turned on forcibly by a person.
Wiring diagram for a motion sensor on the street or in a room with windows. There may be a photo relay in place of the switch
They are also placed in the break of the phase wire. Only when using a light sensor, it must be placed in front of the motion relay. In this case, it will receive power only after it gets dark and will not work “idle” during the day. Since any electrical appliance is designed for a certain number of operations, this will extend the life of the motion sensor.
All the schemes described above have one drawback: the lighting cannot be turned on for a long time. If you need to do some work on the stairs in the evening, you will have to move all the time, otherwise the light will periodically turn off.
Connection diagram for a motion sensor with the ability to turn on the lighting for a long time (bypassing the sensor)
To make it possible to turn on the lighting for a long time, a switch is installed in parallel with the detector. While it is turned off, the sensor is in operation, the light turns on when it is triggered. If you need to turn on the lamp for a long period, flip the switch. The lamp stays on until the switch is turned to the off position again.
Connection diagram
As a rule, motion sensors have their own switching circuit, depending on the requirements for the operation of the sensor. Each sensor is connected to a 220 V network, which has a phase wire (L) and a neutral wire (N). Similar markings are also present on the terminals for connecting the motion sensor. It is not recommended to ignore this connection sequence. The device body also has terminals for connecting a light source (lighting lamp).
If the motion sensor is installed outdoors, then a light sensor (photo relay) will not interfere. In this case, you can choose a sensor with a built-in photo relay or use a regular switch, but then you will have to turn it off in the morning and turn it on in the evening when it gets dark. If an independent photo relay is used, it is connected to the phase wire break.
In addition to the advantages of this device, it has one drawback. While in the sensor's coverage area, you must move all the time so that the light is always on. If you don’t do this, the lighting will turn on and off, which is not entirely comfortable.
To prevent this from happening, a regular switch is installed parallel to the motion sensor. It is enough to turn it on and the light will remain on as long as necessary, regardless of the operation of the sensor. When the electric lighting is not needed constantly, the switch is simply turned off, which switches the device to normal on/off mode.
How to connect a motion sensor
Adjustment (setting)
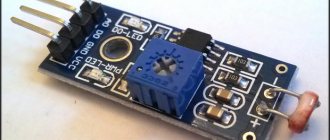
After installation, the motion sensor must be configured to turn on the light. There are small rotary controls on the body to adjust almost all parameters. They can be turned by inserting your fingernail into the slot, but it is better to use a small screwdriver. Let us describe the adjustment of a DD-type motion sensor with a built-in light sensor, since they are most often installed in private homes to automate street lighting.
Tilt angle
For those sensors that are mounted on walls, you first need to set the angle of inclination. They are mounted on rotating brackets, with the help of which their position changes. It must be selected so that the controlled area is the largest. It is impossible to give exact recommendations, since it depends on the vertical viewing angle of the model and on the height at which you hung it.
Adjusting the motion sensor begins with selecting the angle of inclination
The optimal installation height for the motion sensor is about 2.4 meters. In this case, even those models that can cover only 15-20° vertically control sufficient space. Adjusting the incline is a very rough name for what you'll be doing. You will gradually change the angle of inclination, check how the sensor works in this position from different possible entry points. It's not difficult, but it's tedious.
Sensitivity
On the body this adjustment is labeled SEN (from English sensitive - sensitivity). The position can be changed from minimum (min/low) to maximum (max/hight).
Basically, the settings look like this
This is one of the most difficult settings, since it determines whether the sensor will work on small animals (cats and dogs). If the dog is large, it will not be possible to avoid false alarms. With medium and small animals this is quite possible. The setup procedure is as follows: set it to minimum, check how it works for you and for inhabitants of smaller stature. If necessary, increase the sensitivity little by little.
Delay time
Different models have different shutdown delay ranges - from 3 seconds to 15 minutes. You need to insert it the same way - by turning the adjusting wheel. It is usually signed Time (translated from English as “time”).
Glow time or delay time - choose what you like best
Everything is relatively easy here - knowing the minimum and maximum of your model, you can approximately choose a position. After turning on the flashlight, freeze and note the time after which it will turn off. Next, change the position of the regulator in the desired direction.
Light level
This adjustment relates to the photo relay, which, as we agreed, is built into our motion sensor to turn on the light. If there is no built-in photo relay, it simply will not exist. This adjustment is labeled LUX, the extreme positions are labeled min and max.
They can be located on the front or back side of the case
When connecting, set the regulator to the maximum position. And in the evening, at the level of illumination when you think the light should already turn on, turn the regulator slowly to the min position until the lamp/lantern turns on.
Now we can assume that the motion relay is configured.
Verifying the installation
Before final installation, you need to check the health of the system. There are several switches on the sensor that are responsible for setting up the detector:
- LUX. The switch is responsible for the threshold illumination. If there is enough light from the sun outside, the sensor will not respond to movement.
- TIME. The time for which the light will turn on after triggering (from 2 seconds to 15 minutes). The countdown starts from the moment the object leaves the coverage area.
- SENS. The sensitivity depends on the brightness of the IR light to which the device must respond.
Motion sensor controls
Viewing angle
In cheap device versions, only settings for sensitivity, duration and threshold illumination level are available, and the viewing angle is fixed. More expensive analogues allow you to adjust this characteristic. If the device often works at the wrong time or blind spots appear, then it is worth checking the correct direction of the viewing angle.
Advice! For maximum efficiency of wall-mounted street sensors, the optimal installation location is at a height of 2.5-3 m. The range is about 10-20 m and the height is 1.5 m. You should not try to increase the regulated range by installing the detector at a higher or lower level.
Installing a Wall Sensor
Light level
Correctly setting the light level will increase the efficiency of the lighting device: operating a lamp with sufficient light from the sun is a waste of money. To adjust the LUX parameter, the regulator must be set to the maximum position (work at night), and then gradually turn it to the right.
Switch delay
The delay time varies from 2 seconds to 15 minutes. The optimal time is considered to be 50-60 s. You need to turn TIME to the minimum value, and then gradually increase the time. The first shutdown after setup will occur slightly later than it was set. Subsequent ones will be carried out according to the settings.
Location of controls on the sensor
Sensitivity
If the sensitivity of the motion detector is increased, false alarms are likely. At a high level of sensitivity, the detector is triggered when animals appear in the area. To correctly configure the device, you should start with the minimum value and gradually increase the SENS regulator.
Advantages and disadvantages of devices
Wireless motion detection devices that automatically turn on the lighting are currently more popular than models connected to the mains using wires. After all, wireless devices have the following advantages:
- simple and quick installation. Installation requires a minimum of tools and in just a couple of minutes the sensor will be installed;
- there is no contact with the electrical system of the house, as a result, the risk of electrical injury is minimized. Such a device can be installed by any person who is not even familiar with the basics of electricity;
Installed wireless sensor
- complete autonomy. Such devices work regardless of whether there is electricity in the house or not;
- low cost of the product compared to wired models. Here you will not need to spend money on laying cables and the work of specialists, which significantly reduces the financial costs of installation;
- the ability to use a sensor to turn on the light at a distance from the house. The maximum permissible distance is 100 meters;
- high reliability of the transmission channel. It cannot be damaged. The only thing that can happen is the signal is jammed;
- creating a lighting system that will be as economical as possible. Due to the fact that the light turns on only when there is movement (person), its use becomes ergonomic and economical. Now there will be no need to turn on/off the lights in the room. This will happen automatically.
Batteries for the sensor
In addition, installing such devices will not spoil the appearance of the completed repair with unnecessary wires, which in other models should also be aesthetically disguised. The power source for such sensors is ordinary batteries.
However, despite the impressive advantages, there are still some drawbacks. The disadvantages of such devices include:
- the need to change batteries or recharge batteries. Before discharge, the sensor will signal this by turning on the siren or light. Typically the batteries last for a couple of years;
- reduction in the range of the device when using certain building materials. Materials such as brick, reinforced concrete, tempered glass and concrete blocks have varying degrees of signal blocking. This drawback can easily be eliminated by connecting additional equipment that amplifies the signal.
As you can see, the list of disadvantages is very small. At the same time, they are offset by the costs required for laying the cable. Therefore, it is wireless models of devices that respond to movement by turning on the lighting that are most in demand today.