Like all products, two-key products are divided according to the following criteria:
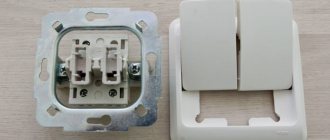
Two-key light switches differ in the type of contacts; two types of contact designs are used. Screw-type, the bare end of the wire is clamped with a screw between two metal plates. A very reliable method, but it has one significant drawback: if the wire is loosely clamped or the wire cross-section is incorrectly selected, the contacts heat up.
This leads to a weakening of the clamping force; it is necessary to periodically tighten the screws. Otherwise, there will be a complete loss of contact or a fire in the wiring and other plastic elements of the light switch. In the clamping design, the end of the wire is fixed by a plate, which is constantly pressed by a spring, ensuring stable contact.
Light switches can be divided according to the material from which the housing is made, plastic or ceramic. They must be marked with the permissible value of current, power, volts. Ceramic products dissipate heat well and are designed for installation in high load circuits 10A, 220V, power up to 2300W. Plastic cases are designed for lower currents of 3-6A.
Wiring diagram for a double switch for 2 light bulbs, tips for beginners
Important! When examining the two schemes together, one can immediately see the difference not only in the number of connectors, but also in the functionality of the devices used.
Expert opinion
It-Technology, Electrical power and electronics specialist
Ask questions to the “Specialist for modernization of energy generation systems”
Connection diagram for a two-key switch: drawing, installation and wiring If you follow these rules, select a suitable diagram and step-by-step implementation of all work, there will be no problems, the problem can be solved without the involvement of a specialist. Ask, I'm in touch!
Design and principle of operation of a two-key switch
A two-key switch is a device designed to direct current to 2 electrical appliances or two groups of one lighting source. It is most often used in circuits to control ceiling chandeliers with many bulbs. A separate group of light sources is connected to each key. It is also possible to connect 2 lamps located in different rooms or at a distance from each other in the same room.
A two-key switch consists of an operating mechanism and a protective part (frame and keys). The keys allow you to turn groups of lamps on and off separately and simultaneously (6 operations in total).
To see the working part, you need to remove the keys by prying them off with a screwdriver.
The frame is attached:
- latches;
- screws.
The working mechanism in the socket box is attached:
- using a bar or frame;
- using paws.
There are holes in the frame (bars) that allow you to adjust the position of the mechanism. The legs are located on the sides, and when the screws are tightened, they unfold until they rest against the socket box.
The working mechanism has 5 contacts:
- one for connecting a suitable phase;
- two – for connecting outgoing wiring;
- two movable ones, called jumpers (for closing and opening the circuit using keys).
To fix the working part in the socket box, a spring mechanism or plates are provided that move when the screws are tightened.
Important! Two-key switches are designed for connection to a network with a maximum voltage of 1000 V and a current of up to 10 A. They do not have protection against overload, overcurrent, or short circuit.
These devices are:
- internal;
- external;
- moisture-proof;
- with backlight.
Principle of operation:
- when the key is in the “off” position, both movable jumpers open and the lamps turn off;
- When the key is moved to the “on” position, the movable jumpers close and the lamps light up.
The keys can be moved to one of two positions individually and simultaneously.
Disabling the indication circuit
If necessary, the backlight elements can be removed. Such a need may arise, for example, when LED or energy-saving lamps flicker unpleasantly, caused by the flow of a small current through the limiting element. This problem can be solved in other ways, but it may happen that removing the indication is the only solution. In this case, you will need small wire cutters.
The work of removing the indication chain can be carried out on a dismantled device, or you can not dismantle the switch with the LED, just remove the decorative plastic parts. In any case, before starting work, you must turn off the power to the lighting network using the switching device in the switchboard. After this, make sure there is no voltage directly at the switch.
After gaining access to the internal structure of the device, it is enough to cut off any LED pin. This will open the indication circuit. But it is better to completely remove the LED or neon to avoid accidental short circuits with cut leads.
Two-key device with a neon light bulb.
Removing the plastic parts may not be enough to gain access to the backlight chain. In this option, you will need to continue disassembling the device. In most cases, this cannot be done without removing the switch from its installation site.
In the video they remove the LED from the switch very quickly.
Installation instructions
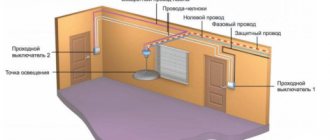
The circuit is installed using a three-core cable (even in the absence of grounding). If possible, it is better to choose a switch that has a wiring diagram on its body.
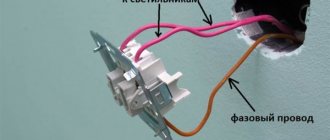
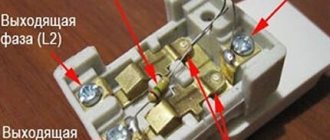
Before you start connecting, you need to disassemble the device - remove the keys and the backing, screwed on with screws or mounted on latches. What remains is the housing and the internal part with contacts. It is important to correctly determine the one to which you need to connect the phase from the distribution box.
To determine the purpose of the contacts, you should consider the markings. The main contact for the phase wire is designated by the letter L (it is not always located in the center or separately on one side).
Connection to the power supply system
You can determine that the electrical wiring was carried out according to the new system by looking at the laid cable. It will be three-wire for single-phase power supply or five-wire for three-phase power supply. One of the single-phase power wires will be the phase marked in brown or red, the other will be the neutral (zero) marked in blue, and the third will be the protective wire marked in yellow-green.
To facilitate identification, alphabetic and color designations are used:
- A, B, C - phase;
- N - neutral or zero;
- PE - protective.
The difference between this connection diagram is the additional protective conductor PE, which is led directly to the lamps.
The connection diagram for electrical installation devices TN-S assumes connection to a grounding system
After connecting the wires to the working mechanism, they are pressed closer to the body and then installed in the socket box. Fixed in the mounting box using clamping tabs or bolts. Put on the decorative case and keys.
Before assembling the entire structure, turn on the light and make sure the lighting system is working
Double switch connection diagrams
The design of a two-key switch is two single-key switches installed in a single housing.
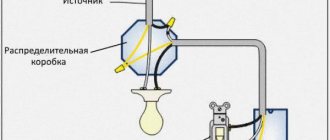
The connection diagram consists of:
- light bulbs connected in parallel;
- switch;
- distribution box;
- 220 V power supply.
The following is entered into the distribution box:
- a cable with two wires (one of them is phase, the second is zero) from the switchboard (power source);
- cable for 3 wires from the switch;
- 2 cables to 3 wires from the lighting fixture(s).
The power supply phase is connected to the phase of the two-key switch. Two wires from the lighting fixture and two from the switch remain free. They need to be connected in pairs.
To disconnect the conductors in the distribution box, it is best to use quick-release terminals.
Terminal blocks are required to connect wires to the lighting fixture. The veins are inserted into them according to the markings. The phase is connected to the central contact of the light source, zero - to the base.
After pressing any of the keys, the chain is closed, the lamp (or part of the chandelier bulbs) lights up. Pressing it again opens the chain.
Types of pass-through switches
Switches vary depending on the type of device:
- Keyboards (standard type with any number of keys used).
- Touch (requires a separate circuit for installation).
You can also classify the device by type of wiring:
- External wiring.
- Internal wiring.
Depending on the number of keys, switches are:
- single-key (with one working switching element);
- two-key (with two working switching elements);
- three-key (with three switching elements);
- cross with 1 or 2 keys (when turning on the lighting from several places).
Types of pass-through switches
The devices differ in the structure of the contact terminals:
- With screw terminals.
- With spring clamping elements.
Prices for two-key wall switches
Two-key wall switch
Features of connecting a backlit device
The backlight is a neon bulb, resistor or LED with a capacitor installed in the working part of the switch. The most profitable option is the first, as it is suitable for connecting to all types of electric lamps.
If the circuit is opened, the phase current flows through the resistance and the neon bulb to the filament and zero. The resistance of the lighting device filament is less than that of the backlight, the voltage goes to the neon and the series-connected resistance, the backlight is on. After turning on the lamp, the circuit is closed, voltage goes to it, and the backlight turns off.
Attention! If the switches are installed, but the lighting is not used (there are no lamps in the circuit), the lighting does not work due to lack of power.
Illuminated Double Switch Connection:
- cut off power to the apartment;
- remove the old two-button switch;
- connect the electricity supply;
- find the phase wire;
- turn off the power supply;
- strip the wires;
- connect the phase wire and conductors going to the lighting device;
- insert the working part into the box and secure it;
- set the keys.
Video description
How to connect an illuminated switch.
It should be borne in mind that a backlit switch may work well, but the LED lamp will continue to flicker. This is possible, for example, if it is faulty or the service life of the lighting device has expired. If a double backlit switch is connected, the problems may be similar.
Illuminated switch disassembled Source 220.guru
Useful tips
Before you puzzle over how to connect two-key light switches, you need to determine the network parameters, type and cross-section of wiring, power of lighting fixtures, material and cost of switches, and connection diagram.
You should not save on buying switches, especially two-key ones. If the case is made of cheap plastic, and the working part is made of low-quality parts, after assembling the circuit, problems with the wiring will certainly appear.
It is also advisable to determine the type of contacts before purchasing. If light bulbs are connected through plates with screws, it is necessary to take into account that such contacts overheat if the wire cross-section for the circuit is chosen incorrectly. As the temperature rises, the screw becomes loose and must be tightened periodically. Otherwise, the two-key switch housing or wiring may catch fire.
Reference! A more reliable connection is created by a clamp with a spring.
The body of a two-key switch can be made of ceramic or plastic, and the power and current must be indicated on it. For loads up to 2300 W and 10 A, a ceramic switch is connected to the circuit. You can save money with a load of 3-6 A.
To install a double switch on concrete walls, it is better to choose overhead models that are screwed to the surface. The distribution boxes are also attached, the wiring is laid in special channels.
The most unfavorable backlight based on a resistor. It does not work with LEDs due to the high resistance of these light sources. When using compact fluorescent lamps, they will flicker when turned off. An LED with a capacitor does not solve the problem. The only advantage of this option is the reduction in electricity consumption by the backlight.
Some manufacturers offer modular models consisting of 2 single switches. Power connection is carried out separately to each part using jumpers. They are made independently from ordinary wires.
Kinds
Two-key switches are available in several versions:
- with backlit keys;
- combined with a socket;
- designed as a pass-through switch.
By design, switches are available for outdoor or indoor installation. Connecting a two-button light switch depends on the specific situation. It is necessary to decide where the switch for two chandeliers will be used and decide which option is needed.
There are options for two-gang switches that have four contacts instead of the standard three. They are two isolated single-key switches combined in one housing. They are called modular.
For indoor installation
This device is the most common. It is used in office and residential buildings. Installed in a mounting box, which is mounted in a plasterboard or concrete/brick wall. Due to the fact that the switch is hidden in the wall, it is also called “recessed”. The wires are supplied to it in special grooves called grooves. If the switch is fixed in a framed plasterboard wall, then the cable to the switch is laid in a corrugated pipe.
For outdoor installation
When installing open-type wiring, outdoor switches are used. They are mounted on a non-flammable base, and the wires are connected to them in cable ducts, metal hoses, corrugated plastic pipes or on top of the wall on porcelain insulators. Most often, the connection diagram for a two-button switch for two open-type light bulbs is used in wooden houses of gardening partnerships. Outdoor installation is also used in sheds, garages, basements and other utility rooms.
Main conclusions
If you have a wiring diagram at hand, it is possible to install the switch correctly with minimal electrical knowledge. It is enough to remember that such work is carried out with the power supply turned off and requires increased attention to the quality of the wire connections. It is advisable to solder and insulate them, after first checking the functionality of the circuit.
You won’t have to worry about how to properly connect a two-key switch if you hire a qualified electrician. This is the best option if you are not sure that problems with lighting equipment or wiring will not arise in the future. It’s not worth taking risks, as the desire to save money can lead to a short circuit and fire.
Previous
Lighting in the apartment How to make lighting for the steps of the stairs yourself
Next
Lighting in an apartmentHow to correctly calculate lighting according to the area of a room
general information
First of all, you need to understand that a pass-through switch and a two-key switch are not the same thing. They perform different tasks, and the number of contacts they have is also different.
To avoid confusion, you should pay attention to the reverse side of the switch, which should show the connection diagram. Therefore, it is not enough to just look at a photo of a two-key switch; you should pay attention to the description if you buy it on the Internet.
Purpose
types of switches
Despite all the variety of devices for controlling lighting (button, cord, chain, slider, dimmers, remote switches, timers), the keyboard option still remains classic. And the principle of operation is the same for all: the working mechanism has two main positions (“on”, “off”) and performs two main functions - to close the electrical circuit and apply voltage to the lighting element, to open the circuit and remove the voltage from the lamp.
A two-key switch is installed in household electrical networks with voltages up to 1000 V; the main purpose of its use is to turn chandeliers, light bulbs, and lamps on and off. The main advantage of a 2-key switch is two contact terminals at the output, to which two independent groups of lighting devices can be connected.
Installing a two-key household switch is used in the following cases:
- When the apartment has a separate bathroom and both rooms are located next to each other through the wall. In this case, it will be very convenient to connect a double light switch and install it just on the wall partition between the doors of both rooms. One key will turn on the lights in the bathroom, the second key will turn on the light in the toilet.
- Connecting a two-key switch is advisable when a chandelier with five or more arms or spotlights on the ceiling is installed in a large living room or office space. It is not always necessary for all the bulbs in a chandelier to light up at once; sometimes dim light is enough. For example, you can apply voltage to only two lamps by turning on one key. The second key will remain disabled, the remaining light bulbs in the lamp will not light up, thereby saving energy. Indeed, in the case when there is a single-key switch, when it is pressed, all the lamps in the chandelier light up at once. And if you calculate how much each extra burning light bulb consumes per kilowatt, you will get a decent amount in rubles per month. Why pay extra?
- Often a double switch for two light bulbs is used in country houses. It is best to install it in rooms located close to the exit to the street. One button turns on the light in this corridor, and the second turns on the street lamp.