Features of electrical wiring in a house made of aerated concrete
Electrics in an aerated concrete house are perhaps the only type of communications that can be installed after the box has been erected - and even after finishing work has been completed.
Installation must be carried out in accordance with the requirements of the PUE, which will definitely be taken into account in today's material. Electrical wiring in a house made of aerated concrete is not much different from similar work in other buildings, but there are still some peculiarities. Let's talk about this in more detail.
- How to do the wiring in a house made of aerated concrete with your own hands
- Electrical wiring in a private house made of aerated concrete
- Selection of scheme
- Selection of devices, tools and materials
- Installation tools
- Hidden electrical installation
- Outdoor installation
- The procedure for installing hidden wiring
- Cable grooves in aerated concrete
- Installation of wires, junction boxes and sockets
- Safety precautions
- Conclusion
- Aerated concrete house calculator
Power calculation and selection of cable cross-section
Calculating power is very simple: you need to sum up the power of all electrical consumers in the house and add 10% of the reserve. There are special calculators on the Internet that can be used to quickly calculate power. For household wiring, as a rule, a three-core copper electric cable VVGng, ShVVPng with a cross-section of 4-8 mm is used. If you use wires of a smaller cross-section, they will not withstand the load and will begin to melt. In accordance with the requirements of PUE clause 7.1.35, the minimum wire cross-section for intra-house wiring is 2.5 mm.
Article on the topic: How to replace the foundation under a bathhouse
Depending on the type of energy consumers, the recommended cable cross-section is:
- lighting contours - 3*1.5 or 3*2 mm;
- groups of household sockets - 3*2.5 mm;
- electric stove - 3*4 mm;
- air conditioner - 3*2.5 mm;
- pumps, boilers - 3*4 mm.
For powerful devices, the manufacturer always indicates the optimal cross-section of the power cable. Based on the cross-section of the wires, the nominal value of the machines is selected. For a 2.5 mm cable - 25 A, less - no more than 16 A.
Hidden electrical installation
Aerated concrete is an easy-to-process material and, unlike concrete walls, does not cause any particular problems for laying internal wiring. It can be easily cut with both a wall chaser and an ordinary grinder, but there is more dust. You can do this step yourself.
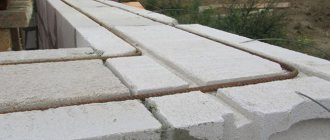
After this, you need to mark out the electrical wiring, as well as the installation of sockets and switches for the entire area. One rule must be observed: any laying is carried out only horizontally or vertically, connecting at an angle of 90 degrees. There should be no diagonal laying patterns in the house.
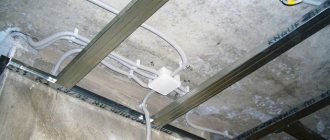
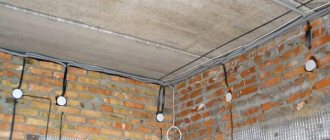
According to the drawn up diagram, the electrician creates grooves, cuts out seats for switches, sockets, sconces, and wall lamps. In the prepared aerated concrete, he walls up electrical components, lays wires, and secures them in the grooves using clamps, as shown in the photo below. After this, the voids are filled with mortar and leveled.
Some owners have a question about how to lay a cable in the wall using internal cable ducts or electrical corrugation. This method is only suitable for conditions where regular changes occur in the wiring diagram. As a rule, a well-thought-out and calculated scheme does not require regular changes and installation along previously prepared channels is not carried out. A huge disadvantage is that to lay the corrugation you will need to cut the groove in the aerated concrete 1.5-2 cm deeper. If a section of cable fails, there is also no guarantee that it will be possible to restore the electrical network using built-in cable ducts or walled-up corrugation. This is true for installing wiring in aerated concrete walls and in walls made of brick or concrete.
How to conduct electricity through the ceiling? If the walls of the house are made of aerated concrete, then the ceiling can be made:
- monolithic;
- reinforced concrete floors were installed;
- wooden floors have been installed.
Depending on the type of interior flooring, you need to choose a method for connecting wires to chandeliers and ceiling lighting. If the ceiling is monolithic, then during its manufacture channels should have been provided for laying electrical wiring. In this case, it is enough to use a ready-made solution. In the case of installed prefabricated reinforced concrete floors, you can use technological holes that are provided in advance. If these are wooden floors, then it is necessary to carry out an open installation in compliance with all the requirements of the PUE. We talked about how to install electrical wiring in a wooden house in a separate article.
The photo below shows another popular option for electrical wiring in an aerated concrete house - along the floor:
Selecting a cable type
Electrical wiring in aerated concrete is subject to the same requirements as in any other conditions. For normal and safe power supply to the house, wires of the appropriate cross-section must be used. The best option is a three-core copper cable type ShVVPng (or similar). The cable cross-section is determined by the load value. This is one of the most difficult moments, since it is extremely difficult to predict in advance the number and power of all consumption devices; only experienced specialists can do this. There are online calculators online that you can use to make your task easier. It is recommended to duplicate the calculation on another calculator to ensure the accuracy of the result obtained.
Article on the topic: What is chapi bani
You can also choose a cable based on average indicators, which private developers often use:
- for kitchen stoves, heating boilers and pumps, the cross-section of each core should be 4 mm 2;
- sockets and air conditioners - 2.5 mm 2;
- lighting circuit - 2 mm 2 (1.5 mm 2 allowed).
If no particularly powerful devices are planned, these indicators may well be used when choosing the type of cable.
Electrical wiring diagram in a house made of aerated concrete
The electrical wiring in a house made of aerated concrete must exactly correspond to a pre-developed diagram. Only after careful study can you begin to construct networks.
When designing an electrical wiring diagram in a private house made of aerated concrete, it is recommended that all consumers be divided into groups according to purpose and power. Typically the following consumer groups are distinguished:
- high-power equipment - heating boilers, water heaters, pumps, air conditioners, kitchen electric stoves, ovens;
- sockets for household appliances - washing machines, dishwashers, microwave ovens, electric kettles;
- sockets for connecting low-power household appliances - televisions, computers, mixers, food processors;
- lighting lines.
In addition to this division, each of the above groups can be divided into subgroups by room.
The wiring diagram should show:
- floor plan;
- electrical panel installation location;
- installation locations of powerful consumers;
- routes along which wires or cables will be laid.
In addition, it is advisable to indicate on the diagram the installation locations of sockets and switches, indicating the requirements for their power and degree of protection. Depending on the load on each line or circuit, the cross-section of cables or wires and their number will be selected. It is also better to select sockets and switches based on the diagram. To connect powerful electrical appliances, it is necessary to provide sockets with grounding contacts.
Preparatory work
Before starting the actual installation of electrical wiring, it is necessary to perform some preliminary actions, the purpose of which will be to eliminate mistakes and hasty and often dangerous decisions. It is necessary to immediately take into account that fire safety depends on the quality of installation work. In this case, it is impossible to play it safe; electrical wiring in a house made of aerated concrete is no less dangerous than in a building made of any other material.
First of all, you need to draw up a plan of all the premises. It is not necessary to carry it out in strict accordance with the requirements of GOST; you can make a working sketch. The main task of this plan is the placement of electrical wiring, routing, and determination of convenient installation points for switches and sockets. In addition, you need to choose the optimal placement of lighting fixtures (modern design solutions differ significantly from the chandeliers in the center of the room that were common since Soviet times).
Article on the topic: How to treat a window in a bathhouse
It is better to position the switches so that in the dark you do not have to frantically fumble along the wall with your hand. It is most convenient to place them at the level of the palm of the freely lowered hand. The number of sockets should be such as to avoid the need to use extension cords. This especially applies to the kitchen, living room and study, where a lot of kitchen, computer and other equipment, lighting fixtures, televisions, stereo systems, etc. are used. Practice shows that there are no extra sockets in the house - no matter how many there are, you have to use tees or extension cords somewhere.
In addition, you must immediately decide on the location of the main panel, machines and other devices. It is necessary to immediately resolve the issue of the possibility of a three-phase power supply (this should be discussed with local power grids or other supervisory organizations). In a private house, the presence of three-phase power is a big bonus - you can start electric motors, use fairly powerful ventilation, and install some machines and devices in the garage.
Types of electrical wiring
There are two types of wiring used in a private home:
- open. The wires pass along the surface of the wall, the supporting points for them are ceramic insulators-weights;
- closed. The cable is laid in a groove - a recess made in the wall for hidden placement of elements of the house's energy supply system.
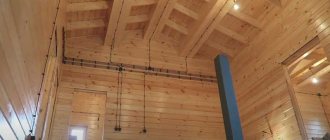
Open wiring was used in the early to mid-20th century, and at some time was practically forgotten. However, it was remembered when wooden houses made of rounded logs, not sheathed or finished with anything on the inside (not counting transparent paint and varnish coatings) came into fashion. In such conditions, it is impossible to use hidden wiring, since there is simply nowhere to hide it.
Closed wiring is familiar to everyone - this is a common type of placement of elements of a home power supply system. All wires are laid in special cable channels or in wall recesses (grooves), sockets and switches are internal. Cables or wires are not visible, finishing work can be done in a given style, without unwanted technological additions.
Today, both types of electrical wiring are used, and the open type is found not only in wooden, but also in brick houses. The fashion for open placement of wires creates many problems - today there are many more of them than in the last century, therefore, you have to be cunning - stylize one wire for open installation, placing the rest in hidden channels.
The main problem with hidden wiring is the need for labor-intensive gating, a dusty and very noisy procedure. However, aerated concrete differs favorably from dense building materials - it is soft and allows you to make a hole with hand tools. For this purpose, a special wall chaser is often used, designed to make grooves for reinforcing rods in the masonry of gas blocks.
Hidden electrical installation
Aerated concrete is an easy-to-process material and, unlike concrete walls, does not cause any particular problems for laying internal wiring. It can be easily cut with either a wall chaser or an ordinary grinder, but there is more dust. You can do this step yourself.
After this, you need to mark the walls for electrical wiring, as well as install sockets and switches for the entire area. One rule must be observed: the cable line must be laid only horizontally or vertically, turning up or down at an angle of 90 degrees. There should be no diagonal wiring diagrams in the house.
According to the drawn up diagram, the electrician creates grooves, cuts out seats for switches, sockets, sconces, and wall lamps. In the prepared aerated concrete, he walls up electrical components, lays wires, and secures them in the grooves using clamps, as shown in the photo below. After this, the voids are filled with mortar and leveled.
Some owners have a question about how to lay a cable in the wall using internal cable ducts or electrical corrugation. In this case, you need to make the groove deeper and wider (according to the size of the corrugation). It is usually attached to clips or dowel clamps, which in some cases speeds up electrical installation.
However, you should not assume that in this way you can replace the wiring if it is damaged without opening the wall. In most cases, pulling the cable out of the corrugation is difficult, and electrical installation in the corrugation is not intended to ensure the replacement of electrical wiring, but is only a method of laying it and additional protection.
How to conduct electricity through the ceiling? If the walls of the house are made of aerated concrete, then the ceiling can be made:
- monolithic;
- reinforced concrete floors were installed;
- wooden floors have been installed.
Depending on the type of interior flooring, you need to choose a method for connecting wires to chandeliers and ceiling lighting. If the ceiling is monolithic, then during its manufacture channels should have been provided for laying electrical wiring. In this case, it is enough to use a ready-made solution. In the case of installed prefabricated reinforced concrete floors, you can use technological holes that are provided in advance. If these are wooden floors, then it is necessary to carry out an open installation in compliance with all the requirements of the PUE. We talked about how to install electrical wiring in a wooden house in a separate article.
The photo below shows another popular option for electrical wiring in an aerated concrete house - along the floor:
In this case, the cable must be additionally protected with black corrugation (it is more durable). We also talked separately about how to lay wiring on the floor.
Using corrugation
Corrugation is an additional cable protection and is used in electrical wiring quite often. But is its use always justified? Let's figure it out. Many electricians insist on the widespread use of corrugation in order to increase the amount of work and the overall cost. But let's approach this issue logically.
Think about it, if you use a good VVGng-Ls cable, which is hidden in an aerated concrete groove and plastered, does it need corrugation? From a fire safety point of view, corrugation is not needed in this case, but it can be justified if the cable is replaced when it is pulled out of the groove with wire. But it is far from certain that this will work out.
Corrugation must be used if part of the cable is laid in a concrete screed.
The use of corrugation is mandatory for open wiring, and especially when using flammable facing materials such as plastic and wood.
Hidden electrical installation
Aerated concrete is an easy-to-process material and, unlike concrete walls, does not cause any particular problems for laying internal wiring. It can be easily cut with both a wall chaser and an ordinary grinder, but there is more dust. You can do this step yourself.
After this, you need to mark out the electrical wiring, as well as the installation of sockets and switches for the entire area. One rule must be observed: any laying is carried out only horizontally or vertically, connecting at an angle of 90 degrees. There should be no diagonal laying patterns in the house.
According to the drawn up diagram, the electrician creates grooves, cuts out seats for switches, sockets, sconces, and wall lamps. In the prepared aerated concrete, he walls up electrical components, lays wires, and secures them in the grooves using clamps, as shown in the photo below. After this, the voids are filled with mortar and leveled.
Some owners have a question about how to lay a cable in the wall using internal cable ducts or electrical corrugation. This method is only suitable for conditions where regular changes occur in the wiring diagram. As a rule, a well-thought-out and calculated scheme does not require regular changes and installation along previously prepared channels is not carried out. A huge disadvantage is that to lay the corrugation you will need to cut the groove in the aerated concrete 1.5-2 cm deeper. If a section of cable fails, there is also no guarantee that it will be possible to restore the electrical network using built-in cable ducts or walled-up corrugation. This is true for installing wiring in aerated concrete walls and in walls made of brick or concrete.
How to conduct electricity through the ceiling? If the walls of the house are made of aerated concrete, then the ceiling can be made:
- monolithic;
- reinforced concrete floors were installed;
- wooden floors have been installed.
Depending on the type of interior flooring, you need to choose a method for connecting wires to chandeliers and ceiling lighting. If the ceiling is monolithic, then during its manufacture channels should have been provided for laying electrical wiring. In this case, it is enough to use a ready-made solution. In the case of installed prefabricated reinforced concrete floors, you can use technological holes that are provided in advance. If these are wooden floors, then it is necessary to carry out an open installation in compliance with all the requirements of the PUE. We talked about how to install electrical wiring in a wooden house in a separate article.
The photo below shows another popular option for electrical wiring in an aerated concrete house - along the floor:
In this case, the cable must be additionally protected with black corrugation (it is more durable). We also talked separately about how to lay wiring on the floor.
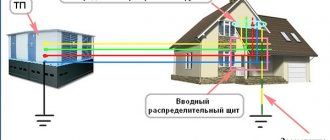
Single-phase input or three-phase - which is better?
Currently, electricity consumption in private homes is constantly increasing. Back in the mid-twentieth century, the number of electrical appliances was limited to an electric stove, a couple of household appliances, and a few incandescent lamps.
Today, in any room there is a huge abundance of household electrical appliances, therefore, in private properties they often began to resort to three-phase cable inputs, abandoning single-phase ones.
Three-phase or single-phase current - the choice is yours
Many believe that a three-phase network will allow the use of power more than usual, in fact, turning on many devices at the same time. But this is not at all true, because the maximum permitted power is indicated in the technical conditions for connection.
For a three-phase connection, this is usually 15 kW for household needs, for a single-phase network - 10-15 kW. As you can see, the benefit is insignificant or completely absent. In addition, the meter for the three-phase input has bulky dimensions - and this is a minus.
However, the fact that it becomes possible to directly connect three-phase electrical receivers to the network:
- electric boilers;
- asynchronous electric drives, etc.
This is definitely an advantage. The fact is that for the operation of the same asynchronous motors connected to a three-phase network, the energy and mechanical parameters are improved. And when operating powerful electrical consumers, such as boilers and stoves, “phase imbalance” is not observed.
The operating voltage in a three-phase network is close to 380 volts, which will require you to take a more careful approach to electrical safety issues! especially if the electrical wiring is in a wooden house.
Disadvantages of three-phase input
- It is necessary to obtain permission to connect from local authorities.
- Increased risk of electric shock, as well as the risk of fire and fire, due to high voltage.
- Cumbersome dimensions of distribution input panels.
- The need to install a modular surge suppressor in the switchboard.
Advantages of three-phase input
- The ability to avoid “phase imbalance” by redistributing workload between phases.
- Direct connection to the network of powerful three-phase electrical consumers.
- Reduction of current ratings in input protection equipment and cable cross-section.
- Sometimes, the possibility of increasing the maximum permitted power consumption of electricity.
As you can see, the use of three-phase input is most appropriate for houses with a usable area of 100 sq.m. and more. When there are many single-phase current consumers, it is easy to distribute the load more symmetrically. Moreover, three-phase input is ideal for heavy-duty three-phase electrical appliances.
In other cases, the transition to “three-phase” is not particularly necessary.
Electrical wiring in a house made of aerated concrete - which scheme to choose
We are talking about the consumer connection diagram. The footage of the cable used for wiring, the necessary accessories, as well as the serviceability, durability and practicality of wiring installation will depend on this.
In practice, several main options are used:
- A diagram that involves connecting all outlet groups and lighting sources through one common circuit breaker.
- A scheme in which there is a separate circuit breaker for sockets and a separate circuit breaker for the lighting system.
- Each room has its own machine for sockets and its own machine for lighting. At the same time, such high-power electrical equipment as electric kettles, stoves, boilers, electric heating will be powered separately. Professionals recommend choosing the third connection scheme as the safest and most reliable.
Installation of distribution boxes and sockets
Distribution boxes, like sockets, can be recessed into the thickness of aerated concrete, or they can completely protrude on the surface. The recessed version in aerated concrete is more preferable, as it is both more fireproof and more practical.
A large hole in aerated concrete for a socket or distribution box can be made using a screwdriver with a crown. The circles are drilled out and the inside is chopped off with a hammer.
Electrics in a private home: features of high-quality installation
The main task that craftsmen have to face when installing new wiring is the choice of materials, wire cross-section, and characteristics of the machines. The reliability and safety of electrical appliances depends on this.
We calculate the total power of electrical appliances
An important rule: the power of the machine must correspond to the cross-section of the wiring. This will ensure that it operates before the insulation begins to melt or a fire starts.
For lighting, the total power is usually 10 or 16 A. For a group of sockets, it is taken from 16 to 40 A. Taking this into account, electrical installation of a house begins with calculating the power of consumers connected to one line. The resulting value is divided by the network power, which is 220 W. For example, if a total of consumers require 4 kW, then the required network power is 4000/220 = 18.2 A.
When making calculations, it should be taken into account that it is practically impossible to turn on all electrical appliances at the same time. Therefore, a correction factor is introduced, which depends on the total power:
- less than 14 kW it is taken 0.8;
- up to 20 kW – 0.65;
- below 50 kW – 0.5.
Using the coefficient will help you avoid unnecessary expenses on purchasing expensive equipment. At the same time, network security remains at the proper level. It is better to dispel any doubts about installation in a panel house or any other house by consulting with specialists.
For many craftsmen, electrical installation in a private building becomes a difficult task. A program for developing an electrical part project allows you to simplify it and avoid many mistakes. She will handle the following questions:
- calculation of power supply capacity;
- voltage loss calculation;
- determining the length and cross-section of the cable;
- selection of materials.
Another important bonus: using the program for installing any type of wiring will ensure an accurate calculation of the required number of lighting devices and selection of their optimal installation location. It will become a reliable assistant to a person who has minimal knowledge of electrical engineering. In addition, the program makes it possible to consider options without financial investments, study the features, advantages, and disadvantages of connections. This minimizes the likelihood of error.
Table of cable cross-section by power and current
Wiring in a house made of aerated concrete
Work begins with calculating the power of electrical appliances. It is done separately for each room, and then for the entire building. Installation of electrical wiring in a house made of aerated concrete is carried out in a hidden and open way. The disadvantage of the open option is that the power grid remains visible. If high demands are placed on the aesthetics of the room, then it is better to refuse it.
Grilling
The advantage of aerated concrete is its ease of processing. It can be easily cut with a grinder or wall chaser. Moreover, it is quite possible to do this in the house with your own hands. First, markings are made by drawing two parallel lines on the surface, then the walls are tapped. The process is noisy, dusty, and labor-intensive. To protect the body you will need gloves, goggles, and a respirator. Grilling requires care: aerated concrete is quite fragile and can crack under strong force.