It is advisable to choose and consider any of the options described below at the stage of designing a house, or at least attaching a porch to it. Because heating a porch on the street will require increasing the power of the input electrical cable, combining the system with internal communications, connecting to them, etc.
Upgrading an existing porch is more difficult, but also possible. The video in this article will tell you and show you how to make a warm porch to your house correctly.
Water heating
Water heating of outdoor areas involves laying thin tubes filled with non-freezing liquid along them, followed by pouring the surface with concrete.
Having chosen such a heating system, you will have to take care of purchasing a pump and a heating boiler. Or about replacing it with a more powerful one, if water heating at home already exists and is in use. Plus, it will be necessary to constantly monitor the volume of liquid and pressure in the system.
In general, water heating of porch steps is the most expensive in terms of materials and installation. It only makes sense to choose it if the house itself is also planned to have water heating, and from a gas boiler.
Infrared heating
To quickly and without serious physical effort get an insulated porch, you can lay thermomats on it. These are rubber mats, plates or sections of various shapes with an infrared heater inside. You can buy them ready-made, or order them made to your size.
All sections are connected to each other using special connectors with your own hands, without using any tools. Each element is equipped with two cables with such connectors - one works as an input, the second as an output. They can be placed in boxes or left lying along the edges of the steps.
The advantages of this option include:
- Installation speed;
- Relatively cheap (about 7,000 rubles/sq.m.);
- Economical operation;
- Easy to dismantle for the warm season.
There is also a drawback: rough black coverings hide beautiful steps underneath, depriving the porch of its visual appeal. But they can be kept in reserve to be used in emergency situations for a short time.
Heating cable
According to experts, this is the most optimal way to create warm steps on the porch. And not just steps: the heating cable can be laid on the area in front of the porch, on the path leading to it, and at the entrance to the garage. The main thing is that there is a power source somewhere nearby.
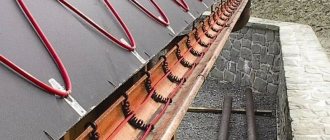
As you can see, the cable is laid on a heated surface like a snake, with a pitch between turns of 4 to 10 cm and secured with metal plates.
The installation instructions look like this:
The heating cable is laid on horizontal surfaces in a continuous wavy line.
The end is led outside the porch and connected to the electrical network through a thermostat. After which its performance is checked.
After checking the resistance, a tie is poured over the cable, securing it in a given position and protecting it from mechanical damage. It is necessary to ensure that the screed is free of voids.
After pouring the solution, you need to wait for it to dry completely, and then make sure again that the system is working.
If everything is in order, you can line the heated porch with porcelain stoneware, clinker tiles or other material.
When deciding how to insulate a porch, you can choose two options for adjusting and controlling the system - manual and automatic.
Manual control means that you will turn the system on and off as needed. This will have to be done after snowfalls and when the air temperature outside is from zero to minus 7-10 degrees - it is in this temperature range that ice forms. In severe frosts, if the porch was initially dry, there is no need to heat it, since snow does not fall at this temperature.
Control in automatic mode is carried out using an anti-icing system, which includes thermostats, temperature and humidity sensors, distribution boxes, protective and distribution fittings.
The heating part of the system can consist of a resistive (with constant power) or self-regulating (with varying power) cable.
Automatic control is much more convenient than manual control. It allows you not to constantly monitor the weather, temperature and humidity. All indicators from the environment are transmitted by sensors to the thermostat, which regulates the heating power and turns the heating system on or off.
The easiest way is to buy a ready-made kit and install it according to the instructions, rather than selecting all the adjustment and control elements yourself.
Is such street heating necessary and beneficial?
Someone will immediately object that such heating is not a cheap undertaking and it is better to wave a shovel a couple of times a week than to bother with this ice.
Of course, large retail chains and stores that value their reputation and customers have long switched to this type of outdoor heating and can afford it.
They plan in advance, even at the construction stage, to heat paths, parking lots and access roads to their retail outlets and offices.
In the West, they realized a long time ago that this costs much less than all the legal costs from injured buyers who accidentally walked in with full packages of goods.
What do these snow melting and anti-icing systems provide at home?
firstly, a clean and dry surface of the places where you move throughout the winter period
For some, it may not be a problem to go out with a shovel and remove all the snow after a snowfall, but what if this is your parents’ house? And you yourself will someday turn 70+.
You won’t hire janitors every time.
longer service life of tiles, asphalt and other coatings
Now you don’t have to hammer with a crowbar, trying to pick off another crust of ice. This ice also gets into the seams, gradually expanding and spoiling the original mosaic and neat pattern of the paths.
Besides, asphalt and rough tiles may tolerate this, but what if you have marble steps?
and most importantly - the absence of fractures, dislocations and other injuries associated with icy conditions
Therefore, if you want comfortable and safe living in your home throughout your entire life, sooner or later you will still come to a conscious decision to do such anti-icing on your site.
Options for controlling heating of outdoor areas
- The simplest option: a self-regulating heating cable is plugged directly into an outlet or panel and turned on manually when necessary. The self-regulating cable can be used with all thermostats.
- A simple option using a resistive cable: heating a walkway or porch can be done with a resistive cable through a regular floor heating sensor to protect the heating cable from overheating.
- Using a thermostat and sensors: the heating system is controlled by a thermostat based on the readings of air temperature and precipitation sensors.
Options for layout and combination of control options are possible. This is justified in cases where, for example, there is a limit on power consumption (as sometimes happens in cottage villages). The main entrance and path can be made resistive, controlled from a weather station, so that there is always no ice. And the remaining areas, which do not have enough power to heat at the same time, are heated with a self-regulating cable, which will be turned on manually when the main section is turned off.
On the left is a resistive cable - entrance to the garage, on the right is a self-regulating cable - additional parking for guests
Calculation of power for heating open areas
It is necessary to give 300-350 watts per square meter of heated surface. The power supplied depends on the thickness of the layer between the heating cable and the surface.
For example, you need to heat a path 0.8 m wide and 3 m long, it turns out 2.4 m2 2.4 * 300 = 720 W
Self-regulating cable Lavita GWS 40-2CR with a rated power of 40 W/m needs to be taken 18 meters (720/40=18). Resistive cables come in sets with a fixed length and power, and you need to select the nearest larger one. Using the example of the proven two-core resistive heating cable ready for installation TXLP/2/28 DEFROST SNOW (TWIN), we select the 890 W section (31.78 m).
An important nuance when heating porch steps of a standard width (30cm) with a self-regulating cable: it is optimal to take GWS 30-2CR with a rated power of 30 watts, and put it in 3 threads with an interval of 10 cm. It turns out just 300 W per m2. Whereas 2 threads of Lavita GWS 40-2CR may not be enough, and 3 threads may be too much.
Self-regulating heating cable is laid on steps in grooves
Heating cable installation options
- on a plastic mesh spread over the entire heated surface
- onto mounting strips pre-fixed with dowels
- into grooves, can be pre-fixed with a weight and a small amount of mortar
The distance between the threads of the heating cable is calculated, and the cable is fixed with clamps to the mesh or tongues of the mounting tape.
We fix the self-regulating heating cable Lavita GWS 40-2CR with clamps
Fixing the resistive cable on the mesh with clamps
Heating of storm drains and drains
igorkzn FORUMHOUSE user
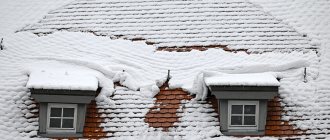
I have a house with a flat roof. I want to heat the storm drains and drains with a heating cable to avoid icing of the funnels and, as a result, the formation of a “pool” on the roof. I thought about what I need to buy for this, how to connect everything, how to connect it, do I need sensors? It is advisable that it does not turn out to be very expensive, because... The house is still being completed and a simple temporary plan is needed.
Portal users actively responded to igorkzn’s request and proposed a number of solutions. A member with the nickname beutiflet recommended a budget option. Buy a heating cable, which is used to warm up the concrete mixture in the formwork during monolithic work in winter. Connect the cable in pieces (according to the resistance calculation), 10-15 meters long, through 12 V transformers used to power the light bulbs. Among the disadvantages of this method, it can be noted that this is a temporary solution, because... The steel cable is in a PVC sheath and can quickly fail.
On average, a heating cable consumes from 9 to 20 W of electricity per 1 linear meter. m. Knowing these parameters, you can calculate the total energy consumption of the system and find out how much its operation will cost during the winter period.
3fazy FORUMHOUSE user
In addition to the heating cable, you also need a cable for the “cold end”, i.e. a cable that will not heat up and is inserted into a machine or a control device. The cable cross-section must be selected based on the total power of the heating cable.
Important: the heating cable can be a so-called self-regulating (samreg), which begins to heat when the temperature drops below a certain level (from + 5 °C and below) and a resistive heating cable. Such a cable consists of a heat-generating metal conductor, insulation, braided shielding and a high-strength outer sheath.
A resistive cable requires automation - a thermostat and a humidity sensor, which will regulate its operation so that it does not heat all the time without turning off. Samreg is easier to connect, it is more difficult to overheat and damage it, but you should not think that its “miracle” characteristics will decide everything for the user.
Any system requires a thoughtful approach.
igorkzn
As a result, I installed a temporary solution - I connected the cable coming from the funnel through extended wires to the heating samreg and simply connected the extended wire to the C25 RCD. When I get to finishing work, I will install temperature controllers, sensors, etc. The system also works on the roof around the funnel, and no ice has formed at the exit.
Combining a humidity and temperature sensor allows the anti-icing system to work most efficiently and at the same time not go down the drain on your electricity bills.
DIY installation technology
As we said earlier, you can make a warm floor outdoors yourself if you know the technical aspects and nuances of installation. The design of the snow melting system is not complicated. It includes the heating cable itself, a thermostat, humidity and precipitation sensors, a signal cable (for connecting sensors), and automatic protective equipment. As for the heating power, as a rule, for the street the calculation is reduced to 250-300 W/m2. In this regard, it is recommended to choose a conductor with a power of about 28 W/m.
Before proceeding with the installation of a heated floor, you need to carefully level the surface. After this, according to the manufacturer’s recommendations, you must lay the heating conductor and connect it to the network, sensors, and protective automation. Next, depending on the situation, a concrete screed is poured, onto which, after hardening, it is recommended to pour a layer of sand. At the very last moment you need to move on to paving with natural stone, tiles or other suitable material.
You can also do without a screed, simply pouring a sand cushion 3-4 cm thick over the warm floor. If you still need to fill the screed, be sure to first secure the heating cable outside with mounting tape, as shown in the photo below.
The installation locations of the sensors are discussed in the attached instructions from the manufacturer. The thermostat itself must be installed in a room protected from precipitation and low temperatures. It is recommended to install the thermostat in the corridor.
When laying an electric heated floor outdoors, be sure to take into account an important point - the cable should not be affected by paving elements. If you miss this moment, the site's cable heating system may be damaged in the future. Repairing it will be extremely problematic and, of course, costly. One more nuance should be noted here - if you decide to lay a heated floor on a sand cushion, make sure that there are no stones or other debris in the sand, because under load, stones can damage the conductor.
If you need to electrically heat the steps on the porch, the cable is laid according to the selected pattern with the same pitch over the entire area. After this, a concrete screed is poured, on top of which stone, tile or even marble is paving. By the way, an alternative heater in this case can be a thermomat or a tape. You can clearly see what heated steps on the street are like in the diagrams and photos below:
We also recommend watching the video installation instructions:
How to make snowmelt on steps
Laying heating cable outdoors
That's the whole technology for laying heated floors outdoors with your own hands. As you can see, installing an outdoor heating system for paths and steps is quite labor-intensive. We still recommend leaving this task to specialists, many of whom will do everything inexpensively and quickly. Only in this case will heating the site be economical, safe and durable!
It will be useful to read:
- How to properly light a fence
- How to lay a cable underground
- How to install solar panels for your home
Coolant liquid
The system of tubular heat exchangers has been used for a long time; the technology has been proven in organizing home floor heating. There are no problems when installing indoors. The main thing is to ensure sufficient strength of the tube. Moreover, the coating can simply lie on a lining like a Lego constructor, without any pouring of concrete.
But this option is not suitable for the street. A monolithic structure is required that can withstand high traffic loads of people, as well as thermal expansion of the material when temperature changes. Therefore, the coolant pipe is placed in a standard concrete porch structure. Technologically, it looks like this: a structure is being built 10–15 cm below the planned plane. Then the coolant pipes are laid on the base. Concrete is poured on top (at least 5 cm from the top of the pipe). It is advisable to lay a reinforcing mesh to minimize the possibility of damage to the tubes. And already on the plane of the finishing layer the facing material (ceramics, granite, marble) is laid.
What to pay attention to when connecting
Since the circuit is connected to a conventional room heating system (boiler, pipes, radiators), care must be taken to prevent “defrosting” of external heaters. It is unrealistic to organize continuous heating with intensive water flow through external pipes. In addition, cooling occurs faster than in the house. As a result, you will not only be left without heating your porch. If frozen pipes rupture, the unified heating system of the house will be inoperable. Therefore, it is advisable to separate the internal and external circuits using a heat exchange container (similar to a double-circuit boiler).
The outdoor circuit coil passes through the heated water of the indoor system. Of course, the coolant must withstand sub-zero temperatures. You can follow the analogy of a car radiator and pour regular antifreeze (antifreeze) into the external system. Then you won’t have to waste heat in vain; you can turn on the external circuit as needed.
Moreover, it is not necessary to heat the entire porch and steps; it is enough to organize a small path.
To save money, you don’t have to buy special materials. Conventional metal-plastic pipes are perfect for such purposes. The only condition is continuity of installation. That is, no couplings, splices, or splitters. One pipe went in, one went out. A pump for coolant circulation will not be superfluous. It is installed indoors and turns on simultaneously with the start of heating.
It makes no sense to organize heating of the paths of a country house in this way. The length of the highway from the house (with the heating system) to the sidewalk is too long; the carrier will cool down along the way.
The undeniable advantage of this method is its low cost. Of course, there is a risk of damage to the pipe in the porch, followed by expensive repairs. But the lack of operating costs outweighs all other problems.
Important!
After installation, it is necessary to give the concrete screed time to shrink. Complete hardening ends after 20–30 days. At this time, it is better not to supply heat to the pipe.
prices in St. Petersburg from ROME
Tomsky is pleased to offer you modern innovative equipment for the installation of effective heating systems of varying complexity: fireproof infrared heated floors based on thin heating mats and constantan flexible heating cable.
The warm fireproof floor is made using durable Japanese-made Toray carbon fiber, which has a huge temperature reserve and ensures the fireproof structure throughout its entire service life.
This type of flooring is actively used for heating residential buildings, public institutions, and non-residential premises of various configurations and purposes.
The heating cable is a two-core heating wire made of a heat-stable constantan alloy, which provides uniform, rapid heating to a given temperature level while saving energy. The heating cable is used to warm up plastic and metal pipes of different diameters, roofing and gutters, driveway steps and porches, soil in greenhouses, and runways. The use of a heating cable increases the level of safety in the cold season and extends the playing season on football fields.
The heating cable for steps has a cut-off design, which allows you to purchase any length of cable from 1 meter (but not less than 2 meters). This makes it easier to install the cable, since there is no need to carry a heavy coil with you.
On the official website of the plant, you can buy heating cables for outdoors and indoors online. A detailed electronic catalog with a complete list of equipment produced by the plant allows you to independently select a heating cable for porch steps and place an order in a matter of minutes.
In the “Where to buy?” section a list of partner companies is presented that sell products in various cities and towns in Russia and abroad - you can purchase a heating cable for a porch in your city (Moscow, St. Petersburg, Novosibirsk, etc.) and save time on delivery.
Best price for heating cable for heating steps
The price of heating cable for porches and steps presented on the manufacturer’s website is devoid of trade markups, which allows you to purchase the required footage of equipment and save financial resources. Prices for heating cables for heating a porch in partner companies (in Moscow, St. Petersburg and other cities) may differ from manufacturer prices.
For more efficient operation of a heating cable used to heat an outdoor porch, it is necessary to use an accurate thermostat that allows you to set and maintain the required temperature throughout the entire period of operation.
Optimal types of heat treatment for porches and steps
The most effective methods used to combat icing of steps:
- Installation of a self-regulating, resistant heating cable;
- Installation of a coil with coolant;
- Installation of infrared heaters.
All options have found their application in heating street objects
However, before choosing the appropriate option in a particular case, you should pay attention to the following criteria:
- Average temperature during the cold period;
- Amount of precipitation;
- Width, height of the heated area;
- The type of material used to cover the surface.
Based on the obtained parameters, you can determine the appropriate type of degree processing and the required power.
Electric heating of the porch
It is distinguished by its simplicity, ease of installation, and availability of components. To equip your porch with electric heating, you need a heating cable with suitable parameters. The cable is installed under the outer surface of the porch, steps, both under a concrete base and tile masonry. The main criteria in choosing the required cable are moisture resistance, mechanical loads and the ability to withstand low temperatures. In addition to the heating cable, a control group (temperature regulators, temperature and humidity sensors) and a distribution group (fastener elements, electrical boxes, control equipment) are required.
A beautiful porch decorated with tiles or stone is the pride of the owners of the house. But in winter, it causes injuries and sudden surges of adrenaline into the blood when it becomes covered with a layer of ice. The most modern way to solve this problem is to heat the steps.
In this article we will look at what heated floors are like on an outdoor porch and which type is best to choose in a given situation.
Heating of outdoor areas Devi
Heating of outdoor areas from Devi
It is difficult to find a person who has not encountered slippery steps or sidewalks in winter. The methods that many have used for centuries - salt, sand or reagents - are not only obsolete, they require a lot of effort, money and time. With the development of modern technologies, it has become much easier to deal with icing of street areas or steps - special heating systems are used for this.
Features of heating outdoor areas
The main purpose of heating outdoor areas or steps is to prevent the formation of a cover of snow or ice. This way you can protect the movement of people. Most often, such a system is based on a Devi heating cable or a special heating mat from the same manufacturer, which is laid under the surface during the construction process. A mandatory element of such a system is a heating element control device. The main task of the automation system is to control and regulate the heating temperature depending on weather conditions.
Operating principle of the Devi heating system
Anyone who has encountered “warm floors” knows that the basis of such a system is an electrical cable. Heating of sites is carried out according to the same principle - the heat generated by the cable is retained by the surface. Therefore, the cable is embedded in the base, on which the paving slabs or the surface of the steps will then be located.
But in order to properly heat an outdoor area using Devi systems, you need to choose the right heating cable
In this case, it is important to take into account not only the speed at which the surface will be heated, and it is directly related to power consumption, but also the possibility of savings. Not everyone can afford to pay quite large amounts of electricity bills for heating the street
The power of the Devi cable used for outdoor systems is less than for indoor systems. Taking into account the fact that the cable is laid in a zigzag, its power can also be adjusted. As practice shows, the cable power is selected individually, taking into account all the features of the application, and is 0.2-0.3 kW/sq.m. But the data is averaged; an individual calculation is made in each specific case.
Scope of application of Devi heating systems
In order for heating systems for outdoor areas to be as effective as possible, it is worth knowing some of the features of their use. The heating cable or mats are spread on a flat surface and secured using a special reinforcing mesh, on which a layer of concrete or other building mixture is laid. Controlling the Devi heating system is quite simple - power cabinets and microprocessor-controlled control panels are used for this. Such a cabinet is assembled from ready-made elements, with the help of which the controls can be adjusted to the conditions of the facility.
Electric heating systems
Electric heating is optimal for small areas that require constant clearing of snow and ice. These include steps, a porch, paths from the entrance to the site to the doors of the house. Natural and artificial stone heats up especially effectively from electricity - heating evenly throughout its entire volume, it maintains its internal temperature for a long time. Installation of the system does not take much time and is extremely simple.
The anti-icing device can be controlled autonomously or manually. Control occurs through thermostats that record the presence of excess moisture and precipitation, comparing the information received with external temperature indicators. After switching on, ice and snow thaw, and the resulting water enters the reservoir or, if its volume is small, completely evaporates.
Installation of outdoor heating is best done directly during the arrangement of the yard. The first step is to calculate the system power, length, type and cross-section of conductors. The optimal power for outdoor heating is considered to be from 250 to 300 W/m2. In areas with long snowy and frosty winters, the power can be increased to 350-400 W/m2.
Parameters 250-300 W/m2 correspond to the linear power of the conductor of 28 W/m2. In accordance with these recommendations, the total energy consumption should be calculated.
The heating cable, which is the main working part of the heated floor, can be of different types. The most commonly used wires are:
- Resistive. The main component is a thin nichrome wire, located in a polymer sheath and copper braid. A resistive cable has a constant resistance value, which results in its peculiarity - the impossibility of temperature control. The nichrome thread is heated to a certain, maximum temperature for a particular section, after which it stably holds it until it turns off. The advantage of resistive cable is that it can be easily bent in any direction. Disadvantages - the impossibility of free cutting into the required fragments, so the calculation of the length should be done especially carefully.
- Self-regulating. This type of cable differs from the previous one in the ability to adjust the heating temperature and simplified installation - a wire of this type can be cut into arbitrary fragments. The main thing is to connect each segment correctly. A self-regulating cable works by heating a polymer matrix that is located between a pair of copper wires. The system is well protected from external influences by rigid polymer shells, and there is also a grounding braid.
Before installing floors on the ground, you should carefully level the surface on which the installation will take place.
The poured concrete screed is checked for irregularities. If you skip this step, the wire will lie crookedly, which will lead to the appearance of uneven heating zones. Different manufacturers of electric heating systems make different recommendations for installing their products, so you should carefully read the information from the manufacturer before starting work. The heating wire is laid on a perfectly flat surface, while the distance between its loops should be kept stable - about 15-20 cm. A layer of concrete screed up to 5 cm thick is poured on top of the cable. If the layer is too thick, the device simply will not be able to transfer heat to the surface , which will lead to excessive consumption of electricity and rapid failure of the heated floor.
Before pouring concrete, the wires are secured motionlessly with metal mounting tape. During work, it is recommended to draw up a detailed diagram of the section indicating the locations of cable kinks, the number and relative positions of individual loops, and connection points. In the future, this will facilitate possible repair work and will allow us to limit ourselves to dismantling only part of the coating.
After complete hardening, the rough screed is prepared for installation of a decorative covering - paving slabs, natural or artificial stone, paving stones. To do this, pour a layer of sand onto the screed, level it and compact it. Then paving slabs or stone are laid on the sand, and the seams are rubbed with fine quartz sand.
Heating porch steps and stairs using a heating cable
Heating of external stairs and porches
To guarantee protection of street steps from ice, it is necessary to provide a heating power of 250 - 300 W/m2.
As a rule, powerful ELEKTRA heating cables are used - single-core or double-core, with a specific power of 20 W/m.p.
For this use:
Which cable to choose for installation: single-core or two-core? It is convenient to lay a two-core cable when heating steps, but a single-core cable can also be used on platforms. When it is not possible to increase the height of the step, grooves (grooves) are cut under the cable, and the cable is laid in them.
Examples of power calculations for heating a porch.
Heating of the entrance group with ELEKTRA VCD 25 heating cable.
Initial data:
- number of heated steps 4 pcs.
- step length 1200 mm.
- step width 300 mm.
- step height 150mm.
- dimensions of the heated area 1200 x 1200 mm.
- specific heating power 300 W/m2
To ensure a heating power of 300 W/m2 using a VCD 25 heating cable, the laying pitch should be: 25 (W/m.p.) / 300 (W./m2) = 0.083 m.=83 mm.
On one step, measuring 1200 x 300 (1.2 m x 0.3 m), it is necessary to lay a heating cable with a length of: L = (300 (W/m2) \ 25 (W/m.p.)) x 0, 3 x 1.2 = 4.3 meters. Accordingly, at four steps this length will become 4.3 x 4 = 17.3 meters. Let's add 0.15 m to the height of the steps: 0.15 x 4 = 0.6 m. The length of the heating cable located on the site is: L = (300 (W/m2) \ 25 (W/m. p.)) x 1.2 x 1.2 = 17.3 meters. Total total cable length is 17.3 + 0.6 + 17.3 = 35 m. We choose the Elektra VCD 25 / 890 heating cable. Considering that the overhang of the step is usually 20 - 30 mm. and the thickness of the riser lining can reach 25 mm, the first row of cable is laid at a distance of no more than 4 cm from the edge of the step.
Porch heating using single-core cable VC 20.
With a heating power of 300 W/m2 using a VC 20 heating cable, the laying pitch should be: 20 (W/m2) / 300 (W/m2) = 0.066 m = 66 mm.
The length of the cable for heating a step measuring 1200 x 300 (1.2 m x 0.3 m) is equal to: L = (300 (W/m2) \ 20 (W/m.p.)) x 0.3 x 1 ,2 = 5.4 meters. Accordingly, at four steps this length will become 5.4 x 4 = 21.6 meters. Let's add 0.15 m to the height of the steps: 0.15 x 4 = 0.6 m. The length of the heating cable located on the site is: L = (300 (W/m2) \ 20 (W/m. p.)) x 1.2 x 1.2 = 21.6 meters. Total total cable length is 21.6 + 0.6 + 21.6 = 43.8 m. We choose the Elektra VC 20 / 930 heating cable, 46 meters long. We will lay the rest of the 2.2 meter cable in front of the stairs. Remember that the step overhang is 20 - 30 mm. and the thickness of the riser cladding is 25 mm, the first row of cable is laid at a distance of no more than 4 cm from the edge of the step.
Features of installing heated porches or stairs
When laying heating cables, you must adhere to the following rules:
- The VC 20 cable laying pitch must be at least 50 mm.
- The VCD 25 cable laying pitch must be at least 60 mm.
- The TuffTec 30 cable laying spacing must be at least 70 mm.
Due to the fact that the side parts of the steps are not heated, the outer turns of the cable should be located as close as possible to the edge of the step. If the cast steps need leveling, as in the photo, then the cable is laid on top of the steps, secured with mounting tape and filled with leveling solution. For this, it is better to use cement-based dry mixtures intended for leveling surfaces.
You can control the heating of the porch using an ETOG thermostat with a temperature and humidity sensor, or using an ETR controller working with a temperature sensor.
Heated floor on the outdoor terrace
Heating paths, terraces or entire areas has ceased to surprise
Although not everyone understands the importance of such a “warm” approach to urban and suburban spaces
Heating of terraces is done in modern country estates in order to:
do not remove snow, avoid the formation of ice, maintain a certain surface temperature (important for gardeners), continue to use the terrace comfortably even in the cold season.
The first two reasons are the most common. Removing snow and ice is an activity that is certainly beneficial for the site and health, but not everyone likes it. Sometimes you are more drawn to talk with your beloved wife or play with your child than to throw snow from one place to another.
The materials under which the heating elements can be installed are durable, strong, and resistant to various weather conditions.
Usually, for heated terraces, they choose WPC (solid or hollow, it doesn’t matter, but it must be of high quality) and porcelain stoneware (also of high quality)
It is not difficult to build a heated structure. Before purchasing heating elements, analyze the weather conditions of your area and power sources. All electric heaters, for example, require high network performance, and not every gardening company has the same characteristics.
Next comes the preparation of drainage outlets or systems similar to storm drains, only in miniature. Water drainage is necessary, since when the heating system is turned on, the melting of snow will be quite intense, and moisture must be removed so that when the device is turned off, it does not freeze, for example, under the terrace.
In order to ensure quick and relatively simple drainage, it is recommended that the area prepared for the heated terrace be made with a slope of several degrees. This will allow water to flow freely from the terrace or foundation naturally.
Classic heating elements in the form of cables are laid on the screed, secured and covered with another layer of screed. After this, the top, finishing coating is installed. The entire scheme of work repeats the installation of underfloor heating systems inside the house. All work must be carried out by specialists, in particular, laying the cable and connecting it to power sources.
According to the described principle, previously only stone terraces were built. With the development of technology and the improvement of outdoor floor heating devices, the number of acceptable materials has expanded. WPC is suitable for such terraces due to its characteristics and performance properties.
Skeptics may argue that if you can make a WPC, why not make a tree?
The fact is that wood absorbs moisture a lot. With constant thawing and freezing, it will warp many times faster than during natural wintering. Wood already suffers greatly from weather changes and seasonal changes, becomes porous, cracks and turns gray due to the gradual drying of juices and leaching of natural pigments. Making a heated floor on a wooden terrace is equivalent to cutting the covering with an axe. Next year the terrace will turn into firewood.
Choose high-quality materials, ask questions to experts and make your life more comfortable and better.
GOODECK is more than just a terrace.
Heating the steps of the porch with your own hands, selecting the cable
Heated steps can ensure ease of use of the stairs in any weather. Snowstorms and frosts are not scary with it. The stairs will always be clear of snow and ice. You can do the installation of step heating yourself.
Methods for heating steps
In order not to experience inconvenience in the harsh Russian winter, they use heated steps, porches and paths. This approach to landscaping not only ensures safe movement, but also creates an atmosphere of order and cleanliness. A residential or public building equipped with a heating system for outdoor structures at the entrance looks well-groomed and cozy.
There are several heating methods:
- heating cable laying;
- installation of a coolant circuit;
- using infrared lamps and heating elements.
When choosing a heating device for outdoor structures, several factors must be taken into account:
- climatic conditions of the region of residence;
- dimensions of the structure or area where installation is planned;
- type of construction covering (concrete, stone, wood, asphalt).
For regions with harsh winters, the optimal choice would be to install a heating circuit powered by a heating system. Laying a cable in this case will not help get rid of icing and snow drifts. This method is optimal for the middle zone and southern regions. For Moscow and the region, even laying three cable lines at one stage will not be enough.
When planning the installation of a heating system, it is necessary to take into account that in most cases it will be necessary to purchase anti-slip coatings. This is due to the fact that when snow melts, liquid will inevitably form, which can cause slipping and injury. Special coatings are required for stairs made of porcelain stoneware and natural or artificial stone.
Installation of a step heating system using a heating cable
This option for landscaping street areas is often used by owners of dachas and country houses. In order to install the cable system, you will need the following materials and tools:
- heating cable with a power of at least 28 W/m;
- level;
- screwdriver;
- tester;
- ground temperature sensor;
- air temperature sensor;
- humidity sensor;
- ballasts.
It is more convenient and easier to carry out installation during the construction of a staircase, porch, bridge or walkway. In this case, the cable is laid directly on a concrete base, which is subsequently covered with facing material. First of all, it is necessary to perform the required calculation of the system power. You can focus on the following indicators:
- for driveways and sidewalks - 250 W/m2;
- for external steps without thermal insulation - 300-375 W/m2;
- for external steps with thermal insulation - 200-300 W/m2.
The cable system consists of 3 main elements:
- heating network;
- distribution network;
- control systems.
Video about heating stairs:
Stages of work:
Clean concrete or stone surfaces. If necessary, carry out a set of leveling works (use cement-sand mortar, self-leveling screed or sand filling 3-4 cm thick). Lay the cable (zigzag)
It is important that the rows of cable are spaced at the same distance from each other. Connect a system of sensors; when choosing a location for them, follow the manufacturer’s instructions
Connect the control group. Fill the area with self-leveling screed or concrete. Carry out finishing work.
Electric heating is beneficial in many respects: it is convenient to use, fireproof, and does not require repair or replacement of the main elements of the system.
But it also has its drawback: dependence on power grids. It should also be taken into account that if the cable system operates around the clock, the cost of paying for electricity will increase significantly.
Video about the location of pipes on the stairs:
The design of a circuit powered by water heating is similar to the installation of a heated floor. When choosing this option for heating outdoor areas, significant costs will be required for the purchase of materials (pipes, fittings, sensors). Most often, metal-plastic pipes are chosen. The circuit is laid on a concrete base, connected to the heating system and covered with a layer of concrete.
Infrared heating does not require labor-intensive work using sand and cement. Heating elements are installed above the surface that is planned to be protected from ice and precipitation.
How can you heat outdoor infrastructure elements?
There are many methods, among which you need to choose the best one for your conditions.
- Laying warm electric mats.
These are external linings that are either simply held in place by a friction surface or secured with eyelets. In the latter case, some damage to the steps is caused. The undoubted advantage is ease of use and the ability to transfer to another installation location. The disadvantage is that such a system spoils the appearance and heats only directly within its area (there is no uniform distribution of heat throughout the volume). In addition, these linings cannot withstand kinks: the heating elements break. - Heating using infrared emitters.
These heaters have long been used to create comfortable conditions in the fresh air. If you direct the heat flow onto the steps or path, the snow and ice will quickly melt. Of course, such equipment is used only on private property. In a public place, visitors are at risk of getting burned. In addition, the emitters have low efficiency: part of the heat is dissipated in the air. Yes, and directing the flow of energy over a large area is problematic. There can be no talk of any permanent work. He took it out of the room, turned it on, melted the ice, and brought it back. The main advantage is mobility. - Heating paths and steps using liquid coolant. A pipeline through which hot water flows is laid in the staircase foundation mass (path bedding).
- Electric heating systems. Similar to home “warm floors”. The only difference is that it is necessary to use frost-resistant materials.
The last two methods are the most popular, so we will pay more attention to them.
Features of the design of the electrical heating system for external structures
For a dacha, the second floor, which can be accessed by modular staircases like Graz, is a fairly common phenomenon. Heating street steps and walkways will help avoid problems associated with people falling. Reviews materials clearly show the effectiveness of systems of this kind. During construction, a power cable is inserted into the steps, the dimensions and resistance of which are sufficient to prevent freezing of the structures. The price of materials and work is quite affordable, and the effect is noticeable immediately after installing the equipment.
The porch of the dacha, for heating of which a conductor was installed in the array, does not freeze and ice does not form on it. A similar situation is observed in relation to the external staircase leading to the second floor. Interfloor spans with built-in conductors have higher prices than conventional ones, but the costs are offset by safety and ease of use.
Filling the entire area in front of the stairs with a heating cable
Modern options for providing anti-icing of steps
All existing methods of combating the formation of ice on street stairs and steps can be divided into three groups:
- chemical, involving the use of various reagents that melt ice or make it friable;
- mechanical, based on the use of various tools and devices, with the help of which the icy layer is cleared from the porch and steps;
- thermal, eliminating or reducing the likelihood of ice formation by heating structures.
The last group, as the most effective, should be considered in more detail.
Connecting and setting up thermostats
The thermostat to which the control and power wires are connected should be located in the house itself. Where it is warm and there is no high humidity.
From an access and service point of view, a hallway or hallway will do just fine. The thermostat connection diagram is similar to that used when installing home heated floors.
A detailed process with step-by-step pictures for home options is described in the article below.
However, you cannot use the usual home thermostats for outdoor use. At low temperatures from -10C and below, they simply “fall into a coma” and stop reacting to anything until the thaw.
Moreover, if you want the outdoor floor heating system not to turn on automatically during severe frosts (in this case it snows very rarely, and there is no point in heating paths and steps), then you will need special devices.
These are usually installed on a DIN rail in a remote panel, and not mounted in socket boxes.
It’s true that regular ones also have a switch on the front surface for this case. You just snap it off in severe frosts and wait for the thaw.
To ensure that the snow constantly melts and does not turn into ice, on the outer surface of the steps and paths, the temperature must always be maintained within +3 degrees. It seemed that this was exactly what needed to be set on the regulator.
However, there is one very important nuance.
For every 1 cm of layer of screed, tiles or other material that is located above the heating cable, an additional 1.5 degrees should be added on the thermostat.
That is, if you have tiles with glue 2cm thick on your steps, then you need to add another +3C to the 3 degrees set on the thermostat. As a result, the melting temperature will be +6 C.
With a greater thickness of the screed or tile, it will increase even more. This will be the so-called operating temperature of the heating anti-icing system.
Two-position thermostats are also widely used. They are automatically started when the temperature of the controlled surface is between two preset values. Moreover, one of the thresholds (positive) can be set rigidly by factory settings.
You can, of course, control the entire system and a regular automatic machine. But in this case there will be no savings or comfort. We fell asleep in the evening in one weather, woke up in the morning in another, and all the steps were snow-covered or covered in ice.
The 220V supply wires are connected to the switchboard through an RCD with a leakage current of more than 30mA.
The simplest conditional diagram for connecting the anti-icing system of the porch and paths can be presented as follows.
Equipment from SST
The designs of snow melting systems from the SST Group of Companies, which heat street areas and roads, are universal. They are installed under heated surfaces of any size, with different geometries and configurations. The presence of automatic control makes any such system effective and economical, be it heating steps on external stairs, heating ramps of various lengths and other street areas.
Our cable snow melting systems ensure that garage driveways, suburban patios, walkways, and ramps clear ice and snow for safe passage through outdoor areas.
Why do you need to heat your porch?
Ice or a layer of trampled snow on the porch not only interferes with normal movement on it, but also leads to traumatic situations.
To get rid of them, two usual methods are used - chemical and mechanical:
Everyone can imagine what these methods lead to. These include shoes damaged by reagents, and destruction of the lining of the steps, and, as a consequence, the need to restore them. And the price for materials and labor, in this case, is considerable.
For reference. In addition, periodically freezing and thawing water that penetrates the concrete or under the tiles itself destroys the structure, causing the appearance of growing cracks.
But heating the porch and steps during snowfalls and frosts prevents the formation of an ice crust at all, instantly melting the precipitation and preventing it from freezing.
It turns out that once we spend money on insulating the porch of a house, we will receive several advantages:
Of course, no heating method is free, and during operation you will have to pay additional bills for electricity or another energy source. But the safety and health of loved ones is worth it.
Installation of heated electric floors outdoors
The method of installing the heating cable depends on the characteristics of the heated area. In any case, proper insulation of the floor base is required.
Laying an electrical cable with a tie
The cable floor heating system outdoors should only be located on a fairly flat horizontal surface. Before the installation process, the base is completely cleared of debris.
Installation of cable-type electric heated floors on the street should be carried out according to a previously planned scheme. To lay equipment with a screed you must:
- Lay the cable with a reinforced base on a completely clean surface. During distribution of the device, it is necessary to ensure that the heating elements do not overlap each other.
- Secure the structure. The cable heating system is fixed to the surface using mounting tape. In this case, you should ensure that the equipment is held firmly enough and remains in its original position while pouring the solution.
- Prepare the solution and pour the screed. The screed must be highly resistant to temperature loads and mechanical stress. The electric heating system is completely covered with a concrete layer of 3-5 centimeters. When filling the system, there should be no seals or air voids.
The solution must be homogeneous. In order not to harm the heating cable, the presence of sharp particles and stones in the concrete mixture is excluded. Before pouring, electrical equipment must be tested for resistance compliance.
Heated floors can only be put into operation after thirty days. This time is quite enough for the screed to completely harden.
Installation of a heating mat under paving slabs
Laying paving paths and areas near the house under tiles has its own characteristics. The installation process is carried out in the following sequence:
- The surface is leveled and cleaned. There should be no sharp elements on the working base that could damage the heating structure.
- A reinforcing mesh with an attached electrical cable is distributed over the surface according to the designed pattern. Mounting tape is used to secure the system to the base.
- The installed electrical heating equipment is completely covered with sand. The bulk material must be evenly distributed over the entire surface of the laid cable. The recommended thickness of such a sand cushion is 2-3 centimeters.
Upon completion of the installation of the heated floor, you can lay paving slabs.
Heated floor pie for laying on the ground
To install a heated floor directly on the ground, special preparation of the base is required. The main task in constructing a pie for a heating system is to create maximum protection, which will protect against unnecessary expenditure of electrical energy for heating the ground.
The technology for laying the thermal insulation base is quite simple:
- a layer of sand is laid on a flat surface cleared of debris, stones and vegetation;
- the bulk material is evenly distributed over the entire working area and compacted;
- on top the sand cushion is covered with crushed stone, granite screenings or gravel;
- in order to prevent the accumulation of water under the top finish, the layer of such coarse-grained material should have a thickness of 7-8 centimeters;
- the crushed stone is covered with a metal mesh, which will serve as the basis for the concrete solution;
- After this, a rough coating 5-10 centimeters thick is poured.
Laying out a heated floor on the street
A waterproofing layer is spread on the hardened base for the heated floor, and an insulating material is placed on top. All joints of both coatings are secured with tape.
Sometimes laying a heating system on the ground requires additional finishing screed and insulation. The level of thermal insulation of the cake depends on the climatic characteristics of the area in which the heated floor is installed.
Types of heating
The best option is to install a heating cable. The installation procedure can be carried out both for those who intend to build concrete steps and for those who prefer paving slabs. First you need to select the cable itself that will be mounted. The most common two types are rubber heating cable (which are well suited for pouring into a concrete screed), and cable mat (which is a kind of mat, attached to mounting adhesive).
How to heat
A less common option is heating using “water heating”. The structure itself is a water-heated floor built into the steps. Installation is carried out at the stage of building a house and is carried out by professionals.
Now let's take a closer look at how the cable is installed in both cases - when pouring screed and when laying paving slabs.
Screed installation
- You need to clean the surface on which the cable will be attached. A two-core cable is convenient because you can adjust not only the length, but also the area where the cable is laid. For owners of “patterned” steps or a non-standard porch, this is an ideal option.
- Having secured the cable with mounting tape, the surface is poured. The consistency of the screed should be dense, without various compactions. Otherwise, you risk creating “air pockets”, which in turn will lead to disruption of thermal insulation and deformation of the cable.
After pouring the construction mixture onto the site, you must wait at least 30 days before connecting the heating cable. During this time, the screed hardens, and after that you can use the insulation. Also, pouring the mixture should occur in the warm season, since a sharp temperature change will damage the integrity of the concrete, and you will have to start all over again. Insulation of this kind is suitable for a house under construction, and will not make your life difficult by reducing your movements around the yard.
Installation under paving slabs
In the second case, if you insulate steps that are covered with paving slabs, the procedure will be slightly different.
- After preparing the surface for the heating mesh, the mesh itself is laid, which is secured at the edges with mounting mesh or construction adhesive.
- Afterwards, sprinkle the surface of the site with a thin layer of sand (until you cover the mesh) and lay the tiles. The work must be carried out extremely carefully, since the cable in the heating grid is thinner and more susceptible to deformation.
Both options are designed to provide quality heating on your steps. A big plus is also that by heating the entrance area to your home, you not only protect yourself from accidental falls, but also extend the service life of the staircase material. Installation of the insulating cable is carried out once.
With proper installation and safe operation, you can ensure peace of mind when moving around your yard for a long time.
Heating the paths of a country house: which system to choose
If the heating area is large enough, then it is best to use a water heating system. Its meaning is that pipes are laid under the heated surface into which warm water is released. In general, everything is exactly the same as with heating in the house, however, outside you will have to heat the ground, sidewalk and melt snow. Undoubtedly, such a solution will cost a pretty penny, but if you can afford heated sidewalks, then in the very first winter you will experience a new level of comfort - the paths will be clean and dry in any weather. Even after heavy rain, they will dry quickly, because liquid evaporates from a heated floor almost instantly.
It is believed that a water floor is much more economical than an electric cable floor, but installation of the system is more expensive. Of course, you can hide a thin cable under a screed without any problems, quickly heating, for example, the porch of a house. However, a warm water pavement is beneficial when heating large surfaces.
Reasons for installing heating in the hallway
The hallway is considered the place that determines the first opinion of guests about the house. Therefore, it is worth thinking about materials for finishing the room, because a correctly selected design creates a feeling of harmony. Well, a heated floor in the room will add comfort.
If it is snowing or raining outside, then a warm floor helps eliminate moisture - it is used to dry shoes. Moisture is unacceptable for shoes, and by placing them on a warm surface, they can be dried evenly.
Coming home from the street, it’s nice to take off your shoes and step on the heated floor. It is laid under such popular flooring materials for the corridor as laminate, tile, porcelain stoneware.
Thermal methods of combating ice formation
Currently, heating of porch steps can be carried out:
- heating cable;
- coolant circuit;
- infrared heaters (thermomats) or lamps.
Those. All of these options, previously used for installing heated floors indoors, have found application quite successfully for heating outdoor structures. However, it should be borne in mind that the systems listed above operate under more stringent conditions, and therefore more stringent requirements are imposed on them.
When choosing a specific heating method and designing a system with the required power, the following factors must be taken into account:
- average temperature and precipitation in winter;
- parameters of stairs and steps (width, height);
- type of coating used.
Heating steps using a heating cable
This is the most popular option for combating ice formation. Its wide distribution was ensured by:
- ease of installation;
- availability of materials and components;
- possibility of heating structures of any complexity;
- use under any coating;
- ease of operation.
This heating system includes the following elements:
- heating (main) part - self-regulating (with variable power) or resistive heating cables; when choosing them, one should take into account not only power and electrical safety, but also resistance to mechanical loads, exposure to ultraviolet radiation, precipitation, and low temperatures; the cable can be laid both under the screed and under piece products (ceramic, concrete, marble tiles, natural stone, etc.);
- distribution group – electrical distribution boxes; regulating and protective equipment; fasteners;
- control group - thermostats, temperature and humidity sensors.
At the same time, environmental sensors transmit information to the thermostat, which regulates the power of the cable. The distribution elements are responsible for powering the heating element and transmitting data in the control group.
Figure 1 – Step heating system using a heating cable
Figure 2 – Recommended cable layout options
Heating of the porch and steps in this way can be carried out automatically and continuously throughout the entire snowy period.
Heating of structures using a liquid coolant circuit
This option is structurally similar to the water heated floor system. Installation is more complicated and should be done at the construction stage of the building, because... such a system is usually connected to those heat sources that are provided by the project for heating the premises. However, if the heating area is large, this method turns out to be more effective (in terms of operating costs) than the one discussed above.
The structure of the liquid heating system includes:
- a system of pipelines through which the coolant moves;
- heat source (gas or electric boilers);
- a pump that ensures uniform heat distribution throughout all pipes;
- control and distribution elements - sensors, controllers (devices for automatically turning the system on and off), fasteners.
Heating the feet using infrared devices and lamps
A fairly effective option for heating steps is the use of thermoelectric mats.
The heating element (source of infrared radiation) in them is a carbon film placed on a heat-insulating material with special shielding and reflective layers (the first is designed to increase the safety of the device, the second is to ensure a directed flow of thermal energy).
Thermal mats are manufactured in the form of separate sections, enclosed in a sealed, moisture-proof shell and equipped with separate temperature limiters.
Figure 3 – Infrared film element for heating street structures
To heat street structures, infrared lamps of the IKZ type can also be used, which additionally provide their illumination. As a rule, they are built directly into structures so as to ensure sufficient heating of the horizontal plane: with a small width of the staircase it is possible to install them at both ends of the steps, with large sizes - on their vertical surface.
Clutchless heating section based on TMF cable
Heating cable section for heating pipelines, tanks and other technological equipment
- Linear heat dissipation up to 40* W/m
- Clutchless section design - an economical solution
- Operating temperature up to 180 °C
- Easy to install
- Fluoropolymer insulation
- Tinned copper wire braid
- Fluoropolymer shell
- Installation wire
- Heating cable
- Splice point label
- Wire welding location
- Conductor
- Heating core
Specifications
| Maximum operating temperature | 180 °C |
| Maximum permissible temperature without load | 200 °C |
| Ambient temperature range | -60…+50 °С |
| Minimum installation temperature | -60 °C |
| Available for operating voltage | ~220 and 380 V |
| Protective braid resistance no more than | 18 Ohm/km |
| Linear heat dissipation of a single cable | up to 40* W/m |
| Minimum bending radius during storage and transportation | 150 mm |
| Minimum permissible radius of a single bend during installation | 30 mm |
calculation of street paths Calculation of cable heating for a country house Calculation of heating cable for external coverings Calculation of sidewalk heating Calculation of installation Calculation of heated floors on the porch combating ice You may also be interested in:
SST Group of Companies - world-class electric heating technologies
Smart technologies for a comfortable life