Electrician in the house
Encyclopedia about electricity from A to Z
Masters catalog
Find the best master or company in your city
Automatic lighting control systems
Relays for automatic lighting control have recently become increasingly popular. After all, they can not only significantly reduce lighting costs, but also make your home more comfortable to live in. What can we say about centralized lighting control systems that will allow you not to go to the switches at all.
But often the installation of such systems is quite expensive, and not everyone can afford it. At the same time, if you have minimal knowledge of electrical engineering, you can easily create a centralized control system, which in its functionality will be little inferior to its more progressive counterparts. But its cost will be much lower.
- Devices used to automate lighting control
- Automatic lighting control circuits Connection circuits with one sensor
- Connection diagrams with two sensors
Devices used to automate lighting control
In order to understand the issue of automatic control, let's first look at how a centralized control system differs from the installation of conventional sensors. And what, strictly speaking, sensors can be used for this?
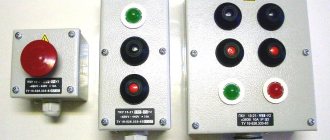
To answer this question, let's take an outdoor lighting control cabinet with a centralized system, and see what is connected to it. You will be surprised, but these are ordinary light, motion, presence sensors, timers and door opening limit switches.
Modern lighting control system and more
The control process itself is carried out only through these sensors. And the centralized system only ensures their coordination, changing operating modes and a convenient user interface for configuration and management.
- That is, we can easily create such a control system with our own hands, which will just not be so convenient to use.
- But how often do we need to change settings? Maybe once or twice a year - and even then, only on individual relays.
- This can be done manually, and not through the WEB interface. But the cost of such a system will be several times lower.
- What do we need for this? First of all, the sensors themselves. Therefore, let's look at them in more detail.
| A motion sensor is a device that is triggered when there is movement in its field of view. This sensor can be tuned to minor movements - for example, the movement of branches from the wind, the movement of animals or the distant movement of people. |
| The light sensor is triggered when the light level at the device installation location decreases to the set limit. You will set the response limit yourself, and it can be either complete darkness or slight darkening from a cloud. A timer is a device that counts the time between turning on and off the light. Timers can be single-task - that is, capable of counting time for only one command, or multi-task, capable of counting time for a large number of tasks at the same time. |
| Limit switches for opening and closing doors. Essentially, these are ordinary buttons that are mounted in the door and fix its position. They are actively used not only for lighting control, but also for integrating lighting control systems with security systems. |
| Presence sensors – these are devices that detect the presence of a person in the field of view of the sensor. They can be made using a variety of technologies, which is why the price of the device can vary quite significantly. For example, some sensors detect the presence of human thermal radiation, and some work on the principle of a motion sensor, recording human movements. |
Main advantages of control systems
Initially, the ability to remotely control lighting was only available in expensive and advanced smart home systems. Now the situation has changed and the function has begun to be implemented in simpler control complexes and blocks.
One of the main advantages of the control system is the ability to control groups of devices or individual light sources from a single client interface
Remote equipment has many useful qualities and advantages.
Among the main advantages are the following important positions:
- Ensuring the security of the premises in the absence of owners. System control is available through any modern gadget with Internet access. Property owners, when going on a business trip or vacation, can program the lights to automatically turn on/off, simulating the presence of residents in the house or apartment.
- Saving money and materials during installation. To install the simplest remote control system, you do not need to buy a cable, hire workers to groove the walls, and spend additional money in the future on replacing wires.
- Independence from voltage surges and emergency power outages. In many advanced control systems, the cabinet, automatic machine and touch switch with the remote control are in contact via radio waves and do not require the presence of an energy resource in the network.
- Financial feasibility. Remote control units allow you to use electricity as efficiently as possible and illuminate only the necessary objects, rooms and territories at any given moment. With this approach, the efficiency of the lighting system increases, and energy consumption decreases without compromising the comfort of property owners.
These parameters make the systems a relevant and popular technical solution for remote control of lighting equipment.
Automatic lighting control circuits
Connecting the above sensors using the “and” or “or” scheme allows you to fully automate the lighting control process:
- The so-called “and” logic is when the lighting is turned on when two sensors are triggered at once.
- For example, when the light level decreases, the light sensor is triggered and the power to the motion sensor drops, when triggered the light turns on. Thus, triggering one of these sensors will not turn on the light.
- The “or” logic is when the light turns on based on the response factor of one of several sensors. For example: the light will turn on either due to a decrease in illumination, or due to the fact that the response time on the timer has arrived.
Connection diagrams with one sensor
To understand this issue in more detail, let's look at various sensor connection schemes. Let's start with the simplest circuits with one sensor.
As an example, let’s take a diagram for connecting a light sensor, which, when the level of natural light decreases, will give an impulse to turn on artificial lighting. The principle of connecting other sensors is similar.
- To do this, we need the light sensor itself. It can be of two types. In the first case, it is a sensor with a switching mechanism inside. Such a device is capable of controlling lighting with currents up to 6, 10 or 16A. Higher currents will cause the relay contact part to burn out.
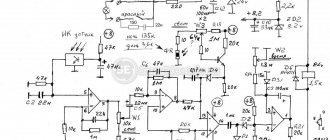
Schematic diagram of the light sensor
- The second type of relay is an automatic lighting control with a remote sensor. The machine and the sensor are connected using a wire. In this case, the sensor only supplies a control pulse to the machine, and the circuit is switched directly by the machine. Such devices are capable of turning on and off lighting with rated currents up to 32A, and sometimes higher.
- In our example, we will consider connecting the first type of light sensor, as it is more common. For it to work, we need to connect the phase and neutral wires to it (see How to ring wires: consider the options).
Connecting a light sensor without a switch
- To do this, we connect the phase wire from the switch of the lighting network, which we plan to automate. Moreover, we connect it to the contact coming from the distribution box or from the group machine. We connect the neutral wire directly in the distribution box - or lighting control cabinet, as in the video.
- Now our sensor is operational, but it still doesn’t switch anything. To do this, we need to connect another wire to the third terminal of the sensor. It will also be phase, and is connected either to the outgoing contact of the switch, or directly to the nearest lamp. The neutral wire for the lamp is taken separately from the distribution board or box.
The photo shows the correct connection of any sensor with a shunt switch
Note! It is not for nothing that our instructions place such emphasis on connecting from the switch. The fact is that, according to PUE standards, any lighting networks with automatic control must be equipped with a manual control system that bypasses automation equipment. Simply put, there must be a switch that will allow you to turn on the light in addition to the sensor.
Connection diagrams with two sensors
Now let's look at the issue of connecting several sensors at once. In this case, we will have two options: the first connection using the “and” logic, and the second using the “or” logic.
- As an example, let's consider a situation where we want the lights to turn on when it is dark enough and when there is a person in a certain area. For this we need a light sensor and a motion sensor. Instead of a motion sensor, there may be a presence sensor.
Serial connection diagram of sensors
- Now let's look at the connection diagram - it is called serial. First of all, as in the version with connecting one sensor, we install a light sensor. We connect only the wire that went to the lamps as an incoming phase wire to the motion sensor. And we connect the outgoing phase wire from the motion sensor to the lamps. In this case, we connect the neutral wire for the motion sensor to the external lighting control cabinet or distribution box. You can make one contact with the neutral wire of the light sensor.
- With this scheme, after the level of natural light decreases, the light sensor will work. It will supply a phase to the motion sensor, and it will start working. Once a person enters the sensor’s coverage area, it will trigger and turn on the lighting.
- Now let's consider the option when we have a long track. We need the light to turn on when a person appears on one or the other side of the path. The coverage area of one motion sensor is not sufficient to cover the entire track. Therefore, we will need two, or even three sensors.
Parallel circuit for connecting motion sensors
- The scheme of such a connection is quite simple. All sensors must be connected in parallel. To do this, we take the neutral wire from one point and connect it to all sensors. We do the same with the phase supply wire. But we connect the phase wires leaving the sensors to each other and connect them to our lamps.
Note! If we have a 380V lighting control box from which we connect sensors, then it is extremely important that they are all powered from the same phase wire. Otherwise, it will cause a short circuit. Therefore, to avoid errors, it is better to make connections at one point.
Control circuit with a large number of sensors and a single control system
With this connection method, when at least one of the sensors is triggered, the light will turn on along the entire track. By combining the above options, the highest degree of automation can be achieved.
But for complex circuits, it becomes quite expensive to install power wires from sensor to sensor. Therefore, in such cases, all power switching is performed in the power cabinet. But only power is supplied to the sensors, and control signals come from them.
How to choose Xiaomi/Aqara smart switches
And there are several options here. In the range of smart switches from the Chinese brand, three fundamentally different devices should be distinguished.
Wireless switch
On the left is a thin wireless switch, on the right is a wired one with an in-wall unit.
This switch is the cheapest and is distinguished by the absence of a unit built into the wall. This is a flat button with a body and a smooth cover on the back. It is glued with double-sided tape anywhere in the apartment, even on the ceiling.
Such a switch is convenient because it can be located in a convenient place without altering the wiring. Of course, it does not open the contacts by itself.
The wireless switch is assigned through the application to turn on any device from a suitable ecosystem or to duplicate a regular smart switch.
When is such a switch needed?
For example, if you have a Xiaomi/Aqara/Yeelight smart lamp, then such a switch can become a kind of control panel for it. The wireless switch will turn the light on and off, but the voltage will not be removed from the smart lamp, which means it can continue to be controlled through the included remote controls, application, voice assistant, etc.
Another example is the installation of a so-called pass-through switch. With conventional models, you will need to lay wiring between the socket boxes across the entire room, and if there are 3-4 pass-through switches, the wiring for them turns into a real web.
With smart models, it is enough to install one physical one, which is installed in place of the old one, which disconnects the wiring. The remaining switches will be wireless and can be installed in any convenient location.
Wired switch without neutral line
Two-button switch without a zero line
A switch typical in connection diagram, which is used for the physical open phase (or zero line, which is often found in Soviet-built houses) going to the lighting device.
In this case, the switch is an independent device in the application; the wireless one only duplicates the function of turning on and off a wired switch or lamp.
The peculiarity of this switch is that it requires power to operate and even when turned off, it passes a small current through the lighting fixture.
In most cases, this is not critical, but you should remember that to replace the lamp you will have to turn off the power to the switch or the entire room.
When is such a switch needed?
There will be no problems with modern lamps and most diode lamps. There will be difficulties with “housekeepers” and inexpensive diode light bulbs.
The current passed through is periodically enough to briefly flash such light bulbs. If you use a similar connection scheme, for example, in the bedroom, then small flashes of light can seriously interfere with sleep.
It is better to take one switch to test and see how all the lamps in the house behave with it. In the future, either replace the light bulbs or use the next model of switch.
Wired switch with zero line
Wired one-button switch with zero line
The most advanced switch model, which puts forward certain requirements for the wiring used.
In the box for installing such a switch, it is necessary to have both an openable phase, which it will control, and a zero line.
This can be either a zero coming from the lighting device or any other zero of their general wiring system.
Such a switch completely cuts off the voltage from the lighting device and at the same time has its own power supply for remote control.
When is such a switch needed?
The insides of the switches are the same, but the wireless model has a battery
You won't find a zero line in most typical homes. Even in new buildings, no one cares about laying two cables to the switch instead of one.
Here you need to either completely change the wiring and connect both phase and neutral to the switch, or supply zero from a nearby outlet.
Don’t be greedy and when replacing wiring, lay a three-core cable; additional backup contacts will come in handy sooner or later
Often the socket is located next to the switch and drawing a zero line from it is quite simple.
Another zero can be obtained directly from the lamp if it and the switch are connected by a pair of contacts to control different light bulbs.
The advantage of this model is the presence of a meter for the consumed electricity that passes through this switch.
All types of switches described have versions with one or two keys. For convenience, I found a seller who has all the described gadgets; choosing and specifying the one you need is not difficult.
Buy Aqara switches: from 916 rub.
A wired switch can be turned into a wireless one. So one or both buttons (for a two-button) can be made logical through the application. Pressing the button will not open the relay in the switch, but will run the configured scenario.
At the same time, the device connected via the switch can be controlled using a second button or another gadget from the ecosystem.