Have you been thinking for a long time about how to place a microwave in the kitchen so that it is accessible and does not disturb anyone? This question disappears by itself if it can be built into a headset column. However, if your kitchen is already 10 years old and there are no plans for renovation yet, then we usually place the microwave oven where it can fit.
Microwave cabinet for the kitchen - models and selection rules
A microwave oven is an integral attribute of a modern kitchen interior. Housewives use a household appliance for defrosting food and heating ready meals almost every day, so the microwave should be located in a place convenient for use and always at hand. The best solution for accommodating your constant assistant would be a table for a microwave in the kitchen.
Main rules for placement
Because you often have to use a microwave oven, you need to pay special attention to where it is placed.
General requirements for placement:
- the best height from the floor is 60-150 cm;
- must not be placed near a stove, oven, radiator or other heating devices;
- position it so that you can reach it with your hand without effort;
- do not place the microwave (microwave radiation, ultra-high frequency radiation - electromagnetic radiation, including the decimeter, centimeter and millimeter range of radio waves)
oven next to the sink; - make sure that nothing prevents the door from opening and closing;
- Ventilation openings must not be blocked. They are usually located on the top panel. If particles of food or water get in there, the device may burn out;
- Do not store interior items or kitchen utensils on the appliance.
Ignoring advice on ergonomic and non-hazardous placement is not recommended. Due to improper use of the microwave (microwave radiation, ultra-high frequency radiation - electromagnetic radiation, including the decimeter, centimeter and millimeter range of radio waves),
the oven will quickly break down, and if it is awkwardly positioned, you risk spilling hot food on yourself and getting burned.
Cabinets in the kitchen interior - what functions do they perform?
Kitchen cabinets are interior elements that will allow you to rationally organize the space of the room. The piece of furniture is used to place food, household utensils, household appliances and built-in kitchen appliances.
A traditional kitchen cabinet consists of an upper and lower horizon, connected by sides, a back wall, and shelves. A kitchen cabinet for a microwave oven is a box with a special niche designed for mounting household appliances.
Why is location so important?
It is necessary to decide how to install a microwave in accordance with safety rules, ease of use of this equipment and, if possible, taking into account the overall style of the kitchen. In other words, the location for the microwave should be safe for equipment and people, convenient for the user and fit into the design of the room. Installing this equipment in an inappropriate location usually leads to fairly rapid failure. In addition, the equipment itself in this case may become a source of danger for the user.
The highest heating of the microwave oven occurs when using the grill function. Therefore, if such equipment is installed in an insufficiently ventilated place or close to heat sources, it is better not to use this function.
Options for placing a microwave oven in a cabinet in the kitchen
Properly selected furniture for a microwave oven will provide comfortable conditions for daily use of the household appliance. Compliance with technical requirements and recommendations of specialists regarding the location of the microwave will ensure trouble-free operation of the device for many years.
The place for installing the microwave must allow the device door to open freely. Furniture for a microwave oven must contain technical openings for laying the electrical cable.
The method of placing a microwave oven in the kitchen largely depends on the features of the “device”. Microwave ovens are divided into standard and built-in models.
A standard microwave oven is a free-standing household appliance. A traditional microwave oven can be installed on the top horizontal surface of the bottom row or placed in a kitchen module with a niche for a microwave. The body of the household appliance should not come into contact with other pieces of furniture or the walls of the furniture module. The gap should be at least 10 cm on the sides and at least 15 cm on the back wall. This arrangement will ensure free circulation of heated air and ensure trouble-free operation of the household appliance.
As a place for a microwave, you can install an additional shelf in the top row of the kitchen unit.
To install built-in microwave ovens, column cabinets or lower row cabinets are used. The main advantages of furniture for built-in kitchen appliances are space saving and aesthetic qualities.
The option of placing the microwave in a cabinet-column allows you to place the device at an optimally comfortable height for use. However, for small rooms it is better to choose a floor-mounted structure for installing a built-in household appliance, since the column will look too bulky in a small kitchen.
The most popular placement options for built-in models:
- above the oven;
- under the tabletop.
Power and features
Conventionally, microwaves can be divided into two types - for heating food and for cooking. Low-power microwave ovens usually have rather limited functionality, while more advanced models may already be equipped with convection, grill and other useful options.
Models up to 800 W are mainly suitable only for heating food. In principle, you can cook in them, but the process will be slow, and not all recipes will be suitable. At the same time, such devices will also not warm up quickly - at least several minutes.
800–1000 W is the most standard power of devices. Allows you to cook any dish and quickly heats up food. Most often, such microwave ovens have several power modes – from low to high.
1000–1500 W – high-power devices. They handle cooking with ease, heat up food with lightning speed, and also have several operating modes.
The functionality of the microwave also needs to be selected based on your needs. It is worth saying that modern devices cope perfectly with any culinary tasks no worse than an oven. If 10–15 years ago food in microwaves did not always turn out well, now there are no such problems. Baked goods can be as tender and fluffy as in the oven, and various stews, porridges and other dishes can be juicy and cooked evenly.
Convection is the main assistant for cooks. Convection is the uniform ventilation of hot air inside the chamber. Due to the movement of hot air, any dish is cooked evenly on all sides. This is especially true if you cook in large quantities or love baking - in the convection mode, any dough rises better and better.
Grill – an additional heating element on the upper wall of the chamber. Allows you to achieve a crispy crust for any dish. The presence of a grill is worth paying attention to if you like hot sandwiches, fried meat and chicken, and grilled vegetables.
Defrosting - usually presented in several automatic modes depending on the type of product. Just select the desired option, and the microwave itself will select the power and defrosting time.
Cooking programs – in most models you can find ready-made modes for certain dishes. In some cases you need to choose the type and weight of the product, in others - a specific recipe. It is convenient because the device itself operates at optimal power and cooking time. All you have to do is press a couple of buttons and you can forget about cooking.
What requirements must a cabinet for a microwave oven meet?
The microwave cabinet must have a durable structure that can support the weight of the household appliance. The cabinet under the microwave oven must provide ventilation to remove hot air. In the designs of kitchen modules for built-in appliances, the air duct can be represented by a grille or technical openings. In some models, the issue of free air circulation is resolved due to the complete absence of the rear wall.
Where should you not place a microwave?
When placing a microwave in the kitchen, you should follow the “half-meter rule”. That is, you cannot install equipment at a distance of less than 50 cm from the gas stove and sink. A bad neighbor for a microwave oven is a TV. The warm-up equipment will remain intact, but interference may occur on the screen.
It is necessary to ensure a safe distance of the device from the stove, sink and other electrical appliances, and the wall at the attachment points must be flat and strong.
One of the rules is to avoid installing the device too close to the floor surface. This will make using the technology inconvenient. The optimal distance varies from 0.6 to 1.5 m.
But it is not recommended to place the microwave device very high. It’s better to abandon the idea of posting it:
- on the closet;
- on the refrigerator;
- under the ceiling;
- shelves installed above 1.5 m from the floor level.
This is not only inconvenient, but can also lead to household injuries. A high setting often leads to burns.
It is recommended to choose a height that will be comfortable and safe for each family member. It’s good if there is a countertop nearby on which you can immediately place heated food.
In order to integrate equipment into an existing set, additional costs will be required for the purchase of materials and the work of a specialist.
It is also recommended not to install the microwave next to the oven or heating appliances. It is not advisable to be near a refrigerator. It is prohibited to install other (even small) household appliances on microwave ovens, including coffee makers, toasters, electric kettles, and blenders.
You need to choose an installation method that will allow you to use your kitchen space as efficiently as possible.
As you can see, there are different options for installing equipment. Choosing the optimal method for your conditions is not difficult. Photos that present many real ideas will help you place a microwave in a practical and convenient way in your kitchen interior.
Dimensions of seats and methods of installation
Typical dimensions of modern built-in microwave ovens are the following parameters:
- width – from 45 to 60 cm;
- height – 30-45 cm;
- depth – minimum 30 cm, maximum 59.5 cm.
As a rule, the microwave is fixed inside a built-in cabinet using guides; some modules are equipped with special latches. The required size of the installation niche for the microwave is determined by increasing the overall parameters of the device by 2-3 cm.
Advice from professionals
As you can see from the instructions, fixing the bracket to the wall with your own hands is not so difficult
To ensure a high-quality result, you should pay attention to the advice of professionals:
- Before starting work, be sure to check the strength of the wall;
- use only a high-quality tape measure or a centimeter with clear divisions;
- check the building level more often;
- use only durable materials of certified quality - this applies to both the suspension itself and the fastening elements;
- It’s better to check the mark several times and screw the bracket one by one rather than re-drill the holes several times;
- Be sure to follow safety precautions when choosing a place to place a hanging microwave.
Manufacturing materials and coatings
To choose a high-quality furniture module for a built-in microwave oven, you should pay attention to the materials from which the structural elements are made. Hull materials and their coatings must be resistant to operation under conditions of regular temperature changes.
In the production of cabinet frames for built-in appliances, the following is used:
Safety and convenience of accommodation
In order to combine the safety of the equipment and the convenience of its placement, you should adhere to certain criteria when choosing the location of the microwave oven. Let's list them:
- equipment that is excessively heated from external heat sources when turned on and continues to operate can quickly fail (external heating up to 40˚C is considered unsafe), so it is advisable to keep it away from heat sources and direct sunlight;
- this equipment is negatively affected by vibration, so it is advisable not to place it on other equipment that vibrates during operation;
- steam and high humidity also negatively affect the performance of equipment;
- it is necessary to ensure normal ventilation of operating equipment, for which it must be placed at a certain distance from the wall and other equipment (at least 10-15 cm);
- when choosing a suitable location, you need to take into account how the door of the microwave oven swings open, otherwise nearby equipment or furniture may interfere with the normal opening of the door;
- It is optimal to have sockets near the equipment; the use of extension cords reduces the reliability of the power supply to the equipment.
Equipment
In addition to a niche for mounting built-in equipment, a cabinet for a microwave oven can contain additional equipment in the form of one or two drawers. As a rule, pull-out structures are located at the bottom of the kitchen cabinet.
Additional equipment allows you to use the kitchen module not only to accommodate built-in household appliances, but also as a full-fledged storage system.
In the drawers of the microwave cabinet you can store kitchen utensils of limited height, for example:
- frying pans;
- dishes for the microwave;
- textiles, etc.
The retractable storage system is equipped with a roller or telescopic opening mechanism. In the first version, the retractable module moves along guides using rollers. Telescopic systems use ball guides. The telescopic extension system is more reliable, but it is more expensive than its roller counterparts.
In some models of floor cabinets for microwaves, the lower space of the module is occupied by a shelf hidden behind a hinged or folding facade.
Built-in appliances in modern kitchens are no longer uncommon. Household appliances mounted in cabinets save space in the work area. A wide selection of kitchen modules for built-in appliances will allow you to choose furniture that is ideally suited to the parameters of any microwave oven.
Source: links-stroy.ru
How I pumped up my microwave
Mechanical keyboards are a real trend these days! People love tactile sensations, and some will go to great lengths to customize their taps to suit their tastes. The question arises: if we love to press keys so much, why are keyboards only used in computers? If you wish, you can list quite a few devices used every day that could use a keyboard! On May 20, a course on the profession of a developer begins in C++ - a powerful and flexible language close to hardware, and especially for its launch, we are sharing with you material, the author of which tried to provide a homemade keyboard... microwave!
Yes, yes, you heard right! Here's the story of how I managed to create the world's most advanced microwave by connecting it to a hot-swappable mechanical RGB OLED keyboard! You can watch the high definition video with sound below:
Background
A year ago I bought a used Proline Micro Chef ST44 microwave from a sale for just £5. I think it was released in the early 2000s. It doesn't stand out from other microwave ovens in any way. But it didn’t cost me much, and most importantly, it worked, and I didn’t need anything else.
Problem
Almost a year has passed. One day I started pressing the regular buttons to heat up food, but the buttons refused to respond.
At first I couldn't figure out why, but after doing a series of experiments, I realized that, in all likelihood, the membrane keyboard was broken. At first, several buttons still worked somewhat, but soon they stopped responding altogether.
I could give up on everything and just take the device to a landfill, because in any case it justified its cost. But this would be unreasonable, since only the cheap plastic keyboard failed, and the device itself worked fine. Plus I could save a couple of pounds - after all, repairing is always cheaper than buying new. I took the device apart and saw if I could do anything with it.
We disassemble the device
We remove the case and see the main printed circuit board:
- The microcontroller is in the middle on top.
- Buzzer in the upper right corner.
- The blue ribbon connector for the keyboard is in the middle left.
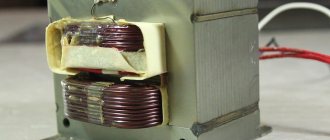
- Transformer and control relay at the bottom.
- Through holes in the board... I don’t know what they are for, but since the board is working, let’s not pay attention to them!
This is what the board looks like from the front side:
The board is well labeled, and, by the way, it is quite interesting that it has a vacuum fluorescent display (VFD), which went out of fashion around the time the microwave was made.
I also noticed that the circuit board, and indeed the entire inside of the microwave, were made by Daewoo, a Korean corporation that makes everything, including cars. She also made my device.
But let's not get distracted. At first I thought that I could just clean the ribbon cable contacts and the problem would be solved. But I did not notice that the contacts in the device are carbon (graphite?), and not made of ordinary metal, and during the cleaning process some of them were erased to zero:
So if the contact worked half an hour ago, now it was definitely no good. Bravo, great start!
Welcome to the Matrix (scanning)
But let’s face it, this isn’t the end of the world, is it? The keyboard almost certainly used a matrix scanning method to communicate with the controller.
A detailed description of this method is provided on the Sparkfun platform. In short, the matrix scan method allows a large number of input data to be read from a limited number of controller pins.
For example, our computer keyboard contains more than 100 keys. If we want to directly connect each key to an input pin, such a controller chip must have more than 100 pins! Needless to say, it is bulky, expensive to make, and just plain inconvenient. But with a little thought, you can change the firmware so that the keys are coded in a grid of columns and rows. Such a grid is called a matrix:
Thus, by scanning one row and one column at a time , you can determine which key (or keys) were pressed. Naturally, there are many other ways to encode keys; you can read about them here.
In any case, in the above example, instead of 4 * 4 = 16 contacts, we only need 4 + 4 = 8 contacts - already double savings! And with our computer keyboard we only need , and not 100! Thus, we see that the matrix scanning method can reduce the number of pins and reduce the complexity of the design of input devices.
Creating a matrix
Let's return, however, to our microwave keyboard. We see that the ribbon cable consists of two parts, each of which contains 5 contacts:
That is, if my calculations are correct, the matrix will have a size of 5x5 = 25 buttons. Scroll up the page a little and you will see that there are exactly 24 buttons on the microwave keyboard, so my assumption is confirmed and I am on the right track!
Now we know that we need 5 columns and 5 rows. Let's now find out which combination corresponds to which key. To do this, I unsoldered the ribbon cable connector and replaced it with a regular pin base:
By the way, I note that the manufacturer of the TMP47C412AN microcontroller is Toshiba. This is a four-bit processor with 4 kbytes of ROM and 128 bytes of RAM, which can directly control the operation of vacuum fluorescent lamps. In general, we are dealing with a very specialized chip for household appliances. Its performance is extremely low compared to Arduinos and STM32. But, nevertheless, he copes with his task! I connected a series of jumper wires:
And labeled the rows and columns with letters 1-5 and AE:
I then set the board in place, turned on the power, and rang each pair of wires to see which button they responded to.
It took some time, and in the end I figured out the location of the buttons I needed on the matrix:
| A | B | C | D | E |
| 1 | NP_4 | NP_1 | ||
| 2 | NP_5 | NP_2 | NP_7 | |
| 3 | NP_6 | NP_3 | POWER | NP_8 |
| 4 | STOP | TIME | NP_9 | |
| 5 | START | NP_10 |
What did I get in the end? 10 keyboard buttons and 4 control buttons. There are many other buttons, but I didn't bother with them since I'm not going to use them anyway. I quickly sketched out a simple diagram:
With its help, I connected several buttons to the perforated board with wires - still sloppy, just to check:
It's working! At least now I could continue heating my food! And it didn't cost me a penny. But, as you can see, the final product was not very presentable: everything was a mess, 10 wires hanging from the case... I was sure that it could be done better.
Let's pump up the microwave!
Around the same time, I was working on the duckyPad, a mechanical 15-key macropad with OLED display, hot-swappable, and RGB, as well as a complex automation scheme using duckyScript:
If interested, check out my project page!
I called it "Do-It-All Macropad". The name is compelling, so I decided to try it in conjunction with my microwave! If I could do this, my humble 20-year-old microwave would turn into the only microwave oven in the entire world with mechanical switches and RGB lighting! That's what I call... Korean traditions! However, everything turned out to be not as simple as it seemed at first. Several problems arose:
- I needed to use the existing duckyPad unchanged, that is, without modifications.
- I wanted everything to be done cleanly and neatly, so I set myself the goal: the fewer wires, the better.
- The macropad must be powered from the microwave itself.
PMM board
Now there are 10 wires coming out of the case into my homemade keyboard, and this whole homemade product looks very messy. Ideally, with duckyPad you can get by with just three wires: Power, Ground and Data. There won't be many wires, so I can fit them all inside one cable, which will be much cleaner and neater. But what about the fact that in any case 10 wires from the matrix keyboard must enter the microwave controller? So I'll need some sort of adapter. We will call such an adapter a PMM board.
duckyPad will interact with the PMM board, and that, in turn, will interact with the microwave controller. You'll end up with something like this:
Not a bad start! Let's go even further and remember that so far we have used real physical switches in the matrix keyboard. But we can “trick” the microwave! With a PMM board, you can control the matrix keyboard electronically so that the microwave “thinks” that physical keys are being pressed! How to do this?
Blast from the past
I began to look through my old works and was surprised to discover that three years ago I was occupied with exactly the same problem! Back then I was trying to automate the data entry process for Nintendo gamepads, and they also used matrix scanning to encode buttons. And what decision did I come to then? I've come to analog switches! They are similar to regular mechanical switches, but are controlled by electronic signals rather than by finger pressure. I took the ADG714 chip from the analog devices section. There are 8 switches on one chip, they are controlled using a simple SPI protocol:
I quickly wired up the PMM board:
The board turned out to be relatively simple. I installed an STM32F042F6P6 microcontroller and laid out all its pins on a pin base in case they were needed. There are 14 control buttons, so I needed two ADG714 switches. Using SPI, they are easily connected in a daisy chain.
The diagram shows that the analog switches are connected in exactly the same way as my hand-soldered “snot” keyboard. Only now the buttons are pressed not by fingers, but by commands from the microcontroller. I made a printed circuit board and soldered all the components to it:
I then did some preliminary testing with a continuous buzzer and the circuit seemed to work fine. But the final verdict could be made only after installing it on a real device.
Let's talk sequentially
The PMM board can now control the button matrix. How will duckyPad interact with it? Since only one wire is used to transmit data, I decided that a simple one-way serial communication would be more than enough.
Each time you press a key, duckyPad will send a simple serial message at 115200 bps. The PMM board will receive this message and, if the message format is correct, will momentarily close the corresponding analog switch, simulating pressing a button on a microwave oven.
I added the top-secret UARTPRINT command to the duckyScript parser and created a profile for my microwave keyboard. The keys on duckyPad are located like this:
Why are you so negative?
We assemble the entire structure! And then the last question arises: how to supply power to it? I thought that this issue should be resolved easily. There is already a microcontroller on the microwave's circuit board, so you just need to plug it into the power socket and you're done! Yes, that's all true, of course. But not really. A detailed study of the printed circuit board revealed that it all operates at negative voltage.
We see that it receives -26 V from the transformer, steps it down to -12 V and then to -5 V. The voltage regulator is S7905PIC: a fixed negative voltage regulator.
It's not entirely clear to me why this circuit is designed this way. Perhaps because it somehow interacts with the AC converter. In any case, the problem that has arisen is not so fatal, you just need to look at the problem from a different angle. I connected two power wires from the printed circuit board to the power connector of the PMM board and through it to the duckyPad:
:To avoid confusion, I labeled them 0V and -5V.
Typically we connect 0V to GND and positive voltage to VCC. But in our case, 0V actually has a higher potential. So all I need to do is connect -5V to GND and 0V to VCC. The potential difference will still be 5V, so everything should work.
Some eagle-eyed readers may have noticed that I covered the buzzer with a sticker. He roars so much!
So my DuckyPad came in handy!
I put the PCB back on, connected everything I needed, and did a quick test - everything worked great!
There are three wires running from the duckyPad development base to the PMM board; There are 10 wires going to the control board where the blue ribbon cable used to go. I attached the duckyPad to the microwave, cut the end of a cheap USB cable, took four wires from there and ran everything through the hole in the bottom.
Ready! The first and (possibly) only microwave oven in the entire Universe with mechanical switches, OLED and RGB backlighting!
Have you ever experienced the bliss of the crispy-clicky tactile and audible perfection of Gateron Greens switches when you're reheating frozen processed foods at 2am because you're too lazy to cook? I will answer you - I tried it!
Watch the high definition video with sound below:
I want that!
If you are interested in duckyPad, you can read about it here! But, if you want to repeat my experience one-on-one, it, unfortunately, will be much more difficult.
Different microwave ovens have different matrix keyboard layouts, so you will have to understand them and design and build the PMM board yourself. I warn you - you will have to try, but at least all the background information can be found in this article! If you want to follow in my footsteps, write to me if you have any questions!
I would also like to warn you: when disassembling the microwave, there is a danger of high voltage electric shock. Also, don't forget about microwave radiation, so be careful!
Reasonable caution is also needed when handling C++, a language where getting a little confused or losing sight of a small detail is very easy to shoot yourself in the foot. In our course, experienced mentors and experts in their field will teach you how to safely program in C++, work with databases in this language, talk about C++11, share knowledge about the new standard - C++20, and about desktop development and not only. Come - it will be difficult, but interesting!
Find out how to improve in other specialties or master them from scratch:
- Profession Data Scientist
- Profession Data Analyst
- Data Engineering Course
Other professions and courses
PROFESSIONS
- Profession Fullstack Python developer
- Profession Java developer
- Profession QA engineer in JAVA
- Profession Frontend developer
- Profession Ethical hacker
- Profession C++ developer
- Profession Game developer on Unity
- Profession Web developer
- Profession iOS developer from scratch
- Profession Android developer from scratch
COURSES
- Machine Learning Course
- Course "Machine Learning and Deep Learning"
- Course "Mathematics for Data Science"
- Course "Mathematics and Machine Learning for Data Science"
- Course "Python for Web Development"
- Course "Algorithms and Data Structures"
- Data Analytics Course
- DevOps course
Installation methods
The first step is to decide where and how you want to install the built-in microwave yourself. The fact is that today there are several original ideas for installation, namely:
- Installing a built-in microwave oven in a kitchen unit. A traditional option that will not take much time, because... All modern furniture manufacturers create special kitchen sections for various types of household appliances. The microwave oven is no exception in this case, and to install and connect it yourself, you will need to find a cabinet of suitable dimensions in a furniture store.
- Mounting in a niche. A more labor-intensive option for installing a microwave oven, which should be planned during renovations in a house or apartment. You need to choose a microwave in advance, and based on this, make a plasterboard niche according to the dimensions of the built-in housing. In this case, it is recommended to simultaneously consider additional space in the niche, for example, to connect an oven or dryer.
- Installation in a box. The most modern idea, which you can see in the photo below. This option is incredibly convenient to use and also allows you to save some free space. Leading companies producing microwave ovens have in their line of models such options, the housings of which are mounted in a kitchen drawer. In this case, installing a built-in microwave oven and connecting it to electricity is not difficult; the only obstacle, as customer reviews indicate, is the increased cost of unusual models.
Where to install a microwave ↑
There are special models of stoves that can be built into kitchen furniture. The principle of their operation is no different from free-standing devices, but the cost is much higher due to the design features: a body with improved thermal insulation and a decorated front part. This model can be built into any niche or cabinet that is suitable in size.
Locker in the work area ↑
In order for the appliance to fit perfectly into the niche, there are two options: order a compartment at the same time as the kitchen according to the dimensions of an existing microwave, or select the appliance to fit the dimensions of the existing niche (usually, manufacturers leave standard cabinets without a back wall for installation of equipment). For non-standard models, you can make a box using order it or do it yourself and paint it in the color of the facades.
Important! When measuring the depth of the cabinet, do not forget to take into account not only the width of the stove, but also make allowance for the plug connector, otherwise the device may protrude slightly beyond the kitchen facades and the integration effect will not work.
The built-in oven harmonizes perfectly with the kitchen facades
To install a built-in stove, it is necessary to provide an individual socket in the niche so as not to use extension cords that spoil the appearance of the wall. The microwave shelf is equipped with fastening elements (most often these are guides, but there may also be special clamps provided specifically for this model). Then the cord is connected to the outlet, the device is carefully pushed into the niche, covered with a decorative frame and aligned in line with the facades.
Main process
So, in order to install a built-in microwave oven in the kitchen yourself, you need to complete the following steps:
- Unpack your purchase and check it for defects/damage.
- Make sure that there is a connection point near the installation site that the electrical cord from the equipment can reach. If there is no suitable point nearby, you need to connect the outlet yourself to protect yourself from using unreliable extension cords. The installation height of the socket should be not only convenient, but also safe (it cannot be mounted next to a sink, hob, etc.).
- Install all fasteners, if included (for example, guides, as shown in the diagram).
- Make a hole in the back wall of the furniture to connect the built-in microwave oven to an outlet.
- Carefully place the cabinet inside the niche/cabinet/drawer.
- Unplug the cord and connect it to the electrical outlet.
- Install the decorative frame that comes with the equipment.
Here are the instructions for installing and connecting a built-in microwave oven with your own hands. As you can see, you can handle this kind of work yourself, and installation can actually be done in 5 minutes (maximum 10) if everything is prepared. Finally, we recommend watching the video, which provides visual instructions on how to install the microwave housing in a niche!
We hope that now you know how to properly install and connect a built-in microwave oven without calling a technician. As for the latter, the price of a specialist’s work will cost at least 1,500 rubles, which you can easily save!
Also read:
Source: samelectrik.ru
The process of installing a microwave oven
If the location for the device is chosen taking into account the above recommendations, you can safely proceed to the installation process itself.
Let's look at the most common installation instructions. It involves performing the following steps:
- Carefully inspect the equipment for damage and various defects.
- In the operating instructions, find the installation section and read it.
- If a mount is included, install it.
- Make a hole in the cabinet wall to provide easy access to the electrical outlet when using the device.
- Place the device in the cabinet, remove the cord, and insert the power plug into the outlet.
- Install the frame if it is included with the built-in oven. How to secure it can be found in the instruction manual. In the case of a regular microwave, there are no decorative frames. Remember its need for proper heat dissipation.
As you can see, if you look at all the points, installing the equipment yourself is quite simple. But if you doubt your abilities, consult a specialist.
However, installation of a microwave oven should be carried out taking into account all recommendations and rules. Then the electrical appliance will work correctly and will serve you for many years.
Source: cosmo-frost.ru
Option 1. On the countertop
A simple and logical option is to place the microwave on the work surface. However, not every kitchen can afford this: sometimes the countertop is barely enough even for cooking. You also need to remember about the safe distance to the stove and sink and the presence of a free outlet in the immediate vicinity.
Where to make a socket for a microwave
It is recommended to plan the location of all kitchen outlets, including those for the microwave oven, only after the kitchen design has been approved and it becomes clear where the kitchen equipment will be located. After this, it is very easy to determine the installation locations of the sockets - they are placed next to the equipment. If it is not possible to adhere to this principle, then it may turn out that the kitchen will be literally entangled in extension cords. This will not have the best effect on both its appearance and the reliability of the power supply to household appliances.
Option 3. On the windowsill
The kitchen window sill often remains empty - you don’t really use it for cooking, or for storage. If its width allows, you can place the microwave there: it’s a comfortable height, and it doesn’t block the light too much. The disadvantages of this placement are quite significant, especially if you are used to using a microwave oven not only for quickly heating up dinner, but also for preparing full meals. Firstly, there is a fairly large thermal load on the glass; in winter this causes a contrast with the temperature outside the window, and the glass may not withstand it and crack. Secondly, if you are one of those who are used to growing flowers on the windowsill, microwave radiation is harmful for them. And thirdly, you can’t make an outlet on a window, and it’s difficult to install it through the window sill - be prepared for a cord running from the side and, possibly, an extension cord.
Where to install a free-standing device ↑
A standard microwave oven differs from built-in models in that it is installed at a certain distance from other appliances and furniture. This is a necessary condition for unhindered circulation of warm air and efficient operation of equipment. The size of the gap depends on the size and power of the stove and is determined by the manufacturer (but not less than 10 cm on the sides and 15 for the back).
In a large kitchen, a microwave stand can be:
Worktop ↑
The most logical option for a convenient location of a device that heats food. If the size of the kitchen allows you to allocate 60-80 cm of surface without loss, then you won’t find a better place. Everything is taken into account here - the proximity of the working surface, the optimal height, and the reliability of the support. Just remember to maintain a “safety zone” of 50 cm from the sink and stove and make sure there is an individual socket for the appliance. A microwave oven on a countertop is an option without installation difficulties:
Kitchen window sill ↑
The window space often remains unused in the kitchen interior, and its height is almost ideal for comfortable use of the microwave by all family members. True, there is one important nuance due to which manufacturers do not recommend installing devices here - temperature changes due to the proximity of window glass.
In summer, equipment can overheat under the influence of sunlight, and in winter, it can consume additional energy due to hypothermia (and the glass itself can crack if it gets too hot). Therefore, this option is suitable only for kitchens in which the window opening opens onto a loggia or insulated balcony, or for wide window sills, where a gap of at least 20 cm will be maintained from the glass packages to the back of the microwave. A microwave oven on a windowsill is convenient, but unsafe option:
On a note! Of course, you can close the window behind the back wall of the appliance with a piece of foil or other heat-insulating material, but such protection is unlikely to have a beneficial effect on the design of the kitchen.
Bar counter or dining table ↑
Placing a microwave on the dining table may be convenient for using the device, but it is very questionable from an aesthetic point of view. Despite modern stylish designs, stoves still remain rather bulky appliances that are unlikely to decorate the dining table. Therefore, such a location can only be temporary.
But you can experiment with the bar counter, when its dimensions allow, of course. If you install the device in such a way as to hide the unsightly rear part with wires and a vent grille, this arrangement can become very functional, especially for those who like to eat quickly.
Advice! You can enclose the device in a box decorated to match the color of the countertop or furniture facades to make the stove look more harmonious.
Option 4. Built into a closet
This option is the most convenient and beautiful. However, the necessary initial data does not always coincide with reality: you purchase a stove before or simultaneously with a new set. In some kitchens, you can provide a standard cabinet with ventilation holes and choose a regular model for it, but the most harmonious will be a built-in microwave model that fits perfectly in size.
It is most convenient to install the microwave oven in a high cabinet, for example above the oven. The space under the tabletop is also good, although you have to bend over a little. But a microwave located in the upper cabinet will not be so convenient, although this depends on your height and the distance between the cabinets and the countertop.
Choosing hanging brackets
Before installing a microwave oven, you should first decide on the fasteners. A standard microwave hanger consists of two metal corners with a powder coating. On one side there are holes for mounting on the wall, the second serves as a stand for the microwave. The length of the fastener under the microwave can be standard or adjustable by extending it forward.
A bracket with two slots may not support the weight of a heavy microwave oven.
Each bracket is equipped with anti-slip pads or special clamps to prevent falls. The main colors of brackets produced are the most common white, black, gray, and gold. There are no significant differences between designs from different manufacturers; they mainly differ in design and color.
When purchasing a bracket, pay attention to the rubberized gaskets; they will securely secure the microwave
Before purchasing, you need to measure the depth of the oven and select fasteners of the appropriate size and color. There is no point in worrying about strength - each bracket can withstand the weight of a microwave oven with a margin of 2-3 times.
Option 5. Purchase integrated equipment
Purchasing integrated appliances will help you save as much space in your kitchen as possible: an oven plus a microwave oven in one housing. An interesting option, a classic in North America, is a microwave with a built-in hood for placement above the stove. In this case, you won’t have to look for a place for a microwave at all. The big minus is that the price will be higher than when purchasing two units of equipment separately. And the range is sharply reduced.
Of course, these are not all possible options for placing a microwave. If you have a wall-mounted dining table or bar counter, then the microwave can be placed on the tabletop itself (which is less convenient) or on a shelf above it. However, nothing prevents you from hanging the microwave on any kitchen wall where it is convenient for you. A low sideboard, shelving unit or cabinet is also a good place if they are already nestled in your kitchen. Some even place the microwave on the refrigerator (if it is low enough) or on other free-standing appliances.
Microwave in the island
So, if you decide to have it on an island, you might want to think twice about that placement. You must understand that the island is usually low, so you will have to constantly bend your back. If you love sports and especially squats, then squeeze a warm-up into the island.
By the way, the disadvantages may be the cases that we indicated when placing the headset in the lower cabinets.
What lighting options are there?
LED lamps for kitchen cabinets come in 3 types.
Check out our article about organizing lighting in the kitchen.
Spotlights
Round, square, rectangular - they can either be built into the bottom of the box or mounted on top of it. Spotlights look good both under cabinets and under open shelves. To ensure there is enough light, choose the appropriate brightness and place the sources at a suitable distance from each other.
LED panels
To achieve soft, diffused, homogeneous light, there is no better option. Unlike strips or spots, panels typically occupy the entire bottom surface of cabinets, ensuring an even flow of lumens. The panels do not heat up, are safe for the eyes, and last about 50,000 working hours (~15 years). Easy to install and maintain. The only drawback is the relatively high cost.
Important! Any diode lamps - strips or panels - are characterized by energy-saving properties. They consume much less energy compared to conventional incandescent lamps and even energy-saving lamps
LED Strip Light
An affordable option with a low price. Just like panels, tapes do not emit heat and last for many years. They can be installed anywhere:
- the angle between the apron and the bottom,
- in the center of the bottom,
- near the front side.
At the same time, you can install lighting in the kitchen under the cabinets yourself, without the help of specialists. The only disadvantage of the tapes is the serial connection. That is, if one LED burns out, all of them will stop working, which means the strip will have to be changed completely.
What comes first and what is best?
Equipment of the kitchen space should begin with the selection of equipment - this option is more likely to eliminate possible inconsistencies and installation problems.
It is ideal if you decide on the models and their location at the kitchen design stage: this way you can not only buy or order a suitable set, but also calculate the location of sockets (and their number), water supply, the required network voltage and many other technical aspects.
Of course, it is better to entrust the development of the project to a professional designer, but you can do it yourself. Personally, in my work I adhere to a certain plan of action, which I will be happy to share with you.
- Decide on the basic composition of kitchen appliances. Decide which appliances will be built-in and which will be “solo”. Manufacturers of kitchen equipment offer to install not only large appliances - refrigerators, washing machines, dishwashers, ovens, but also small household appliances - coffee machines, combines, etc. Most often, users opt for the standard four: hob and oven, range hood, dishwasher .
- Consider the location of the devices. It all depends on your personal preferences - as long as you feel comfortable. However, there are several recommendations that it is advisable to follow:
- Do not install the hob next to a sink. Firstly, washing dishes or vegetables next to a working stove is not very convenient; secondly, there is a risk of getting burned; thirdly, water that gets on a hot burner can shorten the life of the hob. The optimal distance between it and the sink is 120-180 cm.
Give preference to an independent set of hob and oven. In this case, the placement of devices is limited only by your ideas about comfort. You can choose the traditional method - the cabinet is installed directly under the hob. Or install the oven at chest level - this makes it easier to remove the baking sheets.
Designate a space for the dishwasher next to the sink. With this placement it will be easier for you: 1) connect the dishwasher to the water supply, 2) load it with dishes. Leave free space on both sides of the hob. The minimum recommended distance is 40-50 cm. Allow for a distance between the hood and the hob. For a kitchen air purifier to work effectively, the distance between it and a gas panel should be 75-80 cm, and an electric panel - 70-75.
What should you think carefully about before purchasing a microwave?
Device functions. If you only need a microwave to defrost food or heat up ready-made food, you should choose the simplest option, and if you need a microwave for cooking, you can look for a model that is equipped with a variety of modes, including grilling.
Advice. When owners rarely eat at home, such a microwave can replace a stove, which will help save significant space in a small kitchen.
Device dimensions. If there is little space in the kitchen, you should try to find the smallest microwave oven available for sale.
So, the microwave has been purchased, it’s time to find a place for it. Let's consider three options:
- microwave on the cabinet;
- built-in microwave;
- hanging microwave.