The safety of living in a modern home and the comfort in it depend on many factors. The state of the electrical power supply circuit for household consumers is one of the first places in this matter.
It can work reliably and unnoticed for decades or constantly cause problems for the owner if installed incorrectly.
The tips we have selected are intended to help the home handyman to independently assess the electrical wiring of an apartment when purchasing it or in everyday life, as well as to eliminate identified defects.
For clarity, they are supplemented with pictures, diagrams and a video.
What to check
It is known that the wiring in an apartment consists of wires carrying electricity and auxiliary elements, including couplings, fasteners, etc. The reliability and quality of electrical energy production will directly depend on the condition and serviceability of all these elements. In addition to these, sometimes the electrical equipment itself also needs to be checked. Experts recommend checking the wiring by testing the wires from one point in the circuit to another.
How does a multimeter work?
Even a beginner who has never dealt with electrical work can ring the wiring. The main thing is to be careful. To test the wiring, the multimeter must be switched to resistance testing mode. After this, the clamps are connected to the ends of the electrical wires. High-quality cables should have a resistance that will not exceed 1 ohm. If the wiring in the apartment is faulty, it will have resistance, which is sometimes even more than 10 ohms. If one of the wires in the wall is broken, the device will display a unit on the left side of the screen. This means that the measured resistance is greater than 200 ohms. In this case, it can be stated that the contour has a significant gap.
Using a multimeter, in addition to checking the wiring, you can also check the performance of batteries, determine the voltage in the apartment's sockets, as well as the current strength in high-voltage wiring.
Checking the circuit for open circuit
To check the circuit for an open circuit, in addition to a multimeter, you can also use a special tester. Such a device is a metal rod in an insulating material with a light bulb, a battery and a clip connected to the wire. The tester makes it very easy to determine whether there is voltage in the wiring in the apartment. To check for a break, fix one end of the wire with a clamp, and touch the other with a rod. If the light on the device lights up, this means that electric current is passing through the area.
It is important to note that before checking the circuit for an open circuit, you need to turn it off
Wood is an extremely grateful material. Strong enough to last, hard enough to hold even a very thin shape, enough.
Karambit is a very specific melee weapon that became suddenly popular thanks to the game Call of Duty: Black Ops, and also numerous.
What you need to know about the device to connect wires
If you plan to test the wiring in your apartment, you need to know several fundamentally important facts about multimeters. First of all, it is worth noting that you can check the wire with the simplest device. An inexpensive Chinese model with minimal capabilities is quite suitable.
But at the same time, it is most convenient to use a device that has the dialing function itself. In order to set the device handle to the appropriate position, you need to turn it in the direction of the diode icon (as an option, an image of a sound wave can additionally be applied). This means that when checking the integrity of the wire, a sound signal will sound when the contacts are closed.
But the presence of sound is completely optional for testing wires with a multimeter. The fact that the circuit is broken will be indicated by a unit on the display, indicating that the resistance level between the probes is higher than the measurement limit. If there is no damage in the area under study, the resistance value will be displayed on the screen, which ideally should tend to zero (subject to operation in short-distance household networks).
Finding the break point
After a break in the electrical wiring has been discovered, it is necessary to localize the place where it happened. For dialing in this case, you can use a tone generator, for example, the Cable Tracker MS6812R or TGP 42. Such devices allow you to determine the location of the break with centimeter accuracy, as well as determine the route of hidden wiring; in addition, the devices have other useful functions.
Model MS6812R
Devices of this type include an audio signal generator and a sensor attached to an earphone or speaker. When the sensor approaches the place where the UTP cable pairs or electrical wiring wires are broken, the tone of the sound signal changes. When a tone test is performed, the wiring must be de-energized before connecting the sound generator, otherwise the device will be damaged.
Note that with the help of this device you can test both power and low-current cables, for example, check the integrity of twisted pair cables, radio wiring or communication lines. Unfortunately, such devices will not allow you to determine the correct connection; special equipment is used for this purpose - cable testers.
Old-fashioned methods of searching for hidden wiring
Our grandfathers and great-grandfathers did without any instruments to search for hidden wiring, and at the same time they accurately found the electrical wiring line under plaster and wallpaper without any problems.
The easiest way is when a major renovation is done in a house or apartment. That is, the wallpaper is peeled off, and there are traces on the wall where the electrical wiring runs. This is roughly what it looks like.
The next method, which our grandfathers and great-grandfathers used, is to take a radio, tune it to a frequency of 100 kHz, and slowly move it along the wall. In the place where the electrical wiring will be laid, you will hear characteristic noises and cracklings in the receiver's speaker.
Problems of assessing the condition of wiring
Accurate knowledge of information about the load and condition of the apartment’s electrical wiring is necessary for its reliable organization and elimination of problem areas in all rooms.
Preparing premises for renovation
Buying an apartment often involves its subsequent reconstruction for decent living. The volume of construction work is affected by the quality of electrical wiring.
Its condition must be identified first of all before leveling the walls with plasterboard or other methods, painting them with special dyes or gluing wallpaper on them, applying decorative plaster and other finishing methods.
This is especially true for hidden wiring inside walls and building structures.
The scope of repair work greatly depends on:
- the need to completely redo the electrical wiring in the apartment with the replacement of all components, gating of walls for laying new cable routes;
- the possibility of only partial replacement of individual lines or equipment;
- the prospect of leaving reliable wiring in its original form without any alterations.
A realistic assessment of an apartment’s electrical wiring allows you to accurately plan the scope of repair work and take their cost into account in the family budget.
Clarification of the electrical diagram of the apartment
Unfortunately, not all apartment owners have a complete understanding of where and how cables and wires are laid, how they are configured:
- load sensing circuit breakers;
- RCD or difavtomat;
- voltage control relay;
- arc protection type UZM-51;
- Other devices.
Quite often, after eliminating an accident, you have to quickly search for hidden wiring inside building structures to eliminate faults. And all this takes time, and it is difficult to guarantee an accurate result due to the imperfection of search tools.
When checking the condition of the electrical wiring, both the electrical circuit diagram and the installation diagram of the apartment must be clearly marked, indicating on them the locations of the end points and the passage of cable routes in all rooms.
Particular attention is paid to the places where the wires are connected, the ease of use of junction boxes, and the correct signature of the controls in the apartment panel.
The computer program Electrician 7.8 is designed to facilitate the search for technical information and the solution of specific issues in electrical wiring for the home handyman. It contains a lot of reference material and various options for constructing electrical circuits based on their load.
Registration of work results
Checking the electrical circuit of the apartment should end with saving a working document that can be quickly used if necessary.
To do this, you can simply draw it on paper using accessible methods or create it in a convenient computer program, for example, Visio, and then simply print it out on a printer.
Finding problem areas
This is the main task of wiring assessment. The entire layout of the apartment must be carefully examined, its technical condition checked, defects and weak points identified.
Problem areas are understood as those branches of the electrical installation that no longer comply with safety rules for the loads of connected electrical appliances. They need to be redone.
This also includes those parts where the state of installation raises doubts about the reliability of its operation at maximum load. For example, old wiring with poor quality twisting without welding or soldering of aluminum or copper wires with a reduced cross-section.
Over time, such places are subject to oxidation of metals, leading to an increase in contact resistance at the points of electrical contact and increased heating. This contributes to further damage to both the insulation and all wires.
Aluminum conductors, which were previously widely used in power supply for household consumers, do not cope well with powerful modern loads and operate at the limit of their capabilities. PUE does not allow their installation in residential premises under construction, and in old houses they are completing their service life and already require replacement.
What does an electrical wiring inspection include?
There are several possible scenarios when you need to check the electrical wiring yourself:
- Certain sockets in the apartment do not work or the light does not turn on in one of the rooms;
- Knocks out the circuit breaker. When you try to turn on the circuit breaker, the knockout is repeated;
- You are planning a renovation and need to find hidden electrical wiring routes for your apartment;
- You are planning a major renovation of your apartment and need to diagnose the old electrical wiring.
These are not all cases that give a “bell” that it’s time to think about the electrical wiring of the apartment and house. You can add to this list:
- Purchasing a new powerful household appliance;
- Buying an expensive electronic device;
- Desire to install a new chandelier;
- You felt that the washing machine was receiving an electric shock;
- You constantly smell a slight smell of heated plastic (it's hard not to recognize it).
The most common electrical wiring faults in private and apartment buildings
The causes of faults in electrical wiring are various, the most common are:
- A short circuit of the neutral or ground wire to the phase wire can occur due to lack of insulation, aging of the insulating layer or its burning as a result of excess current loads, unreliable contact at the connection points. If the protective shutdown circuit breaker does not work, such a malfunction may lead to a fire;
- Lack of phase or neutral wire contact in the junction box, at the terminals of switches, circuit breakers, sockets or lamp sockets. This happens due to heating of the contact connectors, poor cleaning of the contacts, insufficient tightening of the wire fastening bolts on the contact group.
- Broken wires most often occur at connections to switches, sockets, and sockets. When replacing lamps, the wires at the socket become bent; in junction boxes and sockets, during the installation process the wire bends and breaks inside the insulation. This may not appear for some time, but then the weak contact will burn out.
- Violation of the integrity of hidden wiring can occur as a result of drilling walls;
- There are times when circuit breakers in switchgear break down; they can break the circuit or short out. When switching, the electrical contacts do not close or open; sometimes the cocking mechanism jams and it is impossible to switch.
Testing home electrical wiring
We will talk about an apartment in which the wiring of power lines complies with modern standards and requirements: each room has a separate line, and its power is supplied through its own “automatic machine”.
If the light in a room suddenly goes out, but in all other rooms it lights up normally, then first of all you need to check whether the light device is working. Before starting work, the power supply to the room must be turned off. If the lamp lamp is transparent, the broken filament will be immediately visible; if not, you will have to test it with a multimeter.
First you need to see whether the circuit breakers in the electrical panel have worked or not. If they are on, the problem most likely lies in the socket, switch, or the light bulb itself, and the wiring is fine. When the machine is triggered, it is necessary to check all elements of the circuit, except the switch, including the switch itself.
The machine didn't work
If the light goes out and the switch remains in the on position, then you first need to ring the switch. If it is working properly, then when the element is in the on position, the multimeter should emit a sound signal, and when it is off, the number 1 should appear on the display if there is no sound.
Further checking occurs in the following order:
- Turn the multimeter into voltage measurement mode, and then check the input and output of the switch.
- If there is a potential difference on the machine, unscrew the light bulb from the socket and touch its central contact with one probe and the base with the other. If there is no signal and the display shows 1 or 0, the lamp is faulty.
If the check shows that the light bulb is working, you should proceed to testing the socket. Having disassembled the lighting device, you need to inspect the connected conductors and contacts. If a visual inspection does not reveal any problems, the problem is not in the cartridge.
Such a check usually reveals that one of the listed elements is faulty. After replacing or repairing it, the problem disappears.
The machine worked
If the light in the room turns off along with the operation of the machine, first of all you should check the cartridge and the integrity of the cables connected to the lamp. How this is done was described above.
Damage to it occurs infrequently, but sometimes occurs, for example, when installing decorative parts or installing suspended ceilings.
The procedure for dialing the electrical line is as follows:
- Disconnect the supplied cable and move it to the side using a screwdriver.
- Unscrew the incandescent light bulb from the socket.
- Put the multimeter in dialing mode. Use one of the probes to touch the neutral wire, and the other to the end of the disconnected wire. The tester's sound signal will notify you of a short circuit in the electrical wiring.
- After making sure that there is a short circuit, you need to find and then open the junction box and disconnect the conductors in it from each other.
- Check all cable groups for short circuits. To determine a closed section, you must first ring the circuits located on the apartment electrical panel with a tester. The signal that is heard will indicate a malfunction of the conductor leading from the panel to the junction box. If it is OK, then the diagnosis continues until a damaged cable is detected.
An example of searching for a broken wire in the video:
In this material, you learned how to test wiring to detect faults using a multimeter. This procedure is quite simple, but when carrying it out, as during any other electrical installation work, safety precautions must be strictly observed.
Method for checking the condition of electrical wiring
You are here: In this article we will look at a very important and interesting topic - how to check the wiring in an apartment or house with your own hands. The need to check the electrical system arises in several cases: when purchasing a new home, during renovations before finishing the walls, in case of problems, and also sometimes after the apartment is flooded.
If you doubt your abilities and have no experience at all in electrical installation work, we recommend calling a specialist who can quickly and, most importantly, correctly inspect the electrical wiring.
However, if you know how to use the tester and at the same time are regular readers of our website for electricians, we recommend that you familiarize yourself with the testing methodology described below.
Initial inspection after purchase
If you just bought a house or apartment, the first thing you need to do is check the condition of the wiring, because... Even the slightest malfunction can subsequently lead to electric shock or fire.
In a new and old house, the inspection technology will be different, so we’ll look at both methods separately. We immediately draw your attention to the fact that before checking the electrical wiring, it is necessary to turn off the electricity in the panel.
Working under voltage, especially for inexperienced electricians, is strictly prohibited!
New building
It is most often necessary to check the electrical wiring in a new building after installation after purchase, before major repairs - finishing the walls and arranging furniture. The importance of this event lies in the fact that if you do not inspect the cable line from the very beginning, in the future it will be much more difficult to check the wiring under a suspended ceiling or behind plasterboard sheets.
First of all, you must calculate the total power of the electrical appliances that you will use, based on which, calculate the cable cross-section by power and compare this value with the cross-section of the conductor already laid in the walls. If the cross-section is insufficient, be sure to replace the electrics, however, as experience shows, such problems do not arise in new buildings.
The next step is to check the condition of the hidden electrical wiring. The insulation must not be damaged, and all wire connections must be made using terminal blocks or other connectors (for example, PPE caps), but not by twisting.
Twisting is prohibited; see the list of permitted connection methods in Chapter 2.1. PUE clause 2.1.21. It is also important to determine the cable cross-section and check the ratings of the sockets.
The socket group must have copper conductors with a cross-section of at least 2.5 mm2, the rating of the circuit breaker of the socket groups must not be greater than the rated current of the sockets, usually 16A.
If all the above requirements are met, the last thing left to do is to check the wiring in the apartment for load. In other words, you need to check yourself whether the switchboard is assembled correctly. When all equipment is connected and all lamps in the rooms are turned on, the machines should not operate.
If a circuit breaker trips, it means the electrical wiring is not able to withstand the load from the connected electrical appliances, as a result of which it will be necessary to replace the circuit breakers, divide the electrical wiring into groups, etc. If the circuit breakers in the panel do not turn off after turning on the load, then the home wiring is correct.
It wouldn’t hurt to additionally check the reliability of the connection of the machines in the panel, as well as checking the ratings with the load that comes to them.
Old housing
It is more difficult to check the condition of the electrical wiring in an old house or apartment, especially if you have just bought a home and have no idea how the electrical wiring is done in the rooms. So, an audit of the electrical network must be performed using the following method:
- Find all distribution boxes by room. By opening the cover, you can understand which cable is used for the hidden electrical wiring: aluminum or copper, as well as what cross-section of the wires. You should also immediately check the condition of the insulation - if the wiring is old, even the slightest bend in the cable will cause the insulating layer to begin to crumble or crack. Such electrical wiring must be changed without any reservations. It would be correct to check the insulation resistance with a megger (so to speak, for breakdown and current leakage). Its resistance must be at least 0.5 MOhm. But not everyone has such a device, so “for the sake of decency” you can at least measure the resistance with a multimeter, although this can hardly be called a normal test. If the insulation resistance is poor, leaks will occur and the RCD may trip if you upgrade the electrical panel. It is equally important to immediately inspect all wire connections - there should be no damage or twists, especially aluminum and copper. If necessary, you should immediately connect the wires with terminal blocks instead of twisting them. We talked in detail about how to find a junction box in the wall of an apartment building in the corresponding article.
- Check sockets and light switches. In sockets, it is necessary to inspect the integrity of the wires and insulation, and also determine the rating for which they are designed. If three-wire wiring is connected to the sockets, it is imperative to determine where the phase is, where the zero is and where the ground is. To do this, you will need a multimeter or an indicator screwdriver, and we provided the technology for determining phase and zero in the corresponding article. After you determine where the grounding conductor is, you need to check the grounding in the outlet. We also talked about this in detail. Another very important point - if the socket is installed in a metal socket box, it is better to replace it with a more modern, plastic one. As for the light switches, you need to disassemble them yourself and make sure that the break is the phase wire and not the neutral one. If before this the would-be electrician brought the gap to zero, you will have to redo the connection, because This option is unsafe - even when replacing a light bulb in a chandelier, you may get an electric shock.
- Inspect the input panel. It should have modern machines, not traffic jams that were used in the distant past. Be sure to check that an RCD is installed on the electrical wiring in the bathroom, which will protect against electric shock due to insulation breakdown and current leakage. Please note that the installation of an RCD in two-wire wiring (TN-C system) is prohibited according to the PUE clause 1.7.80 (see Chapter 1.7). Also check the quality of all connections and the cross-section of the input cable. If the cross-section is insufficient, replace the cable with a more suitable one.
- When all the most important nodes have been analyzed, all that remains is to check the old wiring for load, as we described above. As experience shows, in old private houses and apartments it is impossible to do without replacing the electrical system, but you can wait for some time (for example, until renovation), just do not turn on many powerful electrical appliances at once.
How to ring a wiring
Testing the socket with a multimeter
The easiest way is to contact specialists. If you master the rules and techniques, you can cope on your own.
Rules for safe wiring
Operations with electricity require compliance with technical safety standards. In addition to maintaining health, the rules allow you to complete the job quickly and accurately. The main points include:
de-energizing the circuit; the ends of the wires must be secured with lugs - “crocodiles”; When checking long wires, it is important not to touch them with your fingers; Multi-core cables are separated and stripped.
The last rule is important when working with circuits that are designed for high voltage networks. If the load is small, you can simplify the process
How to check wiring during installation
Cable laying in the groove
The wires are laid in special grooves (recesses) or along the walls. This is followed by the stage of plastering and finishing. Checking the wiring in an apartment or other premises is carried out up to this point.
Builders and electricians make mistakes. In the first case, it is necessary to carefully monitor and check the work. In the second, use the prepared diagram and promptly check the wiring in the apartment (before plastering and finishing). Checking the electrical wiring begins with the following activities:
- visual inspection;
- short circuit test;
- checking with a megohmmeter;
- ringing
How to test wiring with a multimeter
To test the wires in an apartment, the easiest way to understand the operating diagram is to use a multimeter. If we assume that the electrical system was initially installed according to all the rules, the check will not take much time.
When a light bulb goes out in a room, the first thing you need to do is check if it is working properly. De-energizing the room is the initial stage. Testing the wiring with a multimeter is a quick and safe way to check the electrical system in an apartment. If you follow the rules and safety requirements, you can do this yourself.
How to check the wiring in an apartment - electrician tips - Electro Genius
You are here: In this article we will look at a very important and interesting topic - how to check the wiring in an apartment or house with your own hands. The need to check the electrical system arises in several cases: when purchasing a new home, during renovations before finishing the walls, in case of problems, and also sometimes after the apartment is flooded.
If you doubt your abilities and have no experience at all in electrical installation work, we recommend calling a specialist who can quickly and, most importantly, correctly inspect the electrical wiring.
However, if you know how to use the tester and at the same time are regular readers of our website for electricians, we recommend that you familiarize yourself with the testing methodology described below.
How to check wiring correctly
Electrical wiring is checked in order to identify faults, make a decision on further operation during repair work in the building, and also to obtain information about the condition of the wiring after emergency situations.
Such situations include flooding of the premises or the activation of protective devices when there are no problems for consumers.
In apartments and private houses, it is necessary to check the wiring immediately after purchasing the premises, if it was previously operated by other persons.
Replacement timing
After the electrical wiring has reached the end of its service life, it needs to be completely replaced without testing or inspection. The timing of inspection, replacement or interval between major repairs is established by VSN 58-88(r) (departmental building codes) and is:
- for hidden indoor networks 40 years;
- the same, but for open 25 years;
- for main wiring between apartments and input and distribution devices 20 years;
- for production and technical premises and lighting of public places 10 years.
Checking the electrical wiring in an apartment or private house, despite its apparent complexity, if you have the necessary knowledge and a minimum set of tools, you can do it yourself, without inviting a qualified electrician.
Types of faults
Faulty electrical wiring can cause fires and electric shock. Basic electrical wiring faults can be of two types:
- wire breakage, and, as a result, lack of electric current in any part of the circuit;
- short circuit of a phase wire with a neutral or ground wire, which leads to the circuit being disconnected by protective devices.
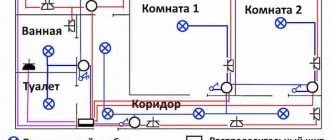
Checking and troubleshooting hidden wiring is greatly facilitated if there is a detailed diagram of the wiring in the room. This diagram is mandatory when drawing up a technical passport of the premises.
If there is no diagram, you need to determine the location of the wiring routes in the walls. Subject to compliance with the requirements of the PUE, wires and cables must run in a straight line connecting distribution boxes with sockets and switches. In this case, the routes must be strictly vertical or horizontal.
Checking the wiring with a multimeter
To avoid mistakes, the electrician’s work must be checked in a timely manner using the dialing method. This is done using a multimeter set to AC voltage.
You should start with the junction box. It contains a bunch of unmarked wires. First you need to find the phase wire at the output and mark it with electrical tape. Then they find zero: touch the phase with the probe of the device, and alternately touch the remaining ends of the beam with another probe. A value of about 220 V appears on the indicator - the neutral conductor has been found.
Conductor integrity check
To check the integrity, you need to disconnect the conductor from the power source. The multimeter is set to Ω. Its probes are connected to the ends of the conductor. An entire conductor will show zero resistance. You can call your home electrical network without involving specialists. To do this, you need to look at the position of the machines.
If the machines don't work
If the circuit breakers do not work, you need to ring the circuit breaker. When turned on, the multimeter will produce a beep. After this, the voltage at the input and output terminals of the machine in the house is checked. If there is voltage, the light bulb is unscrewed from the lamp socket. One measuring probe touches its central contact, the other touches the base. If the lamp is working properly, a signal will sound from the device. A burnt-out lamp should be replaced. If the lamp is working, check the socket, then the switch in the room.
If the machine worked
When the circuit breaker is turned off, they look for the cause of the short circuit between the phase wire and the neutral or protective wire. Use a screwdriver to disconnect it and move it to the side. The lamp is unscrewed from the socket. The probe of the device is connected to the neutral conductor and to the phase. An audible signal will indicate a fault in the circuit. In this situation, you need to open the box near the ceiling and disconnect all the wires in it. Each is checked for short circuits.
Checking the outlet
You need to unplug the outlet, and only then can you remove the cover from it and inspect all the parts. If there is no carbon deposits or visible damage, you need to connect the device probes to the terminals. The tester shows infinity - the socket is intact, there is a fault in the wiring. Then check each conductor separately using the methods described above.
Check at the installation stage
At this stage, you need to pay attention to possible problems with laying the electrical network. It is mounted on bare walls and covered with finishing materials
The check is carried out before the start of plastering work. During this period, electrician errors are easily detected when carrying out electrical installation work on the walls of the house. To perform the operation, take a wiring diagram that will help you understand the tangle of wires.
How to identify problems
You can check whether there is an open circuit with a tester or a multimeter in ringing mode. To speed up the search, you need to clearly understand that current flows from the input device through the distribution boxes to the sockets and lighting fixtures.
For example, if there is no voltage in the outlet, but there is voltage in the other outlets connected to the same box, the problem is in the area between the box and the faulty outlet.
If there is no voltage in all sockets connected to the box, the break should be looked for in the area from this box to the previous distribution box.
If there is no voltage on the lamp, it is necessary to check the wiring section up to the switch, for which the presence of voltage between phase and zero is checked.
To connect to zero, you can use an auxiliary piece of wire, since there is most likely no zero in the switch. If voltage is present at the switch, the presence of voltage is checked at the contacts of the lamp when the switch is on.
The search area for a short circuit is significantly reduced, and the search is faster if the circuits in the distribution board are divided into rooms and each protected by its own protective device. In this case, to check, it is necessary to turn on the machines one by one, and, based on the one that worked, determine the area for troubleshooting.
You can check whether there is a short circuit with a tester or multimeter by measuring the resistance between the phase wire and the neutral wire or between the phase and ground wires, separately in sections of the circuit.
To do this, you need to physically turn off all devices, that is, remove the power cords from the sockets, unscrew the lamps from the lighting fixtures. And, of course, be sure to de-energize the entire network. This is the simplest verification method. You can use a hidden wiring detector to find faults, but the accuracy of determining the location of the fault in this case is low.
Malfunctions such as failure of electrical installation products - sockets, switches - are possible. These products are usually in plain sight and finding problem areas is not very difficult. Checking such products consists of inspecting contacts and housings. The malfunction is detected by the presence of burnt contacts and melted housings.
Wiring and requirements for it
The first and very important point that you should know about before starting electrical installation work is that in panel houses (Khrushchev-era buildings) you most often cannot trench walls in accordance with Moscow Government Decree No. 73-PP dated February 8, 2005 “On the procedure for renovating premises in residential buildings on territory of the city of Moscow." Also, according to Government Decree No. 508 (Clause 11.3 and 11.11 of Appendix No. 1), it is prohibited to tap load-bearing walls.
In this case, it would be rational to conduct wiring through existing channels, the floor or under the ceiling (if a suspended or suspended ceiling is planned). The first and last options are more preferable. If the electrical wiring in the apartment is changing and you plan to cover the walls with plasterboard, an excellent solution would be to lay the wiring behind the plasterboard.
Important! It is strictly prohibited to scratch the ceiling in the apartment! The only option in which you can make grooves on the ceiling is to first apply an additional layer of plaster to the ceiling, in which the cable will be hidden. This layer can already be carefully grooved without touching the monolith
Those. The simplest option is to draw lines from the panel to the sockets and switches along the ceiling, ducts or floor, and then make vertical grooves and so-called wells for installing socket boxes.
Another important point that you should pay attention to if you decide to do the wiring in the apartment yourself is that noisy work is allowed from 9 am to 7 pm (except Sundays), while an hour of silence must be provided from 1 pm to 3 pm! Shredding is a noisy job and can not only cause the anger of neighbors, but also cause a fine (from 1 to 5 thousand rubles for individuals)
Let's return directly to the installation of apartment electrical wiring. As we said earlier, the length of the conductors must be purchased with a reserve. This reserve will be used to connect them to each other (on each side the outer sheath of the cable is removed by 5-10 cm) and to connect sockets, switches, lamps (the length reserve is from 10 to 15 cm).
The video shows how to correctly install electrical wiring in an apartment without breaking the rules:
Calculation of the need for materials and accessories
The required amount of material is determined in two ways:
- according to the wiring diagram - the most accurate;
- for the total area of the apartment - approximate.
When calculating the cable according to the diagram, the total length of the electrical wiring marking is measured, to which 10% is added, plus 20 cm for each socket or switch, plus 50 cm for each lamp and 50 cm for the distribution panel.
To calculate the need for cable based on the area of the apartment, the numerical value of the housing area is multiplied by 4, and the total footage of the wire of all sections is obtained. 40% of the obtained value is the length of the cable for lighting, the remaining 60% is the footage of the power cable.
Cable sections of wiring sections are calculated in relation to the wire material, laying method and maximum load on the line. For the convenience of selecting the required wire, the cross-sectional values are tabulated depending on the specified factors:
| Cable cross-section (mm2) | Open installation | Pipe installation | ||||||||||
| Copper | Aluminum | Copper | Aluminum | |||||||||
| Current (A) | Power, kWt) | Current (A) | Power, kWt) | Current (A) | Power, kWt) | Current (A) | Power | |||||
| 220 V | 380 V | 220 V | 380 V | 220 V | 380 V | 220 V | 380 V | |||||
| 0,5 | 11 | 2,4 | — | — | — | — | — | — | — | — | — | — |
| 0,75 | 15 | 3,3 | — | — | — | — | — | — | — | — | — | — |
| 1,0 | 17 | 3,7 | 6,4 | — | — | — | 14 | 3 | 5,3 | — | — | — |
| 1,5 | 23 | 5 | 8,7 | — | — | — | 15 | 3,3 | 5,7 | — | — | — |
| 2,0 | 26 | 5,7 | 9,8 | 21 | 4,6 | 7,9 | 19 | 4,1 | 7,2 | 14 | 3 | 5,3 |
| 2,5 | 30 | 6,6 | 11 | 24 | 5,2 | 9,1 | 21 | 4,6 | 7,9 | 16 | 3,5 | 6 |
| 4,0 | 41 | 9 | 15 | 32 | 7 | 12 | 27 | 5,9 | 10 | 21 | 4,6 | 7,9 |
| 6,0 | 50 | 11 | 19 | 39 | 8,5 | 14 | 34 | 7,4 | 12 | 26 | 5,7 | 9,8 |
| 10,0 | 80 | 17 | 30 | 60 | 13 | 22 | 50 | 11 | 19 | 38 | 8,3 | 14 |
| 16,0 | 100 | 22 | 38 | 75 | 16 | 28 | 80 | 17 | 30 | 55 | 12 | 20 |
| 25,0 | 140 | 30 | 53 | 105 | 23 | 39 | 100 | 22 | 38 | 65 | 14 | 24 |
| 35,0 | 170 | 37 | 64 | 130 | 28 | 49 | 135 | 29 | 51 | 75 | 16 | 28 |
When calling a conductor a cable or a wire in everyday life, you should know that these are not synonyms:
- wire is a stranded or single- or stranded conductor with or without light tubular insulation;
- a cable is a system of insulated conductors combined into a single structure, which is additionally insulated and, depending on the model, protected by an armored casing.
As for the material used to make the cores, the regulatory documents clearly define the following:
PEU 1.7.34 “... Cables and wires with copper conductors should be used in buildings...”
SP 31-110-2003, clause 14.3 “Internal electrical networks must be flame retardant and made with cables and wires with copper conductors in accordance with the requirements of 2.1 and 7.1 PUE.”
For equipment with a power of more than 2.0 kW, it is recommended to connect a separate power line with a circuit breaker, the rating of which can be determined from the following table:
| Cable cross-section (sq. mm) | Current (A) | Power, W) | Machine rating (A) |
| 1,5 | 15 | 3300 | 16 |
| 2,5 | 21 | 4600 | 20 |
| 4 | 27 | 5900 | 25 |
| 6 | 34 | 7400 | 32 |
Features and differences of electrical wiring in apartment buildings and private buildings
In modern apartment buildings, the electrical supply circuit is carried out according to standard designs, with wiring hidden under the plaster. Distribution boards with metering devices are located in the entrances on the landing. In some cases, in the entrance there is only a common circuit breaker and a meter for the apartment; group circuit breakers are placed in a separate switchgear (switchgear) in the apartment.
In private houses, in addition to traditional lighting groups and sockets, outbuildings can be allocated to a separate wiring group:
- workshop;
- sauna;
- street lighting:
- garage power supply;
- a barn with rabbits and other options.
Depending on the building material, wooden structures may use methods for installing exposed wiring in plastic cable ducts. Connections between buildings are made by underground cable or overhead lines. Each building can be equipped with its own switchgear with group circuit breakers.
Testing wires with a multimeter
Manufacturers make different types of multimeters, but the measurement principle remains the same, only the location of the controls and measurement limits differ. To check the integrity of the wires, the measurement mode switch is placed in the continuity position; this is marked with a diode or buzzer sign. After which the dialing process is carried out using the methods described above. The integrity of the conductor, in addition to the display of zeros (no resistance), is accompanied by an audible signal or an LED indicator, this depends on the brand of the multimeter. article: → “How to use a multimeter for dummies?”
Multimeter GE 2524 in dial position
The probe with the black wire is inserted into the connector with the ground symbol (case), the red one above, into the connector for measuring resistance with the Ohm symbol “Ω”. The disadvantage of many digital multimeters in dial mode is the delay in the sound indicator signal when touching the contacts. It is necessary to fix the probes on the wire for 2-3 seconds to make sure there is contact. This inertia in operation creates some difficulties in checking the integrity of the wire.
Multimeters of the UNI-T type have good performance in dialing mode; the sound indicator operates almost instantly when the contacts are closed.
In other parameters, UNI-T is not inferior to other models in measurement accuracy and number of options. article: → “Checking circuits with a multimeter or tester.”
Comparison table of characteristics of Fluke-179 and UNI-T UN61 multimeters
Please note that for all instruments it is advisable to use probes with gold-plated rods. Unlike steel ones, they are not subject to oxidation and provide reliable electrical contact.
Rules for safe wiring
For accurate and safe work with electrical networks, compliance with the following rules is required:
- the ends of the measurement wires are equipped with crocodile tips;
- the circuit is de-energized;
- when checking the integrity of a long conductor, do not touch the bare ends with your hands;
- A multi-core cable is called in a special way.
“Crocodiles” make electrical contact reliable and free the inspector’s hands. When the circuit is de-energized, the capacitors in it must be discharged. This is done by short-circuiting. If this is not done, a multimeter of any design will burn out. If you touch the wires, the wiring tester will give incorrect readings.
The multi-core cable is stripped from all ends. The “crocodile” is fixed to the core, the other end touches each remaining core in sequence. This checks for short circuits.
Dialing options
There are two dialing options:
- checking for the presence of a phase-neutral connection;
- cable quality check.
If there are no phase-neutral connections in the electrical wiring in boxes and sockets, the device indicator displays a unit and there is no sound signal. Other indications indicate the presence of a shorty. When testing a cable, it is recommended to strip all ends and twist the bare wires at one end of the cable. The absence of a sound signal is evidence of a violation of the integrity of the conductor.
Search methods
To search for wiring, you can hire a specialist, or you can conduct an independent search using specially designed devices and tools. Which of these options to choose is up to everyone to decide for themselves.
Devices
- Probe MS-158M, MS-48, MS-18 - in addition to wiring, they find metal inclusions in the wall (nails, screws, etc.), react to slab reinforcement at a depth of up to 5 cm.
- Alarm E121 “Woodpecker” - responds to an electromagnetic field and detects breaks in live wires at a depth of up to 7 cm.
- POSP-1 – detects the presence of alternating electricity and wire breaks.
- CEM LA – 101 – reacts to the electromagnetic field, detects wire breaks.
- Non-contact sensor ExtechDA30 – detects the electromagnetic field of alternating voltage. Works with cable ducts, shielded wires, distribution boxes.
- MS58M - reacts to metals, no voltage required in the wires.
- Hidden wiring detection device "OSP" - for accurate and quick search of electrical wiring breaks. When using a generator (supplied) it finds wires disconnected from electricity. Finds copper at a depth of up to 30 cm.
Various types of thermal imagers are prohibitively expensive, but clearly detect live wiring and its breaks.
Scanner
The main difference between scanners and other devices that are used to detect electrical wiring is that they can “see” not only wires.
- Black&Decker BDS300 detector – finds electrical wiring, non-ferrous and ferrous metals, wood.
- Metal detector ZirconTriScannerPROSL - in addition to detecting metals, scans live electrical wiring in all operating modes.
- The Skil 0550 AA detector is a liquid crystal indicator that, in addition to detecting metals, scans live electrical wiring in all operating modes.
- The Bosch PDO Multi digital detector is the most budget-friendly of the Bosch family; it detects potential wiring (phase), materials inside walls and their depth.
Multimeter
A multimeter is usually called a device that can replace several other devices. In our case, the multimeter combines an ammeter, an ohmmeter, and a voltmeter.
The most common ones to look for electrical wiring are:
- The tester - multimeter LA-1014 - accurately determines the location of de-energized and live wires, the state of computer and telephone lines, places of breaks, overlaps, and short circuits.
- Testers GVD-504A, GVD-503, GVT-92, VP-440 - analyze the condition of the hidden cable, determine the location of breaks.
There are a huge number of different devices that are designed to search for wiring. The use of most devices requires experience in operation to correctly distinguish the signals that come from them.
Using a smartphone, telephone
You need a smartphone or phone equipped with a magnetic sensor and a special Metal Detector program designed to search for metals.
Determines the location of the wire by the electromagnetic field that occurs in live wires.
Also, such a finder is capable of finding the location of a wire break and fittings in panel houses. The work of such an indicator is not of high quality and requires preliminary training.
The search accuracy depends on the position of the device relative to the surface being scanned.
Indicator screwdriver
Searching with an indicator screwdriver is the easiest and cheapest option. Determines the electromagnetic field with an accuracy of search width from 10 to 20 cm.
This screwdriver can be used to check the continuity of the circuit. It does not “see” de-energized and shielded wires. Detects electrical wiring at shallow depths.
Without devices
Remove wallpaper from the walls and determine the presence of wiring by looking at the unevenness of the plaster.
This method is applicable only if the surface of the panel is not completely plastered, but rather the method of laying wires in grooves.
Use a wiring designation map (a very unreliable method even in new apartments, since the map does not always correspond to the work done by the electricians).
Professionally installed electrical wiring should be 15 cm parallel to the ceiling, and vertically upward, from sockets and switches.
In panel houses, the wiring can be laid along the shortest path (diagonally) from the distribution boxes, and in houses with multiple renovations, it is generally messy.
Metal detector
Handheld metal detector Garrett THD
The device reacts to an aluminum or copper conductor inside an electrical cable, for which the detector creates its own electromagnetic field, which in turn creates an induced electromagnetic field around the conductors near the detector emitter. And this field is already captured by the electromagnetic receiver of the detector.
A metal detector allows you to search not only for healthy live wiring, but also for broken cables, and this is an absolute advantage. The downside of the device is that it reacts to any metal objects - nails, screws and, of course, fittings. So you shouldn’t use it to look for wiring in concrete walls.
The most advanced metal detectors can “understand” what kind of metal is detected. This makes it easier to find electrical wiring
How to check electrical wiring at the installation stage
Let's figure out what potential problems an electrician can expect when laying new electrical wiring.
Typically, new wiring is laid either in special grooves or along bare walls. Then the walls are plastered and further finishing is carried out. Therefore, the first check is carried out before starting plastering work. Otherwise, it may be that in order to fix the problem, you will have to re-drill the walls and open the plaster.
At this stage, problems can occur for two reasons: due to errors by builders (concrete workers or finishers) or due to errors by electricians.
To avoid wiring problems that can result from builder errors, you need to be very careful and vigilant. And in order to avoid electrician mistakes, you need to lay the wiring according to a pre-drawn diagram, and also carefully check and call the electrical wiring before starting finishing work.
What needs to be done in order to know for sure that the wiring is working properly?
- It is necessary to check the electrical wiring for a short circuit, that is, make sure that there is no contact between phase, neutral and ground.
At high voltages, the quality of the wire insulation depends on the quality of the cable, so you should not save when buying a cable and purchase the cheapest option.
If you have any doubts about the insulation of the wires, you can check them using a megohmmeter.
Visually inspect the wiring for mechanical damage. Any damage must be repaired before plastering or other finishing work begins.
If you are convinced during the check that everything is in order, then you can proceed to checking the electrical wiring. Below is an algorithm on how to ring wiring, which can be used for both new wiring and the one that already exists in your apartment.
Wire inspection
During the process of major renovation of a premises, the electrical wiring is usually replaced entirely.
When making cosmetic repairs, the wiring is examined in order to decide whether it can be used in the future, and for how long its trouble-free operation is possible.
At the slightest sign indicating that the electrical wiring does not meet the requirements of the standards, it is better to replace it before finishing work begins.
The inspection consists of inspecting and checking wires, sockets, switches, and measuring the insulation resistance of electrical wiring.
The decision to replace the wiring in the premises is made if wires and cables with aluminum conductors are identified. Such cables are currently used only for external wiring.
Replacement of wiring is also necessary in cases where the cross-section of the wires does not correspond to the increased total load of electrical appliances.
Sections of circuits must be replaced if the inspection results reveal damage to the cable either mechanically or due to overheating as a result of overload.
How to check the integrity of a conductor
- First you need to completely disconnect the conductor from the power source. If the conductor is a multi-core cable, then you need to disconnect all the wires that enter it.
- The multimeter must be turned on either in the dialing mode or in the resistance measurement mode. If the resistance measurement mode is selected, then you need to set the maximum limit.
- You need to connect the multimeter probes. If the device is in ringing mode, it will emit a sound signal, and if in resistance measurement mode, zeros will appear on the display.
- Then you need to open the multimeter probes and attach them to the conductor. If the conductor is intact, it will show zero resistance.
- If the conductor is multi-core, then the actions are the same. The only difference is that if the conductor cores do not differ in the color of the insulation, then they must first be marked.
If checking the cable shows that the conductor is intact, then the cause of the problem must be looked for in some other place.
You can find a cable break or find the location of a short circuit, as well as ring the wiring in the apartment yourself. Actually, it's not that difficult. The most important thing is not to neglect safety rules, even if you are an experienced electrician.
Calling the wiring
Dialing tools
Multimeter for dialing
Most often, testing is done with a multimeter - a special device designed to record various parameters of an electrical connection (current, voltage, resistance, etc.).
A simple multimeter is inexpensive and therefore deserves a permanent place in your toolbox.
A multimeter set to dial mode (most often indicated by the corresponding icon) will help you if necessary:
- Check contact availability
- Check the integrity of the electrical circuit
- Check the operation of the switch or socket
- Figure out which of the cable bundles (a very common situation in our apartments) is connected where.
Multimeters can be digital or analog, but the principle of their operation remains the same.
We will tell you how to use a multimeter to test wiring in the next section.
Testing with a multimeter
When testing the wiring using a multimeter, we perform the following operations:
We set the dialing mode on the multimeter - most often it is marked with an LED.
Then we move on to the place where the wiring rings - the junction box. There, as a rule, we are presented with a bundle of unmarked wires. We find the phase - after turning on the machine, we check all the wires using an indicator screwdriver. We mark the found wire using insulating tape or window tape.
- Next we look for zero. We turn on the multimeter to measure voltage (if we need to find 220V, we set it higher - for some models it is 600 V). Then we touch the phase with one multimeter probe, and with the other we test the wires one by one. As soon as the required 220V appears on the multimeter, the wire we need has been found. We mark it too.
- We check other pairs of wires using the same principle, and mark them in the same way.
Using a multimeter, you can not only test the wiring in the junction box, but also check whether there is a break in the wire (for example, in the power cable).
Conductor integrity check
We check the integrity of the conductor as follows:
- Disconnect the conductor from the current sources. If the conductor is a multi-core cable, then we do this for all the wires included in it.
- We turn on the multimeter either in the continuity mode, or in the resistance measurement mode at the roughest limit.
- We connect the probes of the multimeter: zeros should appear on the display, and in the ringing mode with sound accompaniment, the device will make a squeak.
- We connect the open probes of the multimeter to the conductor. An entire conductor shows zero resistance.
- For a multi-core cable, the verification procedure is the same, but you must first mark the corresponding cores (if they do not differ in the color of the insulation).
If, after checking, no violations of the cable integrity are detected, then the fault should be looked for elsewhere.
Testing the wires in the apartment, searching for a cable break or a short circuit can easily be done independently. And yet, we remind you once again - even if you are an experienced electrician, do not forget about the safety rules!
Testing wires and cables when repairing wiring in an apartment
Testing wires and cables is a necessary procedure after complete or partial replacement of home electrical wiring. In addition, it is necessary to test the wiring in an apartment or car when there is an electrical fault, but its exact location is unknown.
Of course, to check electrical communications, it is easiest and most reliable to use the services of a specialist. But sometimes they wait for days for an electrician from the management company, while private craftsmen have very high prices. Therefore, more and more often, owners prefer to carry out simple work related to electricity themselves.
And in this article we will talk about how to check the wiring in an apartment without resorting to outside help.
Testing electrical wires and cables at the installation stage
Installing new home wiring is always associated with certain difficulties, due to which the integrity of the conductors may be compromised even before the main line is used.
The new line is most often laid inside the grooves, or simply on top of the wall, which is then covered with a layer of plaster and subjected to other finishing work. The initial check of the electrical wiring is carried out before the groove is sealed or the wall is plastered.
If the master is too lazy to do this, then it is possible that, after an unsuccessful attempt to turn on the light or use the socket, he will have to chisel the plaster or open a groove in the thickness of the wall.
A wire break at the initial stage can occur due to the fault of both electricians and finishers. To avoid unpleasant consequences and unnecessary work, it is necessary to lay the electrical line according to a diagram drawn up in advance. Before burying wires in the wall, you need to check the electrical wiring for breaks.
How can you make sure the wiring is working properly?
First of all, you need to make sure that the phase and neutral cables, as well as the ground wire, are not in contact with each other - that is, there is no short circuit.
If the quality of the conductor insulation leaves much to be desired, then under the influence of high voltage it can be damaged, which will most likely lead to a short circuit.
Therefore, when buying an electrical wire, you should not save too much and purchase the cable, focusing on the lowest price. If you doubt the integrity of the insulating layer, check the line with a megohmmeter.
Having laid the line, you should not seal the groove and plaster the wall without first inspecting the surface of the cable along its entire length to ensure there are no mechanical damages.
If the line is not closed, and a visual inspection reveals no damage, it is called for a break.
How to check the wiring during installation is shown in the following video:
How to ring the wiring in an apartment?
The most common way to check the serviceability of an electrical line is to test it using a multimeter (tester). A multimeter is a measuring device that can be used to measure various electrical characteristics:
- Current strength.
- Voltage.
- Resistance.
There are two main types of these testers: digital and analog (arrow). However, the principle of their operation is the same. The price of a regular multimeter is low, and we recommend that every owner have such a device in stock, since it will become a reliable assistant in almost any procedure related to electrical measurements and installation.
By setting your tester to the continuity mode, you can easily check the presence of contact on any part of the wiring, diagnose it for a break, and also check the functionality of the socket or switch.
How to test an electrical cable using a multimeter?
Do-it-yourself testing of wires using a tester is carried out in the following order:
- Set the multimeter switch to dial mode (as a rule, an LED icon is drawn opposite this division).
- The black test lead must be installed in the COM socket (sometimes indicated by a ground sign or an asterisk). The red cable is inserted into the socket marked Ω (or R).
- Turn on the tester (if it is not automatically turned on when you turn the handle).
- Touch one probe to another. The signal that is heard will notify you that the meter is working properly and is ready for operation.
- On the wire being tested, remove the insulation from the ends and strip them until a metallic sheen appears, and then touch them with probes.
Diagnostics of electrical wiring in an apartment and the cost of the service in Moscow
Diagnostics of electrical wiring (electrical network)
is the most important stage of repair work in the house.
If problems are discovered in the network after repairs, it will be necessary to provide access to the electrical wiring, and for this you will have to ruin the new wallpaper. That is why all work related to electrical wiring must be carried out in a timely manner.
At the same time, a complete replacement of the wiring during repairs is not at all necessary if it has already been changed and there are no complaints about its operation. However, if your house in Moscow was built more than 10 years ago, it makes sense to think about completely replacing the electrical network in the apartment.
Attention!
Under no circumstances should you check the electrical wiring yourself. If the test is carried out by an unprofessional electrician without permission to work on the electrical network, then he can not only damage the wiring, but also risk his own health and even life.
Initial inspection after purchase
Wiring in a new building with a rough finish
Checking the condition of the electrical wiring is the first thing you need to do after purchasing a home. Even minor problems can lead to short circuits, fires and other unpleasant consequences.
New building
In new housing, the wiring is examined before major repairs and finishing work. First, the power of the devices that will be in the room is calculated, the cable cross-section is determined, and compared.
External visual inspection, compliance with laying rules are mandatory. To check the wiring in the house if it is already covered with plaster, you should use a multimeter. The circuit of the outgoing ends of the cables is closed and checked with the probes of the device.
Old housing
“Secondary” or older buildings are more difficult to verify. First you need to find distribution boxes, find out the location of sockets, switches, lamps. The wires in the boxes must not be damaged, rust or other contamination must not be allowed - such electrical equipment must be replaced.
Sockets and other devices are inspected in a similar way. The protective covers are removed and the resistance is measured with a multimeter.
Partial wiring replacement
Simply improving the wiring in one room will, first of all, reduce the load on the rest of the apartment, and secondly, it will allow partial renovations to be made in the apartment. This is most suitable for residents of Khrushchev-era apartments, communal apartments, hostels and Stalinist houses. And also to several families living in the same living space. If it is not possible to replace all the wiring, first of all you need to think about a partial replacement.
Priorities of work to improve the condition of existing or emergency wiring:
- Replacing traffic jams with automatic machines
- RCD installation
- Laying separate lines from the shield
- Bulkhead junction boxes
- Replacing sockets and switches
- Replacement of lighting devices and lamps
An easy way to test new wiring
Below I’ll tell you how to check the wiring when sockets and switches have not yet been installed.
The apartment wiring diagram (the simplest case for one power group after the machine, when both sockets and lighting are installed on one machine) can be represented as follows:
Simplified apartment wiring diagram
This diagram will appear after all connections in the junction box. What needs to be done to check?
First. Check for short circuit. In other words, there should be no contact between phase, neutral and ground. The quality of insulation at high voltage can either be taken on faith based on the quality of the cable. If there is no faith, check with a megaohmmeter (you can ask when purchasing). You also need to check visually whether there is mechanical damage to the cable insulation.
Second. Close all switches. In other words, connect all the wires that will be connected through the switch contacts. Then short-circuit three wires (phase, neutral, ground) on one of the sockets. Now the apartment wiring diagram has taken on the following form:
Checking new wiring
Third. Ring all terminals of sockets and lamps. As you might guess, the continuity test should show a short circuit. Or, to be more precise, the resistance of the wires is 1-2 Ohms.
Once all connections have been verified successfully, another important step is required. You need to confidently declare to the owner of the facility and other specialists carrying out work after the electrician that the electrical wiring has been checked and is 100% operational.
Fourth. New electrical wiring must be tested under the maximum possible load.
Once again, the essence of the article is that the new wiring needs to be photographed and called!