12/29/2016 master
Everyone has had cases when, while relaxing in a country house or at the dacha, the need arose to connect a tape recorder on the street. And to do this, I had to throw an extension cord from home, which is not always convenient. And this is where street sockets come in handy, as they will greatly simplify connecting electrical appliances outside the home.
Outdoor socket
Sockets of this type are intended for use outside the house. Their presence will make your garden more comfortable and convenient for friendly gatherings. Our article will tell you how to choose the most optimal outdoor model, as well as install it yourself.
Design features of outdoor socket models
We are all familiar with the sockets that our home is full of. But only a few people know that similar devices can be installed outside the house. And exactly, how can you even think of installing a socket in the garden if it sparkles at the first rain? It turns out that there is a special street block that will not only withstand all the hardships of street existence, but will also allow you to provide either high-quality and safe lighting for your garden, or simply connect any electrical appliance.
Note! The outdoor model differs from the indoor model in its high degree of moisture protection (IP65).
Socket design
Due to the fact that these sockets are waterproof, this fact had a significant impact on the design features of the products. All modern models with a high degree of moisture protection IP65 have:
- thermoplastic body, which is characterized by increased resistance to flammable and chemical substances;
- The product block is equipped with a special protective membrane. In addition, the outdoor socket and its protective membrane are made taking into account the grounding contact and the housing cover when installing the product yourself;
- all contacts are bronze and have a high level of conductivity;
- presence of flange and gutter. They are necessary to remove moisture past conductive parts;
- 100% tightness of cable entries. They are usually equipped with rubber or silicone linings.
Any street model that can be found on sale today will definitely have such a structure.
Socket design
Any socket consists of three main parts:
- Socket base. It is made from fire-resistant plastic or ceramics. Plastic is a more convenient material to use than ceramics. It allows you to provide for any features of the fastener, but can melt in the event of disruptions in the operation of electrical networks (voltage surges, increased loads, short circuits). The ceramic base is safer, removes heat well, is not susceptible to heat, but is quite fragile and somewhat more expensive than plastic.
- Conductive elements. Made from a copper alloy that conducts electricity well. Contacts made of uncoated brass are cheaper than others and are more often used, but they have some disadvantages. During operation, conductivity gradually deteriorates, since at high humidity and when interacting with aluminum (wire material), brass oxidizes. Tinned brass contacts are more reliable because they are less susceptible to corrosion and are easier to solder if necessary. All brass contacts do not spring well enough, which leads to the socket becoming loose. However, most devices use pressure washers to prevent this. The best, although rare, are bronze contacts. They spring well and keep contact reliably.
- Front panel. This is the outer part of the outlet. Most often, a socket is chosen based on the front panel to suit the interior and design idea - a variety of shapes and colors now allows you to realize any idea. The front panel is usually made of non-flammable polycarbonate, but glass, wood, and ceramics can also be used.
Socket design
What to choose from
Various modifications with IP65 waterproof rating are presented in a fairly wide range. These devices, first of all, differ from each other in their housings, which can be:
- rubber;
- rubber. They are used for cable extension cords and their accessories;
- completely poured out.
Outdoor socket in the wall
In addition, the division is not only based on the characteristics of the body, but also on other grounds. These features should have a direct impact on your choice. Therefore, before going to the market, you need to have at least a little idea of what you will have to deal with. The first thing you should pay attention to when choosing waterproof sockets (IP65) is the method of their installation. Today, such products can be installed in two ways:
- laying on the surface. Overhead waterproof models are considered more profitable, since it will be much easier to install them yourself. They are usually mounted on the wall of a building. Such models have a hermetically sealed housing. At the same time, they are equipped with a hinged lid that also protects the openings of the socket itself from moisture getting into them during rain or watering the garden plot, as well as from morning dew;
Note! Waterproof overhead sockets are considered the most optimal solution for a summer house and a private home.
Overhead sockets
- cutting into the surface. To install a mortise block into the wall, you need to make a special hole with your own hands, verified according to all the necessary parameters. Despite the difficulties with the installation process, mortise devices look more aesthetically pleasing than overhead models. If desired, they can even be disguised as the external facade of the building.
Note! For mortise street sockets you will need an additional special socket box. In this case, insulation will also have to be installed.
Mortise street socket
It should also be noted that the appearance of different models may be different. Therefore, you will also need to focus on this parameter in order to choose a more optimal option for yourself. The last point, which is of no small importance for a well-chosen device of this type, will be the manufacturer. Today on the market and in stores you can find various devices from domestic and foreign manufacturers. You need to be especially careful and demanding when choosing Chinese models. After all, here you can buy not very high-quality products. It is better to buy products from trusted brands and manufacturers who have been working in this market segment for several years.
Where to install and how to connect an outlet on the street.
The very first thing you need to do is decide on the place where you want to install the outlet. I’ll tell you right away that the socket must be of a special design and have a degree of protection - IP65. But this does not mean that the outlet can be installed simply in the open air.
It is best to install the outlet under an overhang or overhang of the roof of your home. But if this is not possible, then you can install a special shield that will protect the outlet from all precipitation.
Also, when choosing an installation location, you need to take into account such a factor as accidental damage to the outlet.
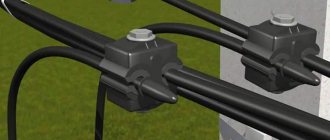
You can supply power to the outlet from the nearest electrical panel. And if you have one and it is located in the house, then you need to install an additional circuit breaker for the socket in the panel and run the cable. If, when laying a cable, it will pass through a wall, then you need to insert a piece of pipe into the wall and pull the cable through the pipe.
If the cable will run outdoors and it does not have a sufficient degree of protection, then the cable must be laid in a corrugated pipe or in a metal hose. And if the cable is sufficiently insulated, then you can do without additional protection.
The outlet itself must be installed on a non-combustible surface. If this is not possible, then the outlet must be isolated from the surface on which it is located. To do this, I advise you to buy plates made of special material. Or make it yourself using available materials.
When you connect the cable to the outlet, make sure that the rubber seals are intact and fit securely to the cable.
I recommend connecting the cable from below. This way you will protect the outlet from moisture penetration.
You should pay attention to the fact that you are using this outlet outdoors, which means that the person who will work with the power tool will be in constant contact with the ground. Therefore, you need to choose an outlet only with a grounding circuit. And during installation, be sure to connect it to the main ground loop.
You can also install an RCD for additional protection. It will trigger at the slightest current leakage, which means that a person will be protected from electric shock.
Finally, I advise you, when using an installed outlet, not to plug in devices that consume more current than it is designed for.
The current for which the socket is designed is usually written on its surface. If you don’t know how much current your drill or grinder consumes, then take the following values: 1 kW - 4.5 A.
I will end here. If you have any questions for me, write them in the comments, click on the social media buttons and subscribe to updates. Bye.
Expert opinion
It-Technology, Electrical power and electronics specialist
Ask questions to the “Specialist for modernization of energy generation systems”
How to install a socket in a dacha For laying underground, either a regular cable of the VVG type is used and it is laid in a HDPE pipe, or an armored cable of the VBBShV type is laid in the ground without a pipe. Ask, I'm in touch!
Moisture protection is an important selection parameter
Separately, it is worth considering the moisture-proof properties of the products, since they will be forced to work in clearly unfavorable conditions. If the moisture resistance is lower than required for its purpose (for example, IP65), then there is a risk of a short circuit due to moisture or dirt penetrating into the housing of the street outlet. And this poses a threat to the lives and safety of people.
Outdoor socket in electrical panel
The moisture resistance class (for example, IP65 and below) for street switches and sockets is determined by the International Electrotechnical Commission. But here you need to understand that such a device can be installed outdoors in different places:
- in the electrical panel. In this place, the device will have additional protection in the form of an electrical panel cover. Therefore, there is no need to buy sockets with a high water resistance class (IP65). Here, a degree of protection from moisture and dust at the IP44 level will be quite sufficient;
- directly on the wall of the house. Here, in order for the device to effectively withstand dirt and moisture, the waterproof class must be higher - about IP54/55, or even IP65.
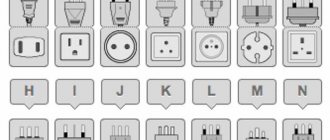
Today, the most popular models of outdoor sockets are those with a waterproof rating of IP65. To understand what these letters and numbers mean, here is a breakdown of the degree of protection of outdoor devices from moisture and dust:
- the abbreviation IP stands for International Protection, which translated from English means international protection;
- the first digit of the marking indicates the level of protection of the device from dust;
- the second digit indicates the level of protection of the device from moisture.
As a rule, all models of street sockets have a fairly high moisture resistance class. Here the choice must be made only in favor of a larger or smaller value. Moreover, it must be remembered that the higher the moisture resistance, the more expensive the device will be. Therefore, if there is no great need to protect the outlet from moisture (for example, it is installed in an electrical panel), then you can save money and purchase a less protected model.
Cost of installing sockets
The installation of sockets is not very difficult, but it requires some skill and specific equipment. Therefore, it is better to entrust this matter to professionals.
- Prices for installing an outlet depend on what kind of work needs to be done. If there is already a socket box in the wall, then the cost of installing the socket will be 200 - 400 rubles.
- Inserting a socket box into a wall costs extra and depends on the wall material: 150 – 250 rubles for a plasterboard wall, 300 rubles or more for a concrete or brick wall.
- Accordingly, the cost of installing a block of three sockets with preliminary insertion of socket boxes into a plasterboard wall will cost somewhere between 1200 - 1400 rubles.
- Also, if preliminary wiring of the electrical network is required, then this work is paid additionally and depends on whether the walls need to be tapped for this. Payment is made per linear meter of wiring.
Where are they used?
Outdoor sockets are used:
- in garages;
- at car washes and vehicle parking;
Waterproof outdoor wall socket
- in the local area, as well as dachas and country houses;
- on construction sites;
- as an element of the lighting system of squares, parks and public gardens. Here they are used for additional connection of equipment, for example, a sprayer.
Note! Only those models of waterproof sockets that are designed specifically for indoor use can be installed indoors. This ban is due to the fact that outdoor models will always have a higher water resistance class.
Choosing the right location
After you have chosen the socket you need from the available assortment, you need to select the location for its installation. Remember that a correctly selected placement location will allow you to operate the product for the entire period established by the manufacturers. But placement in the wrong place can in the near future negate all the advantages of this type of device. When determining the location of street-type outlets, you must be guided by the following requirements:
- devices must be placed under the visor. Its role can be played by either a roof overhang or a canopy over the porch;
- It is recommended to install the device in protective boxes or electrical panels;
- The height of the socket must be selected correctly. This way you can avoid excessive flooding of the device or its flooding.
Option for placing a street outlet
Even despite the high degree of protection of the product from moisture, prolonged and constant flooding can still lead to leakage of sealed elements and, as a result, failure of the outlet. Therefore, in order to protect yourself and your loved ones from the risk of electrical injury, the choice of location for this device must be carried out according to all the rules, taking into account all regulations.
Connection rules
When independently connecting street-type outlets to the power supply network, you must adhere to the following rules:
- choose the right location for the device;
- selection of the optimal option for conducting, grounding and connecting the cable.
All these actions must be performed taking into account the wiring parameters in the house. The process of installing this type of product (mortise model) with your own hands is as follows:
- First we make an inlet hole. To do this, you can use a drill and special attachments;
- Next, we place the wiring as close as possible to the internal outlet;
- then we attach a socket box with protective clamps for the device to the outlet space;
- Next, we fix the atmospheric pressure protection system in the box;
- after that we lay the wires to the connection point. For this purpose, a protective shutdown pass is used (if necessary).
DIY socket installation
Overhead models are much easier to install. Here you only need to attach them with fasteners to the wall in the right place. All manipulations with wires must be carried out in accordance with the requirements of street wiring. This will reliably protect the wiring from moisture and dirt. The cable must be well protected. Therefore, to protect it, you can use a shell made of polymer or PVC plastic. At the same time, all actions for organizing wiring for mortise and overhead models are carried out according to the same scheme.
LiveInternetLiveInternet
Outdoor sockets are designed for use outside the house, which provides convenience in connecting equipment. In the article we will consider the features, technical characteristics of devices and installation rules.
Features of installing street sockets
Outdoor sockets are manufactured taking into account safety parameters and protection in the external environment from adverse events. Their installation is practical for connecting lawn mowers, garden equipment and appliances to the electrical network. This simplifies the task of using wiring and carrying.
Outdoor electrical sockets are usually made of high quality steel, but all additional elements are made in accordance with standard safety regulations. Such devices are installed on a solid base, for example, on concrete, soil or tiles, as well as in gazebos, on a veranda or platform.
Very often, clients prefer to install electrical devices to control the switching on of street lighting. This is necessary so that in the evening you can easily turn on all the lights in the yard, as well as adjust the brightness of the light bulbs in the garden. As a rule, you can manage the overall system in several ways:
- remote control using a computer connection;
- the presence of a switch or socket block inside the house;
- All electrical switches and switches are located outside the house.
The choice of one of the control systems depends on the characteristics of the individual model, as well as its parameters, illuminated area, and so on. It is worth noting that in a large area it is easier to control everything remotely from home, and in a small area you can install an outdoor outlet.
All control systems are shown to make it easier for the owner to decide on an outdoor electrical installation system. It is best to install a block of street sockets, which will allow you to control all devices, both lighting and connection items, such as electric saws, mowers, and so on, from one place.
One of the varieties is the purchase of waterproof sockets, which ensure the safety of the electrical network from the adverse effects of natural phenomena and factors. For example, a high-quality device must withstand temperature changes and be protected from moisture and dust, which is very important in places where excavation and irrigation are carried out.
Outdoor waterproof sockets must be made in such a way as to avoid external interference, and also so that children cannot reach them. One of the safety rules is to install a metal case that is securely fastened. It can be designed for 2 or 4 sockets, which are standard connectors. For a better security system, models with a waterproof level are installed.
Outdoor sockets with moisture protection level
To ensure safe operation of an electrical outlet outdoors, it is recommended to install devices with a high level of moisture protection. According to the standards of the International Electrotechnical Commission, a street socket, as well as a switch, must have a certain class of protection from moisture and dust. For example, for a socket that is located in a panel or box, the class is designated as ip44. For an open device, the marking class is different - ip54/55, and the most popular and widely used are outdoor sockets ip65.
Explanation of the markings and security class of the device:
- IP—International Protection (from English—international protection);
- the first digit shows the level of dust protection;
- the second digit indicates the level of protection against moisture.
As a rule, street sockets are produced and manufactured only for outdoor use. After all, all characteristics and parameters are calculated for the external environment.
Installation locations for street sockets
Devices are most often installed in the following places:
- summer cottages or in the area near the house;
- in car washes, garages, as well as in parking lots or parking lots;
- on construction sites;
- by area of electric lighting near the house, in parks, and so on (with the further possibility of connecting other equipment or devices).
The main thing to remember when installing is that sockets designed for indoor locations are not suitable for outdoor use. Such devices have a low degree of moisture protection, which can cause a failure in the electrical power supply at home and the like.
Features of connecting a street outlet: rules
Considering the fact that the socket for outdoor installation has a durable casing and level of protection, it is still necessary to follow the installation rules and know some features, which include:
- correct choice of outlet location;
- method of conducting and connecting the cable;
- taking into account the wiring parameters in the house.
Choosing the right outlet location
It is recommended to make sealed street sockets under a roof, canopy, canopy or other hanging structures. All this is important to take into account so that the device does not flood with water, because even an IP65 system can be significantly damaged in heavy rain. Therefore, all systems must be installed in protective boxes or shields. Also, a sufficient height of the socket must be selected. This is important so that it does not become flooded or flooded in the wrong location.
Features of installation to the cable:
All electrical installations adapted for the street have two inputs - lower and upper for connecting the cable. To avoid problems with the electrical network, it is recommended to install the cable through the lower opening. Because the top connection may be flooded with water, even including the wire sealing ability.
Accounting for wiring parameters in the house
There may be nuances in the wiring that allow moisture to seep in and cause a short circuit, and these include solders and twists. Therefore, in the process of installing outdoor garden sockets, a single piece of wire is used, and couplings are also additionally attached to solder the cable. For wiring or cables that have a thin layer of insulation, a metal sleeve or corrugated pipe, as well as a special cable duct, are used so that the entire wiring system is properly protected from damage and exposure to natural phenomena.
Note! When installing the device for outdoor use, it should be placed on a non-flammable surface. If there are such areas, the installation should be accompanied by a layer of insulation with non-flammable properties, which will protect it from contact with other devices.
Design features of street sockets
Determining the characteristics from the influence of the external environment, as well as for protection from moisture or dust, determined some parameters of the socket elements:
- the presence of a protective membrane, taking into account the housing cover and grounding contact during installation of the device;
- contacts must be bronze with a high level of conductivity;
- the presence of a gutter and flange as objects for draining liquid past parts that conduct current;
- cable entries must be completely sealed, usually with silicone or rubber linings installed;
- The thermoplastic body of the socket must be resistant to flammable substances and the like.
In stores you can see sockets that have completely molded rubber casings. Such products are made of rubber and are intended for cable extension cords and their kits.
Rules for installing a street outlet
The waterproof socket is perfect for outdoor installation. Some use it for work, while others use it to connect Christmas lights, street lights or other electrical tools.
The installation process is different from the indoor installation method. This is due to the need to contain safety rules from external factors, as well as the practicality of the location. Let's consider the question: how to properly install a street outlet, taking into account all the rules? First of all, you should choose a place for installation with a set height under the cover to avoid problems.
Rules for laying underground and overhead cables
To lay a terrestrial cable, you must adhere to the following rules:
1. A standard PVC polymer sheathed cable can be laid if the total length is up to 3 meters.
2. The need for a longer cable must be accompanied by additional tensions as well as couplings, and such a wire must be installed with a grounded contact near the building. In this case, the distance above the ground may be more than 36.5 meters, and below the ground approximately 52 meters or more. Only taking these parameters into account will it be possible to connect a street outlet. The price of such wiring will be higher than usual.
For underground cable the following conditions must be met:
1. The cable that is laid underground must be equipped with a polyvinyl chloride insulating pipe. It must be soldered using solvents and some parts and elements that will ensure a continuous supply of current.
2. The cable of such an installation is laid in the ground. Under a terrace or courtyard the depth should reach 4.5 m, and under flower beds or lawns up to 7.5 meters in depth.
Installing an outlet with a grounding contact
The socket should be installed with a grounding contact, and the connection parameters to the building’s grounding loop should also be taken into account. It is also recommended to attach a special protective shutdown device to the wiring or cable, which leads to the street outlet. In some cases, an RCD will help protect against fire or electric shock that can occur through a damaged wiring surface or outlet.
It is worth remembering that the device is designed for a certain power, so it is important to immediately determine the connected tools. For additional protection, it is recommended to purchase a circuit breaker.
Installing a street socket with your own hands
The socket installation process is as follows:
1. Work must begin with identifying the inlet.
2. Install an outdoor outlet so that you can make a hole in the wall and place the electrical wiring closer to the indoor outlet.
3. After fixing the box to the output space, and after describing the circuit, connect it to the protective terminals of the device.
4. The panel must be secured to the box to ensure proper atmospheric pressure protection.
5. Route the wires to the connection point through the protective shutdown passage, if necessary.
Connecting to a power source
The surest way to run electricity to an outside outlet is to run a 240-volt circuit from the main panel in the house to an additional panel in the desired building. Once the circuit is laid, already near the external outlet it can be divided into different voltage levels, for example, 240 volts and 120 volts.
In this system, it is better to use an underground cable of the required length, and for safety reasons, protect it with insulating material to avoid external damage. The installed circuit breaker must also be rated for 240 volts. Outdoor socket, the price in some stores may vary depending on the power.
In many homes, it is compliant to install a booster switch rated at 20 or 30 amps. But first, you need to make sure that this installation system can withstand such an amplifier. In order not to make a mistake, you should call for help an electrician or a specialist who will consult on all the safety measures for installing a street outlet, whose photo (and video) will show you an easy way to install the device in your garden or yard.
It is worth remembering several ways to install a street outlet, taking into account all the parameters of use and safety. In the first case, this is the conduction of electric current to additional structures on the site, and in the second case, this is the conduction of electricity for working with equipment or other garden tools. All work is carried out simply, but at the beginning it is important to inform the local office in the area in order to carry out all installations according to regulations, observing safety precautions.
«««««««««««««««««««««««««««««««««««««««`
Series of messages “*** dacha plot / 2”:
Part 1 - Nettle is not only a source of vitamins in the spring Part 2 - Let's remember the autumn gifts of nature... Part 5 - 4 mistakes when planting conifers in a dacha plot Part 6 - How to care for fruiting grapes Part 7 - Outdoor sockets: features and installation rules Part 8 - Do you want a lot of currants? Dry the potato peelings Part 9 - Tips for beginners: how to plant an apple tree and why to do it... Part 47 - Important features for caring for currants in the fall Part 48 - Sea buckthorn in the open ground - all about planting, care and propagation Part 49 - How to properly prune an apple tree and pear in spring