To connect objects to the centralized power supply line, wires with an integrated load-bearing element are used that can withstand wind loads. Before connecting the SIP with a copper cable at the entrance to the house, it is necessary to study the regulatory documentation and purchase the necessary components. Switching errors lead to problems with the power supply to the facility.
Design features of clamps
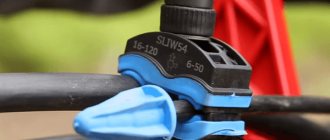
The design of the piercing clamp is based on two contact plates connected to each other.
There are teeth attached to them, with the help of which the insulation of the SIP cable is punctured. In this case, teeth with aluminum or copper wires create reliable contact. The entire structure is encased in a fiberglass-reinforced polymer body. It has two recesses, precisely adjusted to the diameter of the SIP cable itself. Each recess contains contact plates. Insulation punctures are made under the influence of pressure on the housing using a bolted connection, the second function of which is to fasten the SIP cable itself in the clamp.
The connection and fastening of two self-supporting insulated wires is ensured by clamping bolts, which are used with the so-called breaking head. It provides a guarantee that the contacts will not be pinched, the housing will not crack, and the threads will not break.
Attention! Clamps for SIP wires can be used to connect a section to an existing main without first disconnecting it. That is, all work can be done under voltage
Since self-supporting insulated wire is often used for laying overhead electrical lines, the clamps for them are a sealed device that provides resistance to all types of precipitation. To create complete tightness, rubber caps are additionally supplied to the device, which cover the free ends of the SIP cable protruding from the clamp
Mistake #10 – Repeated installation and dismantling
Dismantling the piercing clamp is possible, but reinstalling it is unacceptable!
The piercing elements (teeth) are very deformed and when reconnected they simply will not provide good contact.
By the way, regarding dismantling, although this is theoretically allowed, if you need to reconnect or replace the input, it is better not to touch the old puncture at all, but to place another one next to it.
By removing the clamp from the old place, you thereby break the tightness and expose the puncture sites.
Through them, moisture will penetrate into the SIP. For reliable insulation you will need a special sealed tape, which is not so easy to get.
How to connect the cable yourself
How to connect a vulture to a copper cable. Often during repairs a situation arises when an electrical cable breaks through the wall. This situation arises for the following reasons:
When drilling a hole in the wall (floor) with a grinder, due to the lack of visibility of the outlet to the electrical cable;
Broken wire in the wiring box;
When moving an outlet from one place to another.
You can repair the damage yourself, however, in order to understand how to properly connect the cable, you must follow a number of instructions.
The best option is to replace a complete section of wiring, that is, to replace the cable completely, from the distribution box to the outlet (switch);
You can't just twist one cable and another cable and wrap it with electrical tape, they have to be made of a certain material! For example, copper must be connected exclusively to copper, aluminum must be connected to aluminum accordingly. Copper and aluminum are nonsense.
Of course, replacing a complete section of wiring will require cutting the wall, which means damage to the plaster, wallpaper, tiles... However, if you connect one cable and another cable, simply twisting it and covering it with electrical tape, then after a while the wiring at the junction begins to oxidize and heat up!
Important: you can connect wires of only one metal! If one wire is copper and the other is aluminum, then how to properly connect the cable in this case? They can only be connected using a terminal block, because in it the wire strands do not directly touch each other
When soldering copper and aluminum wires without a terminal block, heating will occur due to oxidation and interruption of electrical contact. Remember this.
When connecting wiring to a residual current device (RCD) in the panel, or to an automatic differential current switch (difatomat), you should be especially careful to isolate the phase, neutral and grounding conductor from each other. Now in this case you know how to connect the cable yourself.
An excellent solution would be to use a heat-shrink tube, which is put on before connecting to the wire, then after soldering (or extension), it is moved to the connection site and heated with a special hair dryer (lighter, gas burner). After heating, the tube will be tightly compressed and provide an excellent seal.
If the wiring runs in a damp place, then it is recommended to only solder the wires (weld) and make improved insulation. Wires with a cross-section of four and six millimeters, for an electric stove - just solder! If the wires are broken and the remaining tip of the wire is one and a half centimeters, the wire is extended using a terminal block. If the exposed piece is small, then you need to strip it a little to the box... If the wires are of different colors, you must always connect the same ones - this will help to avoid problems in the future.
Connecting SIP to the cable on the facade
Let's consider the second option, when you connect a copper cable to a SIP on the facade of the house. Some recommend doing this using ordinary “nuts”. Simple and cheap.
Do not do this, since nuts have no climate conditions. Protection degree IP20. Connections can only be made indoors. And the loss of contact with its subsequent burnout is only a matter of time.
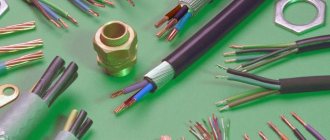
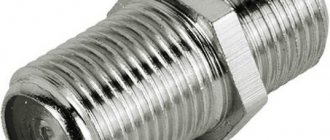
Using sleeves, although reliable, is the most inconvenient option. You will need special aluminum-copper adapter sleeves, plus heat-shrinkable tubing.
The main disadvantage, besides the need for a press, the inconvenience of installation at height and the shortage of such sleeves, is that the connection will be permanent. And if necessary, it will no longer be possible to disconnect the cable from the SIP without cutting it.
True, some energy network companies categorically require that the connection be inextricable and that there is no access to live parts up to the metering cabinet. Then this option may be right for you.
If you generally want to get rid of all these copper-aluminum transition connections when connecting SIP, then run the SIP cable directly to the input switchboard.
Just remember that it must be placed outside the room, since a standard SIP is a flammable conductor and it is prohibited to bring it into the house.
In addition, make sure that the shield is of appropriate dimensions. The self-supporting wire is produced with a cross-section of at least 16mm2, and if you have a three-phase system, then it will be problematic to insert it into the inside of the shield, plus bend it there accordingly with a minimum of free space.
Hello! The first option is precisely used for connecting to a self-supporting insulated insulation system; I would use this one. If you decide to use sleeves, ensure they have good contact and moisture protection.
The conclusion is this: Connection using P645, but you need information from the offline. sources about the possibility of this connection method for my case. Does it exist somewhere or not?
SIP wires are made of aluminum. This metal is subject to rapid oxidation in air and a film with high resistance to electric current is formed on its surface.
Copper conductors do not have such a negative property, so their direct connection with aluminum conductors can lead to loss of functionality of the entire cable line. In this article we will consider the following issues: connection and installation of SIP wires with different types of cable products, as well as their connection to each other.
Correct cable connection
Safe connection of wires
The correct procedure for connecting cables using clamping mechanisms guarantees high-quality, safe and stable contact. To correctly connect two wires, you need to follow the given algorithm.
Step-by-step instructions for connecting cables:
- Bringing working conductors to the point of contact.
- Disconnecting the network, unplugging the device from the socket, if the wire is being extended on household appliances.
- Removing insulation from the area where the terminal is inserted. You can trim the ends with a knife or using a special tool. The latter option is preferable, since professional equipment will not damage thin wires. Stripping is carried out until the characteristic shine of the wire appears.
- Installation of non-insulated cable parts inside the clamp sleeve.
- Fasten in an appropriate manner. These can be electrical punctures, tightening, squeezing and other types of fixation.
If necessary, you can additionally insulate the contact point.
Connecting the cable to the SIP on the support
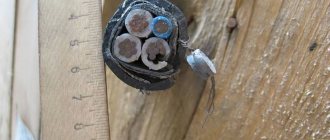
On the support everything is solved with the help of piercing clamps. As a rule, they use VVGng 3*10 cable with a monolithic core. To connect via a piercing clamp, there is no need to strip the insulation of the cable core.
They can be used equally with both copper and aluminum wires. It is rare, but it still happens that when a solid-core cable is punctured, the clamp teeth can damage or break the core.
If you are afraid of this option, you can use one-sided piercing clamps to connect SIP and copper. Brands of such clamps:
Punctures for SIP
The only thing that can be connected through a die clamp in the loops of anchor supports when installing a main SIP is a non-insulated support wire, for example in SIP-1. Everything else is just through the sleeves.
Expert opinion
Viktor Pavlovich Strebizh, lighting and electrical expert
Any questions ask me, I will help!
However, this size is very inconvenient for coupling with thin VVG conductors, so such a connection requires a special adapter. If there is something you don’t understand, write to me!
SIP brands
When considering known designs, the following positions can be distinguished in which the neutral core is used as a supporting wire:
- SIP-1 is a wire with a bare neutral core, connected to main lines and various branches;
- SIP-2 - a cable with an insulated neutral wire, intended for the installation of lighting networks, as well as supply lines;
- SIP-3 – single-core insulated cable used in high-voltage lines;
- SIP-4, SIP-5 and SIP-5NG, containing two or four insulated tightly twisted conductors without a neutral core.
The last three positions are used exclusively for arranging branches to houses (main line). The figure below shows the cross-sectional designs of different SIP wires.
Various types of SIP wires (section)
Types of SIP wires
A huge advantage of using wires of this type is the ability to connect two or more cables of different sections. However, experts do not recommend connecting wires of radically different diameters. Good contact is possible only when two or more wires of either the same or adjacent cross-section are connected. There are the following types of SIP wires:
- SIP-1
- wires of this type are distinguished by the fact that all copper conductors in them, except the neutral one, are insulated with a special material - SIP-2
- in these wires all cores are also insulated, except for the neutral one. The difference lies in the method of insulation - here a material with special molecular cross-sections is used - SIP-3
- recommended for installation of electrical networks in private homes. A distinctive feature lies in the design of the wire - there is only one aluminum core, which is insulated with a material with light-stabilized particles. When purchasing it, a specialist recommends asking the seller for a quality certificate - SIP-4
- characterized by the absence of a neutral core. All conductors are carefully insulated with special material, which ensures absolute tightness - SIP-5
- wires of this type are used mainly for laying electrical networks in factories, in cities or between populated areas. A distinctive feature is that each core is placed in a special box. It is almost impossible to connect wires of this type on your own.
If you need to connect two SIP wires to each other, and you are striving to make a reliable and safe contact in all respects, consult with specialists before proceeding. Not all wires can be connected to each other. For example, a thick wire with a cross-section of 4 mm is very difficult to properly connect to a cable that has a cross-section of 1.5 mm. Here it is necessary to follow a certain sequence, and any deviation from technical recommendations can lead to problems in the further operation of the power grid.
Connection of SIP with VVG cable
For input, SIP-4 or SIP-5 with 16 mm2 conductors is used. A smaller size is prohibited by the PUE, and this permissible cross-section will be more than enough. The number of cores can be 2 or 4, depending on whether the power supply is single-phase or three-phase. For branches, SIP-2 grade wire with a supporting zero core is also used.
According to the standard, the maximum span for an overhead wire is 25 m. If the distance from the building to the power line is greater, an intermediate support with a supporting clamp is installed.
A branch is made on the support of the main line. The SIP is attached to the wall using a bracket with an anchor clamp. The clamp for the carrier wire SIP-2 is made in the form of a clamping die (Fig. a), and for SIP-4 a clamp is used that simultaneously captures all the cores, the tension between which is distributed evenly (Fig. b).
Anchor clamps for SIP-2 (a) and SIP-4 (b)
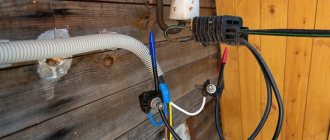
The cores of the VVG copper cable entering the house are connected to the wire using piercing clamps (circled in red in Fig. a). They guarantee the electrical connection of conductors without stripping the insulation.
Connecting SIP with VVGng cable using piercing clamps: a – installation of SIP on the wall of the house; b – piercing clamp device for two wires
SIP with a copper conductor is connected in the following ways:
Piercing clamps (Fig. b). The insulated wires are inserted into the holes in the clamp, after which the top bolt is tightened. The hermetic body of the device is made of glass fiber reinforced polymer. It reliably protects the connection from moisture and is resistant to ultraviolet radiation. Tightening can be done with one bolt or separately for each core. Branch clamps (photo below). The design includes 3 bimetal plates and screws for fastening them. The cores are stripped, inserted between the plates and fixed. An insulating box is placed on top. The nut connection is preferred for aluminum wires that are sensitive to spike nicks. Shells. The cores are stripped, inserted into the sleeve and crimped with a press. A heat-shrinkable tube with gel inside is placed over the connection to seal it.
Branch clamps (“nuts”) for connecting wires
An alternative solution is to directly insert SIP into the electrical panel of the house, after which the wiring is done inside. The power supply company allows the use of such projects, since any break in the input cable creates a loophole for the theft of electricity.
It is prohibited to lay aluminum PUE cables on combustible structures. Here you will need to switch to a copper cable, for example, VVGng.
For any input option chosen, you should request technical specifications from Energosbyt and perform the work in accordance with them.
The piercing clamps for connecting the cable are sealed and accessible for inspection. To prevent Energosbyt from asking questions about the possibility of electricity theft, you can install clamps with a breakable head that cannot be disassembled.
The connection can be made to the input of a conventional two- or four-pole machine. SIP is a rigid wire and connecting it is not very convenient. A regular cable is connected to the output of the machine, which ensures a reliable transition. It is preferable to place the machine outside the house in a closed, sealed box. Its rating is chosen higher than that of the home system protection.
Another advantage of this method is that SIP insulation is not designed for installation inside the house. Its contact with any surface is undesirable. In addition, polyethylene is a flammable material, although a wire with a cross-section of 16 mm2 is difficult to heat to the ignition temperature in the presence of a machine gun. If you lay it inside the house, you should choose the SIP-5ng brand, where the insulation does not spread fire.
The weak point is the input through the wall. In wooden houses, the installation is done through a metal pipe. In other cases, it is enough to lay a plastic one.
Experts may have different points of view regarding the introduction of electricity. To avoid having to redo it later, the connection project should be agreed upon in advance with Energosbyt.
How to install SIP correctly
As for how to properly install SIP to a house, you can find a lot of varied information on the Internet, which is sometimes quite contradictory. What is the best way to proceed? Where to go for help? Of course, contact the manufacturer!
We find the website of the Niled company, which modestly calls itself “the main initiator of the implementation of self-supporting insulation systems in the Russian Federation.” Here you can find technological maps for carrying out various works on lines performed by self-supporting insulated wires, which were developed together with PJSC Rosseti.
We find album No. 1, cards No. 5, No. 6. The maps describe the technology of work on connecting the input to the house from the main VLI - an isolated overhead line, that is, SIP. Specially trained personnel who have the appropriate materials and tools, as well as protective equipment, must connect the SIP from the overhead line to the house. That is, the question of choosing the best method is removed by itself. You contact the energy supply company, pay the specified amount of banknotes and wait for the team to arrive.
Connecting SIP to the house. It was smooth on paper
But it's only smooth on paper. As in any business, there are many subtleties, and connection to the line must be entrusted to a team from the energy supply organization.
Unauthorized connection of a home input to an overhead line can easily result in several months of treatment spent in a hospital bed. There is nothing to do on the support without using the appropriate tools and protective equipment. Also, you need to remember that you can be fined a hefty sum for unauthorized connection.
But even if the person reading these lines is not an electrician, it is important to navigate them. For example, what are the editing errors, who can tell?
SIP 2x16 mounted on the wall of a private house
We need to touch on one more topic - where is the equipment of the energy supply organization, and where is the subscriber equipment? To answer the question, you will have to look into the agreement concluded with the energy supply organization - the guaranteeing supplier of electricity.
The contract must indicate in black and white the boundary of the balance sheet. Formally, this is the boundary of the site, but in the Act for the delimitation of balance sheet ownership, this boundary usually runs along the accounting board. Tell us in the comments where this border is for you - at the place where the SIP is connected to the input circuit breaker, at the terminals of the meter, or at the terminals of the cable going to the house?
There is good news for new subscribers: from July 1, 2022, in accordance with Federal Law No. 522 - Federal Law, the responsibility for installation, replacement, verification, replacement and operation of electricity meters falls entirely on the electricity supplier. But as usual, there are often problems with this locally. For example, they may say “there are no meters, they will bring them in half a year.” And what? People have to agree to bet at their own expense.
In this article we will consider only the issue of electrical connection of SIP from the consumer side.
Wire switching methods
The connection of conductors can be carried out in various ways. Some of them:
- Using terminal blocks - this method is quite durable and reliable.
- Pressure testing using sleeves. In this case, knowledge of the basics of technology is necessary. The connection is strong, but requires the use of special tools.
- Bolted connection - even a novice master can easily handle it. This method is used in difficult situations, for example, when you need to switch from an aluminum conductor to a copper one.
- Welding is the most reliable method. With its help, the strength of the connection is ensured, but certain skills and the presence of a welding machine are required.
- Soldering - it is important to use a similar method if the conductors will heat up to a temperature of no more than 65 degrees.
- Various spring clamps are easy to install and provide reliable switching when operating conditions are met.
SIP-3 connection in span
To connect SIP-3 wires in a span, several types of sleeves can be used. For example, crimp connectors from Niled - MJRP.
On isolated low voltage lines VLI-0.4 kV, similar connecting sleeves MJPT or GSI-N are used.
To install the crimp connector, you will definitely need a mechanical or hydraulic press with special dies E173 and E215.
To ensure reliable sealing of the connection, it is necessary to compress the outer edges of the sleeve, which have metal rings.
Characteristics of connecting sleeves:
Niled MJRP
Sicam MJPT G28
If you do not have a press, insulated wires in the span can be connected in another way. It is especially common during prompt emergency repairs in the event of a SIP-3 break.
For this purpose, collet-type connecting clamps are used - MHV. They don't require a press.
The connected ends of the wire are stripped in turn of insulation to a length of slightly less than half the length of the clamp.
After this, insert it all the way into the collet clamp and, using two standard open-end wrenches, tighten the corresponding cap nut. Tightening occurs until the collets inside the clamp come off.
This moment should be accompanied by a characteristic click.
Characteristics of collet clamps for VLZ:
When installed on a VLZ-6-10 kV protected wire, collet clamps must be installed complete with slide-on or heat-shrinkable covers. Moreover, here you need to use high-voltage thick-walled thermotubes.
Before connecting the wires, do not forget to first put heat shrink on the SIP-3 itself. And only then carry out their sleeving.
After tearing, the heat-shrinkable cover is pushed onto the tightened clamp and the tube is heated using a gas burner, gradually shifting the heating zone from the middle to the edges.
Typical mistakes when connecting wires by crimping
Some important tips for novice electricians, or people who independently use such a connection method as crimping wires with sleeves.
1. Use of sleeves with a cross-section smaller than the wire.
Never use sleeves smaller than the required diameter. To insert wires into them, it is necessary to reduce the diameter of the core, which is done by cutting off part of the conductor and reducing the cross-section of the wire.
Those. if you want to extend a wire with a cross-section of 2.5 mm2, and your sleeve is 1.5 mm2, you do not need to take a file and trim the wires so that they fit into the sleeve.
Thinning the wire leads to an increase in the resistance of the contact area and also reduces its throughput. Therefore, the purpose of maintaining the same conductivity along the entire length of the line is lost. At the junction, the wire begins to heat up and quickly collapses, it’s good if there is no smoke or flame.
Reducing the cross-section of the wire also leads to a decrease in the mechanical strength of the connection. With any external influence it can simply break. Finding a break in an extensive network is not an easy task even for a professional electrician, unless, of course, there are special instruments. But they are not in every home.
Use of large diameter sleeves.
Increasing the diameter of the sleeve also does not bring any benefit. It is not always possible to achieve a reliable and strong connection. The use of the “folk” method of bending the ends of the wire in half can be considered only a partial solution. Practice shows that the mechanical strength of the pressed joint in this case is also reduced by almost half.
Cutting cartridges into several pieces.
Many beginners use this method to save on cartridges. Do not shorten the factory sleeve. This leads not only to the inconvenience of working with pliers, but also to an increase in resistance. The consequences are described in the first tip. Mechanical strength also decreases due to a decrease in the length of the contact section.
Common installation mistakes
Now let's pay attention to the main points during installation, which you can and should check during the work of an electrician.
Firstly, the distance from the main support to the house should be no more than 25 meters. Otherwise, you will have to install an additional support or make a pipe stand
Firstly, the distance from the main support to the house should be no more than 25 meters. Otherwise, you will have to install additional support or make a pipe stand.
You will also need a pipe stand if the energy supply organization does not give permission to install a metering cabinet on the facade and requires it to be placed on the nearest support.
Error No. 18 It is impossible for the clearance from the ground to the SIP wire on the facade of the house to be less than 2.5 m.
Don't be lazy, take a tape measure and check this height. If you cannot fulfill this requirement, install a gander.
Error No. 19 Do not attach the anchor bracket to the roof elements (windbreaker).
The load-bearing capacity of wood in these places is rather weak and fasteners can be torn out by the roots due to strong wind loads. Although the weight of the SIP is small, the lever, a couple of tens of meters long, does its job!
It is best to drill to the gable of the house using a good old traverse or supporting beam.
Error No. 20 It is also not recommended to attach SIP to the side wall of the building.
The point here is icicles, which in the spring often damage wires when they fall.
You can, of course, get confused and get rid of the icicles once and for all. But that's a completely different story.
The cable run to the switch cabinet must be protected with corrugation.
Error No. 21 The corrugation should not be gray as for home wiring, but resistant to ultraviolet radiation + non-flammable.
On wooden walls you need to use a metal hose.
Error No. 22 The end of the cable at the point of connection to the SIP on the facade should look down, not up.
This is protection against moisture penetration into the cut cable.
It’s even better to seal the end of the corrugation, where the wires come from, with a “TPI mini” glove from KVT.
It sticks perfectly to 25 and 32 corrugations.
If the cable goes directly into the attic, and does not go down the facade, then the entry through the wall must be made through a metal sleeve.
In this case, the tube should not be straight, but with the end bent towards the bottom.
The holes in it must be reliably sealed after inserting the cable. To protect the SIP itself from moisture, both on the support and on the facade, caps are used.
Error No. 23 If they are not there, then in a couple of years the wire, like a pump, will pick up water and very soon fail.
Here is a clear example confirming this problem.
https://youtube.com/watch?v=DWOP43hQ4zc%3F
The caps cost a penny, but without them long-term and reliable operation of the self-supporting wire is impossible. Almost every piercing clamp has such a cap in its design.
However, on some models they are attached to thin straps. It happens that the strap comes off and the cap is lost.
In this case, do not save money and be sure to buy yourself a new one. Fortunately, they are also sold separately.
Error No. 24 There is no need to remove the insulation from the cable core when connecting through a piercing clamp.
If your cable cross-section is too small (2.5mm2-4mm2, but where would such a cable go???), then the manufacturer recommends folding the core in half to ensure a larger contact area.
A thin vein can get between the spikes, and even if contact appears at first, over time this place will heat up and the cable will burn off. Cores from 6mm2 do not need to be folded in half.
The SIP itself from the support to the house, despite its insulation, must pass at least 0.5 m from the nearest trees and shrubs.
If you do not want to cut down your favorite birch or apple tree, then it is better to choose another attachment point on the facade. Any SIP passing through trees will eventually fray.
Mistake No. 25 Don’t listen to those who say that such wires can be safely run through green spaces and nothing will happen to them.
Even thick veins of 50-70 mm2 after a few years with constant winds are cut through by a branch like a hacksaw.
Here is a summary table of the minimum offsets and distances when laying SIP wires in a residential building.
https://youtube.com/watch?v=GYs2IU8b3_w%3F
How to connect SIP with copper cable?
This is perhaps one of the most pressing issues for people involved in electrical wiring work. It is no secret that private construction is now actively developing in our country. Moreover, many, for a number of reasons, prefer to carry out all the work with their own hands. This also applies to electrical installation procedures.
The laying of electrical networks for private houses or outbuildings is most often carried out using self-supporting insulated power wires (SIP cables), which have many advantages specifically for installation work. The main advantages of SIP wires:
- safety - electrical installation work can be done by hand. It is not necessary to resort to the services of professional electricians, since the design of wires of this type ensures absolute safety of the process. But if you do not have the skills to work with electricity, then it is better not to take risks and call an experienced specialist for help.
- reliability – SIP wires provide stable current transmission in any conditions
- performance characteristics - cables of this type can be used in various weather conditions, at any temperature. They are strong enough to withstand strong gusts of wind, and are made of special materials that maintain flexibility and elasticity in severe frosts
And, of course, an important factor is that SIP wires can be connected to cables of other types that have cores made of dissimilar metals.
Working with Energonadzor
- Submit an application to the local distribution zone to issue you a technical specification. Typically, such a document is prepared within 1 month. In the summer it’s really hard to get it, and you have to wait the entire period: the document is not complicated, but there is a long queue for it. The sooner you come (late winter or early spring), the easier it will be.
- You enter into contracts: for the installation of sip cable from the pole to the house, for the use of electricity.
- When submitting any documents, you must have the original documents for the plot, house, passport - this is relevant for new subscribers at the address. But you leave only copies in the RES.
- After receiving the specifications for installing a sip cable from the pole to the house, you must agree on the timing of the connection and the installation location of the meter (see above). Remember one thing: you choose the location of the meter. The main condition for this is that the metering device must be at eye level from 160 cm to 180 cm, and there must be an approach to it.
- Physical connection of the SIP cable to the house from the pole. This process takes about 2...3 hours, but there is a queue for it. In addition, keep in mind that in the event of severe weather conditions, the team sent to eliminate the accident may also not arrive. This is a force majeure situation; to resolve it, it is necessary to maintain telephone contact with the local energy supply organization. There can be no lateness for connection work without reason.
Today, the installation of self-supporting insulated wires (SIP) is a necessary process that increases the level of safety of populated areas and also significantly reduces energy costs. Due to the use of a durable protective coating for the wires, short circuits are excluded, including due to the lack of contact with conductive elements and the impossibility of breaking the wire.
Installation of SIP wires
The wiring process includes the necessary steps, the observance of which guarantees efficient and long-term operation. Briefly, the installation process includes:
- Initial cleaning of the installation area.
- Rolling out and adjusting wires, as well as ensuring the inviolability of wires with conductive elements.
- Installation of brackets.
- Installation of supports.
- Rolling out SIP.
In order to manually install a SIP cable, you should arm yourself with complex technical equipment, with the help of which you will fasten the tape clamp, trim the tapes, secure the brackets, roll out the roller and the leader rope. Such equipment should not only be of high quality, but also time-tested. Therefore, the process of installing wires is extremely unsafe and should be entrusted to the hands of professionals.
Violations that must be avoided when installing SIP cable
Due to ignorance or in case of unqualified intervention, the chances of a power outage or serious injury to workers increase significantly. Typical mistakes include:
- Rolling wires over conductive surfaces.
- Re-installation of branch clamps.
- Insufficient number of clamps during dismantling.
- Using inappropriate tools for the job.
To avoid such mistakes, you should entrust the process of installing SIP cables to trusted contractors, who in their work use only new and high-quality equipment, have all the dismantling elements and have the appropriate qualifications of craftsmen.
Why should you entrust the SIP installation process to us?
We have at our disposal only time-tested and best technical equipment of domestic and foreign production. Our craftsmen not only have solid work experience, but also a license to carry out their activities. We guarantee you high quality installation and dismantling in any locality.
Our main advantages:
- Efficiency;
- Mobility;
- Efficiency;
- Quality assurance;
- Affordable prices for SIP installation.
Developed more than half a century ago by engineers from Finnish network companies with the assistance of power equipment manufacturers as an alternative to bare aluminum wires and cable rope systems. Installation of such lines does not require special skills from the performer. Various technological operations have been significantly simplified: laying on supports, connecting SIP to SIP, to existing power lines, to consumers.
How to install correctly
As mentioned above, when this electrical installation is installed, there is no need to uninstall the cable itself. For example, you need to connect a branch to an existing line. How can such a connection of two wires be made (in fact, this will also be the fastening of the beginning of the outlet section)?
- The branch clamp is placed on the live line.
- The end of the wire for the branch section is inserted into the second groove.
- The bolt head is manually tightened until it stops.
- Then, using a spanner wrench, the bolt is tightened to such an extent that its head simply falls off. This indicates that the teeth of the device have reached the metal strands of the SIP wire.
The entire process is carried out only with dielectric gloves. Installation is quite simple, but it is not worth carrying out if you are not an electrician. There are certain restrictions and requirements regarding admission to this type of work. This is especially true for areas under voltage.
Installation of SIP wires - stages and requirements
What is branch compression - design features and installation method
Safety precautions
You cannot carry out any electrical work:
- in high humidity, fog or rain;
- in the dark;
- wearing clothes with short or rolled up sleeves;
- using a “walnut” connection when connecting on the facade;
- if any damage to the VLI is found on the support.
Step ladders should be used with extreme caution. Their length cannot exceed 5 meters, and the angle between the pillar and the stairs should be 60-750
In any case, pulling wires while standing on a ladder is strictly prohibited.
For installation you will need:
- turn off all power supply circuit breakers so that the SIP is without load;
- overalls with thermal protection;
- technological maps (all work is carried out only according to these documents);
- protective equipment regulated by technological maps;
- insulate with protective covers wires that may accidentally come into contact with a person.
The work is carried out by 2 electricians: one climbs the pole, and the second carries out installation on the facade. Installers should have a first aid kit. Lifting is carried out from the side opposite to the location of the SIP. This is necessary so that the electrician does not fall if the wire breaks.
First, you must obtain permission to carry out work from the owners of the VLI. It is necessary to check the stability of the pole on which the VLI is located. If we are talking about a wooden support, then it is necessary to assess the degree of decay. For this purpose, a special device is used - POZD. The installation diagram is shown in the figure.
Connecting SIP cable to copper wire using terminals
If you need to connect a SIP cable to a bare copper wire at home, and you do not want (or do not have the opportunity) to contact specialists, buy spring terminals. They are inexpensive, but allow you to connect wires with cores of dissimilar metals quickly and safely.
The process of connecting wires takes place in several stages:
- the insulation is removed from the wire
- the bare core is inserted into a special hole in the terminal
- the core is fixed by a spring
Connecting wires with cores made of dissimilar metals is problematic not because of the quality characteristics of the materials or the complexity of the process, but because aluminum and copper have different degrees of oxidation: aluminum oxidizes almost instantly upon contact with external factors, while copper does this very slowly. As a result, a film forms at the junction, which prevents the creation of reliable contact.
Spring terminals are made from a special material that is treated with a paste that prevents oxidation of the wires, which ensures a reliable connection and stable contact between them.
Connecting the cable to the SIP on the support
On the support everything is solved with the help of piercing clamps. As a rule, they use VVGng 3*10 cable with a monolithic core. To connect via a piercing clamp, there is no need to strip the insulation of the cable core.
They can be used equally with both copper and aluminum wires. It is rare, but it still happens that when a solid-core cable is punctured, the clamp teeth can damage or break the core.
If you are afraid of this option, you can use one-sided piercing clamps to connect SIP and copper. Brands of such clamps:
Types of piercing clamps for SIPs
- P4 – small-sized clamp for connecting a subscriber and street lighting (Fig. a below). Contact plates made of aluminum or tinned copper are used.
- P616R – for entry into the house and street lighting (Fig. b). The contact plates of the clamp are made of tinned copper.
- P645 - for connecting SIP with a copper or aluminum branch (Fig. c).
The listed types of clamps are used to connect copper or aluminum cores to each other. They can be installed on live lines. Secondary installation is not possible due to the breakaway bolt head made of aluminum alloy.
Piercing clamps for SIP: a – P4; b – P616; c – P645
What is SIP
First you need to understand how SIP works, what brands there are and how they differ. The abbreviated name SIP stands for Self-Supporting Insulated Wire.
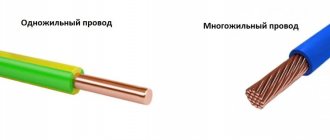
Although for many, wire and cable remain synonymous. And SIP is also often called a cable. Apparently due to the fact that it is heavy and thick)
The main difference is that a wire is a metal conductor that can be solid or stranded, bare or insulated. A cable is a set of wires that have separate insulation, which are combined together and covered with a common insulating sheath. I wrote more about power cables here.
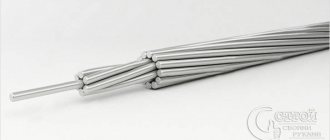
The design of the SIP wire includes phase conductors consisting of aluminum or aluminum alloys and a neutral conductor. The neutral conductor can be made entirely of aluminum alloy or have a steel core inside, coated on the outside with an aluminum alloy. Also, the wire design may contain additional cores designed to power street lighting networks.
It should be immediately noted that SIPs with main copper cores are not produced.
According to the current GOST 31946-2012, the following brands of SIPs are distinguished, intended for networks with a voltage of 380 V:
- SIP-1 has insulated phase conductors, the supporting zero conductor has no insulation.
- SIP-2 has insulated phase and neutral conductors. The zero core is the carrier. Designed mainly for installation on overhead lines (OHL) and for organizing linear branches from them.
- SIP-3 with additional protective insulation is designed for networks from 6 to 35 kV.
- SIP-4 also has insulated phase and neutral conductors, but structurally does not have a load-bearing element. The load is distributed evenly between all cores. Such wires cannot be connected to each other in overhead line spans. It is allowed to connect them only on supports.
- SIP-5 mainly differs from SIP-4 in that it is capable of operating at low temperatures. This GOST does not talk about it.
For “domestic” use (connecting private houses), in most cases, SIP-4 wire is used. Its minimum cross-section is 16 mm2, the number of cores is 2 (for single-phase connection) and 4 for three-phase.
It should be noted that flame retardant wires must be used for inputs into the building and for laying along the walls. Such wires are marked with the letter “n”. For example, SIPn-4. It is SIP with the letter “n” that is recommended in the specified GOST (Table 9a) for branching from overhead lines and for laying along the walls of buildings and structures.
I will add that from the point of view of conductivity for SIP, as well as for other types of cables and wires, the important parameter is the resistance of the core, and not its diameter or cross-section (which is essentially the same thing). I have spoken about this more than once in my articles and comments, but still most readers, when checking a core, take a caliper rather than a milliohmmeter. The maximum electrical resistance of SIP wire cores is given in GOST 31946-2012, Table 3.
Connecting dissimilar wires
Entry into the house is usually carried out through a VVG cable. It is not recommended to connect copper and aluminum conductors directly. Due to the high resistance, the contact point heats up and quickly fails. However, there are simple ways to create connections between dissimilar conductors.
The basis is the exclusion of their direct contact. The simplest method is to use a bolted connection. Here you will need a bolt, a nut, several washers and a groover so that the contacts do not weaken over time. When tightening the bolt, a washer is installed between the conductors to protect them from direct contact. It will be even better if you tin it.
Connecting copper and aluminum wires to each other with a bolt and nut
The connection should then be wrapped with insulating tape.
A common way to connect dissimilar conductors is to use terminal blocks. You can use a regular terminal block, but there are special ones, for example, Wago terminals, as well as series 222, 773, 2273, where the connection is made without screws. The method is suitable for small cross-section wires.
The cable conductors at the input have a large diameter and here it is better to use aluminum-copper sleeves pressed onto them.
Wire rolling
The installation of SIP begins after installing the VLI supports with clamps attached to them.
Anchor clamps are installed on the anchor supports that carry the tension force of the conductors, and supporting clamps are installed on the intermediate supports located between them.
Installation of SIP cable begins with its unrolling. To do this, perform the following steps sequentially:
- Special unrolling rollers are installed on all supports of the anchor span on which the wire is mounted. On the extreme, anchor supports, the rollers are fastened with a belt; on the intermediate supports, the rollers are suspended on a hook in the eyes for supporting clamps;
- A drum with wire is installed behind one of the outer supports of the span. It is located in a vertical position on special stands that allow it to rotate during the rolling process. In order for the wire to enter the roller at a flatter angle, it is recommended to install the drum from the support at a distance not less than its length;
- On the other side of the mounted span there is a drum on which a leader cable is wound, usually a synthetic rope with a diameter of 10–12 mm, depending on the rolling method (manual, mechanized);
- Next, the leader cable is rolled out manually. This operation is performed by sequentially lifting onto each support, threading the cable into the roller and further pulling it;
- After lifting to the last support, the leader cable is connected to the SIP using a special stocking and swivel that prevents the wire from twisting during the rolling process.
This is where the preparatory procedures end, and the actual rolling out of the wire begins. The leader cable slowly, without jerking, is pulled in the opposite direction. During mechanized rolling, the drum winding device is driven by an internal combustion engine with a gearbox; the leader cable can also be pulled out manually.
During the rolling process, the wire, following the leader cable, rises to the support and takes its place on the rollers. Rollers and drums must be located so that when rolling there is no friction of the wire on the ground, support and other structures. It is unacceptable to use a technology in which the wire is rolled out on the ground and then lifted onto a support.
How the connection can be made
The connection may be different, in particular it depends on the location of the metering panel.
The metering board is installed on the line support
To make such a connection, you must use a solid conductor. In this case, experts advise using a piercing clamp.
It is specifically designed for this purpose, but it is important to consider the parameters used. You also need to take into account that you can use the same SIP or copper cable as a tap
You need to take a closer look at the main components of the compression; they are steel and equipped with sharp teeth. By the way, the teeth can be used for tightening bolts, if the need arises. Using such a tool, you can ensure complete tightness of the connection and reliable contact.
When connecting to a SIP, you should use standard fittings. At the same time, experts are of the opinion that the optimal solution would be to run the wire into the distribution box. In this case, there will be no need to make a connection. But if you need to make such a connection, then it is better to do it outdoors, at the entrance to the house. In this case, use a piercing clamp; you can also use special die clamps. By the way, these squeezes are somewhat reminiscent of nuts in shape.
These clamps are intended to connect the cores together. Moreover, they can be created from various materials. This ensures that the conductors do not come into contact with each other. When using such products, the conductors will only come into contact with steel plates.
Shield on the wall of the house
In this case, a solder clamp is used, and the solder is inserted directly into the shield. When using a SIP, you will need to install special clamps on the wall; they are needed to secure the wire. And when using a copper cable, you will need to tension a steel cable. A connection between a SIP and a copper product may also be required if there are several buildings on the territory, and a SIP is used for wiring. A piercing or tablet clamp must also be used for this purpose.
Some use a special sleeve and then perform crimp testing.
But this method is considered unjustified for several reasons:
- a special device will be required;
- such a procedure is used to restore the veins, otherwise it is not necessary;
- another technology will provide greater strength than a sleeve.
Installation sequence
To connect using GAM bimetallic sleeves you must:
- Remove the insulation from the SIP cable core and put on the coupling.
- Deform the retainer using a 6-sided mandrel, moving the tool along the sleeve and performing successive compressions.
- Strip the copper cable of insulation, insert it into the coupling and secure the cores with a hexagonal mandrel. The length of the exposed area depends on the dimensions of the sleeve.
- Place a shrink tube on the metal elements; to increase the tightness, you can use several protective covers.
If you plan to use clamps, then you need to bring the cable to the wall of the house and secure it with an anchor. Then a clamp is put on the wires (main and branches) and the bolt is tightened. It is necessary to follow the installation rules: with a weak force on the key, the contact pins do not penetrate well into the cable cores. Protective caps are placed on the exposed ends.
The main line entering the house is laid through a pipe that prevents melt or rain moisture from flowing into the shield.
Bolted wire connection
If you need to create a really strong and reliable connection of wires from different metals, but you don’t have special tools for this on hand, use an ordinary bolt, washer and nut. The connection process is not too complicated:
- strip the metal cores of both wires. Determine the length of the stripping section yourself. Usually two to three centimeters are enough, but if the bolt has a large diameter, then the length of the stripping section can be increased
- make loops from the stripped wires and put one of them on the bolt
- place the intermediate washer on top and put on the second loop
- then the washer is put on again, and the nut is put on it
After the nut is placed on the last intermediate washer, you need to take a wrench of the appropriate diameter and tighten it carefully. When you have completed all the work, do not forget to check the strength of the connection - the tighter the nut is tightened, the more stable the contact will be.
How to connect two SIP wires to each other - All about electricity
Self-supporting insulated wire today is the most popular material for work in the field of electrical supply. Its use helps to significantly increase the durability of power lines and reduce electricity costs. To connect power to the internal electrical wiring, you need to connect the SIP with a cable made of identical or different material.
How to connect SIP/SIP wires to each other
Today, many people prefer to carry out most of the installation work themselves, including the electrification of a private yard. In order for your home to be connected to power, you may need to connect SIP cables together. The most practical and easiest way to solve the problem is to twist the wires and then solder them.
You can independently and without professional knowledge connect two wires with aluminum conductors, following the following instructions:
- On both wires you need to strip the wires a couple of centimeters.
- Connect the prepared cables by carefully twisting them together.
- Solder or weld the two ends using special equipment.
- Carefully insulate the area where the wires were connected.
The role of insulating material can be performed by electrical tape or caps specially designed for this purpose.
Also, connecting SIP wires can be done using ordinary bolts, which are likely to be found in every owner’s tools. Professional electricians claim that the correct use of this technology provides the connection with high levels of reliability, quality and durability. Another advantage is the simplicity and fairly high speed of such installation.
To achieve the desired result, it is enough to adhere to the following recommendations:
- Strip the core to the length corresponding to the selected bolt.
- Bend the prepared section of wire into a loop.
- Carefully place the resulting loop onto the bolt.
- Place the washer on top.
- Tighten the nut thoroughly.
After completing the work described above, be sure to check the strength of the resulting connection.
This way you will protect yourself and your loved ones from unpleasant consequences.
Why SIP?
So, SIP is a self-supporting insulated wire. It replaced the usual non-insulated stranded aluminum AC wire, which can still be seen as part of the overhead line (VL - high-voltage line) of the private sector in many regions of our country. Bare wire was used in the past simply due to the lack of reliable insulating materials capable of serving in harsh outdoor conditions.
Due to the lack of insulation of the overhead line wires, during its installation it was necessary to use support insulators. Transmission lines took up a lot of space because it was necessary to maintain the distance between the wires. But, despite this, the wires often overlapped with each other, for example, in strong winds. Then there were short circuits, broken lines... In general, there were enough problems.
With its appearance, SIP immediately eliminated almost all these problems and issues. Cross-linked polyethylene insulation is not afraid of rain, wind, or sunlight and can serve faithfully for at least 25 years. For such conditions, the period is impressive. Installing an air duct using SIP does not take much time and effort, since a wide range of different fastening fittings have been developed for this wire. Everything has been thought out to the smallest detail: not installation, but pure pleasure.
Therefore, if you see that your high-voltage line on poles since Soviet times was carried out using a line of bare wire, we recommend replacing it with SIP