Electrician in the house
Encyclopedia about electricity from A to Z
Masters catalog
Find the best master or company in your city
Installing a triple socket
Connecting a triple socket can cause some confusion for non-professionals. But there is nothing complicated about it, and following our simple tips, you can connect everything in just a few minutes.
The main thing here is to be attentive and not to neglect safety rules.
- Determining the possibility of connecting an outlet
- Installing a triple socket Assembling a triple socket
- Connection from distribution box
- Connecting one outlet to another
How to replace the socket box without ruining the wallpaper?
Accordingly, in this case, there is no need to tear off the wallpaper, unroll it, then re-glue it, grease it - spoil the newly created interior. All this is nonsense and there are no unsolvable cases.
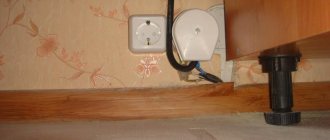
When you pull out the old socket, select a socket box that is as close in diameter as possible to the old hole - so that it fits as tightly as possible. And if there is any play left (very small), use foam double-sided tape. But remove the protective strip from the tape only on one side. Glue, wrapping around the entire circumference. So you will add this missing millimeter of diameter. And that’s it, it will fit tightly into the hole and most importantly it will not slip.
Because you won’t be able to guess which one will suit you in the end.
And an experienced master himself may not be able to guess by eye: even if one seems to initially fit, then during the final installation it may not fit properly. That’s why an electrician walks around with these several “spare” socket boxes.
It’s better to trust such things to people who specialize in this and do it on an ongoing basis, so as not to store a bunch of unnecessary construction rubbish later. As they later write on the Internet, “I’ll give away the remaining building materials.”
What can replace a pleasant and professional installation? - nothing! Therefore, do not save a penny on socket boxes and use good socket boxes.
Andrey Bely. REMONT-EKSPERT.RU
When using materials from AXIOMPLUS.COM.UA
All rights reserved. Copying is permitted only with reference to the source
Why markup
If you install one single outlet in a concrete wall, then essentially no markings are needed. There is no particular difference if it is placed plus or minus a centimeter. It’s another matter if there are other sockets nearby and the owner of the room has a “perfectionist’s look.” Some people have this developed by nature, and if any thing stands out from the overall picture, it will cause irritation.
As a result, it is better to spend an extra couple of minutes to calculate and draw on the wall the location of the future outlet. This must be done without fail when installing a block of sockets that will be placed close to each other. Here you will need a level, although if the floor in the room is crooked, you will have to think about how to make the markings - at a level or parallel to the floor surface.
A correctly made marking “drawing” is a horizontal line on which the centers of the holes for the socket boxes are marked. To see if the crown has jumped off the mark, the marking should be slightly larger than its diameter. The most reliable method to calculate the distance between centers is to put the socket covers together and measure the distance between their centers.
Theoretical basis
The main thing to remember when carrying out any work with electrical appliances is safety precautions. Before connecting the wires to the outlet, be sure to turn off the electrical current. To do this, you need to turn off the corresponding switch located on the panel, or unscrew the plug from the meter. Then check the operation of the electrical network and voltage by trying to turn on the light.
In fact, the socket connection diagram is quite simple. Only two wires are used here - zero, phase. For sockets that provide grounding, you need to connect a third wire.
It is necessary to ensure the presence of reliable contact, as well as to exclude the possibility of a short circuit. To do this, protect that section of the wire that is located at the entrance to the terminal.
If there is an excessive stripped section of the wire, it must be cut using wire cutters to the required length. The exposed part of the wire is located exclusively inside the socket and should not protrude from the terminal.
At the next stage of work, you need to tighten the clamping screws well. Check that the wire is securely fastened in the terminal. The mechanical reliability of such a connection is very important. It is not permissible for the wire to fall out of the terminal even if force is applied.
By applying this theoretical knowledge, you will not have problems connecting sockets. If you doubt your abilities, it is recommended to watch video instructions on how to connect any type of outlet.
Connection diagram
Connecting a triple socket is carried out in compliance with all safety rules. The first and most important thing: remove the voltage not only from the group to which you plan to connect, but also from neighboring circuits located nearby in the distribution panel.
If a triple socket is installed in addition to an existing lighting group, you need to make sure that the group circuit breaker has the required power reserve. If this is not the case, you will have to replace the device with a more powerful one. If a 25 A machine has already been installed, you need to use the device carefully and do not allow 2 heating devices to be turned on simultaneously in one module.
Open the junction box and find the neutral, phase and supply wires for the desired group. The cables in the shield have different colors, which makes installation easier.- Strip the ends of the cable from the socket installation site. Screwed to the cable core to the phase, neutral and supply wires. Close the shield. The module implies autonomous operation of each outlet. To do this, the sockets are connected to each other in series with a cable. However, the PUE prohibits this option. Often this requirement is ignored. To do this, you need to make three branches of the ground wire using crimping.
- Disconnect a piece of cable to get 3 pieces of ground wire - it is usually yellow-green in color. The ends are cleaned.
- The fragments and the grounding conductor are connected and crimped with press pliers. Insulate the sleeve with a piece of heat-shrinkable tubing. The connection is small and fits easily into the box.
- For a serial connection, 2 neutral and 2 supply wires are cut off . The cable cores from the panel are connected to the first socket. Then the modules are connected to the first terminal with a phase conductor running from the first socket to the second, and to the second terminal - a piece of neutral wire according to the same circuit.
- The block is inserted into the sockets and fastened with screws. Cover with a decorative panel and lids.
Valera
The voice of the construction guru
Ask a Question
If two wires are pulled into one contact, their cross-sections must be the same. Otherwise, the conductor of a smaller cross-section will make poor contact and heat up. This may cause a fire.
Triple socket - economical option
Triple socket with grounding
No electrician in his right mind would advise you to install such triple sockets on a permanent basis. They can serve normally as a carrying extension, but nothing more. However, on the market you can often find products from Kuntsevo Electro and similar companies that offer you 3 sockets at once for a price of less than $4.
Advantages of this solution:
- They take up less space than the options described above - three sockets fit into a 95*95cm block;
- Price. The mechanism of a normal Legrand socket costs $4, but here, together with the housing, the price is the same for three pieces.
Here are the disadvantages:
- Due to its design, the socket cannot be properly attached to one standard socket box and will constantly fall out of it. No matter how carefully you use it, it will definitely fall out!
- The quality of the plastic used. Self-respecting companies do not produce sockets of this format, and all the others, including Kuntsevo Electro, use cheap flammable plastic, so the use of such sockets even as “makeshift” is very dangerous.
- Contacts. There is no copper, bronze or brass inside these sockets. Only painted tin. This is how cheap goods are made. After watching a video about the production of sockets in Kuntsevo and even disassembling such a socket, you will see supposedly brass in the contact groups, but everything immediately falls into place if you check this “brass” with a magnet. After some time, tin contacts stop springing, transfer electricity through the plug worse, heat up, and rust. In general, they do everything that a tin should do in unusual circumstances.
Do not install such sockets unless absolutely necessary for yourself or the customer. In both cases it will cost you more.
What tools do you need to prepare?
Before installing the socket, you should prepare the following tools and parts - they will come in handy in this order:
- A pencil, marker, charcoal, or anything with which you can draw markings on the wall.
- Ruler. Even an ordinary school one is suitable for one device, but if a block of sockets is installed, then a large one is better.
- Level – bubble or laser. At the initial step you will only need it when installing the socket block.
- Drill with a “concrete bit” attachment. If you don’t have an attachment, a concrete drill will do. Some people cut the wall with a grinder. If the wall is particularly strong, then water will not hurt, as it will cool the crown.
- A chisel and a hammer are necessary for small adjustments to the walls of the hole.
- Socket box – provides rigid fastening of the device to the wall.
- Putty - gypsum, alabaster or cement mortar.
- A spatula that can be placed in a socket box.
- Voltage indicator - in fact, you might need it at first, but you can’t do without it at this particular step.
- Additional wires are necessary if several points are being installed.
- Knife – as small as possible.
- Pliers - better with wire cutters.
- The socket is what everything is started for.
- A screwdriver - in most cases a Phillips screwdriver, but in some cases a slotted one will be needed - everything depends on the bolts that need to be tightened.
READ How to lay tiles on a concrete floor
It is assumed that before installing the socket in the wall, the wires have already been laid to this place and it is clear which of their phases and which is the zero with grounding. If not, then you will have to plan large-scale work to punch grooves (grooves) in the wall for wiring. To do this, you will have to rent a wall chaser, prepare to drill them out with a drill and hammer drill, or cut them out with a grinder.
When there is no socket at all
Rarely, but it also happens - the socket dangles, and when you take it apart, it turns out that it simply rests with spacer tendrils against the wall, preferably a concrete one.
There is only one correct solution to the problem - to install a socket box, since the steel tendrils will eventually crumble even the most durable concrete and the socket will fall out.
If there is no other choice but to fix the socket in the wall (there is no socket box and nowhere to buy one), then you can make a homemade mount for the socket. To do this, you will need to make chopsticks: from thick linoleum, sandpaper or a couple of pieces of wooden board - preferably not overdried, so as not to crack when tightening the fastening bolts.
- You need to try on where the spacer antennae rest against the wall and carefully hollow out small recesses there.
- Choppers are cut to fit the size of the resulting pits. If it is linoleum or sandpaper, then it is advisable to fold them in half, with the smooth side inward, so that the rough side touches the wall and the fastening antennae. The tree is simply given the desired shape - unlike classic chopsticks, which are made cylindrical, these need to be made rectangular.
- Next, the choppers are inserted into the fastenings, a socket is connected to them and the bolts are tightened, which pushes the fastening antennae apart.
This method can be effective even for walls not made of the hardest material, such as adobe brick, but if possible it is still recommended to make the correct fastening using socket boxes.
Choosing a socket depending on the type and material of the walls
Today, only plastic is used as a material for mounting boxes. When choosing, you should focus on the following characteristics:
- Installation method. In solid or hollow walls. The latter have special clamps for mounting on drywall or other sheet wall material.
- Dimensions. The standard diameter of the socket box is 71 mm, while the depth varies. Regular sockets are installed in 45 mm deep boxes, dimmers and special switches and sockets are installed in 60 mm deep socket boxes.
- Single or butt. Butt-mounted, composite socket boxes have a special protrusion at the bottom for grouping them in a row to form a channel for laying the switching bus. Ready-made combinations of combined 2 or 4 socket boxes are also available.
- Availability of fastenings. Along the edges of the front part of the box there are stands with self-tapping screws for fixing sockets with corresponding perforations on the mounting plate.
Diameter of the socket box, its dimensions, installation features
If an apartment or house is being renovated, it is often necessary to install new sockets, change switches and even electrical wiring. In the case of walls made of concrete or brick, this can be difficult to do.
It is important to correctly determine the diameter of the socket box, its size, and select the necessary tools
Among the things that may be required is a special crown for processing the concrete surface. Such equipment is also suitable for drilling brick walls, concrete with additional reinforcement, stone, natural and artificial. A high-quality crown penetrates the structure of the material to an impressive distance - up to one and a half meters.
Important! It is better to avoid standard drills intended for processing metal and wood. They are not suitable, as in such conditions they quickly become unusable
Determining the diameter
If a triple socket is installed in one socket box, it is important to correctly determine the diameter. These indicators are determined by the size of the crown, as well as other factors:
- The design of the equipment is the diameter of the socket box and its dimensions. Knowing these characteristics, you can safely go shopping for the right crown;
- To avoid mistakes, it is advisable to check for which socket boxes a particular crown is suitable;
- If we are talking about standard concrete sockets, their sizes may vary, but the diameter is 68 millimeters. All modern sockets and other similar equipment correspond exactly to them. Thus, you can safely choose 68 mm crowns for drilling;
- Equipment with a diameter of 70-75 millimeters are used much less frequently.
Where to begin
Before you begin, you should assemble the crown, doing it carefully and carefully - first fix the drill itself using bolts, then fix the threaded bowl. Among the main requirements for assembly are density and absence of inconsistencies. Neglecting these recommendations can lead to deformation of the bowl or even the drilling element. In the worst case scenario, the person doing the work could be seriously injured.
Then you can begin the drilling process using a hammer drill. An alternative to a hammer drill can be an impact drill. A regular drill will not work. You should first apply markings that will be easy to navigate. In addition, for each piece of equipment there are corresponding installation rules. Here are a number of standards that modern specialists try to adhere to in their work:
- In residential premises - about 30 cm from the floor. We are talking about the European standard, and the depth of the socket box is calculated in accordance with it
- Kitchen - about 100 cm from the countertop
- Bathroom with washing machine - about a meter from the surface of household appliances
- Pass-through type switches - about 90 cm from the floor line.
Important! The given standards are not strict rules. It's about recommendations
Hole Size Correction
It happens that the diameter of the concrete socket matches the same parameters of the crown perfectly. In the case of depth, discrepancies may be noted. However, this is easy to fix. All you need to do is adjust the depth so that the socket falls slightly into the hole - not too much, just a few millimeters. The reserve is needed so that not only the equipment itself, but also alabaster and another fixing solution can be placed in the hole.
After fixing the socket box, its protruding section is carefully cut off - thus, the element will be recessed to the required depth and will be flush with the concrete or brick wall. The design will look neat. To connect the wire to the electrical outlet, a groove is made - it should be located at the top. It can be easily done using a hammer drill or even an ordinary chisel - it depends on the characteristics of the material from which the wall is made
It is important that the wire is placed neatly. The socket is turned over, you need to find a slot on it into which the wire will be placed. The best option is to fix the wire at the back
Thus, it will be much easier to install the equipment. The wire is inserted into the socket box and in this form is placed in the previously prepared hole.
Important! The hole must have the reserve mentioned above. You may be interested in:
You may be interested in:
prokommunikacii.ru
Installation of a socket box
Installation of the block begins after choosing the location of the structure:
- in the kitchen, for one-time connection of equipment, it is better to place the device above the countertop;
- in the bedroom, a three-module product can be installed behind the TV - the wires behind the screen will be invisible;
- When installed in a bathroom, a sealed moisture-resistant block is required, located 60 cm from the water.
After choosing the installation area, you will need to prepare tools - a level, tape measure, marker or pencil, a hammer drill with a crown attachment and an attachment for making grooves.
Carry out installation work before the room is finished.
Marking the wall surface
The geometry of the structure and the convenience of organizing wiring depend on the correctness of the markings. To mark installation points, start from the number of sockets in the block. When working, use a level - it will ensure that the device is level.
The distance of the socket from the floor is 20-40 cm. Between the centers of the socket boxes is 72 mm. Otherwise, it will not be possible to fit the decorative panel accurately. The groove is done strictly horizontally or vertically - it is better to draw the outline of the hole.
Connecting sockets with a cable
The main nuance that causes heated debate among electricians is whether it is possible to connect an outlet with a cable?
And on this issue, many are divided into 3 camps: absolutely not
possible in some cases
you can always if the design of the socket allows it
Most modern sockets always have two terminals for each wire: phase-neutral-ground. Total 6 contacts.
It is assumed that in a walk-through socket all six ends of the wires (3 incoming + 3 outgoing) can be safely inserted into the terminals, clamped and be sure that everything is done correctly.
That is, phase and neutral working conductors are connected via a loop without problems, but for the grounding conductor, according to adherents of a categorical ban, this is unacceptable.
It is necessary to make a branch for it. Moreover, it is advisable to do it in a screwless manner so that there is no need for further maintenance (tightening). And this means sleeving by crimping, or soldering or welding.
The easiest and most convenient way to do this is by crimping. Add up the final cross-section of the three cores that will be connected by crimping and select the appropriate sleeve.
For example, you have a 3*2.5mm2 power cable. Incoming cable core 2.5mm2 + branch to socket 2.5mm2 + outgoing cable core to adjacent socket 2.5mm2. Total theoretically – 7.5mm2.
Due to the fact that the actual cross-section of the cores does not always correspond to the declared one, and loosening of the contacts is not acceptable here, select a sleeve with a slightly smaller cross-section than the calculated one - GML-6.
Place the vein into the sleeve and press the press with pliers.
Always cut off the excess length of the sleeve so that it does not take up free space in the socket box.
The resulting connection is best protected with heat-shrinkable tubing.
Although, of course, no one forbids applying several layers of high-quality electrical tape.
Especially if you have a powerful heat gun without smooth temperature control. With such a device, you can inadvertently melt certain parts of the socket box.
Power to the bottom comes from the top. If there is a break or violation of the grounding contact in the very first of them, then the “ground” will automatically disappear on the others. Which is categorically unacceptable.
However, many electricians are confident that the ban on such daisy chaining applies only to sockets located in different blocks, at a distance from each other. And this rule in no way applies to double sockets located in one block, united by a single frame.
That is, in fact, such a block is a kind of connector that has a single housing. This means that it can be considered as a single electrical installation product.
Most doubles, tees and even extensions are made in this way.
You will not be able to disassemble a single product without disconnecting the plugs from adjacent connectors. And since you have disconnected these plugs, then breaking the grounding conductor at the very first point will not affect anything.
But if the socket blocks are located far from each other and do not have a common body, then it is absolutely impossible to connect them with a cable.
Well, third interpreters of paragraph of the rules of the PUE 1.7.144 reasonably notice that in the PUE itself, nothing is said about the prohibition of “loops”. There is not even such a concept for sockets.
It says that the “Pe” conductor must be electrically continuous (the essence is in this word - electrically). And that the current-carrying elements of the device cannot be connected in series to the grounding conductor circuit.
There is neither one nor the other in the train. In most of these sockets, under one terminal, both conductors are immediately clamped. Moreover, in an acceptable way (screw or spring).
Now, if the socket had a ground input on one side and an output on the other (from under another independent contact), then yes - it’s impossible! Moreover, the PUE does not consider the socket contacts as open conductive parts, so clause 1.7.144 has nothing to do with it.
Even if you are forced to dismantle one of the looped sockets in this way, then in addition to the protective wire, you will also break the phase and neutral conductors.
Which of these opinions is true and how should you mount it?
If you are doing what is called for yourself and “for centuries”, so as not to look into the socket box for decades, then install a sleeve and make a branch, not a cable.
Well, if you are firmly convinced that the cable is not a violation at all, and it is not for nothing that manufacturers of sockets initially included the possibility of such a connection in their products, then at home you are free to act as supporters of the second and third methods.
In the end, this is your own home, and no one has the right to forbid you to do this and not otherwise.
Connection methods
If you connect an outlet block of one group, use the daisy chain method. In this case, we are talking about connecting all group members to a common power supply line. The daisy chain is designed for loads no higher than 16A.
In a parallel connection, a pair of cables are laid from the distribution box:
- The first cable runs as a ribbon cable, supplying power to four of the five outlets in the five-seater unit.
- The second cable is directed to the fifth point of the group of sockets. This point is used to power powerful equipment.
The advantage of a combined connection is the distribution of risks: each point is independent of the work of other nearby members of the chain. The combined scheme has only one drawback, which is the cost of purchasing the cable and the increased labor costs of electrical installation work.
Both the loop and combined methods can be used to create an open or closed system. The loop method involves making a channel in the wall through which lines and sockets for connectors will pass. The combined method involves laying a PE conductor along the wall.
The use of plastic cable ducts increases the safety of the system. In addition, open wiring in the cable channel looks more aesthetically pleasing. Most of the channels have partitions into which the line is laid. Monitoring the condition of the conductor can be carried out without problems, since the channel is equipped with removable covers.
Safety instructions
Connecting wires by soldering
When deciding to connect a built-in module, follow the safety requirements:
- Turn off the electricity and break the circuit.
- Use devices and tools with rubber or plastic insulation on the handles.
- Connect the wires with solder.
- Check the cable insulation and, if necessary, place it in a plastic tube.
- Cut the long strand or twist it into a ring and hide it in the wall.
- Extend a short wire, hiding the contacts.
- To prevent a short circuit, check that the socket and wire match the power and current in the circuit.
- Install the triple module in a wooden house only in a metal socket box.
- Place the module near the door so that the switch is closer to the opening than the socket.
Compliance with safety precautions will help to carry out installation work efficiently.
Installation of socket boxes
To clearly understand how to properly install a socket in a concrete wall, you should first familiarize yourself with the video in this article.
The order of work is carried out in the following sequence:
- The electricity supply is turned off;
- The box is fitted to the drilled hole. In this case, there should be no obstacles, and the installation of sockets in a concrete wall should be carried out in a socket box located at the same level with the surface. All unnecessary elements are trimmed and removed;
- The bottom of the hole is cleaned of dirt and dust and then primed. This is necessary to ensure adhesion of the fixing solution to the wall. The primer must dry;
- A plastic fragment is squeezed out of the box and a cable is pulled through it;
- The bottom and walls of the recess, the outer part of the socket box, are treated with a solution;
- A device or block is installed in the solution. The upper edge of the socket box is aligned with the wall level;
- The building level checks the horizontality of the mounting lugs;
- Remove any excess solution that gets into the box with your own hands.
Important! If it is necessary to install a block of sockets, the socket boxes are connected using a structural adapter.
Preparing and installing the outlet
Wiring
A triple surface socket installed outdoors poses a certain danger. After all, atmospheric influences on wires, cables or the outlet itself have an extremely negative effect.
Therefore, in order to avoid negative consequences, this should be taken into account during installation. Below we will provide only the basic rules for installing wiring, and more detailed instructions can be found in other sections of this site.
So:
- External wiring can be done in both open and hidden ways. However, the use of metal pipes is not allowed in all cases. To protect against the effects of precipitation, PVC corrugation or non-metallic boxes are used. At the same time, according to 2.1.63 PUE, installation must be carried out in such a way as to exclude the possibility of moisture accumulation.
- Overhead triple sockets and wires cannot be installed at a distance of less than 1 meter under the window and balcony. In addition, clause 2.1.75 of the PUE prohibits the installation of wires and cables closer than 0.75 m along the window and 1 m along the balcony.
- When installing inputs on insulators, the distance between the roof and the wire in accordance with clause 2.1.79 must be at least 20 cm. When connecting small building forms such as pavilions, temporary booths, etc. the distance from the input to the roof must be at least 0.5 m.
Socket installation
After you have completed all the preparatory activities and your triple surface socket is ready for installation, you need to decide on the type of surface on which it will be installed. If it is a combustible or difficult-to-burn surface, then before installation you need to install a lining made of non-combustible material.
This may be asbestos sheet or steel plate. If it is a fireproof surface, then additional gaskets are not needed.
So:
- If you are using a triple overhead socket, then first secure the box. This can be done using self-tapping screws. Some models have a special seal at the attachment points, which increases the moisture resistance of the outlet.
- The next step is to insert the cable into the outlet box. This is done through a special rubber seal, which is included in the socket. You simply make a hole in it large enough for the cable or wire to pass through and feed the conductors through it.
- Now you can cut the cable and go directly to the connection. If your electrical network meets the PUE standards, then you will have three wires connected to the outlet. One of them is phase, the second, blue, is neutral and the yellow-green wire has a protective function. We connect the neutral and phase wires to the power contacts. The protective conductor is connected to the corresponding terminal. Typically, all triple overhead sockets have the designation “PE” or a grounding sign for this input.
- Now we install the power part into the box on the appropriate fastenings and close it with a lid. That's it, our triple overhead socket is ready for use. After applying voltage to the power line of the outlet, you can check its functionality.
Block assembly of socket boxes and sockets
A triple socket block that meets all the necessary requirements is not so easy to find, even with all the diversity of the modern electrical goods market. In addition, the price of the product may be unreasonably high. In such cases, electricians use standard single sockets, collecting them into a common block of the required size. That is, to assemble a triple socket you will need three ordinary products.
As a rule, these are standard outlets rated at 16 amperes. You will only have to use their internal parts - the cores and frame. The connection into one whole is carried out using an overhead frame with three proportional holes.
Before starting installation, you must select a location for installation. Typically, sockets according to the European standard are fixed at a height of 20-40 cm from the floor level. Thus, the interior is not disturbed and electrical safety is ensured.
It is necessary to calculate the current strength in advance, since each network element corresponds to a certain operating current. If this condition is not met, then safe operation in the future is not at all guaranteed. Under the influence of overloads, not only the sockets, but also the wires overheat. Therefore, the cross-section of the conductors must also be designed for a certain load. The minimum cross-section for copper wire is 1.5 mm2, and for aluminum - 2.5 mm2.
If the socket box does not fit into the wall
In this case, the repair method is selected depending on what kind of electrical outlet is installed and what the wall is made of.
If the socket box was not “seated” on the mortar, then the size of the hole in the wall is “butt” and it needs to be expanded a little so that there is room to spread the plaster or cement mixture. Next, you need to inspect the socket itself - modern models have slots for threading the cable. They are located over the entire area, and if the putty is pressed through them a little, then this will be an additional fastening. If the socket box is smooth, then you can make notches on its outer side, which the solution will grab onto.
As a last resort, if you don’t have the necessary materials at hand, and it is advisable to repair the socket urgently, then you can simply screw the socket box to the wall with screws. There is only one nuance here - drill holes for the dowels from the corner and place them diagonally so that they do not become loose over time.
In some cases, you can try to fix the falling out socket box with liquid nails, as shown in the following video:
Wiring connection
The most important part of the whole work is that you only need to connect two or three wires (depending on the presence of grounding), but do it without errors.
The first step is to make sure that the wiring is de-energized. Taking a minute or two to turn off the circuit breaker and check for voltage will make the job much more comfortable and safer.
Stripping wires. 1.5-2 cm of insulation must be removed from the ends of the cores. Next, the bare piece is bent into a ring, and if it is multi-core, then it can still be divided in two so that the ends of the wires take on the shape of the letter “V”.
To increase the contact area of the wire with the terminal, the core must be slightly flattened with pliers.
Connecting wires. The socket has only two terminals for current-carrying contacts and a third for grounding. They are all clamped with bolts and there is simply nowhere else to insert the wires. If wiring with the correct color marking is used, then the yellow-green wire goes to the ground contact (it “hangs” on the plate with the “whiskers” sticking forward), blue to zero and the remaining to phase (can be any other color)
Grounding must be connected to the contact intended for it, and the phase with zero to the remaining ones - no matter in what order
Socket block. In the first case, wires from the previous one come to the contacts of one socket and immediately go to the next one. In the second, the wires from each socket go to a common “collection point” and are connected there – phase to phase, zero to zero. It should be taken into account that the PUE prohibits the connection of grounding with a loop - this way you can connect the phase and zero, but the “ground” must be connected with a star.
Example of installation in drywall
Plasterboard for walls is usually of standard thickness - 12.5 mm. Just in one such fragment I can show how it works to show exactly what its advantage is.
We take our socket box for drywall, clamp the antennae with our hands and insert it.
This is what it looks like from the back. These antennae are not yet clamped.
Now we perform a simple manipulation - we tighten the screw with a screwdriver (or a grandfather’s screwdriver, whichever is more convenient for you), and the tendril itself moves and (presses) until it stops.
We see how on the reverse side the socket box screwed itself in like this. And he presses himself with these very mustaches. It “fits” very well, very tightly, and it won’t go anywhere.
What it looks like from the front: two screws hold the antennae, and two more screws are left to secure the socket.
Installation of a socket box
In fact, here you just need to embed the socket boxes into the wall, but do it in such a way that the installed plastic cup with its upper part is flush with its surface.
A cement or gypsum mortar is prepared and spread with a spatula on the inner surface of the acquired holes. Then the socket box is inserted there (before this you need to remember to insert the wire into it) and aligned. With all this, a certain amount of solution will be squeezed out of the wall - it is better to remove it not immediately, but after a couple of minutes, when it begins to harden. All that remains is to slightly trim the resulting seam with a spatula and wait for the mixture to completely harden - depending on the material used, this will take from half an hour to a day.
For more information on installing a socket box, see this
Now we install the finished socket boxes.
Some without cable wire. It is pulled into the box after the fixing solution has dried. The reason is that in some circumstances the cable can knock the socket block away from the desired level. There is no right option - you should do what is most convenient.
Installation of socket boxes
The most rational installation path is a triple socket in one socket. The latter is a block with three slots on a common frame. The installation of a composite housing of three sockets and a whole module (triple at once) is identical.
Tools required for installation
:
- hammer drill or drill (depending on the wall material - concrete or brick, respectively);
- special attachment (crown with special incisors and a radius of 35 mm);
- hammer with chisel;
- screwdriver;
- spatula (preferably two - narrow and medium).
Stages of work
:
Drill a hole. Take a hammer drill (drill) and a crown. The drill bit of the tool is pressed against the designated centers and drilled until the bottom of the nozzle touches the wall. It is recommended to break the concrete remains (when the hole is already ready) with a chisel (built into a hammer drill or a hammer). Make a groove. This is a hole for routing cables. Holes should be pressed on the back panel of the socket box. Their number is similar to the number of cable cords (that is, three). Another groove is needed for the power cable. The diameter depends on the latter. Make holes for the wires. They are made between two cable holes. It is necessary that the diameter of the drill matches the diameter of the corrugation where the wiring will be inserted. You can resort to corrugated pipe, but this is not necessary. Fix the socket box in the wall. To do this, the box is secured with alabaster (it holds better and dries faster). The mixture is used to cover the inner walls of the opening. Then place the block there and keep it there for a while (for a strong fixation)
It is important to take care of the amount of mixture, otherwise it will seep out or the socket will hold weakly. The consistency should not be too thick or thin
Complete drying of the mixture will take from 1 to 2 hours.
Three sockets in one frame
The second option, although more labor-intensive, allows you to obtain a high-quality and modern socket design.
Three socket mechanisms in one frame
These are three socket mechanisms in one triple frame. To make three sockets out of one, you need to drill holes in the wall for the other two sockets. If you have wallpaper pasted, you need to carefully remove it so that you can paste it back.
One socket from which you can make three
Making holes for sockets
Next to the hole for the socket, we drill two more, on the right or left. If your wall is concrete, then drilling holes will be difficult, and not always possible. For example, in panel houses, it is generally forbidden to drill or tap walls, but many do not even know about this. If the wall is plaster, this is the simplest option for installing sockets. On a brick wall, it won’t be a big problem either; monolithic concrete is a difficult option, but at least possible, unlike panels.
Making holes in the wall for sockets
How to make holes for sockets depends on the wall material. A plaster wall can be knocked out using a hammer drill with a spatula attachment. It is most convenient to drill with a drill bit, but not always and not everyone has such bits. Buying a crown for 2 sockets is expensive; it costs at least 600 rubles at retail.
When gluing a plaster wall, the main thing is not to overdo it and not to go all the way through it. Typically such a wall has a thickness of 75-80 mm. A brick wall can also be chipped with a spatula attachment. A good option is to drill holes around the socket box with a 10-12 mm diameter drill. and the insides are removed with a spatula. We tap carefully, because we have a live wire here.
We arrange holes for sockets
You can find reinforcement in the wall that you can cut with a grinder, or simply bypass it by moving the sockets a little if you cannot install the sockets to the required depth. After the hole is ready, we try on the socket boxes.
We moisten the hole for the triple socket with water, that is, remove dust; this can be done with a brush. Be careful, because we have a live wire here.
H
Often one outlet is not enough and you have to come up with something. Either insert a tee into it or an extension cord. Let's solve this problem once and for all and make three out of one socket, that is, make a triple out of a single one. Here you can take two paths: the first, as you know, is simpler, the second is more difficult, but the result justifies the effort.
Design features
The design of the socket consists of a body and an internal (working) part. Functionally important elements are terminals with attached springs for the plug and contacts. Most models are equipped with a grounding connection. This helps reduce voltage from connected equipment and improve system safety.
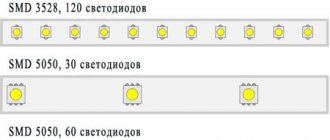
There are numerous types of products on the current market. When selecting specific modifications, the peculiarities of using electrical appliances should be taken into account. A significant number of them are compatible with products of type C6 (euro). But standard devices like C5 (Soviet) are still in demand. They differ from each other not only in appearance, but also in design features. In addition to a more attractive design, Euro sockets can withstand high current (up to 16A, standard ones - up to 6A). Older models are not equipped with grounding contacts. Round holes in Euro sockets have a larger diameter for the corresponding plug rods.
Triple sockets can differ in types of contacts. They come in petal and spring types. The first ones are considered not very reliable. Over time, the petals lose their rigidity and elasticity. Then, when inserting the plug, they notice a spark. Spring contacts are characterized by greater wear resistance. They can be safely used for several decades.
When connecting a triple socket to a power source, it is best to know that it is equipped with brass contacts. The high quality of the product is complemented by a lid made of heat-resistant plastic and a ceramic core.
Main varieties
Manufacturers offer triple sockets in various shapes. Craftsmen often opt for devices that have a square shape. Such models are considered more universal.
Triple socket is:
- internal;
- external or external;
- built-in;
- overhead.
To install all modifications, use the block assembly method. This method allows you to connect three electrical appliances to one power cable at the same time. Experts recommend abandoning external frames for autonomous sockets, replacing them with one common cover. It is selected to match the contours of the inner part.
The triple socket equipped with a switch attracts special attention from consumers. The design allows you to de-energize the unit for a short or long period. This eliminates short circuits or other malfunctions when occupants are not in the room
This eliminates short circuits or other malfunctions when occupants are absent from the premises.
Installation of a triple socket is carried out using a horizontal or vertical panel. Structurally, these blocks are made on 1 frame or on 3 autonomous devices under a common cover.
Drilling a hole
This is the dustiest and heaviest piece of the entire work, although everything depends on the strength of the concrete.
- If a crown is used for drilling socket boxes, then first a hole is drilled in the center of the marking for its central axis, after which the crown itself is used.
- This part of the work will take little longer to complete if you only have a drill with an ordinary drill bit for concrete. In this case, you will have to drill holes around the circumference of the future socket box, and later knock out the inside with a hammer drill or chisel.
- If the perimeter of the hole for the socket box is not round, but square, then there is no violation in this - it will still be covered with cement. Based on this judgment, you can make cuts in the wall with a grinder tangentially to the diameter of the future socket box, remove the inner part and correct the rest with a hammer drill or chisel.
- In especially difficult cases, you can combine these methods - first drill holes with a drill, and then work on them with a crown or grinder.
The result of the work should be a hole in which the socket box that will be installed slightly “falls” beyond the surface of the wall.
Phase left or right
Next, all that remains is to connect the wires to the outlet itself and install it inside.
Here you may encounter the following point, which also causes disputes and contradictions among electricians. Where exactly in the outlet should I connect the wires? If everything is clear with the ground, there is a place for it in the middle, then where should we start the zero and phase?
On the left contact or on the right? Each electrician does this at his own discretion. Because, again, in the rules, there is no clear indication of where the phase should be connected in the socket.
The most important condition here that you must meet is to connect all the outlets in the house or apartment in the same way.
For example, it would be incorrect to connect the phase to the right terminal for sockets in the living room, and to the left terminal in the bedroom. If you have already connected one according to some scheme, connect all the others in the same way.
As for the colors of the connected cores, it is already necessary to comply with the current standard.
yellow-green wire - ground
blue or white-blue – zero
multi-colored or white – phase
After connecting, gradually pack the wires. To do this, bend the socket towards you and down, then press the wires to its back and insert the entire structure like an accordion into the socket.
Use the mounting screws on the sides to perform preliminary fastening. Next, use a compact electrician’s level to check that the installation is horizontal.
If everything is fine, tighten the screws completely. After this, be sure to tighten the two more internal mounting screws.
When they are tightened, the claws extend, with which the socket seems to cling to the inner walls of the socket box.
In high-quality and expensive copies, manufacturers make such paws double on each side.
All that remains is to install the front panel and trim frame.
Some brands, such as Legrand, have interchangeable frames.
That is, the fastening mechanism itself remains in the socket box, but the insert element can be changed. For example, instead of a regular model with curtains, install a waterproof one (for the bathroom), or vice versa.
Another point concerns the frames. If you are installing a socket block, keep in mind that not all brands have a square front panel. Most often it is rectangular.
This means that you will not be able to insert it into a decorative frame as you please.
For example, to rotate 90 degrees, you will have to pick out the fastening element with latches from the frame and also turn it at a right angle.
Only after this, everything is fixed without problems.
Thus, the same frame can be placed both in a vertical block of sockets and in a horizontal one.
Electrical connection features
When the solution has completely hardened, proceed to connecting the internal block of sockets. If the socket is connected using a daisy chain type, the wires go from the distribution box to the first socket box.
The ends of the cable are cleared of braid using a sharp knife
This work must be done very carefully. A side cutter will be a good help for solving the problem.
When stripping, it is advisable to leave a little cable in reserve so that you can create another connection if the need arises. To prevent the cable from getting in the way, it can be rolled into a spiral and placed inside the socket box.
To create bows, prepare fragments of multi-colored wires. In this case, the cross-section of the connectors must be the same as the cross-section of the power supply line conductors. The conductors should not be excessively long, as in this case they will interfere with the normal installation of the socket in the installation box. The cut wires are stripped of the insulating layer by about 1 centimeter.
Wires are threaded through the socket box adapters. Before this, it is necessary to ensure normal patency of the adapters, for which they clean off any remaining gypsum or alabaster mortar. Installing the socket block will be easier if the ends of the conductors are bent towards the terminals.
Remove the protective cover from the block. After this, the clamping screws are loosened by 5 - 7 millimeters. The cleaned end of the power cable phase is directed to the first socket. The location of the terminals should be taken into account. Next, the PE conductor and the neutrals of the power cable lead to the second socket. Exactly the same as described above, connect all other sockets. The sockets should not be tightened too tightly.
Polishing sockets implies strict adherence to the principle of contact polarity. The phase wire comes from the terminal with the phase, and the neutral wire comes from the zero terminal.
For example, if the grounding disappears at the main supply point of a block of power sockets during installation, subsequent participants in the chain will lose the protective zero. In the future, if mains voltage comes into contact with the housing (due to equipment malfunction), the voltage will be transmitted to all other housings of electrical household appliances connected to the network.
Socket boxes with wires attached to terminals are installed in holes in the walls. The structure is fixed with side clamps. Next, the reliability of installation of all devices is tested. Use a building level and, if necessary, make adjustments. Apply electrical tape to exposed areas of electrical wiring or treat them with a heat-shrinkable sponge.
When this work is completed, all that remains is to finally tighten the screws, secure the housing in the socket box and install the decorative cover.
Correct installation of a socket in a concrete wall is done in several stages, the most difficult of which is cutting a hole in the wall where the device will be mounted. If you have the necessary tools, experience, or at least a great desire to do everything yourself, then this task will be completely within the capabilities of any home craftsman.
Double and triple sockets made from ordinary
The meaning of this connection is that the phase and neutral wires are connected from the distribution box to one of the sockets, and the third is connected from its terminals with the next wire, and so on. In essence, these are not double, but double (triple) sockets, which are connected into a separate block, which is still powered from one wire.
A series of sockets connected in this way can be easily repaired - if any part of it fails, then only the broken part will have to be replaced.
The wire connecting the blocks of sockets is selected with the same cross-section as the one that comes to the first of them. If there is no such thing, then without any problems you can take wires with a conductor of a larger cross-section, but in no case vice versa - with a load greater than gentle, the wire connected to such contacts will soon begin to heat up and oxidize. Socket blocks are generally installed in places where the use of a large number of powerful devices is not expected, although if the supply and connecting wires are of sufficient cross-section and the contacts of the sockets are well clamped, then they will easily withstand the operation of the heater in tandem with several other devices.
There is one more nuance when installing socket boxes - they can be installed one at a time, or you can find a whole block that is immediately inserted into the holes drilled in the wall. Otherwise, everything is done in the same way as with a regular outlet.
A detailed story about connecting the socket block in this video:
Useful tips when working
The socket may be corrected due to a miscalculation in the choice of cable cross-section.
Remember to work on de-energized bare wires. The presence of voltage is checked by a phase indicator. All working tools must have insulated handles. The distance between cables laid in grooves and the ceiling must be at least 200 mm, and gas pipes - over 350 mm. The grooves are cut only in horizontal and vertical directions, checking that there are no hidden live wiring in the work area.
Choose a cable whose cross-section is sufficient to ensure the power consumption of the devices plugged into the outlet. You should not skimp on electrical fittings. Sockets that are cheap may begin to heat up and melt when a load is connected, which can cause a short circuit and fire. It is advisable to divide the power lines, separating consumers into categories (permanent, periodically used, lighting) and assigning their own cables to each of them. You should leave a small supply of cable, which is routed to the location where the socket is installed; it will come in handy.
Ensure maximum torque when connecting the soldered cable cores to the socket terminals. Heating and melting of the plug and socket can be caused by exceeding the permissible load on the cable (in the absence of other reasons), which indicates a miscalculation in the choice of its cross-section and the need for replacement. The mobility of a poorly installed socket box can be easily eliminated by re-installing it into the wall in compliance with the technology.
The presence of static voltage (crackling sound when turning on or off electrical appliances) is eliminated by connecting a grounding conductor (reserved in the cable) to the corresponding terminal of the socket. The “symptom”, when it is felt that the wall is receiving an electric current, is caused by the interaction of the wall fittings located close to the socket and the mounting solution that has entered the socket housing. Eliminated by cleaning the internal volume of the “glass”.
Installing sockets in a concrete wall is quite simple. At the same time, compliance with the work technology allows you to securely fasten the product to the wall. The use of effective tools, high-quality materials and compliance with the rules of safe work will ensure long-term operation of the electrical network.
Preparation of tools and materials
The main tools and devices for installing sockets in a concrete wall are presented in the table:
In addition, before installing a socket in a concrete wall, you need to prepare:
- Marker, pencil, chalk or something similar to mark where to drill a hole in concrete;
- Ruler;
- Any building level; for installation of several products in one place;
- Hammer with chisel. With this tool you will need to give the fine the correct shape;
- Putty, which can be gypsum or cement;
- Putty knife;
- Standard set of tools: cutter or sharp knife, flat-head and Phillips-head screwdriver;
- Pliers.
Installing a triple socket in a concrete wall
Components for assembling a triple socket
Let's look at what main components our triple socket . The modern electrical equipment market offers customers a wide range of sockets. However, in this abundance, finding a triple socket in a single housing is very problematic. Even after finding the product you are looking for, a person may encounter two problems:
2. The model does not meet the buyer's requirements.
What to do in such a situation? Most craftsmen use this method in 99% of cases - they assemble a block of single sockets of the required size. Therefore, a triple socket is often assembled from three ordinary sockets.
To do this, we need three ordinary sockets, with a rated current of 16 A. Moreover, we only need their internal part. You can safely throw away the overhead frames for each outlet, since we won’t need them. And to combine three single sockets, we need a special overhead frame with three holes, which will create the appearance of a single whole.
Determining the possibility of connecting an outlet
Before proceeding directly to the connection, we should determine the possibility and correctness of our decision. To do this, you should determine the cross-section of a suitable wire, the rated current of the circuit breaker that powers this group, as well as the absence of prohibitions on installing sockets in a room of this type.
There is no way to do without calculations when installing an outlet.
- Before installing a triple socket into an already operating electrical network group, you should determine whether the circuit breaker can withstand the additional load. To do this, we need to calculate the possible rated current in the outlet. This is done by summing the rated currents of the most powerful consumers of electrical energy that can be connected to a given outlet.
- If we know only the rated power of these devices, then we calculate the rated current based on the formula I=P/U×cosα. Where I is the rated current, P is the rated power of the device (usually indicated in the passport or on the device body) and cosα is the coefficient power of the electrical appliance (the operating instructions for the device should help you find its value, but if you haven’t found it, you can take it equal to 1).
- Now, by summing up all rated currents for a given group, we can check the machine’s compliance with these parameters. Often the machine needs to be replaced with a more powerful one. But if the outlet is designed to connect low-power video and audio equipment, then this may not be necessary.
Note! According to clause 6.2.2 of the PUE, the maximum permissible rated current of the circuit breaker supplying the group network cannot be more than 25A. So, if you already have a 25A machine installed, you will have to think about dividing the group or restrictions on connecting devices to this group.
- Also, if the installation triple socket in an already existing group involves monitoring the cross-section of the supply wire. Often, if the machine is not suitable, then the existing wiring will not meet the new requirements. Therefore, again, you will have to think about the restrictions on the connected load for this group.
- Well, finally, you need to decide, is it possible to install an outlet here at all? The socket cannot be installed in bathrooms or storage rooms. At the same time, there is an exception for bathrooms, which allows installation when an RCD is installed in the power circuit of this group.
The photo shows metal plugs for a socket on a combustible basis
- In addition, if socket must be installed on a combustible base, care should be taken to ensure its fire safety. To do this, the mountings for the socket must be made of fireproof materials. Typically, steel products are used for this.
Sources:
https://beton-house.com/obrabotka/shtroblenie/ustanovka-rozetki-v-betonnuyu-stenu-658 https://plus-beton.ru/blog/ustanovka-trojnoj-rozetki-v-betonnuyu-stenu.html
Marking a concrete wall
In order to drill a hole correctly and without errors, before cutting the socket into a concrete wall, you must clearly mark its position on the wall.
- The center of the axis is marked on the wall surface for routing wires and placing holes. For this, a pencil and tape measure are used;
- If it is necessary to install adjacent sockets or a device block, a certain distance must be maintained between the elements. It is recommended to choose an average distance between the axes of the socket boxes of 71 mm;
- Two axes are drawn in the center: vertical and horizontal. The mowing line must be of sufficient length to ensure that the installation of the socket box is as level as possible.
Adjusting the hole to the size of the socket box
Before installing a socket in a concrete wall, check the dimensions of the hole prepared for the device to see if it fits. The diameter of the hole was initially made larger than the diameter of the socket box, which eliminates problems with width. All efforts are most often aimed at adjusting the required depth.
- The depth of the hole is adjusted to such a size that the socket box is recessed into the niche by 5 millimeters;
- This depth reserve is needed to lay material in the hole, to fix the part - alabaster or cement mortar. In addition, some space will be occupied by the bend of the wire that fits into the outlet;
Tip: To make further work easier, trim the edges of the hole or make a chamfer with a sharp knife.
- Adjusting the depth for installing the socket box allows you to hide it in the hole along with the outer skirt. In this case, the device will be installed with the wall in the same plane. A non-recessed skirt will create a gap between the rosette frame and the wall of up to two millimeters.
READ How to attach a heated towel rail to the wall in the bathroom
Safety precautions
When installing a triple outlet, consider the following precautions:
- Before connecting a triple socket, as before any other electrical installation, turn off the electricity. It is also worth making sure that the electrical network is interrupted.
- During the process, exclusively specialized tools are used, the handles of which are insulated.
- If the electrical wire is long, you should cut it to the required size or carefully lay it in the wall.
- If the wire is too short, it can be extended. In this case, the contacts are soldered. Just doing twists is wrong. This may cause a fire.
- When installing a socket directly into a wall, it is worth monitoring the tightness of the block and the degree of insulation.
- All wires and devices must match the outlet's wattage and amperage rating. Otherwise, a short circuit may occur.
If you follow the rules and recommendations, installation of the socket is quick and safe. However, if you have doubts that you can install it yourself, it is better to use the services of a specialist.
Installation of a double socket
When installing several sockets for sockets in concrete, the sockets are connected to each other using a connector or a butterfly. On the side surfaces of the elements there are special grooves for connecting the butterfly, which allow you to connect two or more elements.
- Marking is being done. At the selected height, a strip is drawn strictly horizontally;
- The socket boxes, connected by a butterfly, are applied to the strip. Their central parts are outlined on the strip;
- A hole is made in any way;
- Connecting grooves are made between the holes. You can make them using a grinder;
- A wire is inserted into one of the holes.
All further work is carried out in the same way, just like making a socket in a concrete wall with one socket.