In every second apartment there are sockets that do not sit tightly in the wall. You may encounter the need to secure a socket box after moving to a new home or if the socket begins to fall out of the wall after a long period of use. Let's figure out how to properly carry out repairs using socket boxes made of plastic or metal. We will also consider the nuances of installing sockets in walls made of various materials (concrete, aerated concrete, brick, plasterboard).
How to fix an outlet?
You don't have to be an electrician to be able to fix minor electrical breakdowns in your home.
It is important to simply follow safety rules and know how the device operates. Let's look at how to fix an outlet in the house without outside help
How to fix a fallen socket?
If the installation is carried out poorly or the socket is handled carelessly, it may fall out of the wall without damaging the wire.
Using such an outlet is extremely dangerous, especially if there are small children in the house, and besides, after a breakdown it looks very unaesthetic.
This can happen to anyone, and therefore you need to know how to fix the socket if it falls out. This is very easy to do - just have alabaster, dry putty or liquid nails on hand. All of the materials listed will securely fix the box in the wall.
Before starting work, it is necessary to turn off the power to the apartment, and then begin to troubleshoot the problem. Dilute alabaster or putty with a small amount of water, quickly cover the hole and insert the box into the middle, pressing it tightly. After drying, you can install the plastic cover and use the socket.
It’s even easier to work with liquid nails - they are applied to the edge of the hole in the wall and along the edge of the socket box. After which the same steps are carried out as with putty.
How to fix a loose socket?
If the socket does not fall out of the wall, but only wobbles, then you can fix it by slightly straightening the legs that fix it inside the wall. After this, the box will fit more tightly to the hole into which it is inserted.
If the plug falls out of the socket
It happens that the plug, which should fit tightly into the socket, dangles in it and even falls out. This should not be allowed, as the socket may catch fire due to poor contact.
To fix the socket, you will need to turn off the electricity supply to the house, unscrew the socket and use a screwdriver to tighten the bolts holding the contacts. If the contacts have oxidized and turned black, they will need to be cleaned with sandpaper and then screwed into place.
RozetkaOnline.ru - Home electrical: articles, reviews, instructions!
The socket falls out of the wall. | How to fix a socket in the wall
Fastening the socket is a very important stage of any electrical installation; the convenience and safety of subsequent operation depends on how correctly and efficiently this is done.
I think many people are familiar with the situation when, during use, a socket falls out of its seat, and there are cases accompanied by a short circuit and even a fire.
Let's consider a similar case, we offer you a detailed step-by-step photo report on how to properly secure the socket, using the example of the ABB Niessen Olas series.
1. Turn off the electricity! To do this, in the electrical panel, it is necessary to move the circuit breaker levers to the “off” state, usually this is the position in which the lever is pointing down. Which machine needs to be turned off, if they are not signed, is determined empirically by turning them off one by one and checking, for example with an indicator screwdriver, for the presence of voltage in the socket wiring. As a last resort, turn everything off. But then be sure to make sure that there is no electric current at the installation site!
2. We disassemble the socket and remove the mechanism from its seat. In our case, we see that there is no socket box and the mechanism is simply installed in a hole in the concrete wall, which is completely wrong, because of this the fastening is unreliable. This often occurs in old houses. It is also not uncommon for cases when a metal socket box is installed in which there are no mounting bolts and the socket mechanisms are attached only with the help of the original spacer mechanism, the reliability of which leaves much to be desired.
3. Disconnect the socket mechanism from the wiring.
What is the danger of a dropped socket?
The main danger of falling out or falling out sockets lies in electric shock.
If there are small children in the house, you should take special care and keep them away from potentially dangerous structures. Seeing a “hanging” socket, an inquisitive baby will want to stick his hand into it
Therefore, protect him in a timely manner from a possible tragic outcome.
Therefore, protect him in a timely manner from a possible tragic outcome.
Another reason for sockets falling out is a broken wire core, which may not appear immediately, but over time. As a result, you will have to partially destroy the wall just to extend the cable. This is troublesome, not very aesthetically pleasing, and also expensive. A socket hanging on wires also does not add harmony to the surrounding environment. Now let's talk about how to fix the socket if it falls out.
Friends, now I’ll tell you how to fix a socket if it fell out of the wall using a live example. We will divide this question into several stages.
Removing the fallen socket
Before performing all the work, you will have to temporarily dismantle the fallen socket. So, first of all, we turn off the power to the room. Having turned off the machine on the panel, we use a special device to check the absence of voltage. After unscrewing the screw, remove the socket cover. Then the socket securing clamps, with the exception of the fallen sockets, are loosened. Next, disconnect the wires. After the screws of the wire clamps are loosened, they need to be pulled out. The removed socket is set aside.
Preparing holes for socket boxes
First and most important. If a metal socket box (Soviet) is installed in the nest, we dismantle it without the slightest regret. In its place we will install a modern plastic socket box with special holes for attaching the frame.
First, completely remove the structure, clean the nest from the old putty and try on a new box in the hole. The socket box is placed in the wall at the same level with the surface. As it protrudes, the size of the hole changes. To remove part of the material, use a hammer or chisel.
Installing a new socket box on the solution
When the dimensions are completely adjusted, the nest is moistened with water and primer. A layer of alabaster is applied to the walls and bottom of the moistened surface.
For improved fixation, the outer part of the box should also be lubricated with a small layer of alabaster. Wires are threaded into the box, inserted into the socket, recessed and secured level. For a tighter entry of the socket into the wall, it is tapped a little with a hammer. To get rid of excess alabaster, a spatula is used.
We are waiting for the mixture to set. If it is alabaster, wait approximately 1 hour. For putty-based mixtures, wait approximately 1 day.
Fixing the socket support
New socket boxes fix the mechanisms in two ways: spacer tabs and screws, which are located directly on the socket box.
After the power wires are connected to the outlet, the mechanism is installed in the mounting box. After horizontal alignment, it is fixed with screws. This is how you can reliably fix the mechanisms of sockets and switches.
In addition to the difficult question of how to secure a falling out socket, this method would be appropriate. Duplicate fixation is carried out using spacer tabs, since the socket is constantly subject to a lot of overload when the plug is pulled out of it.
The final step will be to put on the frame and front panel. The installation has come to an end, and we can only hope that the socket is securely fastened and will not fall out.
The need to repair an outlet often arises. The device may become loose in its fastenings, sometimes a short circuit may occur, and a number of other troubles may occur. Repairing an outlet can be done with your own hands if you strictly follow the recommendations.
Ways to solve the problem
It is logical that you cannot leave the outlet in this state. Firstly, it is not aesthetically pleasing. Secondly, it is dangerous, especially if there are small children or pets in the house. The simplest and most correct option is to install a new outlet, but you may not have such an electrical appliance at hand. This kind of work is quite dusty and requires special tools and skills. The second method of solving the problem is to repair the old socket that falls out of the wall, with further strengthening of the frame.
Quick screwing of the socket
You need to understand that the cause of the socket falling out is faulty claws that no longer hold the device in the wall. If there is no time for a full repair, then you can try to bend these legs so that they press the socket more tightly to the wall surface.
First of all, you need to turn off the power to the outlet and get rid of the front panel. Look how tightly the screws are screwed; if they are loose, they should be tightened
It is important that the spacer tabs fit snugly to the device. Often such measures do not help, since it is not possible to fix the electrical appliance in the old socket
In this case, you can use fixing gaskets made from scrap materials. You will need leftover linoleum, rubber gaskets for plumbing fixtures, sandpaper or wood fragments.
The prepared materials at hand are cut into a rectangular shape. After this, paper, linoleum or wood are smeared with glue and inserted deep into the socket box. In total, you will need two such gaskets, installed opposite each other so as to be located at the level of the spacer legs. After this, all that remains is to press the socket tightly against the box and tighten the screws that adjust the spacer tabs. The final stage is screwing the front panel.
Loading …
Major repair of the seat
Often the reason for the socket to loosen and fall out lies in an incorrectly mounted socket. In this case, a major modernization of this element will be required. To do this you will need to arm yourself with the following tools:
- box for mounting a socket measuring 6.8 by 4.5 cm;
- gypsum;
- construction knife;
- polymer-based primer;
- spatula in the form of a small spatula.
Work must begin by disconnecting the device from the network. If this is your first time doing this, you should mark the wires with a marker in advance so as not to confuse them after the repair. After this, the socket with the drop-down contact group is dismantled. Next, you need to unscrew the screws, remove the plugs and pass the wires into the box. The bottom of the box will probably get in your way, so you need to cut it out first.
After this, you can begin installing the socket base into the box. Maximum fit will avoid further problems with the electrical appliance falling out. Next, the inaccuracies are corrected and the location of the seat is outlined. All that remains is to prime the outside of the box and wait for it to dry. Next, plaster is diluted, which is used to treat the wall and seat. The mounting box is inserted into the prepared cavity, then the material is removed and the gaps are filled. It takes approximately 15 minutes for the gypsum mortar to set. After this time, you can install a new socket by first wedging the base and tightening the adjusting screws. The final stage is installation of the front panel.
Repair options depending on wall type
The sequence of repair work primarily depends on the type of wall in which the failure occurred. Let's look at the most common options.
Repairing a fallen socket in a brick wall
Before you begin, visually inspect the outlet and the wires attached to it. It is quite possible that the cause of the breakdown lies in the loosening of the clamping screws of the socket itself. In this case, you just need to tighten them well.
If the reason is trivial, the whole job will take you a few minutes PHOTO: foreman.rf
The second failure option is failure of the spacer legs of the socket box. In this case, you will have to replace it with a new one, preferably made of metal or high-quality plastic. This kind of breakdown happens quite often, especially if you have to regularly pull the plug out of its socket.
Replacing a socket box is not a very labor-intensive process, especially if you manage to find a new one in the working tools PHOTO: sdelaysam-svoimirukami.ru
After removing the socket box, we look at the condition of the nest and remove unnecessary debris. If necessary, use a drill attachment (usually a crown) to enlarge the hole for the new socket box, or reduce it using masking mixtures and other materials that are at hand. Typically, the mounting socket should be 5 mm larger than the diameter of the socket.
For a tighter “fit” of the socket box, it is laid on plaster PHOTO: sibelektrika.ru
The solution is applied both to the connection points with the wall and to the back side of the socket box. Before installing the socket, it is better to wait until the solution has completely dried.
Before the final installation of the socket box, carefully distribute the wires and insert it into the prepared niche. For even distribution, you can lightly hit the socket box with a hammer so that the edges of the socket box are level with the wall.
Do not forget that before installing the socket, the solution must dry out. PHOTO: materialexpert.ru
Do not forget that in modern socket boxes there are not only special guides for correct fixation in the wall, but also limiters. We fix the socket elements using special fastening screws that are screwed into the guides.
Advice! There are cases when the walls do not allow deeper installation of electrical networks. In this case, it is better to purchase special, narrower socket boxes, which, in principle, are in no way inferior to traditional ones.
In this case, you will ensure the protection of the networks, and provide the outlet itself with sufficient rigidity, which will only increase its service life.
Plasterboard wall - options for repairing a fallen socket
Fastening and fitting a socket into a plasterboard wall is somewhat different from the traditional one. That is why the technology of repair work here will be different. On such walls, clamping feet are used as fasteners.
The main task is to restore the integrity of the wall, if necessary, “building up” the sheet using alabaster in the damaged areas PHOTO: thewiredoctors.com
To fix the extended element from the inside, we use small sheets of plasterboard, securing them under the damaged area on the reverse side. This will increase the strength of the sheet and ensure reliable fixation of the socket.
If this is not possible, then we use an alternative solution. Strength can be achieved by filling the voids behind the plasterboard wall with crumpled newspaper and filling the remaining voids with thick gypsum putty. In this case, the socket itself will become a kind of counterweight to the pressure inside the wall. But the main thing here is to maintain a reasonable balance.
Next, all you have to do is wait for the mixture to set. We perform the same steps as on the brick wall and install the socket in place.
If you do everything correctly, the result in the form of long-lasting sockets will please you for many years PHOTO: electronshik.ru
When there is no socket at all
Rarely, but it also happens - the socket dangles, and when you take it apart, it turns out that it simply rests with spacer tendrils against the wall, preferably a concrete one.
There is only one correct solution to the problem - to install a socket box, since the steel tendrils will eventually crumble even the most durable concrete and the socket will fall out.
If there is no other choice but to fix the socket in the wall (there is no socket box and nowhere to buy one), then you can make a homemade mount for the socket. To do this, you will need to make chopsticks: from thick linoleum, sandpaper or a couple of pieces of wooden board - preferably not overdried, so as not to crack when tightening the fastening bolts.
- You need to try on where the spacer antennae rest against the wall and carefully hollow out small recesses there.
- Choppers are cut to fit the size of the resulting pits. If it is linoleum or sandpaper, then it is advisable to fold them in half, with the smooth side inward, so that the rough side touches the wall and the fastening antennae. The tree is simply given the desired shape - unlike classic chopsticks, which are made cylindrical, these need to be made rectangular.
- Next, the choppers are inserted into the fastenings, a socket is connected to them and the bolts are tightened, which pushes the fastening antennae apart.
This method can be effective even for walls not made of the hardest material, such as adobe brick, but if possible it is still recommended to make the correct fastening using socket boxes.
Problems with the junction box
The source of the problem is in the junction box - this is not uncommon. It is necessary to open it and carefully check all connections: burnt or broken cables will be immediately noticeable.
First of all, naturally, you should turn off the power to the apartment and then measure the voltage. If the reading at the input terminal is sufficient and the reading at the output terminal is zero, then the system is faulty and needs to be rebooted.
Next, you need to inspect all the contacts, which sometimes burn out. We remove the insulation from the darkened, oxidized wire, clean it with a knife and sandpaper, and then twist it and wrap it with electrical tape. We throw away the damaged fragments. After all these steps, we assemble the distribution box and, after connecting the power, measure the voltage at the outputs again.
If none of the cables in the junction box are damaged, the problem must be looked for elsewhere. In the worst case, you will have to look for faulty wires in the walls.
Ways to eliminate such troubles
If the owner notices that the socket is starting to dangle, you should not wait until it falls out completely. It is much safer to immediately correct such a malfunction. To do this, it is not at all necessary to hire specialists and pay for their services. It is much easier to do all the repair work yourself. In the simplest cases, you will only need an indicator and slotted screwdriver, and sometimes pliers. Let's look at the algorithm of actions.
Fixing a problem like this is not difficult; a specialist is not necessary.
What to do first
First you need to completely remove the voltage from the outlet. To do this, you need to turn off the input circuit breaker in the distribution panel. If the voltage supply to the sockets and lighting is routed to different circuit breakers, cut-off from the power group circuit breaker is allowed. In any case, before starting work, it is necessary to check that there is no power at the socket contacts using an indicator screwdriver.
Ignoring the need to turn off the power supply can end very badly, even in death. Electricity is not something to joke around with.
Ways to fix a loose socket in the wall
Sometimes it is enough to simply tighten the screws of the spacer mechanism so that the socket fits tightly. However, it is possible that the socket box is not fixed in the wall. In this case, it must be secured by pushing it all the way down and coating the sides with putty or mounting adhesive. If a socket box with a larger diameter than necessary is installed, you can slightly bend the legs of the spacer mechanism with pliers. It is also possible to install rubber gaskets between the legs and the walls of the glass.
Well-fixed socket boxes are already half the job
The last option is when the socket box is made of metal (often happens in old houses). In this case, its walls will be smooth and the paws simply will not be able to catch on. There is one trick here. You need to fold small pieces of coarse sandpaper in half, preferably on a fabric basis, and lay them like rubber bands, which were mentioned just above. Sandpaper in this case will add the grip the parts need.
It is worth paying attention to the fastening of not only sockets, but also switches
Completion of installation
When the wiring “sits” securely in the contacts, the inner part of the socket can be inserted into the socket box. To do this, bend the wires so that they are parallel to the back wall and push everything inside.
The inner part is fixed in the socket box with spacer tabs - in order for them to move apart, you need to tighten the fastening bolts, which are always located in the front part. When the bolt rotates clockwise, the tab moves to the side, but on the contrary, it simply hangs along the body. Sometimes the legs interfere with inserting the socket into the socket box, opening prematurely, so they are either tied to the body with thread or pulled together with a rubber band.
Additionally, the socket can be fixed with bolts that are screwed into the front part of the socket box.
The last step is screwing on the lid. It has centering pins, so securing it to the socket incorrectly is quite problematic. When everything is ready, the electricity is turned on and the operation of the outlet is checked, as well as the grounding. The check can be done even before installing the internal part in the socket box, but this is how someone feels about the quality of their work.
Related article: How to hammer a nail into a concrete wall
Step-by-step instructions for installing and connecting the socket in this video:
As a result, installing a household outlet in a concrete wall is not an impossible task even for a non-professional. If you have to install several of them, then all the nuances will definitely be remembered - later you can act as an instructor.
The socket falls out of the wall
The socket falls out of the wall
? The phenomenon is quite common, especially in older series houses. A socket falls out for many reasons, but the most trivial one is pulling out the wire without holding the socket, not by the plug, but by the cable itself. Another reason is the weakening of the spacer petals over time, or, conversely, scraping out of the concrete due to the rigidity of these same petals.
It can be treated quite quickly, but not too easily. Of course, you can simply dismantle the socket, bend the petals and try to put it back. You can replace the socket with a new one with wider petals. You may be lucky, but usually such methods do not save you for long - or do not save you at all. We will go the other way - the right one.
So, the reason the socket falls out of the wall is that the petals no longer hold it there. How to make them work? Apply the above methods? Or maybe it’s better to strengthen the socket for a long time, and in the future it will be possible to install other sockets in the hole, which will also not fall out!
We will modernize the landing nest. To do this, we will need a mounting box 68 x 45 mm, used for installation in drywall, plaster or alabaster, a spatula, a construction knife, a flat brush, any polymer primer or diluted PVA glue instead.
How to protect yourself and prevent such breakdowns
The main reason why the socket starts to become loose and falls out of the wall is improper use of the products. We have already mentioned more than once that under no circumstances should you pull out the plugged-in cord, as this could cause the body of the socket to be torn out. No matter what they say, this is indeed one of the most common causes of malfunction. For the rest, you should check the electrical wiring, check the reliability of the installation of sockets and switches, as well as the quality of the connections of wires and terminals.
How to strengthen sockets falling out of the wall
Then we take a standard socket box and try it on the hole.
In our case, the depth of the hole turned out to be less than the depth of the socket box, so we cut off the back part from it.
There may also be cases when you will have to slightly widen the hole; the socket box should not be deformed during installation.
In the case where a metal socket box is installed, it is necessary to carefully remove it, and if you act carefully, serious damage can be avoided and subsequent repairs will not be required, because the rosette frame will hide everything
We try on the resulting socket box and if it fits, i.e. does not stick out from the wall and is not deformed, we move on to the next stage.
4. We smear the socket box. To do this, we dilute the mixture on a gypsum basis according to the instructions, you can also use simple alabaster, and apply the mixture into the hole, as shown in the figure below.
Immediately after this, we insert the socket box we prepared earlier into the hole strictly according to the level. Any excess mixture that comes out is immediately removed with a damp sponge.
5. We wait until the mixture sets, after which we connect it to the wiring and install the mechanism in the mounting box. To secure the socket, we will use screws in the socket box - this is the most reliable option for fixing the mechanisms of electrical installation devices.
After that all that remains is to put on the frame and front panel. At this point, the installation is complete, now the fastening is as reliable as possible and the socket will no longer fall out.
Currently, many people are faced with the problem of falling out sockets. Many people still don’t understand why this situation happens and how to change the outlet.
What to do if the socket itself falls out
There may be two main reasons for this - insufficient pressing of the fastening tendrils and the smooth inside of the socket box, along which the fastenings simply slip.
In the first case, the fasteners simply do not reach the walls of the socket box or the pressing force is insufficient to confidently hold the entire structure. This may occur due to wear of the fasteners or mismatch of models, when the socket itself is smaller than the socket box.
If the socket is still fixed in the socket box, but is then pulled out of it along with the plug, then it lacks quite a bit of pressing force. Here it will be enough to simply bend the fastening antennae a little - they are shaped like the letter “G”, but with the upper part slightly bent upward. If you bend it a little more, the pressing force will increase. To do this, you need to unscrew the adjusting bolt; this part will fall out of the socket itself and can be adjusted with pliers. Then everything can be installed in reverse order. To ensure a guaranteed result, you can make several notches in the place where the fastening antennae will rest, using a knife or a soldering iron.
When the socket itself, even if well fixed in the wall, is much larger than the socket, then it is necessary either to change it completely or, again, to make choppers and make notches on the inside.
There are also often cases when the surface of the socket at the point of contact with the spacer antennae is simply licked off. An effective solution is to remove the socket box and then install it, but at an angle of 90° from the original position. It’s even easier to rotate the socket itself - double and triple ones are often installed this way - in a horizontal position.
Before deciding what to do if the socket falls out of the socket box, you need to inspect the body of the latter - modern models have mounting bolts with which the socket is simply screwed to their body.
Why does the socket fall out? Imperfect design.
The socket falls out due to imperfections in the structure that holds it in the wall. It consists of two metal tabs, which, when tightening the screws, rest against the inner walls of the socket socket, due to which the fixation occurs. If the socket is inserted into a socket without a socket, the spacer legs rest directly on the wall material, which can break and crumble when the plug is removed. Because of this, a gap appears between the spacer tab and the wall of the socket and, as a result, the socket becomes loose and falls out of the socket at the first “convenient” opportunity.
If the socket is installed with an old Soviet socket box, then the reason for its loosening and falling out is that their modern standard sizes are smaller than the old standard sizes. Because of this, the spacer legs are shorter than necessary. And even if they are bent to lengthen them, the force they provide is not enough to securely fasten the structure.
Unbend the “legs” of the socket to secure it more securely
Installation of sockets
It is important to know how to connect the outlet correctly. Before installation, you need to remove 10 mm of insulation from the edges of the wire
Make sure that the machine is turned off during work.
There are two options for correctly connecting the outlet:
- Hidden installation of electrical wiring;
- Open installation of electrical wiring.
For any method of installing sockets of any type, you should know how each wire is designated:
It is also important to know that the wires are designated:
- Red wire – phase;
- Blue wire – zero;
- Yellow (can be green or another color) – grounding.
Each wire must be connected to its own socket, that is, red to phase, blue to zero, and ground to ground.
Final word
To summarize what has been said, it should be noted that a dangling or falling out socket is not only unpleasant, but also dangerous to health and even life. In addition, taking into account the simplicity of solving such an issue, the HouseChief editors advise not to put off such work indefinitely, but to deal with it immediately. The main thing is not to forget about electrical safety rules when performing it.
Remember that electric shock is life-threatening
We really hope that today's article will be useful to novice home craftsmen. If you have any questions, you can put them in the comments below. The HouseChief editors will try to answer them as quickly as possible. We ask you to express your opinion about the article there, and if you have experience in producing similar works, our readers will be interested to know about it. Finally, according to the already established good tradition, we suggest watching one video. It won’t take much time, but it will definitely be useful.
What tools do you need to prepare?
Before installing the outlet, you should prepare the following tools and parts - they will be needed in this order:
- A pencil, marker, charcoal, or anything that can be used to make markings on the wall.
- Ruler. Even an ordinary school one is suitable for one device, and if a block of sockets is installed, then preferably a large one.
- Level – bubble or laser. At the initial stage, it will only be useful when installing the socket block.
- Drill with a “concrete bit” attachment. If you don’t have an attachment, a concrete drill will do. Some people cut the wall with a grinder. If the wall is particularly strong, then water will not hurt, as it will cool the crown.
- Chisel and hammer - needed for fine adjustment of the walls of the hole.
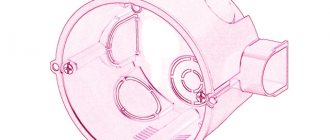
- Socket box – provides rigid mounting of the device in the wall.
- Putty - gypsum, alabaster or cement mortar.
- A spatula that can be placed in a socket box.
- A voltage indicator - by and large, could be useful at the beginning, but you cannot do without it at this stage.
- Additional wires are needed if several points are being installed.
- Knife – maybe the smallest one.
- Pliers – preferably with wire cutters.
- The socket is what everything is started for.
- A screwdriver - most often a Phillips screwdriver, but in some cases a slotted one is also useful - it all depends on the bolts that need to be tightened.
It is assumed that before installing the socket in the wall, wires have already been laid to this place and it is known which of them is the phase and where the neutral is with grounding. If not, then you will have to plan large-scale work to punch grooves (grooves) in the wall for wiring. To do this, you will have to rent a wall chaser, prepare to drill them out with a drill and hammer drill, or cut them out with a grinder.
Structure falling out
How to fix a socket if it falls out? The reason for this phenomenon is simple - incorrect and careless use (sharply pulling out the plug). This can be avoided by tightening the entire structure more tightly. But this does not always help with frequent use. Some people install something solid under the socket, but such manipulation does not bring much results either.
It’s worth thinking about completely replacing the entire structure and purchasing a higher-quality socket box. What you need to have on hand:
- New device.
- Cement (or better yet, gypsum - it sets faster).
- Construction knife.
- Putty knife.
- Primer.
- A set of tools for installing a socket.
The electricity in the room is turned off and the old element is dismantled. It happens that the socket is simply in concrete - it is better to remove it and make a socket box. But this is done before purchasing the part so that the shape matches the existing base in the wall. There is a large assortment of such components on sale, and finding the right one will not be difficult.
How to fix an outlet in the wall? You just need to increase the size of the space in the wall using a chisel and hammer. Afterwards, the selected mixture for fixing is diluted, and the socket box is placed on it. Before this, the base is treated with a primer mixture to ensure better adhesion. If there is wallpaper, they are carefully removed and attached to the wall with pins. Some people recommend using tape, but it can ruin the surface.
After the mixture begins to set, the entire structure is formed according to the level. Next, the socket itself is fixed using the bolts or screws included in the kit. Now it's time to install the outlet. There is no difficulty, but there are quite a lot of actions - you should not skip a single step.
After any repair, the outlet is checked for functionality. To do this, connect a low power device for ten minutes. When working, it is worth controlling the phase. If it is present, do not start installation. It happens that the plug from the socket is broken. How to fix it? There are plenty of reasons for this - a burnt out or loose contact, careless handling during operation, etc. The plug can be easily disassembled because there is a fastening in the middle, in the form of a screw.
When the structure is untwisted, you get two halves with an internal component. There are also contacts there that will tell you a lot. If they have oxidized, darkened, or become detached, the plug will not work. Sometimes it is enough to tighten them, and the device will begin to perform its functions again. Today, many modern appliances have plugs that cannot be disassembled. In this case, you can try to completely replace it.
Differences between old and new outlets
Switches installed in walls are attached using the same principle, but they fall out much less often. The reason is simple - when turning it on and off, the force is always applied in the direction of the wall. In sockets, everything is different - when the plug is inserted into them, the force is directed towards the wall, and when it is removed, it is directed back.
In older outlets, this problem was not so acute, because they were designed for devices with much lower power consumption. This automatically meant that there were no strict requirements for the pressing force of the contacts - plugs were inserted and removed from sockets with much less effort - from that time on, many users began the habit of pulling the plug by the cord. Removing the plug in this way is prohibited now and was not allowed before, but with the old sockets there was enough safety margin, so often such requirements were simply not paid attention to.
Modern sockets use spring-loaded contacts, which are pressed very tightly against the live parts of the plugs. Even a socket installed according to all the rules will gradually become loose, so it is recommended in any case to hold it with your hand when removing the plug.
A day later - a test of strength
Fixation strength test
I don’t know about you, but for me the fork goes in with force and comes out the same way. I stuck it in several times and pulled it out with force, and found that the socket didn’t even move - everything was in place, everything was in perfect order.
The work was done and checked in 15 minutes within one day.
VIDEO: Unusual repair of a falling out socket
Connecting electrical wiring
This procedure is not complicated, because you just need to connect a couple of wires, but the main thing here is not to make mistakes.
The first step is to turn off the electricity in the entire room for safety. We take an indicator screwdriver and touch each wire to make sure that the wires are de-energized and do not pose a threat.
Next, remove approximately 2-3 centimeters of insulating winding from the ends of the wire. After this, the exposed area is bent into a ring, and in the case of a stranded wire, it must be divided into two parts so that it acquires a V-shape. The exposed core of the wire needs to be slightly flattened with pliers to increase the contact area with the terminal.
There are only three terminals on the socket itself: two conductive and one grounding. The wires in all three terminals are clamped with bolts. When using wiring with standard color markings, you need to connect the yellow-green wire to the ground terminal, the blue wire is connected to zero, and the remaining wire to phase. It is quite difficult to confuse the connection sequence, because there are not many options, but still, you need to be careful.
The unit is connected using a solid cable or a star. The first option involves moving contacts from one socket directly to the next element. The star method involves laying a wire from each socket to a common point, and then connecting phase to phase, and zero to zero. It is worth noting an important point that the rules for electrical installations strictly prohibit the installation of grounding with a loop. In this way, only phase and neutral can be connected, and grounding must be connected using the star method.
Strengthening the socket
Electrical accessories are placed in the walls using plastic boxes - socket boxes. The latter have corrugation on the inner surface to firmly hold the mounting tabs of the device. In old houses, socket boxes were made from a metal cylinder with smooth sides. In such cases it can be difficult to securely fix the socket. In a plastic case, the fastening mechanism coincides with the supporting legs of the fittings. Reasons for the socket falling out:
- Installation in a metal cup.
- Lack of socket.
- Deformation of the paws.
- Large size mounting box.
- Destruction of fastenings.
- Installation errors.
Necessary tools, safety measures
It is necessary to carry out the repair procedure with preparatory measures: when working with wiring there is a risk of electric shock. First you need to de-energize the power line of the damaged device. This can be done by turning off the input or dedicated machine. The absence of voltage is checked with an indicator screwdriver or a multimeter. Tools you may need:
- Screwdriver Set.
- Pliers.
- Knife with a sharp blade for stripping wires.
Repair methods
The nature of the restoration depends on the cause of the weakening of the fastening.
Repair methods:
- Tightening the mounting tabs. An effective method in almost all cases of hair loss. To do this, you need to remove the front panel. The legs are tightened with two screws located on the sides of the socket. At the same time, the force is controlled to prevent metal deformation.
- Use of additional pads. If the legs are tightened to the limit, and the electrical accessories are not fixed, you can place pieces of rubber under the supports.
- Bend the legs. When the design of the fastening mechanism allows, you can bend the ends of the supports slightly. To do this, hold the edges with pliers and pull them to the side.
- Installation of a new socket box. They remove the fittings, use a chisel or a hammer drill to knock out the old box, deepen and widen the recess. Install a new kit.
Prevention
The socket falls out when the plug is pulled out. Modern fittings are designed to transmit higher currents than several decades ago. To do this, make tight contact between the clamps. Excessive force when removing the plug leads to loosening of the fastenings, as a result of which the socket pops out along with the cord from the electrical appliance. To avoid this, you must hold both the plug and the fittings.
Repair methods
Before you proceed to repair an outlet that is falling out, be sure to turn off the power at the input panel! You only need to start disassembling the case when there is no voltage in the network!
Let's consider the classic situation when a socket falls out of a concrete wall. First you need to understand why the fastening mechanism, represented by sliding legs, does not hold the body in the mounting hole. Make sure that a socket box is installed in the wall, which is exactly what is needed so that the socket or switch does not fall out. According to modern standards, it should be plastic, with corrugated walls designed to catch the paws. Old metal glasses have flat inner edges, making it simply impossible to properly secure the socket. There are situations when such a glass is not installed at all, and the socket falls out due to the fact that the petals do not open well in the concrete. One way or another, if the case constantly falls out of the glass, we recommend installing a new socket box with corrugated walls, which will solve this problem.
If you see that a normal plastic socket box is installed in the wall, but the socket or light switch is loose, we recommend checking the legs themselves. It is possible that the diameter of the mounting box is larger than the diameter of the spacer of the legs, as a result of which the body simply cannot catch on to the walls of the glass and falls out of it. In this case, you can solve the problem in two ways:
- Place rubber pads under the stop of the paws to compensate for the void.
- Using pliers, bend the petals slightly to increase the diameter of the expansion. Here you should understand that if the metal is soft, it may not be possible to correct the situation by deforming the petals, because when pushed, they will bend back. However, this happens extremely rarely and is due to the poor quality of the product.
A common situation that causes electrical accessories to fall off the wall is an error when installing a socket, when the installer forgets to spread the petals well when tightening the special screws. In this case, in order to strengthen the case that has become loose, you just need to use a screwdriver to fasten it correctly, as shown in the photo below:
We also recommend watching the video for another method that will help correct the situation:
If you live in a panel house and the apartment has old electrical wiring, then often the sockets and switches do not stick well to the wall and fall out because they are installed in a through hole in the partition without a socket box. You can clearly see this situation in the photo:
In this case, the first thing you need to do is install the socket box, trim it if necessary (sometimes problems arise with the thickness and you have to shorten the glass from the bottom) and then re-attach the socket or switch in the concrete wall.
Another situation involves a plasterboard wall. If the socket breaks out of the drywall along with a piece of plaster, it will not be possible to secure the housing using the instructions provided above. This is due to the fact that the principle of fastening the socket box in concrete and plasterboard is different. In the latter case, the plastic cup is attached to the gypsum board sheet using presser feet, which can be seen in the picture below:
To ensure that the socket no longer falls out or wobbles, it is recommended to glue a piece of plasterboard sheet in place using alabaster or gypsum putty. When the solution hardens, you need to cut a small strip from a sheet of plasterboard, place it under the damaged area and screw it in with self-tapping screws. This option of strengthening the wall will save the situation.
An alternative is to stuff newspaper into the void around the hole and fill it with thick plaster putty. Don't forget to run the wires into the socket box before doing this. The mounting box must be pressed into the mortar so that it is flush with the wall (not sticking out), then remove the excess mortar and wait until the plaster hardens.
If the case wobbles and falls out, you can solve the problem even easier, as the master showed in his video tutorial:
Troubleshooting options
The first rule, regardless of which method you choose, is to turn off the electricity supply at the input panel (i.e. completely de-energize the apartment/house)! There are 4 methods to quickly fix the situation when a socket falls out of the wall.
Due to long-term use, the socket may fall out due to improper use (pulling out cords, etc.). To secure it, perform re-installation (removal/installation of the top panel):
- Unscrew the central screw (thin bolt in the middle of the cover);
- remove the outer panel;
- remove the socket block completely from the socket box and then return it back;
- well (but without fanaticism - otherwise you will break the thread) tighten the screws that move the fixing tabs apart;
- install the outer protective and decorative plastic (or ceramic) panel and secure with the central screw.
If the first option does not help, do the following.
- Unscrew the central screw and remove the socket block from the socket cup.
- Bend the spacer tabs with pliers.
- Install rubber pads (wooden inserts, several layers of thick sandpaper) in the places where the legs are spaced to compensate for the existing void.
- Reassemble the socket.
If the problem cannot be solved, additional measures must be taken to secure the outlet.
- Each socket block has round holes in the socket box in the corners.
- Make marks along these lines in the wall and drill 4 holes.
- Drive dowels into them (quick installation is possible).
- Screw in the mounting screws.
- This will provide additional fixation.
This method is considered the most reliable, but requires a little time and labor. It is especially relevant if you have old-style steel socket boxes. They need to be replaced with modern ones made of plastic. However, this will require widening the hole for a new glass.
- Remove the entire outlet completely.
- Run a diamond bit through the drill through the hole.
- Insert the power wires into the new glass, then secure it with cement mortar (or alabaster).
The socket will never fall out again.
Cement
Why markup
If you install one single outlet in a concrete wall, then by and large there is no need for markings. There is not much difference if it is located plus or minus a centimeter. It’s another matter if there are other sockets nearby and the owner of the premises has the “view of a perfectionist.” Some people have this developed by nature, and if any thing is out of the general picture, it will cause irritation.
As a result, it is better to spend an extra few minutes to calculate and draw on the wall the location of the future outlet. This must be done when installing a block of sockets that will be located close to each other. A level will come in handy here, although if the floor in the room is crooked, you will have to think about how to make the markings - level or parallel to the floor surface.
A correctly made marking “drawing” is a horizontal line on which the centers of the holes for the socket boxes are marked. To monitor whether the crown has jumped off the mark, the marking should be slightly larger than its diameter. The most reliable way to calculate the distance between centers is to put the socket covers together and measure the distance between their centers.
Preparation stage
Before you begin installing sockets in concrete, you need to decide on the installation location, as well as prepare the tools and materials that will be needed during the work. When installing sockets in residential premises, it is worth remembering two main factors:
- Installation of sockets in living rooms (living room, bedroom) is carried out at a distance of 30–40 cm from the floor.
- When installing in other rooms (kitchen, bathroom), you should rely only on personal preferences. That is, where it will be convenient and practical, put it there.
When laying electrical wiring, you need to remember some rules:
- The wires are installed at a distance of about 15–20 cm from the ceiling.
- Wire laying is carried out only in a horizontal or vertical position. Under no circumstances is laying diagonally or otherwise allowed.
- The groove for laying the wire (groove) must be at a distance of at least 35 centimeters from the gas pipeline pipe.
Before starting work, you need to prepare a workplace, as well as tools that will be useful during installation.
- Marker, chalk, pencil, or anything to mark the outlet hole in the concrete.
- Ruler of any size.
- A level of any type, which is useful for installing several sockets in one place.
- Drill with installed bit for concrete surfaces. If there is no special crown, you can simply use a drill. In some cases, with certain skills, a grinder is used. It is important to remember that the drill or bit can become very hot during operation and must be cooled down regularly.
- Hammer with chisel. This tool is necessary to give the groove the correct shape.
- Socket box. This item is a frame that gives the mount greater rigidity.
- Putty of any kind, for example, gypsum or cement. You will also need a spatula, which will be placed in the socket box.
- Standard set of tools: knife or cutter, flat-head and Phillips screwdriver, pliers.
Related article: How to attach Roman blinds to a wall
After mastering some rules and preparing the tool, we proceed to the next step.
Ways to solve the problem with the socket falling out
If the socket does fall out of the wall, it is necessary to take measures to restore it and fix it in place. There are several installation methods depending on the cause of the problem and the specific installation conditions of the device. Each of the options can be done with your own hands, but in all cases, before starting work, you must turn off the power in order to protect yourself and those present from the damaging effects of electric current.
Securing a socket in a plasterboard partition
The device provides reliable and high-quality fastening to a sheet of plasterboard
To install a power point on a plasterboard base, it is necessary to use special installation boxes (sub-boxes) that have movable elements for fixing to a thin surface. These devices are driven by screws provided by the design, providing fastening by clamping the drywall between the bulwark of the box and the strips (ears) that are attracted along the thread.
If there is a break in the drywall at the fastening site, you can use two methods to resolve the problem:
Option 1:
- remove the socket;
- loosen the clamping screws;
- turn the box 90 degrees and clamp the ears in the new place;
- install the power point by rotating it 90 degrees.
Option 2:
- dismantle the socket and remove the box;
- glue a piece of plywood or cardboard of the required size from the inside to the undamaged area of the gypsum board, and glue a plasterboard insert onto it that matches the configuration of the broken one;
- After the adhesive has hardened, secure the sub-socket in its original place and mount the detachable device.
Making holes on a concrete wall
This stage is the most difficult and painstaking, especially if the concrete wall is strong and difficult to drill. There are several ways to drill holes for a socket, depending on the availability of the appropriate tool.
- Using a special crown for carving concrete. In this case, a hole is drilled in the center of the marking to enter the central axis of the crown. This will make the crown fit easier. A hole is drilled with a crown, and the remaining pieces of concrete are knocked out with a chisel.
- Using a drill with a drill bit for concrete. In this situation, 10–12 holes are drilled around the marking circumference, after which the resulting circle is knocked out using a hammer and chisel (or other convenient methods).
- Mixed method. The first step is to drill several holes around the circumference, and then this structure is drilled to the end using a concrete crown. The remainder is knocked out with a chisel. It will be easier to work in this way, since the movement of the crown will be easier and softer. This method is most relevant for durable concrete walls.
You should not focus too much on the clear round shape of the hole. It’s okay if the installation space is a little square, because the rest of the space will in any case be covered with a special solution for a strong and reliable fixation of the socket box.
It is important to note that when installing a block of several sockets, it is necessary to drill grooves between them to lay the wiring that will connect all the elements.