LED lighting is increasingly used in apartments and private houses, gradually replacing traditional light sources. LEDs have gained wide popularity due to their technical characteristics and high economic indicators. LED strips are in particular demand, used as the main lighting devices and installed in a variety of places. However, the main obstacle to the widespread use of LEDs remains their rather high price.
Many home craftsmen are trying to solve this problem on their own, creating original devices, including a lamp from an LED strip with their own hands. Such designs are much cheaper compared to industrial analogues, and in terms of efficiency and quality they are in no way inferior to them. If you have knowledge of the basics of electrical engineering, any novice electrician can make homemade lighting devices.
Materials for the lamp
The tape has quite high flexibility, due to this the product can be made in a wide variety of formats. But there will be general principles in the assembly for lamps of any model.
You will need to prepare the following materials:
- directly LED strip with the necessary LED parameters;
- screws;
- aluminum corner, which can be replaced with a plastic box;
- switch.
It is also worth taking care of the tools:
- drills;
- pencil with ruler;
- electric jigsaw;
- pliers.
When all the required materials and tools are ready, you can begin to assemble the future product.
Lightweight and elegant cardboard lampshade
For a paper lampshade, paper or thin cardboard is suitable. Such a lampshade can be either rectangular or square. First you need to think about the size of the lampshade; the larger the room, the wider the structure can be.
- You need to make two circles of wire of the required diameter. They are connected to each other using a fishing line, the distance between the lower and upper frames is 12 - 15 cm, the hoops are fastened with fishing line in three or four places. The larger the diameter of the base, the more connecting elements need to be made.
- On a piece of paper you can draw circles of different diameters and figures of cartoon characters. Outline drawings can be taken from the Internet and printed, then redrawn using carbon paper.
- A special ruler is suitable for drawing circles, or you can outline lids or buttons of different diameters. Some designs are cut out completely with a stationery knife, others are cut along the contour.
- The paper is tried on the base and glued with an overlap. Then glued to the wire; it can also be secured with thin wire.
- To do this, first make a hole in the paper with a thick needle or awl, then thread the wire and carefully tie it to the frame. It is advisable to glue thin paper, as it can easily be damaged.
How to make a lamp from wood with your own hands
What do you need
- Branches;
- hand jigsaw or other cutting tool;
- sandpaper;
- lamp base;
- deep wide lid;
- superglue or glue gun;
- bulb.
How to do
Cut the branches into many lengths. They should differ slightly from each other in length.
Go over all the branches thoroughly with sandpaper.
Glue the lamp base into the lid.
Glue one branch vertically to the side of the lid.
Next to it, glue another one to the lid and the first branch in the same way.
Continue gluing the remaining branches in a circle.
Cover the entire base with wood. Route the wire between the branches.
Screw a light bulb into the base.
DIY lamp for the workplace
It’s also not difficult to make a small lamp yourself using an LED strip. In this case, a correctly selected housing is of great importance. A non-working fluorescent lamp is best suited for this. For example, for high-quality refreshment, a lamp 30 centimeters long will be enough.
In this case, for the lamp it is better to take an LED strip of the Waterproof SMD 5050 LED Strip type with the following basic parameters:
- current consumption – 1.2 A/m;
- supply voltage – 12 V;
- angle of light radiation – 120º.
The LED strip is attached to the inside of the lamp. You must use a purchased power supply or make one yourself.
By connecting the LED strip to the power supply, you need to check the functionality of the lamp.
During installation, it is important to properly insulate the conductive parts. If everything is done correctly, the lamp’s power supply is masked in its housing or, if it was purchased, it is carefully fixed near the place of its installation
The result is a very economical and neat design that provides high-quality lighting to the workplace.
DIY LED lamp for summer cottages and camping. Design. Part 1.
If you have ever turned off the lights in a country house or you like to go out into nature in a car with a large company, then in such cases you could use a powerful and economical LED lamp that would operate from a convenient autonomous power source. An ordinary flashlight, due to its narrow, intense beam of light, is not always able to comfortably illuminate the required area, plus the battery installed in it, as a rule, runs out quite quickly during significant continuous operation. I had 2 reels of 5 meters of cheap LED strip on SMD 3528 LEDs lying idle, 60 diodes per 1 meter, the cost of one such strip on Aliexpress is just over 200 rubles. These tapes were once glued, so the adhesive layer lost its properties and became unusable. When the idea came to me to design a cheap camping light, these were the ones I decided to use.
The next step was to find an inexpensive case suitable for the task. As a result, I bought it on Avito for 200 rubles. per piece 2 new lamps “LPB 31-11-006 V” with bulbs included.
Such lamps are used to illuminate staircases and hallways of residential buildings, as well as basements and other auxiliary rooms, are rigidly mounted on the ceiling or walls, and belong to the anti-vandal class. The body is made of stamped steel, coated with white powder paint, the diffuser is made of transparent polycarbonate with a special prismatic texture. Protection degree IP 40 Overall dimensions: 345x80x50mm Light source: compact fluorescent lamp Number and power of lamps: 1x11 W. Chuck type: G23. Weight: 0.74 kg.
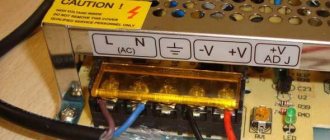
Inside there is a ballast - an electromagnetic ballast, a G23 lamp socket mounted on a metal corner, an aluminum reflector, 2 terminal blocks (in my version), several wires.
The case is opened either with a special key from the supply, or with a regular hexagon (in my case), depending on the manufacturer. I took out all the “stuffing” from both lamps, leaving only empty bodies.
For a long time, I had a sheet of single-sided copper-plated PCB 300 mm long and slightly less wide. It was enough for two substrates for installing LED strip segments.
Having made preliminary measurements, it turned out that 5 segments of 300mm diode strip, consisting of 6 50mm segments, each with 3 LEDs, are ideally suited to the body of each lamp.
After preliminary marking, it was necessary to cut the textolite into elements of the required size, drill holes in the intended places (later it will be clear why), sand with a “null” to remove oxide and scuffs on the copper foil, and degrease with alcohol.
To better reflect light and protect against oxidation, I painted the plates with white gloss paint from an aerosol can, and at the same time I painted the cases better.
To fasten the plates in the body, it was decided to use the corners left over from disassembling the lamp (the cartridges were attached to them), having first sawed them in half.
Then I molded it and soldered the M3 nuts using a soldering iron, special acid and tin-lead solder. Here's what happened:
To protect the corners from corrosion, I also painted them.
After painting, the corners were screwed to the plates. Then fragments of the LED strip were laid out on the plates and secured on both sides with rubber bands.
The pieces of tape were fixed to the board using a hot glue gun. A small amount of glue was poured into the holes, grabbing the edges of the LED strip. This method gives us maximum convenience and quality, working on the principle of a polymer rivet. The advantages of the method are high reliability of fastening and ease of dismantling if necessary.
After all segments of the LED strip are installed in their places, it is necessary to carry out desoldering. For economical operation of the lamps, I have included 3 consumption modes. In the most economical mode, 2 segments (second and fourth) light up - 36 LEDs, in the second case, 3 segments (first, third and fifth) - 54 LEDs, in the maximum mode, all five segments - 90 LEDs. I will write about consumption separately.
For the first part of the article, I think there is enough information, I will publish the next part soon! Wait for the continuation!)
What are LED strips used for?
When placed densely on the ceiling, above the tension fabric, they will play the role of main lighting. Such a ceiling with colored LED strips will look especially beautiful. None of the classic types of lamps can achieve this effect.
LED strip structure diagram
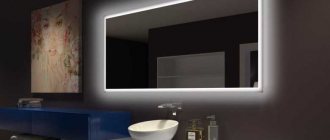
Traditional use can already be considered additional lighting of shelves, cabinets, niches or mirrors, for example, as in this article - a suspended ceiling with lighting. By the way, this is absolutely safe, because the voltage in them is incomparable with a regular 220 V network.
A multi-level ceiling looks impressive if its steps are highlighted with LEDs. If the diode distribution scheme is loose and the brightness is not set to maximum, then it could even be a night light. In this case, blue and green lamp colors are suitable.
Types of LEDs on LED strips
Types of LED strips
Red LEDs are often used for emergency lighting. Due to the minimal consumption of these lamps, they will last a very long time.
Their excellent security allows the use of strips even for street lighting. For example, they are used to decorate the architectural features of buildings or paths from the gate to the door of the house.
LED strip power
Such lamps do not require a voltage of 220 volts, so they are very widespread in car tuning ideas. For example, to illuminate the bottom.
So, what is LED strip?
This is a lamp in the form of a thin flexible strip, which consists of LEDs. Its length can be adjusted as needed. They are produced in 5 meter lengths, but they can be reduced or increased as much as the designer’s idea requires. The width is from 8 to 10 mm, and the thickness is only 2-3 mm. Power for these lamps requires much less than the standard 220 volts: only 12 volts, in rare cases 24 volts. Most tapes have double-sided tape on the back, making them easy and quick to attach to any surface. You just need to clean it and degrease it.
Based on the colors of the glow, LED strips are divided into two types:
- Monochrome. This is a lamp that glows in only one color: red, blue, yellow, white or green.
- Universal (RGB). The color of such lamps can be changed using the control panel. There are a lot of options: from turning on one of the colors or even a mode when the color will change over the entire possible range at a certain specified speed.
Color samples
RGB LED strips, in turn, are divided into 2-3 types according to the formation of light emission:
- In the first, the strip consists of green, red and blue LEDs. They are arranged in dense rows of three along the entire length of the tape. The lamp then differs in that the color is changed by a group change in intensity. This option is most suitable for interior lighting when the strip itself is hidden from view.
- The second type of strip is characterized by the fact that three LEDs are placed together in the housing: green, blue and red. This design means that the emitters are located almost at the same point, which creates the most effective color gradation. Therefore, the lamp can be used anywhere.
- A relatively new type of strip, in which for the first time it is possible to turn on and off each individual LED. This makes it possible to realize any design idea. You can change the intensity of the glow in any area, that is, one LED lamp will emphasize the features of different elements. This is especially convenient for multi-level ceilings.
Based on the degree of protection from moisture, LED strips are divided into three types:
- Moisture resistant. This type of lamp can be used for rooms with high humidity, but without direct contact with water. For example, decorate the ceiling in the bathroom or kitchen.
- Waterproof. For example, a lamp for illuminating an aquarium, swimming pool or outdoor structures.
- Waterproof. Type suitable only for dry places.
The brightness of an LED lamp depends on the number of LEDs. Typically, it is calculated per 1 meter of length. Accordingly, the more there are, the brighter the lamp. The device of an LED strip designed for 12 volts implies from 30 to 120 diodes. A strip designed for 24 volts can include up to 240 diodes.
One meter of tape may have a different number of diodes
Number of LEDs on strip
The difference between 24V LED strip and 12V LED strip
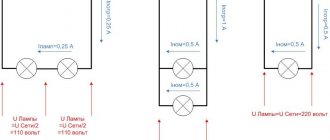
The differences between 24 volt and 12 volt LED strips are insignificant, but the latter still gained great popularity. The first difference, which immediately stands out even in the name of the tapes, is related to the supply voltage, i.e. They will require a 24 volt and 12 volt DC power supply to connect.
The next difference that can be seen visually is related to the connection diagram of the LEDs themselves. A 24-volt strip is powered by twice as much voltage as a 12-volt LED strip. In 12 V strips, three LEDs are connected in series in one chain; in 24 V LED strips, six LEDs are connected in one chain. Accordingly, at least from such an LED strip you can cut off a section with six LEDs.
The third difference is one of the important advantages of 24-volt LED strips; it is associated with the current flowing along the current-carrying tracks of the flexible strip board. At a higher voltage and the same power, the current flowing in a 24-volt LED strip is half that of a 12-volt LED strip. Lower current leads to less heating of the board and, accordingly, to less additional heating of the LEDs, which extends their service life.
The last difference between 24V and 12V LED strips is the total length of the strip, which can be connected to one power source. If in 12V LED strips the maximum permissible section length is five meters, then when connecting 24V LED strips you can connect up to 10 meters with one strip due to the lower current flow. But the connection recommendation still remains the same, no more than 5 meters.
Differences between 24 volt and 12 volt LED strips: – Supply voltage (24V and 12V); – Number of LEDs connected in a row (6 pcs. for 24V and 3 pcs. for 12V); – Less current at the same power (at a voltage of 24V the current is half as much); – Maximum length of one strip (up to 10 m allowed).
How to make a phytolamp and what is needed for this?
To make a phytolamp with your own hands you will need:
- LEDs with a special emission spectrum;
- power supply;
- cooling system;
- frame;
- auxiliary material and tools.
Chips of blue, red and purple phytoLEDs are found in different modifications: in the form of discrete SMD elements or COB matrices. All of them are suitable for making a lamp with your own hands. The easiest way to make lighting is from a ready-made LED strip for plants, cutting it into several pieces. More difficult ones are made from individual SMD chips or COB matrices, which will require correct calculation of the radiator.
The power source for LEDs and matrices is a driver with a stabilized direct current output, and for LED strips it is a +12V voltage source of appropriate power.
A passive cooling system is a must-have element of a plant light. It is responsible for ensuring the compliance of the optical characteristics of emitting diodes throughout their entire service life. The shape, dimensions and materials for making the radiator are described in a separate article. In most homemade lamps, the radiator is also the body.
In addition to the listed LEDs, phytodiodes made using USKI technology (universal blue-red radiation) can be used as light sources. They have a unique emission spectrum obtained due to the special composition of the phosphor. In this case, the phosphor acts as a selective filter, transmitting waves predominantly in the blue and red range, as well as a small part of yellow and green light. In this case, the blue region has a width of 380–480 nm with a slight transition to ultraviolet and a peak at a wavelength of 445 nm. The red region is much wider, covering the orange and infrared spectrum, the share of which reaches 50%. The total width of the red emission is approximately 570–770 nm with a maximum at 640–660 nm.
Thanks to their expanded spectral characteristics, USKI LEDs are ideal for creating DIY plant lamps. A lamp based on them will provide the plant with a full growth cycle: from vegetative development to fruit ripening and can be used to illuminate plants with an extremely low amount of solar exposure.
Application of phyto tape
To design a simple LED lamp for plants, you will need a phyto-tape with a power supply and inexpensive parts for the body, which can be used as improvised material. The lamp can have any shape and size, thanks to its flexibility and the ability to cut the tape into pieces that are multiples of 5 cm, and the adhesive base allows it to be mounted on any smooth surface.
The optimal material for the case will be a thin aluminum (in extreme cases, tin) plate, which will serve as an excellent heat sink for the light-emitting chips of the tape. You need to make mounting holes in the corners of the plate. The entire structure is suspended on two decorative chains that cling to self-tapping hooks screwed into the wall. You can adjust the height by rearranging the chain links.
Do-it-yourself powerful phytolamp with E27 base
You can make effective and economical lighting for seedlings with your own hands from several LED lamps, which are assembled from individual components. To do this, you need to buy a DIY kit (for example on Aliexpress), which includes all the necessary parts for assembling the lamp, namely:
- plastic case and collapsible metal base E27;
- aluminum radiator with self-tapping screws;
- board for SMD LEDs;
- lenses with a dispersion angle of 90° and a holder for them.
Separately purchase blue and red smd leds, a driver of suitable power, low-melting solder and thermal paste. Assembly begins by mounting the LEDs on the board using a hair dryer and a soldering iron heated to a temperature of 280°C. After this, the wires from the driver are soldered to the board and the circuit is checked for functionality by briefly turning it on. After making sure that all the chips are glowing, they proceed to assembling the case.
A thin layer of thermal paste is applied to the contact points between the board and the heatsink and pressed with self-tapping screws. Lenses are installed above all LEDs, which are secured with a holder with screws. A driver is placed inside the plastic case, the output wires of which are soldered to the board, and the input wires are pressed against the central and side parts of the base.
One such phytolamp is capable of providing full additional light in the evening to several indoor flowers or seedlings planted on an area of up to 0.25 m2.
Making a lamp
To make such a lamp, you will have to go to toy stores or furniture stores.
The most difficult procedure will be finding rings of the required diameter, then an LED strip is mounted in the groove and covered with a matte white film. To make a lamp from an LED strip, we will need to draw up a work plan that will take into account all the nuances and subtleties. We will consider the general plan and show the order of execution using a specific example:
- We decide on the design of the future lamp. If you take an old one and simply remake it, then it is much easier for you, if not, you need to draw a future model or imagine exactly how it will look when the work is completed.
- See what materials you have for making. If it is a tree, measure it; perhaps something will be missing; if it is a lampshade made of threads, the procedure does not change; such a lampshade requires up to 70 m of cotton thread and PVA glue. The wire is well suited for frames, but in order to bend it properly, you will need pliers.
- Buy a power supply, an RGB controller, wires, missing materials for manufacturing, possibly drills or wood varnish.
- Get ready and get to work.
- Enjoy the result and brag to your friends.
To implement this solution, you only need a plastic strip. You can twist it into any shape and attach it to any plastic square, for example, to a children's sandbox toy. The LED strip is glued with its back side to the surface of the plastic strip, completely bending around the contours of the rectangle.
The simplest LED strip lamp
To implement this idea, we will need a small list of necessary materials. In this example, we will remake an old chandelier with a modern motif within 50 minutes. So, we will need:
- old chandelier with pendant;
- 6 wooden or aluminum rectangles;
- 8 m of the brightest white LED strip, and a power supply for it;
- Wire for connecting 4 m tape and connectors;
- Metal drill bit with a diameter of 2.8 mm and a drill;
- Short screws (length 25-30 mm) 20-30 pcs.;
- a strip of foam rubber (at a sewing store).
Steel wire will be an excellent basis for a unique chandelier, and an ordinary LED garland is perfect as a light source.
Having collected all the material, we move on to the practical part. We will need rectangles measuring 30 cm high by 25 cm wide. They can be made from wood or aluminum profile.
Chandelier on a wooden base.
In the case of a wooden profile, the LED strip is covered with foam rubber and you get the same glowing effect as in the photo. The wood is painted in the desired color. You can improve the design and give it a more modern style by using an aluminum profile with a diffuser. In this case, you will not need foam rubber.
You will need connecting angles, a clamp for cutting at a 45 degree angle and metal screws. The structure is assembled, and the tape is inserted into the profile and covered with a diffuser.
So, first of all, we free the chandelier from the old appliqué and unnecessary elements; we only need a bare frame, and we will attach the frames to it. We are starting to produce our rectangular lamps. Glue the LED strip in such a way that the strip does not adhere to the chandelier body where the frame is mounted. Cut it at the incision site.
Drill three small holes in the rectangle - two for mounting to the chandelier, and one for exiting the wires of the LED strip. Once the squares are ready and the tape is glued, connect each section on one side and carefully guide the wire through the hole.
Aluminum profiles can be painted, like wood, in any color.
The power supply is well located in the lamp bowl. Connect all ends of the power cables in the correct polarity and connect to the DC output of the power supply. The power supply itself is connected to a 220 V network instead of an old light bulb.
When everything is ready, fix the rectangles on the lamp body. To do this, you need to use metal screws, having first drilled small holes in the lamp body.
Installation of LED curtain lighting
The installation procedure for ice lighting for curtains consists of three main stages:
- A box/cornice with a cavity facing the curtain is installed on the ceiling opposite the curtain. It is necessary for hidden installation of tape, wiring and transformer.
- The transformer itself is attached to the surface of the wall or ceiling using self-tapping screws or dowels (using clamps if there are no special holes in the housing), depending on the location of the box and curtains, as well as the architectural features of the room.
- All conductors are connected and connected according to the electrical diagram, observing the polarity of the contacts (V+ and V-). The power supply is turned on and the functioning of the installed curtain lighting is checked.
Preparation of materials and parts
Before you begin, calculate the required number of LEDs, their brightness and the power of the adapter used. Depending on the purpose of the lamp, the length of the board will be:
- night light, illumination for a switch or socket - a small piece with three diodes;
- aquarium - a segment equal to the length of the wall or the perimeter of the container;
- bed lighting - several parts, the length of which corresponds to the length of the bed;
- backlight for a computer keyboard - in accordance with the length of the peripheral equipment;
- when replacing a fluorescent lamp - several parts, the length of which corresponds to the length of the lamp.
The brightness of the tape, its size and the density of the located semiconductors depend on specific conditions. The power of the unit, as noted above, should be equal to the total load with a margin of 10–15%.
You may also need wires, heat shrink and insulation tubing, a soldering iron, tin, and rosin. Instead of a soldering iron, you can use special connectors. Under no circumstances should you solder the tape with acid, which will cause oxidation and destruction of the conductors or a short circuit.
If using the board as a backlight for an aquarium, use a transparent tube, and to increase moisture protection, use silicone sealant.
How to make a simple LED chandelier from LED strip
Let's consider an easy-to-use option - a square-shaped outline. Dimensions are selected according to the size of the room. This chandelier can be used not only as illumination, but also as main lighting.
For assembly you will need:
- ice strip running on 12 volts (preferably with LEDs arranged in 2 rows - it will be brighter);
- power supply for connecting to the network;
- U-shaped aluminum profile with plastic cover;
- pieces of PCB (for example, from unnecessary boards);
- short screws;
- pencil;
- screwdriver;
- soldering iron
First, the frame is assembled. The profile is divided according to the size of the side of the square (you will need 4 identical parts), the ends are filed at 45°. Cut out the textolite with the letter “G”. The thickness should be such that the pieces fit into the corners of the frame. The squares are assembled with screws.
The diode strip is cut to size. Remove the protective layer and glue it inside the body. Solder the wires or use special connectors for connection. For a square design, corner ones will be required.
The ends are pulled out and connected to an adapter that converts 220V AC to 12V DC. The power supply is usually hidden in a niche, above a cabinet, or in another inconspicuous place. The length of the wire is selected taking into account the distance from this point to the lamp.
The plastic cover is trimmed at an angle of 45°. Insert into frame. The chandelier is ready.
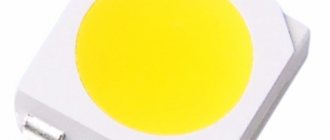
Types of LED diodes used
When creating a homemade strip that glows in one color, semiconductors such as SMD 3028 or SMD 5050 are suitable. In the second case, three crystals are used, so the glow will be the brightest, but the electricity consumption will also be higher. Also, brightness depends on the number of elements located per 1 linear line. m.
The number of LEDs per conventional meter affects the total load of the product:
- 30 elements of SMD 5050 type - 7.2 W;
- 60 SMD Z528 - 4.8 W;
- 60 SMD 5050 - 15 W;
- 120 SMD Z528 - 9.6 W;
- 120 SMD 5050 - 25 W;
- 240 SMD Z528 - 19.2 W;
Boards with semiconductors arranged in several rows are called multi-row. In such cases, RGB technology is usually used, which allows you to get a multi-colored glow.
Due to the existence of several standards, manufacturers produce tape that operates from a 12 or 24 V DC source, or directly from a 220 V AC power supply.
Types of garlands
You definitely won’t encounter a paucity of choice in this matter; there are very, very many varieties of garlands and lighting structures that can be used to illuminate curtains. Let's list some of them.
An additional light source that consumes minimal electricity visually enlarges the room.
- universal linear garland (lamps arranged in series on a long wire)
- curtain garland (long wires not connected to each other)
- fringe garland (branches of different lengths from the main wire)
- mesh (looks almost like a fishing net, only with small lamps)
- duralight (flexible cord with LEDs, especially suitable if you need to give the light picture a certain shape)
Cozy and comfortable rooms in small spaces will become much more spacious and brighter thanks to LED lighting.
LED strip lamp
Before you start upgrading or manufacturing a lamp from LED strip, you need to study the properties of LEDs:
They dazzle the human eye, so they should be mounted under frosted glass or in niches. The location for installing the controller and power supply of the tape is selected in advance during the project
These elements are necessary to maintain the performance of LEDs. The tape is based on adhesive double-sided tape, which allows it to be securely attached to the installation site. When assembling the chandelier, care must be taken as the tape can be easily damaged.
What you will need
To assemble and upgrade the lamp with your own hands, you need to prepare the following materials:
- We purchase LED strip of the required length.
- Select the power supply and controller.
- For assembly it is necessary to use stranded wires with a cross-section of 1 mm2.
- Glue gun and hand tools.
Step-by-step instruction
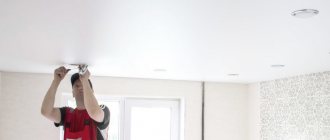
The modernization will be carried out on the basis of a fluorescent lamp consisting of four lamps for suspended ceilings in the following order:
- The lamp attachments are being dismantled.
- Installation of LED strip, controller and power supply.
- Installation of frosted glass and ceiling mounting.
The Thomas Superleds channel demonstrates the modernization of the Armstrong lamp.
Instructions for creating a lamp for a suspended ceiling
A homemade LED strip lamp can be placed under the ceiling. Therefore, you must remember to be careful: the finished lamp must be lifted very carefully to a height, since the tape itself is very easy to damage, it has poor resistance to tensile loads. In addition, it should be taken into account that fixing the tape can be simplified if you first clean the entire length of the place where it is attached.
Knowing how to properly make a lamp from an LED strip will help you avoid mistakes and unnecessary financial costs. To do this, you can use the following instructions, which describe the basic installation rules and sequence of work.
At the first stage of creating a homemade lamp, you should decide on:
- tape length;
- density of placement of lamps on the LED strip;
To make lamps, you can use the above brands of LED strips:
1) SMD 3528 with a density of LEDs per linear meter in the following quantities:
- 60 pcs. (4.8 W);
- 120 pcs. (7.2 W);
- 240 pcs. (16 W).
2) SMD 5050 with a density of LEDs per linear meter in the following quantities:
- 30 pcs. (7.2 W);
- 60 pcs. (14 W);
- 120 pcs. (25 W).
Important! If you plan to use the lamp you are creating in a room with high humidity, for example, in a bathroom, you should choose an LED strip labeled IP44 and higher.
LEDs on SMD 5050 have higher power and visual differences from analogues installed on SMD 3528.
In one cassette, the LED strip has a constant footage of 5 meters. If the ceiling lamp is long, you will need to additionally buy 1 or 2 cassettes. It is possible to connect a tape up to 15 m long to one power supply. The tape is cut along special marks with ordinary scissors.
If a single-color tape is used, then the contacts are soldered minus to minus, and plus to plus. In the case of using multi-color tape when creating a lamp, sections of the same name are soldered in accordance with the letter markings: “B”, “G”, “V+”, “R”.
Attention! When creating a lamp with a multi-color ribbon, to control it, you need to use a controller, with which you can switch colors and smoothly adjust the brightness. As a rule, a special remote control is used for adjustment.
After the footage and density of the LEDs have been selected, the power of the lamp should be calculated. To do this, you need to multiply the power of a linear meter of tape by its footage and add a power reserve of 30%. This value is standard for selecting the unit through which the connection to the 220 V network will be made.
To connect to the controller or to the power source of the LED strip, it is better to use stranded wires: on one side, tips with a cross-section of 0.75 millimeters are installed using a special tool. During installation, they will be installed in a standard block, after which they are fixed with screws.
When the wires are ready, they need to be soldered to the end of the LED strip. To ensure insulation of the contacts and increase the strength of the connection, you should put a special heat-shrinkable tube over the soldering area.
Making a lamp from an LED strip with your own hands is not very difficult. However, the cost of the finished product, created with one’s own hand, is significantly lower than the purchased analogue.
We recommend reading: how to make an LED panel
Modern LED strips are equipped with double-sided tape on one side, so installing them along the perimeter of the ceiling is not particularly difficult. But it is necessary to take into account that it is recommended to carry out all installation operations together in order to prevent damage to the fragile lamp.
The technology described above is optimal for suspended ceilings, when it is possible to glue the tape under the film, which has a translucent structure.
Butterfly chandelier
There are two ways to create such a lamp:
- One big butterfly.
- A “swarm” of small moths of different sizes.
Individual parts of the lamp can be lowered up to one and a half meters from the ceiling.
- An old lampshade or its frame is used as the basis.
- If there are no such blanks, then you can use a rim made of metal or wood or thick wire twisted into a circle.
- You need to prepare sheets with butterfly templates to select butterflies of the required sizes and shapes.
- It is recommended to make moths of at least five different sizes.
- Then the structure will be visually larger.
- Butterflies are cut out with small scissors or a stationery knife.
- It is advisable that the paper be thick.
- The cut out figures are painted with different colors and decorated with sparkles, but on some templates the butterflies may already be colored.
- To finish the product, the butterflies are fixed on fishing lines and attached to the base.
How to make a moon lamp out of paper with your own hands
What do you need
- Paper napkins, towels or toilet paper;
- PVA glue;
- water;
- brush;
- plastic ball;
- White paint;
- black paint;
- sponge;
- lamp base;
- plastic bucket with lid;
- glue gun;
- knife;
- bulb;
- pencil;
- wire.
How to do
- Separate napkins, towels or toilet paper into single-layer pieces. Start gluing them to the ball by coating it with glue lightly mixed with water.
- Place the pieces of paper on top of each other and also coat the top with glue.
Thus, glue the entire ball in several layers. Dry the paper completely.
Cover the figure with white paint and let dry. Mix white paint with a little black to create a gray color. Use a sponge to make gray spots on the ball.
Glue the lamp base to the back of the cover using hot glue. Cut a large hole in the bottom of the bucket. Connect the lid and bucket and screw in the light bulb.
Draw a circle on the ball with a pencil. You can circle a glass or some other object. Cut along the marked line and remove the plastic.
Place the ball on the light bulb. For reliability, you can glue the figure to the base.
Method 3. Lamps made from waste materials - for a modern kitchen!
The most original lamp can be made from waste materials such as plastic bottles and disposable spoons - it’s beautiful, cheap and environmentally friendly!
We make a lampshade in the style of minimalism and hi-tech - no additional decorations from threads or beads, only matte white or colored plastic. To make such dim kitchen lighting with your own hands, we will need:
- Base made from a 5-liter plastic bottle;
- Cartridge with wire and lamp;
- Glue for high-quality fixation;
- Lots of disposable spoons.
To make a chandelier with your own hands, cut out the bottom of the bottle and cut off the handles of the spoons (not completely, so that a small handle remains). Using glue, we fix the cut spoons on the base bottle. They need to be placed evenly, in a row, then the lampshade will look attractive.
Advice! Each next row overlaps, without gaps.
The resulting chandelier will resemble fish scales. However, it should be remembered that this design is quite dense, which means that additional lighting will definitely be needed in the kitchen.
The shape of the lamp can be different, for example, in the shape of a lotus.
You can also make such decorations from disposable spoons.
A lamp made from plastic bottles, or rather from their bottoms, made with your own hands, may seem like lace or consisting of many small flowers.
Advice! Such a lampshade can be made not white, but colored - which means you need to take colored bottles or paint it with paint of the original color: copper, gold, steel, pink, black, etc.
The resulting lampshade can be hung in the kitchen or above the dining table.
Let your kitchen be cozy and bright! We wish you creative success and present some more wonderful ideas for making kitchen lamps with your own hands from improvised materials.
LED lighting for aquarium
There are many options for LED lamps that are installed to illuminate an aquarium. Let's consider the process of making a simple model. The following materials will be useful to you:
- Diode tape.
- A flask or other container to ensure the tape is waterproof.
- Power supply and connectors for it.
- Soldering iron, silicone, awl, knife.
It is necessary to remove the back part from the connector for connecting to the power supply and strip the wires. These wires need to be prepared for the soldering process with the contacts of the diode strip.
The wires are placed in a glass flask with a stopper. To do this, a hole is pierced in the bulb plug with an awl, through which the connector wires are passed and sealed there with the contacts of the tape. Next, the puncture in the cork is sealed with a silicone compound.
The coating covering the adhesive layer is removed from the tape and the tape itself is glued to the wall of the flask. After this, the flask is tightly closed and additionally sealed with silicone on both sides. All you have to do is connect the finished lamp to the power supply, and then place it in the aquarium.
Features and stages of installation work
To create an unusual lamp from a diode strip, a variety of objects are suitable - from a standard incandescent lamp base to the body of a fluorescent light source.
Such procedures are accompanied by numerous requirements, the main of which are:
- When connecting a homemade device, you need to use multi-core wiring. One end is equipped with a tip with a cross section of 0.75 mm and is connected to the controller, and the other is soldered to the ends of the LED board. To increase fixation, heat shrink tubing should be used.
- If the device is mounted on suspended ceilings, it is advisable to use self-adhesive tape. Before gluing, first clean and degrease the surface of the ceiling, allowing it to dry thoroughly. The protective film on the back of the flexible board must be removed immediately before installation. The slightest dirt or dust deposited on the adhesive layer will lead to poor adhesion. The presence of moisture also has a negative effect on adhesion. If the tape is installed in a room with high humidity, then ventilation must be provided. Outdoors, such actions should be performed exclusively in dry weather.
- If the distance is more than 7 m between the power supply and the homemade tape, you need to increase the cross-section of the wire.
The adapter is connected in compliance with the polarity and terminals:
- for single-color tapes, the technology is as simple as possible - “plus” is soldered to “plus”, and “minus” to “minus”;
- Multi-colored tapes have their own markings - V+ (voltage), R, G, B to switch colors (to the controller).
Additionally, multi-colored LED boards are equipped with dimmers designed to change the brightness and change the color of the glow. They come with a remote control. Low-voltage equipment for 12 or 24 V is an ideal solution for a home or apartment, high-voltage flexible boards are for organizing street lighting.
By following a number of technical recommendations and safety rules, you can easily create unusual lighting for interior items, an aquarium, a swimming pool, a ceiling, etc. The cost of lamps made using this principle with your own hands is much lower than factory LED devices.
LED strip for ceiling lighting is a popular type of lighting in an apartment, with which you can add a spirit of comfort and romanticism to a room. Instructions and photographs of the process will help you install the tape yourself.
LED strip is most suitable for suspended and plasterboard ceilings.
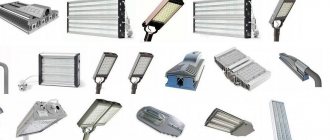
Application areas of LED lamps
The main areas of use of LED lamps are:
- street lighting;
- industrial facilities;
- office lighting;
- architectural structures;
- decorative ceiling lighting in residential buildings, shopping malls, public catering outlets, hotels;
- decorative floor lighting on roads, pedestrian areas, stairs;
- wall lighting in residential premises, public catering establishments, and cultural heritage sites;
- spot LED lighting: paintings, cornices, various art objects;
- transport facilities;
- emergency lighting during evacuation operations and when lighting the most dangerous places;
- explosion-proof lighting: oil and gas and mining facilities, gas stations;
- lighting of premises with increased requirements for cleanliness: medical laboratories, treatment rooms, clinics, hospitals.
Making small spotlights
When making such a lamp, you need to take into account that the light emanating from the LED blinds a person. It is best to hide such light sources in niches or behind ceiling plinths. Only frosted glass is suitable for creating a lamp
It is important to choose a suitable housing to which the LEDs will be attached. For this purpose, you can use an old fluorescent lamp or an unnecessary incandescent lamp
Remote control
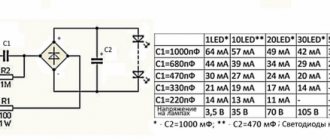
For operation, capacitors marked 400 nF and 10 μF are required, the first is used to control the current strength, and the second so that the light from the lamp does not blink, but is uniform. You will also need a resistor operating with a resistance of 100 ohms, which will protect the system from possible voltage surges. We use an old light bulb as a base.
It must be carefully disassembled without damaging the base. Carefully clean and degrease the surface
Next, capacitors and a resistor are placed in the base. After which you can solder the rectifier, this must also be done very carefully. Assembly adhesive is well suited for insulation; it will fill the space of the base and securely fasten all the parts of the lamp.
General connection diagram
At the next stage of work, you need to solder the board to the capacitor. We must try to ensure that the boards are evenly spaced, this will ensure uniform lighting in all directions. Next, insulation is carried out again using mounting adhesive. Then a resistor (100 Ohm) and a capacitor are soldered to any board and everything is also insulated with glue. The resulting light source can be inserted into a chandelier - it will turn out very beautiful.
Making a driver for LEDs with your own hands
If the user has several semiconductor crystals or a backlight line from an old TV, he can independently make a current source for them.
To do this, you should purchase devices and parts or remove radio elements from old equipment. Often the efficiency of self-made devices is much higher than that of industrial designs.
Materials and tools for work
For a homemade simple driver you will need:
- capacitors: simple 0.27 uF at 400 V and 2 electrolytic 500×16 V and 100×16 V;
- resistor 500 kOhm at 0.5 W;
- 4 diodes or a ready-made bridge for 220 V;
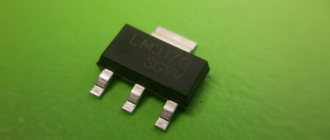
- LM317 chip;
- soldering iron with a power of 20-40 W;
- flux and solder (preferably POS type);
- pliers, wire cutters, pliers;.
- multi-core insulated copper conductors with a cross section of 0.35-1 mm²;
- heat shrink tube;
- multimeter or tester;
- insulating tape;
- board for desoldering elements.
Simple driver circuits for a 1 W LED and a powerful one
A classic converter is a combination of an electronic voltage divider and a stabilizer chip. The first node consists of 2 elements (a 0.27 μF capacitor and a 500 kOhm resistor) connected in parallel, to which a bridge of diodes that can withstand the input voltage is connected in series.
The L7812 chip is often used as a stabilizer, but this is not entirely the right solution. It is a linear voltage regulating device and can burn out if the current changes.
Connection diagram
It is better to use LM317, LM338 or LM350 microcircuits, which have protection against short circuits and overheating. They can be powered with any voltage 5-35 V. 5-10 LEDs can be connected to the driver.
The connection diagram is simple:
- the plus of the divider goes to the input of the microcircuit (1 output);
- the common wire through the anode of the LED goes to the minus of the radio component (middle leg);
- The LM317 output (pin 3) is also connected there through a current-limiting resistor.
By installing an adjustable resistance instead of the last element, you can change the current strength, i.e., the brightness of the LEDs within certain limits.
If you need to build a powerful spotlight, then the driver will have to be modified:
- it is necessary to increase the supply voltage to 24 V;
- install a stabilizer with the highest current, and of the proposed microcircuits, only LM338 can output 5A.
Due to the high current, it should be installed on a radiator.
How to assemble and configure the driver?
A simple LED converter has few elements. The driver can be assembled on a special board, a piece of plywood, or mounted.
The device does not require adjustment if you take all the specified parts. The main thing is to correctly calculate the current limiting resistor.
How to make a paper pendant lamp
In order to add brightness to your interior design, you can make a beautiful and unusual paper lamp.
It should be taken into account that only LED lamps must be used, since paper lamps tend to ignite when heated.
What you will need
You can use an old chandelier to make a paper chandelier.
The following tools and materials must be used:
- parchment paper;
- PVA glue;
- thin thread and wire;
- scissors;
- cartridge E27 and light bulb;
- sewing machine.
Step-by-step instruction
The assembly proceeds as follows:
- We remove the frame from the old chandelier and clear it of jewelry.
- Iron the parchment paper and cut into circles with a diameter of 8 cm.
- All cut circles should be sewn together using a sewing machine.
- The connection must be made in the central part of the circle.
- We attach the sewn circles to the frame of the chandelier using wire.
After assembling all the elements, you need to screw in the LED lamp and install the chandelier in place.
The principle of making a lamp from paper can be seen in the video from the Roman Tkachev channel.
Lamp assembly
Having carefully thought through the design of the lamp, collecting the necessary tools and materials, you can begin to manufacture it. In some cases, the whole process consists of simply gluing the board to some kind of base - for example, to a keyboard. In other situations, partial or complete redesign of the light source may be required.
When installing such a lamp, you need to consider several additional factors:
- The power supply used to reduce the voltage should be placed as close as possible to the diodes. As the length of the wiring increases, voltage losses increase, which will lead to a decrease in the lighting level.
- When placed on a metal base, a layer of insulation must be laid between the strip and the LEDs.
- If the tape is connected to a 220 V industrial network through a capacitor, then it must be coated with silicone sealant. Preferably in two layers.
Important! The tape connected through the power supply is characterized by increased electrical and fire safety, which cannot be said about item 3 from the previous list. Work on such a board should be carried out with the voltage completely turned off.
What will you need?
Due to its high flexibility, a lighting device based on LED strip can have a wide variety of formats. However, the basic principles of manufacturing such a lamp remain unchanged, therefore, in addition to the diode strip itself, it is expected to prepare materials and basic tools, presented:
- screws;
- aluminum corner 10x10 mm;
- small-sized switch;
- electric drill;
- marker;
- ruler;
- electric jigsaw;
- pliers.
If necessary, the aluminum corner can be replaced with a standard plastic electrical box. The functionality and quality characteristics of the manufactured lighting device, in this case, will not be affected.
Benefits of remote control
Advantages of a remote control for controlling room lighting in an apartment or house:
- the design of lighting fixtures allows you to install remote-controlled lamps in a room with any stylistic design;
- By connecting via Wi-Fi and smartphone software, control can be performed from a mobile device, which opens up additional possibilities;
- there are additional functions - changing the color and brightness of the lighting, turning on music, setting a timer;
- the intensity of the luminaires can vary for the entire system or its individual parts or lighting lines;
- electricity is saved by turning on only when necessary;
- turning on the light is not accompanied by clicks or other sounds, and can be done from anywhere in the room, which is especially convenient for families with small children, people with disabilities and other residents with special needs.
Main conclusions
You can make a lamp yourself using improvised means and inexpensive radio products. Also, this will require direct LED elements - lamps or strips. They can be both low-power and strong. When choosing a material for the body, you need to proceed from the parameters of their heat transfer. To connect such a device to a network without a power supply, you will need to make a driver with a quenching capacitor, having previously calculated it using the formula.
Using the proposed technology, it is possible to produce lamps of any shape and parameters for installation as the main or decorative source of lighting. You can mount them with your own hands on the ceiling and walls in lampshades, chandeliers and table lamps, as well as in any other specially made artistic design.
Previous LEDs Formula and example of calculating the limiting resistor for an LED Next LEDsDetails about the characteristics of LED lamps
Where to use a homemade LED lamp
A DIY LED strip lamp can be used to decorate various areas of the interior:
- aquarium lighting;
- decoration of ceiling structures;
- lighting of furniture facades;
- lighting of areas for work or rest;
- decorative lighting.
The options listed are not an exhaustive list of possible installation locations. The scope of application is almost limitless and depends only on the user’s imagination. Making a lamp is not difficult. The strip (or LED strip) is sold ready-made; most often, the owner only requires installation and connection. A supporting structure, housing or transparent bulb will be required to protect the lamp from external influences.