Current strength is a quantity that characterizes electricity. In addition to it, power, voltage, and frequency are distinguished. It is measured in amperes, and it is designated, both in the Russian and in the international system of units (SI), by the symbol “A”. Knowing this value makes it clear how many charged particles rush through the cross-section of the wire at a certain instant. That is, what is the intensity of the flow of electricity in the conductor. This can be compared to the pressure of water in hoses. Only instead of water, electrons flow in the conductors. The greater the “pressure” of electrons, the greater the current value.
To better understand the meaning of current, let's again compare electricity and water in hoses. If the water hoses are of small diameter and the pressure is strong, the hoses will not hold up and will burst. The same thing happens with wires. If the current in the wires to which the electrical appliance is connected is greater than they can withstand, the wires will simply burn out. This principle is the basis for the operation of fuses, which, by burning themselves, protect electrical wires from burning out. Therefore, in order to understand whether it is worth connecting the device to the electrical network, you need to know the critical current values that the wiring can withstand.
You can measure the current with a multimeter. This device can also make other measurements characterizing electric current, but now we will talk specifically about determining its strength.
Types of Multimeters
All devices, according to their design and principle of measuring current indicators, can be divided into two types:
- Analog testers.
- Digital multimeters.
Briefly about each type of measuring device.
Analog multimeters
The main difference between analog and digital devices is the presence of a digitized scale with an arrow. They are very easy to use and quite cheap. But their disadvantage is considered to be the presence of errors in the readings. Although this can be corrected using a tuning resistor. But, all the same, it is unlikely that it will be possible to achieve accuracy comparable to digital instruments. And in some cases, this is really necessary.
Digital multimeters
Since the presence of a scale with an arrow is mentioned as one of the main differences between analog devices, it is logical to assume that they are absent in digital devices. And indeed it is. The measurement results are displayed on the display, which can be LED or liquid crystal, in the form of specific numbers.
As already mentioned, the main advantage of digital testers is the accuracy of current measurement. In addition, they are not much more difficult to use than analog ones. Even a beginner can cope with measurements after a short instruction. The downside is the higher cost of a digital device.
Types of multimeters
There are two types of testers on the modern electrical appliance market:
The main elements of analog instruments are a scale with divisions marked on it, which is used to determine the indicators of electrical quantities, and an arrow-pointer. Such multimeters are in high demand among beginners due to their low cost and ease of use.
But, along with these positive aspects, analog testers also have a number of disadvantages, the main one of which is the high measurement error. It can be somewhat reduced due to the tuning resistor, which is structurally included in the device. However, if you need to measure electrical parameters with high accuracy, it is better to use a digital device.
Multimeter design
The device has several sockets used to measure electrical circuit parameters. In addition to these sockets, the device always has an output for a black wire. This socket is indicated on the multimeter body by the inscription “COM” or a “minus” sign. The black wire is always connected to ground. The second, red, wire is potential or “positive”. Its nest is determined depending on certain measurements. On the case, all the sockets are marked with corresponding symbols, so you need to try very hard to confuse them and take measurements of the wrong things. When measuring the current value, the red wire is inserted into the connector with the symbols “VΩmA”.
There is also a rotating knob on the body that sets the measurement limit. Digital meters have more limits than analog multimeters. In addition, they can be equipped with additional options, such as a sound or light signal.
Before measuring, you need to familiarize yourself with the data of the multimeter. This can be found in the technical documents that normal sellers attach to the electrical goods they sell. In addition, characteristics are often applied to the housing of electronic devices. You need to make sure that the upper limit of the multimeter is higher than the number of amps that may be in the network. So, it will not be possible to measure with a device whose maximum is 50 A, and the electric current indicator is 200 A. If you try to do this, the multimeter will simply burn out after connecting.
Checking readings with a multimeter
It is important to measure current strength when monitoring the correct operation of devices. Often you need to check the charging current level of a battery for a car, laptop, tablet, power-bank.
Current measurements of various types are carried out in different ways inside the measuring device. Therefore, there is always an element on the multimeter whose task is to select the parameter, measurement mode and signal level. Sometimes, in more advanced equipment, the signal level is determined automatically.
Typically, the parameter and measurement mode are selected by turning the knob on the multimeter body. The selected characteristics are grouped by their types. They are usually designated as follows:
- Direct current: A -, DCA, I -;
- AC current: A
;
- Constant voltage: V-, DCV, U -;
- Variable voltage: V
; - Resistance: Ω, R, Ohm;
- The definition of the capacitance of capacitors is often indicated by the capacitor symbol, or the letter C;
- Diode continuity is usually indicated by a diode symbol.
Preparing for work
First, you need to turn the switch handle to the marks of the sector indicated by the symbol “A”. To measure DC and AC values, different sectors are provided. They can be indicated by the symbols:
- three dots under a straight horizontal line - for direct current;
- wavy line - for variable.
The letter designations look like this:
- "DCV" - for permanent;
- "ACV" - for alternating current.
Care and compliance with the instructions when taking measurements will help you avoid mistakes and not break the multimeter.
Next you need to insert the cables into their sockets. Black - with the designation “COM” or “−”. Red with the designation “VΩmA”. There are contacts at the other ends of the cables. They will connect to the measured network.
Real examples of current measurement
Next, we will consider several options for how to connect a measuring device for domestic needs. When measuring batteries, you need to attach one probe to the battery contact, and the second to the load contact, the second load contact is connected to the free terminal of the battery.
If you want to check the current load in the windings of a three-phase electric motor, connect the measuring device to each phase in turn, or if you have three ammeters, you can use them simultaneously. To do this, the probes are connected at one end to the terminals of the windings in the boron, and at the other end to the supply wire of the corresponding phase.
Source
Measurement process
To measure, you need to connect to the open circuit between the network and the connected device that consumes current. The connection is made in series, as opposed to voltage measurement.
As it became clear, to connect to the circuit under test, it needs to be broken. This is done in several ways:
- You can disconnect the output by soldering the contacts;
- unscrewing the screw connections;
- cutting the wires with wire cutters.
Thus, the multimeter becomes an integral part of the electrical circuit. After correct connection, the arrow will show the current strength in the circuit. And the display will display specific numbers.
A few words about current strength, and why it needs to be measured
First, let's remember what it is - the strength of electric current.
This indicator (I) is measured in amperes and is one of the main physical quantities that determine the parameters of a particular electrical circuit. The other two are voltage (U, measured in volts) and load resistance (R, measured in ohms).
As taught in a school physics course, electric current is the directed movement of charged particles along a conductor. Considered with great simplification, it is caused by electromotive force arising from the potential difference (voltage) at the poles (terminals, contacts) of the connected power source. At its core, current strength shows the number of these most charged particles passing through a specific point (circuit element) per unit of time (second).
The amount of current in the circuit is affected by two other parameters. Voltage is related by direct proportionality - for example, its increase causes an increase in current. Resistance is the opposite, that is, as it increases at the same voltage, the current strength decreases.
A funny picture that clearly demonstrates the relationship between the basic quantities of an electrical circuit: “Volt strives to “push” Ampere along the conductor, overcoming the obstacles posed by Ohm.”
And on the left in the illustration there is a graphical, easy-to-read image of Ohm's law showing these relationships. From this “pyramid” formulas are easily compiled in their usual writing:
U = I × R
I= U/ R
R= U/ I
So, current is measured in amperes. With some simplification, it can be explained that 1 ampere is the current that will arise in a conductor with a resistance of 1 ohm if a voltage equal to one volt is applied to it.
In addition to the basic unit, derivatives are also used. So, quite often you have to deal with milliamps. From the term itself it is clear that 1 mA = 0.001 A.
By the way, let’s immediately mention about power. A current of 1 ampere caused by a voltage of 1 volt will do 1 joule of work. And if we reduce this to a unit of time (second), we get a power value equal to 1 watt.
This is determined by the formula of the Joule-Lenz law:
P = U × I
where P is power expressed in watts.
Why was all this told? Yes, simply because most cases of measuring current strength, so to speak, at the household level, are in one way or another connected with the determination of other parameters. Agree, few people would think: “let me check the current strength just like that,” that is, without further practical application. Moreover, as mentioned above, working with an ammeter is the most difficult and often unsafe.
For example, in what cases is current strength most often measured:
- To clarify the actual power consumption of a particular household electrical appliance. Having measured the values of current and voltage, it is easy to calculate the power using the formula.
- The same measurement and subsequent calculation make it possible to assess whether the supplied power line is suitable for such loads.
- It happens that such “revisions” make it possible to identify still hidden, undetected defects of the device - when the current value (and power, respectively) differs significantly from the nominal value stated in the passport in one direction or another.
- Current measurements allow you to assess the state of charge of autonomous power sources - rechargeable batteries and rechargeable batteries. Checking them for voltage never gives an objective picture. A voltmeter may show, say, the required 1.5 volts, but after a few minutes the battery will hopelessly run out. That is, the test should be carried out by measuring the current strength.
- This measurement can reveal current leakage where, in theory, it should not exist. This is often practiced by motorists if they suspect that the battery is being discharged too actively when the car is “resting” in the garage or in a parking lot. The performed check allows you to localize the leak area and avoid, by the way, considerable problems that it can lead to.
Prices for multimeters
multimeter
The ability to measure current allows you to identify leaks in the electrical system of a car
- Sometimes the battery charger needs to be checked to see if it is delivering the required charging current.
There are other cases where it is required to have objective data on the actual current strength. But the main cases are still listed.
Features of measurements
There are several points that are tricks of professionals that they use when taking measurements. One of them is to use a device with a certain resistance with a multimeter. It could be an ordinary light bulb or a resistor. They protect the measuring device from burning out when excessive current is supplied.
If, when connecting the multimeter to the circuit, the current indicators are not displayed, then you need to check whether the limit is selected correctly. You can try lowering the limit by lowering it one more position. If nothing has changed, then the limit is reduced again. This must be done until the value obtained during the measurement appears on the device indicator.
Measurements must be taken quickly. The duration of contact with the electrically conductive cable should not exceed 2 seconds. This mainly concerns measurements of small-capacity power supplies. Prolonged contact results in discharge of the battery or accumulator.
How the measurement is performed
Before measuring, you need to determine whether we are talking about direct or alternating electric current. Let's look at the first option first. It is necessary to first determine what the expected current value is. The red probe is inserted into the socket with the inscription corresponding to the current strength.
When connecting the device, the red wire is connected to the positive terminal, and the black wire to the negative terminal. Checking their location on the site is carried out in accordance with the available information. If the master swaps the contacts, then for direct current the value on the display will be shown with a minus sign. When measuring AC current, polarity does not matter.
Before measuring current, the circuit must be assembled correctly. In this case, the multimeter must be connected in series. When carrying out measurements, it is important to comply with the necessary safety requirements.
If there is no preliminary information about the range in which the current strength is located, then the maximum value is first set. In the future, you need to be guided by the results obtained. If the minimum value is displayed on the display, then move on to a smaller range until the one that is needed is determined. The minimum current value for a multimeter in most cases is 2000 microamps.
Sometimes the user needs to check the leakage current, for example, when repairing a car. In this case, you need to do the following:
- Turn off the ignition.
- Disable current consumption for those devices that operate when the ignition is turned off.
- Disconnect the cable from the negative terminal of the battery.
- Select the correct operating mode of the multimeter. In this case, before checking the current, you need to use a connector rated for 10 A for the red wire.
- Using a special clamp, connect the red wire to the terminal removed from the negative pole of the battery. Connect the black wire to the negative pole.
- Next you need to monitor the readings of the device. If there is no leak, the display will show a zero result. If present, the current value will appear on the screen. The larger it is, the stronger the leak.
To measure the magnitude of alternating electric current, it is advantageous to use a multimeter model that has a current clamp. There is no need to make a serial connection. The wire is covered with pliers, after which the desired value is displayed on the display.
In the absence of current clamps, alternating current measurements are carried out in the usual way. In this case, you need to select the desired mode using the switch. If it is not known what range of values is expected, use the maximum value (10 A). The probes are connected to the open circuit. Depending on the values shown on the display, select the appropriate range.
Charger and adapter measurements
Battery rechargers and power supplies are used with many modern gadgets. True, their purpose is different. Power supplies are designed to convert voltage to one suitable for the operation of the connected gadget. The charger is used to replenish batteries with electricity. It is necessary to know their characteristics in order not to damage an expensive device in case of failure of a standard device.
So, to measure current values in a circuit with an adapter or charger, you need to set the measurement limit in the range from 1 A to 10 A. The multimeter is connected in series to the circuit. If the readings are zero, you need to swap the probes or clamps.
Understanding the multimeter device
To measure current strength, special devices are used, the name of which speaks for itself - ammeters. Ammeters most often found on sale are permanently installed, in the form of panels or for DIN rails. They are usually mounted in a distribution board and allow you to monitor current current indicators, for example, for the entire local power supply system or on some dedicated line.
Ammeters for stationary installation - panel type (left) and for installation in a distribution board on a DIN rail
Such devices are installed, if necessary, only by electrician specialists. Measuring the strength of flowing current using them is as easy as shelling pears. You just need to look at the current readings with the load on the line.
This, in fact, limits their functionality. Naturally, the owner of the apartment (house) will not have the opportunity to remove such a device from its permanent installation site to carry out measurements in another place.
Another option, which already allows you to work in the right place, is the so-called laboratory ammeter. A tabletop device that has terminals, that is, it is possible to connect test leads with probes to check the current strength in a particular section of the circuit.
Laboratory ammeter - limited functionality makes such devices unclaimed for household use.
But purchasing such a “device” for a home instrumental “arsenal” hardly makes sense. Simply for the reason that everything is limited to measuring current strength. And this measurement, by the way, as already mentioned, is carried out at the “everyday” level, perhaps least often.
Therefore, such devices have not gained popularity. And the best option is a multitester (multimeter).
These multifunctional measuring instruments are available for sale in a very wide variety. The first, immediately noticeable difference is that instruments can be pointer-type, with readings taken from scales. Despite the fact that they are considered “yesterday”, some masters prefer them. But for a beginner, it can be difficult to read the readings at first - it’s easy to get confused with scales and steps from the graduation due to inexperience.
“Display” of the once very popular multimeter Ts4353. One arrow and many scales, which can be difficult for a beginner to understand.
Therefore, digital multimeters that display readings in absolute terms on the display are still the most popular. The ability to use such devices is acquired much faster. The cost of many models is very affordable, and such multitesters have become part of the home toolkit.
But even among them there are significant differences that need to be known and taken into account when measuring electrical parameters.
The most convenient are probably multimeters, in which it is enough to set only the measurement mode. The permissible range is not indicated - the device will automatically adjust to the parameters of the circuit, take measurements and give the desired result.
Prices for multimeter Ts4353
multimeter Ts4353
An example is shown in the illustration:
Easy-to-use multitester, which simplifies the installation of operating modes
The mode switch handle (item 1) has only a few positions. This voltage is a combination of alternating V AC (~ symbol) and constant DC (-), in the volt and millivolt range. Similarly with the current strength - A, also without division into the type of current, but with gradation into amperes and milliamps. In addition, there is always an option for measuring resistance and continuity of the circuit. There may be other built-in functions.
At the bottom there are sockets for connecting test leads with probes. There are three or four of them. There must be a COM for “ common” wire (item 2), usually black. Socket pos. 3 – for the red wire when carrying out the vast majority of measurements. Under the socket there is an inscription indicating the permissible measurement limits for voltage and current. And finally, nest pos. 4 – allocated for measuring current strength, calculated in amperes. The permissible limit is also indicated - no more than 10 A.
The readings are displayed on the digital display (position 5).
Such devices are convenient, but their cost is several times higher than the price of widely available multimeters. Therefore, they can be seen more often among professionals.
A more common option is multimeters, when using which it is necessary not only to switch the mode and rearrange the measuring leads, but also to indicate the expected measurement range.
You have to be more careful when setting the switch position in such a multitester.
When using such a multimeter, you not only need to specify the operating mode, but also set the alternating or direct current. , set the switch to the intended measurement range, expressed in milliamperes mA (sometimes also in microamperes, µA ) or in amperes A.
The situation is similar with voltage measurement modes.
Another nuance - an example is shown with four wire connection sockets. Here, two sockets are allocated for measuring current for the red wire. One - with currents up to 200 mA, the second - up to 10 A. All other measurements (voltage, resistance, capacitance and others) are carried out through a separate socket.
But usually under these terminal sockets there is a clear diagram that allows you to avoid mistakes. You just have to be careful.
And now - another very important nuance. The devices shown above allow you to measure current strength, both direct and alternating. But very often, ordinary users purchase multimeters with “truncated” capabilities. Such devices are widely popular due to their super affordable price. And some potential owners do not pay attention to this shortcoming.
Thus, the most common at the household level are multitesters such as DT830 or DT832. They allow you to perform most of the possible measurements. But, please note, they DO NOT have .
A very widespread model of the DT830 multitester. Attracts both with its price and quite large capabilities. But it does not provide for measuring AC current.
Thus, if there is a need to check the current strength in the circuit of a household appliance operating from a 220 V/50 Hz network, then it will not work just like that. You will need to look for another, more advanced multimeter. Or come up with additional “improvements” that will allow you to get by with such a tester. This will be discussed below.
Measuring leakage in a car battery
Another option for using a multimeter and its scale is to detect current leakage in a car battery. Electrical leaks in the car electrical system are a fairly common occurrence, leading to battery discharge when the car is turned off and all devices that consume electricity are turned off. This process can often occur due to high humidity or insulation failure. Although leaks are allowed, they must be minimal, and their standard values are specified in the battery documents.
To measure actual electrical leakage, the multimeter is set to 10 A or 10 ADC mode. The red probe of the device is applied to the positive wire, and the black one to ground. If the multimeter does not give any readings, then everything is in order and there is no current leakage. If the readings differ from zero, even slightly, there is a leak somewhere. To determine a specific location, you need to call the entire on-board network. But it is better to entrust this to the specialists at the service station.
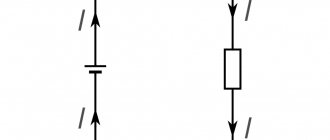
DC current measurement
To measure the necessary indicators , you first need to determine what type of current flows in the circuit being tested. This depends on the power source of the circuit. For example, batteries and rechargeable batteries are constant sources of power. To measure DC current, you need to set the rotary knob of the multimeter to the A -, DCA or I - icon, or press the button on the front panel corresponding to the desired mode. Both alternating and direct current are measured in amperes. Therefore, the value on the meter screen will be displayed in this value.
To understand how to measure amperes with a multimeter, you need to know that the current in a section of the circuit is always the same. When the ammeter is connected in series to the circuit (that is, the probes of the device are connected to different points of the circuit break), it will not create a noticeable change in the parameters of the circuit. In this case, it will be able to display the correct value of the flowing current. It is important to connect the meter in the correct polarity, that is, the red probe - to the branch that goes to the plus of the power source, and the black one - to the minus. Otherwise, the device will show negative values.
When preparing for a measurement, it is very important to know what signal level you need to check. If milliamps flow in the circuit, then the red probe must be connected to the meter socket on which V Ω mA is written, or there is a specific measurement limit (usually 300 - 400 mA). If you are checking a power circuit whose values are measured in units of amperes, then the probe must be connected to the socket labeled A or NA (usually 5 to 10 amperes flow here). Neglecting this rule may damage the measuring device. There are more powerful ammeters, but they are used for special purposes.
Having correctly connected the device, you can start working . The procedure for measuring amperage with a multimeter is as follows:
- Install the probes into the appropriate sockets of the meter corresponding to the signal level.
- Select DC mode using the regulator or by pressing the corresponding button on the front panel.
- If necessary, select the level of the measured signal using a knob or button. The level should be chosen slightly higher than the expected value.
- Connect the multimeter to the open circuit of the circuit branch, observing the polarity of the connection.
- Turn on the power source.
Checking the batteries
In order to evaluate the performance of the simplest portable battery - a battery with a multimeter, it is enough to check its voltage and amperage , and it is not necessary to use a load. To check, you need to install the red wire in the hole marked A (NA), select the DC mode and the measurement limit on the front panel of the multimeter, and attach the probes in accordance with the polarity to the battery terminals - red to positive, black to negative. After a few seconds, the meter screen will display the direct current generated by the element.
If the values are in the range of 4 - 6 amperes, then the battery is “fresh” and ready for use. With readings below 4 amperes, it can only be used in low-power devices. For values below 2.5 A, it is better to refuse to use such an element.
The correct voltage values must correspond to those indicated on the battery.
Testing batteries with a measuring device
Among the parameters of batteries, the output current is important . You can check it with a multimeter, but you need to connect a load in series with the meter. The load can be a regular incandescent lamp. Its resistance does not exceed several hundred ohms, and it can also be measured with a multimeter in resistance measurement mode. To do this, you need to attach the meter probes to the threads of the lamp base and the central terminal. The resistance value will be displayed on the screen.
If we consider the resistance of the multimeter to not make large changes in the current values, then its value should be equal to:
I = U / R, where I is the current in the circuit, amperes, U is the voltage supplied by the battery, and R is the load (lamp) resistance.
The readings of the measuring device must be compared with this calculated value. If the readings are different, the battery may be undercharged.
You can also check the battery leakage current. If you unhook the positive terminal and install a multimeter between it and the positive terminal of the battery, it will show a leak into the vehicle's on-board network. By pulling out the fuses in the car, you can even find out what the leakage is in different parts of the on-board network. With some experience, it is possible not only to learn how to measure amperes with a multimeter, but also to determine the causes of some car electrical faults.
Measuring current when charging a battery
Most car battery chargers have indicators that indicate charging parameters. But if they are faulty or missing, the charge current can be shown by a multimeter. When recharging the battery, you can connect a measuring device to the charging circuit. To display correct readings you need:
- Install the red probe into the hole in the device marked A (NA), the black probe is usually connected to the input marked COM;
- Select DC measurement mode and signal level;
- Connect the positive terminal of the charger in series with the black probe of the multimeter, connect the red probe of the meter to the positive terminal of the battery, and connect the negative terminal of the battery to the negative terminal of the charger;
- Next, you need to plug in the charger. The multimeter will display the current, which should not exceed 10% of the battery capacity.
How to measure current in an electrical outlet
This question can often be heard from non-professionals. There is only one answer - no way. This is because the contacts in the socket are energized, but the current does not produce any work. That is, electrons do not move anywhere. Therefore, there is no current. For it to appear, some device that consumes electricity must be connected. If you plug the probes into a home electrical outlet, all that can happen is that the multimeter will break down. It will simply burn out. And, in addition, by creating a short circuit, you can cause a fire and a fire. Therefore, you should not do this.
AC current measurement
Situations often arise when it is necessary to check the electrical network of a building. This is also the case with a regular electrical network in apartment buildings. Knowing how to measure the current strength with a multimeter in an alternating network, you can make minor repairs to the wiring at home.
The electrical outlet should also not be tested without a load . The best load for an AC network would be an incandescent lamp. To take measurements you need to do the following:
- Install the red probe into the socket of the device, marked with the inscription, A (NA), leave the black one in its proper place;
- Select AC current measurement mode and signal level;
- Connect a load in series with the measuring device to the socket;
- The effective current value will be displayed on the device screen, and the lamp will begin to glow.
Since the voltage in the network has a variable sinusoidal shape, the measuring device shows the effective value, which is 1.41 times less than the amplitude value.
Using the proposed method, you can check any variable circuit, including transformers, inductors, asynchronous and synchronous motors.
Security measures
Any manipulation with electricity poses an increased danger. Including working with a multimeter. Moreover, you often have to work with exposed wires. Therefore, the following safety precautions must be observed:
- all work must be carried out only by protecting your hands with rubber gloves, this will protect not only from electric shock, but also from burns;
- before connecting the multimeter to the network, you must make sure that it is de-energized;
- when working with wires connected to the device, you need to constantly monitor the integrity of their insulation, which is often broken during intensive use of the multimeter;
- It is prohibited to take measurements during rain or when there is strong humidity in the room;
- manipulations with electricity must be carried out in the presence of an assistant who can provide assistance or call doctors if an accident occurs.
At the end of the measurements, the network is de-energized again and only after that the disconnected wires are connected.
Now, having read the article and understood the device, as well as the principles of operation of the measuring device, anyone can easily take measurements. However, it will be better if this is done by a trained professional.
Principles of measuring current with a multimeter
Measuring current with a multimeter is not difficult, but there are certain rules that should not be neglected:
- The electrical network must be de-energized.
- Cables must be well insulated, otherwise the risk of electric shock increases.
- Operate the meter wearing gloves that do not conduct electricity, such as rubber.
- Do not try to determine the current when there is high humidity, because this also increases the risk of electric shock.
- Measure quickly so that the probes do not connect to the wires for more than 1-2 seconds. This is especially important if you are going to work with low-power elements. For example, if you use a multimeter to measure the battery current and hold the probes for a long time, they will be completely or partially discharged.
We recommend that you carry out all electrical work with a partner who will provide first aid/call an ambulance if an emergency occurs.