Thermoregulation of air space in closed volumes plays an important role in various areas of human activity. Thermostats with an air temperature sensor serve this purpose. The air temperature control system includes heating devices and heating devices, the operation of which is controlled by a thermostat with air temperature control.
Electronic thermostat interface
How to choose thermostats with an air temperature sensor
When choosing a thermostat, you are guided by several factors:
- method of heating premises;
- type of thermal installation;
- type of heaters;
- number of rooms and heating area;
- the time when people will be absent from the house;
- financial opportunities.
Considering these conditions, the consumer can choose a mechanical or electrical TP. If you need to regulate heating in 2-3 rooms, you can install an electronic regulator and place sensors in each room. For mansions with 2-3 floors, a climate system with a universal programmable thermostat is suitable.
Types of devices
Mechanical thermostat with remote sensor
There are thermostats on the market with different appearance, design features and characteristics. Depending on the installation method, such devices can be stationary or plug-in (portable). The first type of thermal relay is installed directly into the wall. Portable options have the ability to quickly connect, which attracts many users.
Based on the location of the sensors, the following are distinguished:
- thermostat with remote temperature sensor;
- units with a built-in sensor.
In the first case, the sensor is placed at the end of the cable extending from the temperature relay. Its length can vary - from 10-20 cm to several meters.
When a remote-type sensor is present in the thermal relay circuit, you can count on more accurate adjustment of the climate parameters of the room.
The advantage of the device is that their sensitive elements can be installed on the street, in the cellar and various utility rooms. During operation of such controllers, errors are practically eliminated. The only drawback of a relay with a remote sensor is the occurrence of malfunctions when the electricity goes out.
Mechanical options
Such temperature sensors and relays are considered the most affordable and easiest to use. They work due to the presence of a bimetallic plate in the design. Disabling and adjusting the operating parameters of the device is carried out using a lever and a rotary wheel.
The disadvantage of mechanical models is the complexity of their installation. They are installed in a recess in the wall and directly connected to the network.
Electronic models
Electronic temperature controller with built-in sensor
Electronic thermostats and sensors are also popular. They more accurately measure the climatic parameters of the room due to the presence of semiconductor parts in the design that operate on 24 V current. Such devices can be connected directly to the electrical network or batteries are used.
The electronic thermostat is equipped with a monitor. This makes it easier to configure the device and notifies the user about the results of the last measurement of climate parameters.
Adjustable temperature relays also additionally have a calendar, a clock, and there is the ability to program them (operating modes day-night, weekdays-weekends).
Types and characteristics of thermostats
A thermostat is a device that allows you to record the temperature in a room at a certain time interval and at the same time adjust the device settings to the required values. For example, when the temperature reaches a certain figure, the heating forcibly ends the operation cycle. And, conversely, with its decrease, the device resumes its operation.
The design characteristics and operating principle of thermostats may be different. There are two main types of thermostats for heaters:
- mechanical;
- electronic.
Mechanical type products consist of a plastic box with a switch installed on the outside. It comes in a round type and can be easily adjusted to different positions. The graduation scale may vary. On some devices, the scale step is 1 degree, but there are also devices with divisions of 2.5.
In this regard, electronic devices have a wider range of possibilities for use. As can be seen in the photographs of thermostats of this type, thanks to the liquid crystal screen, adjustment is carried out by touch. To preserve the integrity of the display, protective covers are used.
Electronic temperature controllers, despite their high cost, are easy to program and can easily fit into any type of room.
How much do household thermostats cost and where to buy – review of prices and popular models
Room thermostat Baxi Magictime Plus
If you need to buy a thermostat with a good quality air temperature sensor at the best price, Baxi Magictime Plus is a reliable option. It is a room thermostat with a control panel that allows you to regulate the indoor temperature. At the same time, the homeowner does not necessarily have access to heating equipment.
The model is equipped with an LCD display. Commands are entered using buttons. The specified temperature regime is maintained with an accuracy of 0.1°C. The thermostat can be used for condensing and convection boilers. There is also a reliable programming system that allows you to set time modes. buy Baxi Magictime Plus for 4.3 thousand rubles.
Thermostat Buderus Logamatic Delta 41
The wired model of the Buderus Logamatic Delta 41 is multifunctional and is in great demand among consumers. The device can be connected to double-circuit heating boilers and a number of boiler systems.
The device supports various temperature conditions with high accuracy. In addition, manual and automatic settings are possible, as well as operation in a programmed mode. The cost of this device ranges from 5 thousand rubles.
As for purchasing equipment, it is recommended to purchase it from official suppliers who will provide a guarantee on the goods sold. In addition, dealers provide repair and maintenance services for climate control equipment, and also provide a guarantee on the quality of the work performed.
Installation of thermal relay
Let's look at the example of connecting to a heater. Connecting an infrared heater is no different from connecting other heating devices. That is, you will need to allocate a separate line for it and install an individual machine in the panel. It turns out that you will also use a phase and neutral wire. Next, we select a location for the thermostat. It should be located between the machine and the heater.
Any thermostat has four terminals: two (“zero” and “phase”) at the input and the same number at the output (“plus” and “minus”). When connecting one heater, two wires at the input (from the panel) and the same number at the output, connected to the heater, must be connected to the thermostat terminals. Everything is done according to the principles of serial connection. If you plan to connect another device to the thermostat, then four wires are connected to the regulator terminals (two for “zero” and two “for phase”). In this case, you will be dealing with a parallel connection. Next, the wiring is powered to the heaters using a serial connection method. It happens that owners connect devices bypassing “0”, but then this can lead to incorrect operation of the thermostat.
Connecting several heating panels at once will require you to do the following:
The temperature regulator must be connected to the machine located in the panel. The output terminals are connected to the magnetic starter. Only the starter contacts are connected to the heater.
This connection option is ideal for industrial heating devices or heaters assembled in one room.
Do not forget to make appropriate grounding during the connection process, which will protect you and your loved ones from various troubles.
The wire for this is selected individually; special attention should be paid to the cross-section of the cable and its low resistance. As you can see, connecting thermostats is not an easy task.
You need to have special knowledge and skills. Therefore, if you have doubts that you can do everything yourself, it is better to call a specialist and entrust this work to him
As you can see, connecting thermostats is not an easy task. You need to have special knowledge and skills. Therefore, if you have doubts that you can do everything yourself, it is better to call a master and entrust this work to him.
https://youtube.com/watch?v=7zawy4RrxBI
Thermal relay installation rules
Installation rules depend on where the temperature sensor of the regulator is located.
If it is built into the control panel, it must be mounted in accordance with quite understandable restrictions:
The height above the floor is at least 80 centimeters. Close to the floor the temperature is noticeably lower. Especially when the window or door to the hallway is open. Outside of rising air currents from any heating devices and generally heating structures. Heat from the back of the refrigerator will affect sensor calibration just as much as a radiator. Direct sunlight will also affect the operation of the device. Place the sensor panel in the shade. Finally, it would be unwise to locate the electronic control panel where the wall is often touched by people passing nearby.
If the thermostat uses a remote sensor, all points except the last one will relate specifically to the location of the sensor. The panel is mounted where it is convenient for you.
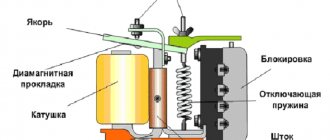
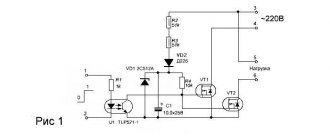
This simple thermal relay circuit, made with just two transistors, can be used as a temperature increase alarm or as a temperature regulator (for example, turning on a fan to cool a controlled object).
Instructions for creating a device
Scheme for creating a temperature controller with your own hands
To make a thermostat with your own hands, you need to adhere to the following scheme:
- Preparatory work. All the necessary elements are placed on the board and soldered. To do this, it is forbidden to use acid, which can damage small parts. Experts recommend using rosin.
- Etching the paths. Performed taking into account the device diagram.
- Checking the functionality of the controller. A tester is used to perform this operation.
- Testing the performance of semiconductors. They measure the polarity of triodes, diodes and other elements.
After completing the assembly of the temperature sensor, connect it to the system with your own hands. Thyristors are selected experimentally; this will allow for more precise adjustment of the functioning of the device.
Option No. 2
The simplified connection diagram is made in the form of one wire (phase), which is connected to the heating device, the neutral cable passes through the thermostat terminals. Of course, in this case, the correct operation of the thermostat is not guaranteed, but there are situations when this option is the only possible one.
One of the advantages of such a scheme is the ability to control a larger number of IR heating devices. You can connect one industrial heater instead. But in this case, you will need to install another mechanism - a magnetic starter. It can also work in full automatic mode, but with electrical appliances of higher power.
Where should the thermostat be installed?
Installing a thermostat on a heating radiator is a very important procedure, because... You must read the instructions and do everything correctly, otherwise the device will not be able to function normally. The location of thermostats is very important, because... for certain conditions the location may be different.
If nothing prevents the installation of a thermostat on a heating radiator, then it is best to place the thermostat on the radiator itself. If the thermostat is equipped with a remote control function, installation of the device is possible at a distance, but not more than 8mm.
In addition, you can mount the thermostat on the radiator horizontally, but only in the area of the pipe that supplies hot water to the heating radiator.
Thermostat installation location
How to choose
In order for the device to justify its cost, serve for a long time and not fail, you should know the selection criteria. Experts advise following several rules:
- Consider the power of the heater. It should not be more than what is indicated in the passport data for the thermostat. Most models are available with a characteristic of 2 -3.5 kW.
- Focus on the room. In accordance with the installation location (kitchen, children's room, living room), select devices with a suitable temperature range.
- Manufacturer. According to consumer reviews, the brands Sardo, Devolt, and Socket have proven themselves well.
- Degree of protection. Be sure to check this parameter with your sales consultant. With IP20 standard, the equipment cannot be used in wet areas.
Connection diagram
The manufacturer must include detailed instructions with each thermostat, which describe step by step how to properly connect the thermostat and how to use it. But there are some general installation rules that must be followed if you need to connect the thermostat yourself.
Most thermostats are designed to operate from a 220 V network connection. Before connecting, you need to make sure that this indicator corresponds to reality. It is best if the sockets and the sensor itself are fixed at the same level at a height of approximately one and a half meters from the floor
If the outlets are located higher or lower, you should use an extension cord. It is important to position the thermostat so that it is not located next to the front door, window or any heating appliances. Such temperature changes will distort the real data, and as a result the thermostat will not work correctly. Before connecting the thermostat, you need to check the serviceability of the socket, as well as the heater itself.
All components of such a heating system must only be in good condition. As soon as the installation of the thermostat is completed, you must immediately program it for further operation - that is, set the settings.
It is worth remembering that before proceeding with the actual installation of a thermostat of any type, you need to make sure that you have all the necessary components on hand.
You can learn how to choose a room thermostat for a heater from the video below.
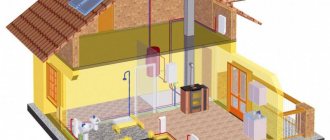
Smart House
Air conditioners, heated floors and adjustable heaters are currently present in the houses and apartments of about 40% of the Russian population. All these devices generally cope with the task of creating comfort and maximum coziness for household members. However, in most cases, heating equipment operates practically uncontrolled and often idle. In order to overcome inconsistencies and, if possible, coordinate the operation of heating and ventilation equipment and avoid wasted energy consumption, an effective unified control system is needed
and management. You can try independent control over all installed equipment, however, practice shows that this method requires a lot of time and constant participation on the part of the homeowner. Therefore, the most rational option is to install a climate control system as a structural component of the smart home system.
“Smart home” guarding the home microclimate
The “smart home” system is capable of independently creating, maintaining and managing an individual microclimate for each individual zone of the home. The coordinated operation of all components of the climate system will allow you to maintain the required temperature and humidity separately for the bathroom, bedroom and living room. In the absence of the owners of the house, the smart climate control system “falls asleep” until the users arrive.
The climate control system can multitask using smart technology. Setting up all thermostats on radiators, turning the air conditioner on and off, regulating the temperature and percentage of air humidity is done using just one application or the software shell of the general control module.
Modern models of the “smart home” system allow you to take into account a huge range of options in the settings: temperature control inside and outside the house, correction of the percentage of humidity in the room, the presence of drafts and open windows. The latest developments of smart systems have another extremely useful functionality - the ability to make adjustments to the microclimate settings at home when the weather outside the window changes.
In addition, climate control in a “smart home” implies the functions of air ionization and ozonation. The system itself will take care of the cleanliness and freshness of the air you inhale, saturating it with microparticles necessary for good health.
Home climate control
So, let's clearly define the parameters and systems that can be independently controlled by the smart home system:
- air temperature;
- room humidity level;
- conditioning and movement of air masses;
- ventilation.
To control the microclimate in a house or apartment, it is necessary to install certain sensors that will record and transmit a signal to the base module. The minimum set for coordinated operation of a smart home consists of motion, temperature and humidity sensors. In addition, you will need switches and touchpads. Direct climate control is carried out through an application on a smartphone, computer or tablet with access to the Internet.
Before launching a “smart” climate system, you need to carefully consider the project and set the required options and parameters in the settings. The ability to regulate different temperatures and humidity in rooms involves installing sensors for each climate zone. An intelligent climate control system uses embedded algorithms and sends commands to instrument servos or air valves of the ventilation system with an air cooling system.
Components for climate control automation
The temperature sensor for the climate control system monitors the temperature indoors and outdoors, regulating favorable living conditions at any time of the year. The temperature sensor within the “smart home” is included in the overall system. Such detectors can be a standard cable or a compact device with additional functions.
Cable sensors are usually used in a wired smart home system. Pricing policies vary, but for a very modest amount of 300-500 rubles you can find a pretty good sensor.
Wireless thermostats, unlike cable ones, are often capable of not only monitoring the temperature in the house, but also controlling air humidity. Such a device is activated by a button, which is usually located on the body. Air from the room enters through special openings, after which the sensor analyzes the indicators. When purchasing and subsequently configuring a sensor, you should pay attention to the possible error that appears when measuring temperature. Permissible deviation values are no more than 0.5 °C, humidity is no more than 3%.
If the thermostat does not have the ability to monitor air humidity, you will have to spend money on purchasing air humidity sensors. The module of such a device works on the basis of a sensor, and data is scanned every minute using a special protocol. After collecting data, the recorded indicators are sent to the main computer.
For the most efficient operation of automated climate control, you will need various filters (breathers), air humidifiers, valves and dampers, modern oil or electric radiators, as well as a supply ventilation system with a recuperator. If a renovation is planned in the room with the installation of heated floors, then this system must also be connected to a “smart home”.
Functionality
A properly installed smart climate control system allows users to control all appliances using a tablet, smartphone or remote control. This includes monitoring the operation and control of various heating and air conditioning devices via a transceiver via an infrared channel, taking into account the time of year, day and event.
The climate control system completely takes over the control of “smart floors” and all heating radiators that are connected to the smart home system. At the same time, heating devices work independently and harmoniously, providing the desired temperature in the room. The owner of the house can observe all changes in this indicator in the application of his smartphone. The ability to remotely control all radiators will allow you to turn off the heating at any time, even without being at home.
Climate control can be either general or local. The microclimate for each room is manually programmed by the user. Automatic temperature and humidity maintenance can be quite different in a kitchen versus a bedroom. This function is especially relevant for large houses with a cellar, where it is necessary to maintain a low temperature with moderate humidity, or a personal greenhouse in the house, which requires high air humidity at a stable temperature.
Effective operation of climate control in the context of a “smart home” is impossible without high-quality air ventilation. Automation carefully checks the air composition every minute. Many automated climate control systems have a ventilation mode by automatically opening windows. The absence of this function can be compensated for by a supply ventilation system with installed breathers. This way, the room will regularly receive air that has been completely cleaned of dust, dirt and allergens.
Also, to maintain optimal air composition, climate control systems within a “smart home” use options such as ozonation and air ionization. They provide oxygen saturation in the room and eliminate harmful substances in the air. Most often, these functions are included in humidifier devices. In the main application, the user can enable or disable these options.
Operation of climate control
Without a doubt, the best option for maintaining a correct and comfortable climate is the centralized control of all heating and climate control systems through a “smart home”. The data collected by the sensors is sent to the “brain” of the system, which itself makes a decision and issues a specific command. Thus, any switching on or off of devices is completely controlled by the main computer, which eliminates the risk of inconsistent operation of devices. The system instantly recognizes every deviation from the norm and any errors in the operation of a particular device and corrects it according to predetermined indicators.
To create a universal climate control system, you need a device that will combine the functions of heating and air conditioning a room. If you separate these systems, the control will be incorrect. To solve this problem, a device called a chiller is suitable. This is a universal system designed to maintain a given temperature. In summer, this unit cools the incoming air, and in winter it warms it up. This way, comfortable climatic conditions are adjusted to the user at any time of the year.
The operation of the chiller is similar to the operation of the heat exchange system. The difference is that here the unit itself is used as a boiler. Water enters it, which, depending on the requirements, heats or cools the vaporous freon. In a liquid state, freon is supplied to devices that produce the required temperature for the premises.
Another important element for climate control in a smart home system is the so-called fan coil, which is a device for ensuring heat exchange. The fan coil removes air from the room using a built-in fan through special tubes filled with liquid. Thus, this device resembles a heating battery combined with a small fan.
In addition to chillers, the system can use special coolants that can maintain a stable indoor microclimate. Smart fans heat or cool the air coming from the street into the house to the required temperature. With this scheme, the climate control system can do without bulky and massive units and a large number of radiators. When installing smart fans, the microclimate will be controlled and controlled through various valves and air dampers.
Heating and cooling thresholds are set in the settings for each heating device - air conditioner, fan or any other equipment used to control the indoor climate. Therefore, absolutely every device has its own degree of heating. Automation independently makes a decision to turn off or reduce the power of operation for any of the devices. In the absence of household members, the system completely completes all processes to save energy and resources.
Advantages of climate control in the context of a “smart home”
In order for the system to work correctly throughout its entire service life, it is advisable to involve professionals in the installation, debugging and configuration of equipment for the climate control system. Before installation, specialized engineers are required to develop a technical design that involves combining heating and ventilation systems.
To summarize, we highlight the main advantages for climate control automation:
- control and maintenance of the required temperature and humidity in the premises;
- energy saving;
- air purification from allergens, dust and harmful substances;
- the ability to maintain an individual microclimate for each location;
- saving the homeowner time.
In conclusion
Is climate control automation necessary in a private home? Definitely yes, if you are the owner of a 2-3-storey home with an area of more than 120 square meters. In such a house, independently controlling the processes of heating, air conditioning and ventilation is quite difficult and energy-consuming. Imagine how much time a homeowner has to devote every day to repeatedly walking around and checking the operation of all installed air conditioners, radiators, heating elements, boiler and window mode.
The smart home system will, first of all, take care of saving electricity, gas and water, and therefore reduce utility bills in the cold season by an average of 30-40%. For owners of standard apartments living in large industrial cities suffering from smog, such a system can completely solve the problem of air purification. “Smart” climate control is especially relevant for residents of homes whose windows overlook a busy highway, since standard ventilation of rooms by opening a window in this case has a rather dubious result.
smart home smart heating
How to choose?
If we talk about choosing a thermostat for such a thing as electric IR heaters, then from the very beginning you should focus on ease of control and functionality. But the main parameter that indicates the device’s ability to perform the required task will be the load current. If this parameter is exceeded, then the switching part, which is usually a solid-state or electromechanical relay, will definitely break. It is quite simple to independently calculate the load current. First you need to calculate the current value consumed by the heater. To do this, you need to divide the device reading by the voltage, which is usually measured in volts. The number that will be obtained will be measured in amperes.
For example, for a 2200-watt home heater, the current draw will be about 10 amps. If you add 15-20 percent to this number, you get a value of about 12 amperes. This is the value you need to focus on when selecting equipment. Often in the instructions for the device the manufacturer writes the highest power that can be switched. This number means the amount of load that can be safely applied to the thermostat.
Connection nuances
Let's talk a little about how to connect such a device. Ceiling or wall heaters can work normally, but the efficiency of the built-in thermostats is very low, because the sensors will not be triggered by the temperature in the room, but due to the heating of the body of the heater itself. Therefore, the correct installation scheme involves remote placement of control parts. The installation of a thermal regulator must be carried out taking into account the zonal use of such a device, otherwise it will be incorrect. To carry out this procedure correctly, you must adhere to a number of standards:
- if a ceiling heater is installed, then it would be better to place the thermostat somewhere further away on the wall; such installation of a heater of the type in question requires installing a regulator there, but not far from the device;
- It is better to place the regulator from the floor at a height of 150 centimeters;
- installation will depend on the chosen mounting option - if the heater is built-in, then you will need to groove the wall, and devices for installation on the wall require a box for power cables and a thermal sensor;
- if the installation diagram requires placing the device on the outer wall of the building, then thermal insulation material must be installed under the housing, this makes it possible not to cause accidental activation of the relay;
- The selected area for installing the temperature regulator should be located relatively far from windows, doors and heating equipment.
Typically, the thermostat is equipped with two pairs of terminals that are connected to the electrical panel and the heater itself. If, in accordance with the diagram, several heating devices are supposed to be turned on, then they must be turned on in parallel. Then two connection options will be possible:
- when there are so many wires coming from the thermostat that it corresponds to the number of connected devices;
- when only two conductors come from it, which alternately supply energy to the equipment.
During installation, it is necessary not to confuse the connection points of the neutral and phase conductors, because a number of models of electric regulators are very sensitive to this point. In addition, it is planned to install a contactor or magnetic starter. If it is needed, then the output type terminals of the thermostat are connected to the control relay, and the heaters are connected through contacts located on the starter.
Operating principle and characteristics of temperature controllers
- the microcontroller that carries out the control has non-volatile memory, which allows you to store user-specified parameters even when the power is turned off;
- digital sensor that measures ambient temperature;
- electromagnetic thermal relay
that disconnects or connects the load.
Temperature regulator
- required t;
- deviation range;
- operating mode (heating or cooling);
temperature relay Temperature
- Single channel. Since t is controlled using a single channel, a device of this type is capable of operating in either cooling or heating mode.
- Two-channel. A pair of measuring channels of the air temperature relay allows the device to serve two sectors simultaneously, using various combinations of modes (heating-cooling, heating-heating).
- Multichannel. The three-channel mechanism is used to optimize electric heating systems and allows you to implement the remote principle of climate control by setting a weekly temperature schedule. Provides maximum savings.
- types of user-configurable values;
- fastening - built into a socket or mounted on a DIN rail;
- temperature ranges;
- power;
- operating modes (heating, cooling).
Principle of operation
Floodlight with motion sensor for street
Air temperature control is carried out as follows:
- The thermostat (TR) receives information about the degree of heating of the coolant entering the heating system (batteries, heated floors, etc.).
- At the same time, the sensors report data on the air temperature in the rooms where they are installed.
- The controller circuit compares the received information and issues a command through the control unit to the thermal energy source to change the operating mode.
Connecting the thermostat to the boiler: instructions
To obtain accurate measurement results, it is important to choose the right installation location:
- Installation near windows, entrance doors, ventilation ducts, climate control equipment and other objects that can affect the air temperature at the installation site is not recommended;
- It is not recommended to install it too high, near the ceiling, or too low to the floor, since heated air masses are concentrated near the ceiling, and in the absence of a heated floor, the temperature in the lower plane of the room is noticeably lower. The optimal installation height is 1.5 meters from the floor level;
- Installation near moving objects or objects that create mechanical shocks (doors, furniture touching the wall) is not recommended;
The connection and installation algorithm is always specified in the instructions for the device. For example, let's look at how to install a mechanical Cewal RQ-10:
| Photo | Process description |
| Remove the temperature control rotator | |
| Having removed the front panel, unscrew the corresponding screws | |
| We mount the structure on the wall through the appropriate holes specified in the instructions. | |
| According to the diagram from the instructions, connect the contacts. For the Cewal RQ-10 model, this diagram is shown in the photo. | |
| Additionally. There may be a jumper between the “TA” contacts of the board of some boilers; it must be replaced with a two-core insulated cable with a conductor cross-section of 0.5-0.75 mm2. |
Most modern thermostats are powered by AA batteries, but if power from the mains is required, its organization diagram looks like this:
All modern models of thermostats are supplied with instructions with a detailed, schematic description of the installation, connection and configuration algorithm. However, this requires basic electrical skills in any case.
How to make a simple thermostat with your own hands
To make the device you will need three elements:
- thermocouple;
- operating unit;
- actuating mechanism.
Thermocouple
The part is a soldering of conductors made of two dissimilar metals. When the air temperature changes, the resistance of the metal joint changes, which causes a change in the characteristics of the electric current flowing in it.
Operating unit
The block is the thermostat itself, which, in response to changes in the current characteristics in the thermocouple, transmits a signal to the actuator.
Actuating mechanism
This is a relay that turns the heaters on and off. When the air temperature drops, the mechanism closes the power contacts of the heating system. When the desired temperature level is reached, the relay opens the power circuit.
Schemes of homemade temperature controllers are published on the Internet. A thermocouple can be used taken from some old device (refrigerator, microwave oven, etc.). In the same way you can get a relay.
The feasibility of installing thermostats makes sense in individual houses where there is no central heating. The operation of thermoregulatory systems brings savings in energy resources, which creates a significant economic effect.
Choosing the optimal thermostat
The best option, of course, would be the regulator included with the boiler, however, it often happens that its parameters do not meet the required conditions. In the huge range of models and prices, which range from the simplest mechanical to systems operating via a computer, it is difficult to make the right choice.
In terms of functionality, the thermal relay kit bm4022 is perfect for home automation. With its help, you can control and regulate the temperature of not only the air in the room, but also the coolant in the heating system, if you use a remote sensor. It is possible to turn on the fan to cool an object if it has heated up to the set temperature. The ability to adjust the response threshold in the range from 0 to 150° C allows you to maintain the temperature at a given level. A powerful electromagnetic relay can directly control heating devices with a power of up to 2 kW. When purchasing, you can select the configuration to meet your specific requirements.
Main functions
Choosing a lamp with a motion sensor
The main functionality of indoor air temperature controllers includes the following:
- Saving fuel consumption. Air thermostats “monitor” the level of air heating, preventing excessive consumption of thermal energy. The heating switch-off and switch-on system is triggered when the temperature level leaves the specified range.
- Creating comfortable conditions for people to stay inside residential buildings and buildings for various purposes.
- Several air temperature control sensors in individual rooms can adjust the temperature conditions in each of them.
- During the absence of people, the thermostat can significantly reduce the heating of heated floors, turn on the economical mode of operation of an electric boiler, water heater or other heating system.
- The safety of operation of the heating system in the event of overheating or shutdown of the thermal energy source is ensured by an automatic sound or electronic signal from the thermostat.
Important! The operating mode of the thermoregulation system can be set remotely via the Internet. Before coming home, the owner of the home uses his smartphone to set the desired degree of air heating in the premises.