Is it necessary to do grounding in a bathhouse?
So, it is advisable to carry out grounding in the bathhouse to those places where, for example, a boiler, an electric stove, etc. will be installed. That is, grounding is necessary where electrical appliances will be mounted and connected.
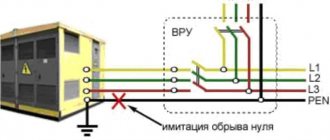
However, that's not all. It is recommended to do grounding, starting from the electric pole to which the bathhouse is connected and ending with a grounding center near the bathhouse itself. In other words, it is necessary to make grounding near the transmission line from which the bathhouse is connected and near the building itself.
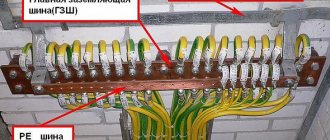
In this case, it is recommended to also make a GZSh - the main grounding bus, which looks like a strip of thick metal with a bolt welded at the end. After assembling the main grounding bus, electrical devices are connected to it, which in one way or another may have contact with the ground. Everything metal in the bathhouse must be grounded, such as pipes, foundation fittings, boilers, and even metal housings of lighting fixtures.
Article on the topic: Is it possible to go to the bathhouse after a stroke?
It is recommended, as additional precautions when making grounding, to install an RCD and a circuit breaker after the main busbar.
Grounding diagram
For those who do not know how to assemble a ground electrode with their own hands, there is the easiest way and diagram of how to do it. To do this, take long pieces of reinforcement or a metal corner, which are driven into the ground with a sledgehammer to a depth of at least a meter.
Ideally, in order to assemble a ground electrode, you need only three pieces of reinforcement, pipe or angle, which are driven in at a distance of at least 60 centimeters from each other. To connect the grounding conductors, it is possible to use bolts with nuts, however, in this option, do not forget that during operation the bolts may become corroded and then there will be no normal contact.
So, we figured out how to assemble a ground electrode and how to ground the bathhouse. Be sure not to forget about safety precautions, because working with electricity is always dangerous and can harm your health.
Methods of conducting electricity into the bathhouse
To conduct electricity to the bathhouse building, it is necessary to ensure its delivery from the central switchboard through the incoming power cable. You can lay the cable to the bathhouse in one of two ways: underground or over the air.
Underground installation method
The safest and most labor-intensive way to lay power cables, which requires preliminary preparation of an earthen trench, is from the power source to the bathhouse.
For underground input, a VBBShV cable with copper conductors with a cross-section of 10 to 16 kV is used. mm. It has increased strength, safety and durability. Protection from mechanical damage and biological effects is provided by heat-resistant insulation and steel braiding.
For underground cable laying, polypropylene pipes are used that are resistant to corrosion and freezing; metal pipes can be used when installing cables on poles or wall structures no more than 180 cm in height.
The technology for laying cables underground is as follows:
- Preparing an earthen trench up to 70 cm deep. Filling the bottom (10 cm) with a sand layer. Cable laying and re-filling with sand.
- The introduction of the cable into the building through a metal input sleeve, which is used to protect against damage to the insulation during shrinkage of the walls of the bathhouse.
- The cable is stripped of insulation before connecting to the machine in the input panel. Next, grounding and protection against lightning strikes are performed.
Air installation method
Installation by air is more accessible and cheaper in terms of labor and financial costs, but it is not durable due to susceptibility to damage and deformation.
If you need to connect a wire from a house to a bathhouse, then you need to correctly calculate the maximum permissible distance between objects. When buildings are located at a significant distance from each other, aerial laying is irrational, since the risk of cable damage increases under unfavorable climatic conditions.
It is also important to observe the regulated height of cable laying: above the road - at a height of up to 6 meters, above pedestrian paths - up to 3.5 meters, on the site - up to 2.75 meters. If the distance between buildings does not exceed 21 meters, then cable entry by air is carried out according to the following scheme:
If the distance between buildings does not exceed 21 meters, then cable entry by air is carried out according to the following scheme:
- Entrance holes are made in the walls in accordance with the diameter of the cable. Plastic or metal adapters are installed in the holes to protect the cable from damage.
- Brackets are installed near the holes for fixing the insulators.
- A metal cable is stretched between the insulators.
- The cable is fixed to the cable with plastic clamps, after which it is inserted into the holes and connected in the panel to the input machine.
All cable entry points through the walls are carefully sealed, and the space in the adapters is filled with foam or mineral wool. The metal cable should have a slight slack to ensure reliable fixation of the cable.
The best option for overhead installation is insulated self-supporting heat-resistant wire (SIP).
Do-it-yourself grounding in a bathhouse
So, it is advisable to ground the bathhouse to the places where it will be installed, for example, a boiler, electric stove, etc. That is, grounding in the bathhouse is necessary where electrical appliances will be mounted and connected. However, that's not all.
It is recommended to do grounding in the bathhouse, starting from the electric pole to which the bathhouse is connected and ending with the grounding center near the bathhouse itself. In other words, it is necessary to make grounding near the transmission line from which the bathhouse is connected and near the bathhouse itself.
Article on the topic: At what distance from the fence can you build a house in Belarus
In this case, it is recommended to also make a GZSh - the main grounding bus, which looks like a strip of thick metal with a bolt welded at the end.
After assembling the main grounding bus, electrical devices are connected to it, which in one way or another may have contact with the ground. Everything metal in the bathhouse must be grounded, such as pipes, foundation fittings, boilers, and even metal housings of lighting fixtures.
It is recommended, as additional precautions when making grounding in a bathhouse with your own hands, to install an RCD and a circuit breaker after the main busbar.
Methods of “natural” grounding
It is believed that the so-called natural grounding conductors cope excellently with the task of current removal:
- Cast iron or steel pipelines in close contact with the soil, that is, not covered with insulation;
- Steel well casing;
- Metal poles of lanterns and fences;
- Lead braided underground cable;
- Reinforcement of columns and foundations located below the seasonal freezing point of the ground.
The aluminum sheath of an underground cable cannot be used as a grounding element, since it is covered with an anti-corrosion layer that prevents the dissipation of current along the ground.
A good natural grounding conductor is a steel water supply system that is not covered with insulation. The significant length of the structure reduces the resistance to current spreading. In addition, the water supply is installed below the freezing point of the soil, which means that neither frost nor summer drought will interfere with the current resistance. During the period of their activation, soil moisture decreases and resistance increases.
Foundation reinforcement as a natural grounding conductor
The use of an iron frame as a grounding element is justified in the following cases:
- If the area in contact with loamy, wet sandy, clayey and sandy loam soil is sufficient according to the PUE standards;
- Bringing out the foundation reinforcement to the day surface (at least in 2 places);
- To connect the frame elements, not wire, but welding was used;
- Calculation of reinforcement resistance in accordance with the requirements of the PUE;
- Installations of electrical connection with a grounding bus.
Grounding diagram for a bathhouse
For those who do not know how to assemble a ground electrode for a bathhouse with their own hands, there is the easiest way and diagram of how to do it. To do this, take long pieces of reinforcement or a metal corner, which are driven into the ground with a sledgehammer to a depth of at least a meter.
Ideally, in order to assemble a ground electrode, you need only three pieces of reinforcement, pipe or angle, which are driven in at a distance of at least 60 centimeters from each other.
Ground resistance measurement
To connect the grounding conductors, it is possible to use bolts with nuts, however, in this option, do not forget that during operation the bolts may become corroded and then there will be no normal contact.
So, we figured out how to assemble a ground electrode and how to ground it in a bathhouse with our own hands. Be sure not to forget about safety precautions, because working with electricity is always dangerous and can greatly harm your health.
Basic rules for laying electrical wiring in a steam room
The use of various types of autotransformers is not permitted. Moreover, a step-down transformer for a bathhouse must have its own separately laid circuit for the primary winding with an RCD and a dedicated secondary circuit, separate protected wiring for powering the lighting devices inside the steam room and washing compartment.
The rules recommend additionally installing a battery with an emergency lighting lamp with a voltage sensor on the secondary winding of the transformer. Step-down equipment with an RCD and a ground loop connection is installed outside the steam room, preferably in the dressing room.
The total amount of work that will probably have to be done when arranging lighting in a bathhouse with your own hands can be formulated in the form of a list:
- Determine the total load or electricity consumption for the bathhouse as a whole and separately for the steam room;
- Choose a method for supplying the power cable to the bathhouse and further laying the wiring in the steam compartment;
- It will be necessary to draw up a preliminary preliminary design, this will help with calculations of the amount of wire and the choice of installation points for lamps;
- We determine a place for a common distribution panel with an RCD and separately install fasteners for a package of switches that control the lighting inside the steam room;
- We calculate the lighting power consumption in a steam bath based on the use of standard incandescent lamps;
- We determine the cross-section of the electrical wiring based on the maximum possible load on the network.
It is clear that additional grounding will be required for lighting devices installed in the steam room and washing department. There must be two grounding circuits - a common one for the bathhouse and a separate one for the steam room and sink. Moreover, they should be located at opposite walls of the bathhouse box.
This is done due to the fact that inside the steam room and the same dressing room or relaxation room there is a different level of humidity and, accordingly, different conductivity of the protected object. The leakage current always follows the line of minimum resistance. Simply put, make two grounding loops so that when you turn on the refrigerator or a powerful pump motor in the relaxation room of the bathhouse, none of the steamers receive an electric shock due to the induced EMF.
Make a separate thread for each lamp with a two-core wire
⚡ Grounding circuit for a private house.
Hi all. Last summer I decided to make a ground loop
for your home. We didn't have one. The wiring is old. All sockets are without grounding. The washing machine sometimes gave an electric shock. And then my wife was looking at the dishwasher... In general, I decided to make a circuit, change the wiring, and push in an RCD. The house is still being renovated...
Article on the topic: How to properly make a septic tank for a bathhouse
After talking with electricians, I found out that a TT system is needed. The simplest one, in principle. There are two wires to the house - phase and neutral. And I throw the third one myself - grounding. The ground is not connected to the electrical network in any way, the zero is NOT connected to my ground. I won’t go into details; there is a lot of theory on all grounding systems on the Internet.
I bought: 9m of metal corner 50x50x4mm
.
The corner will be used for grounding conductors, stakes that are driven into the ground. Instead of corners, you can use smooth round pins (but not fittings). Or pipes. The main thing is that the cross-sectional area of the ground electrode is at least 100mm2. So I have a corner to spare. You can also take 40x40. 12 meters of metal strip 40x4mm
.
This will connect the grounding conductors and lead from the circuit to the house. Copper wire 10mm2
for grounding. I will pull it from the circuit to the shield onto the grounding bus. Spent about 5,000 rubles on materials. Not that expensive. With work, hiring someone will be much more expensive...
I cut the corners exactly three meters long with a grinder. On one side I cut off the corners and sharpened them. It turned out to be three stakes of three meters each. Attention!
For each area and soil, the length of the stakes and the distance between them is individual! We have enough two and a half meters, three with a margin. And there is a rule - which grounding conductors determine the distance between them. Or a multiple. Somewhere in the north or south, in swamps or sands, longer stakes are needed, or maybe shorter ones...
Now I have the fun job of digging a trench for the contour. I decided to make it a triangle. You can do it in line. But it seemed better with a triangle - if there is a break somewhere in the grounding connection line, the contact will still remain and the circuit will work. I figured out an equilateral triangle with a side of 3m at the vertex towards the house and drove with a shovel... I dug a trench more than 50cm. It is necessary that the connection strip be at a depth of at least 50cm. I went a little deeper into the corners and the most interesting thing was working with a sledgehammer. Since I’m not a muscleman, my hands simply came off after these works...)
Article on the topic: How to gasify a bathhouse
He drove the stakes three meters into the ground. Well, almost three meters. I drove it long and hard. I poured some water under the cola, let it sit, and then... The upper ends of the cola were noticeably flattened and curled up. I had to cut a little with a grinder - 5-10 centimes. It’s inconvenient to work with a grinder in a pit, I’ll tell you...
Then - welding. It is necessary to carefully weld the joints of the strip with the corners. The seam should be at least 10 cm at each connection. It must be cooked thoroughly. In the ground, the welding site can quickly rot and the line will break. Then grounding will not help...
I scalded everything. I welded a strip to the side of the house and brought it to the wall.
I covered all the welding points with automotive mastic. Still should extend the life of the welding points in the ground. The entire contour cannot be smeared with mastic or painted!
There must be contact with the ground! That's the point...
I drilled the removed strip and screwed it to the wall. Painted it. I welded an M8 bolt at the end.
I put a small mounting box on the connection point, inserted the wire, put the terminal on the bolt and tightened it well with the nut.
All is ready! You can fill the trench with earth. Yes, I quickly checked the functionality with a regular incandescent lamp. This is wrong and you shouldn’t do it, but I did it) Purely for myself. One wire from the light bulb to the ground (to the grounding bolt), one to the phase from the home network. The light is on brightly - everything is fine. It’s dim—it’s necessary to expand the circuit (adding and welding ground electrodes). If it doesn't light up, everything's bad. Or simply connected incorrectly). If you think about it, you need to call a specialist and let him measure the resistance of the circuit...
I will say this - the washing machine no longer electrocutes. The dishwasher is working. When a phase hits the ground, the ouzo is triggered. I haven’t tried sticking my fingers into the socket. For now)
Article on the topic: When you feel dizzy after a bath
Thanks to everyone who read. More details and clarity in the video. Perhaps it will be useful to someone. The garage can also be grounded. I won’t - I have a line from my house. You just need to change the cable to a three-wire one)
The task and device of protective grounding
The purpose of grounding is to drain electric current that has found a loophole in the insulation to reach the surface. This surface includes metal cases and fasteners for washing machines, computers, microwave ovens, and electric heating equipment. According to their functional responsibilities, they should not conduct current, but they are always ready to provide their metal “barrel” for leaks and short-circuit current. This warm welcome is often felt by the owners of leaky or overly loaded equipment in the form of light blows, pinches and tingling sensations.
Breakdowns in the housing of household units rarely cause serious concern. Well, it shook me a little: it kind of cheered me up. However, the apparent absence of serious risks is not a reason to relax. Stray currents that escape contribute to headaches , discomfort and an unreasonable feeling of anxiety. In addition, ungrounded equipment is noisy and interferes, reducing the speed and quality of signal reception, processing and transmission. Such troubles will not immediately disable the equipment, but will significantly help reduce its working life.
This means that a grounding circuit is necessary:
- to protect owners from electromagnetic radiation, negative mood and ailments;
- to eliminate interference in the electrical network;
- to maintain equipment performance.
Protective grounding will eliminate these misfortunes by providing the current with the most attractive paths to exit. The principle of movement of electricity is very similar to water. It flows to where there are no obstacles, where there is less resistance and where it is easier for it to pass. Those. in order to prevent people and equipment from being harmed, it is simply necessary to lay an unobstructed path “to the left” for the electric current, in the case of grounding, by definition, into the ground.
The resistance of the path being constructed must be less than that of a person and the equipment connected to the protective grounding. Then most of the electricity that has broken through will flow along the intended path with the least barriers, go outside the building and dissipate in the ground. And the owner and equipment will receive only the regulatory minimum.
The grounding system is a closed or linear circuit, which includes:
- two or more metal grounding rods, strictly vertically immersed in the ground;
- a horizontal grounding conductor that connects the electrode rods into a common circuit;
- a bus that provides entry into the house and grounding connection to the protected units.
An autonomous building may have several grounding systems, but one of them must be connected to the main grounding bus or to the main element of the electrical wiring - to the distribution panel with the formation of a metal connection between the panel and the grounding conductor connected to it.
Construction and layout
Baths come in different types in design and layout, but they have the same purpose, and the requirements are the same for all types, which are:
- A Russian bathhouse is essentially a “steam sauna” with a dressing room and other premises, depending on the desires and capabilities of the developer. The bathhouse is heated “black” or “white”. The material of the walls is usually wood (logs, timber, frame structure);
- Finnish sauna is a dry bath with a steam room and auxiliary facilities (swimming pool, shower, relaxation and changing rooms). They are built with various heat sources (gas, electricity, infrared heaters, etc.) The construction of the walls may be different, but the interior decoration is made of wood;
- Hammam - steam or Turkish bath. A rather complex structure, it is extremely rare in individual construction;
- Japanese bath is an exotic version of a bath. Structurally, there can be different options for the device and configuration.
All types of baths are united by the presence of water in liquid and vapor form and a heat source. Structures of this type have high humidity and high air temperature, and therefore, additional requirements are imposed on the electrical wiring in the bathhouse than for other buildings and structures for domestic purposes. The reason for this is the effect of water vapor and temperature on the insulation of wires and devices.
Article on the topic: How to build a bathhouse in a rural area 3 by 4 meters
Purpose of protective grounding
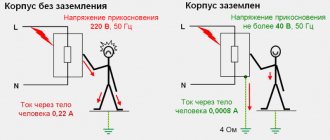
Already from the name itself it is clear that the purpose of grounding is to protect a person from electric shock. Where can it (current) appear? On all metal parts and housings of various electrical appliances that operate on electricity. But, you say, now there are such good insulating materials, high technologies, etc. And you will be right. But we shouldn’t forget the accidents that happen quite often in our lives.
A simple example from our everyday life. Imagine an ordinary small oven for cooking chicken, cakes, and pastries. It has, like many household appliances (refrigerator, bowler, microwave, pump, etc.) a metal body. Over time, the insulation on the wires may collapse, melt, or simply burn off a wire. There are many reasons: long operating time, high temperature, vibration, manufacturing defects, violation of the operating rules of the device and much more.
This “bare wire”, which is energized, may accidentally end up on a metal casing, which means that it will all be energized (casing). What can happen in this case? There may be a short circuit, and then the automation will simply turn off the electricity. Or maybe nothing will happen, everything will work until a person touches the oven body.
When touching a metal part (conductive), a person will receive an electric shock. No one knows how strong he will be. Everything here is individual and depends on hundreds of factors. We will not consider them (factors), but any electric shock is a strong stress for the body, especially for the heart. It’s good if everything ends well, but there are deaths. I don’t want to scare anyone and give up electrical engineering, but the statistics are not forgiving and show specific facts.
So, I think it’s clear why they do grounding. It is no coincidence that in any household appliance the power wires are made of a three-core wire and the plug has a grounding terminal. By the way, the requirements for electrical wiring have now changed significantly, and only a three-core wire is used to power any devices. In a word, the presence of protective grounding is mandatory. If previously two strands of wires (phase and neutral) were enough in the electrical wiring of a house or apartment, now it is no longer possible to install “such a disgrace.” The presence of “land” is a mandatory and necessary requirement. Even bathhouse lamps have a grounding wire on the terminal block connected to the housing.
Electrical wiring diagram in the bathhouse
In order to carry out electrical installation correctly, it is necessary to draw up a power supply diagram before purchasing materials and components.
The scheme must provide:
- External networks that can be done over the air or in the ground. The laying option is selected individually by the developer, depending on the technical and financial capabilities and the required design;
- Input device (electrical panel), and, if necessary, an electricity metering unit;
- Internal wiring, in accordance with the explication of the premises and the requirements for them. The number of lamps and installation products (switches and sockets), as well as heating equipment (electric ovens, heaters, etc.) is determined;
- Ground loop arrangement.
A variant of the power supply diagram may look like this:
Electrical wiring diagram in the bathhouse
Selection of wires, switches, lamps
For the completed wiring diagram in the bathhouse, all its components are selected: wires, sockets, switches and lamps. The cable brand is selected in accordance with the conditions in each of the bathhouse rooms (high temperature and humidity).
Depending on the material of the current-carrying conductor, the wiring in the bathhouse can be copper or aluminum, but due to the much better mechanical and electrical parameters, the choice should be made in favor of copper wires. The main parameter for any cable brand is the wire cross-section. The cross-sectional area is selected based on the load connected to the corresponding section of the wiring.
For the steam room
The requirements of GOST R 50571.12-96 establish the following division of the steam room into zones:
Rice. 2: division of steam rooms into zones
Look at the picture, all zones are built in accordance with the location of the stove, be it electric or solid fuel. In relation to laying wiring cables and installing other equipment, these areas have the following requirements:
- The first is intended exclusively for the stove, if it is an electric heater, then the wiring for connecting it;
- The second is considered the most loyal in terms of wiring requirements; no standards are provided for it;
- For the third zone, there are requirements for equipment that must normally withstand temperatures of 125°C or more, and wiring of 170°C or more;
- Only lamps, sensors and regulators can be installed in the fourth zone, but their wiring is selected as for the previous bath zone.
For internal electrical wiring in the steam room, heat-resistant cables should be used, for example, flexible copper RKGM, PVKV, PRKS or PMTK.
Lamps in the steam room must have a metal body to which grounding is connected, a sealed glass shade with a degree of protection of at least IP24. You should not choose models with a plastic body or parts to connect lamps, as they can melt and deform, causing moisture to penetrate inside.
Dressing room, locker room, rest room
In other functional areas of the bathhouse, the use of VVGng power non-flammable cables is allowed.
When choosing circuit breakers for protection against power surges in the network, first of all it is worth determining their operating power. The main machine must have maximum power; for auxiliary devices this figure is significantly reduced.
To set the limit value of the machine for disconnecting from the network, the current strength in the circuit and in its specific section is taken into account. For example, if the current strength in a section of the circuit is 18A, then the maximum permissible threshold of the main circuit breaker is 20A.
No less important for the protection of electrical appliances is a residual current device (RCD). According to the PUE, the RCD response threshold should be from 25 to 30 mA.
Installation of electrical wiring in the bathhouse
- External networks
Depending on the specific conditions and the chosen installation method, the brand of power cable is selected. With the aerial connection method, it would be most optimal to use SIP brand wires; this will simplify installation and speed of work. When laying cables in the ground, you can use cables with or without armored insulation; a good choice would be a cable of the VBBShV brand.
The cable cross-section is selected from the installed capacity of electrical appliances and devices, after drawing up a power supply diagram for the facility.
- Electrical panel design
If the bathhouse is a structure built into the main building (Finnish, Japanese bathhouses), and also if the electrical connection of a separate bathhouse is planned from a general electricity metering unit, then the installation of additional metering devices is not required. In this case, a distribution panel is installed, equipped with input and group circuit breakers, and a residual current device (RCD).
Requirements for installing a distribution board:
- Access to the switchboard must be free, regardless of the layout, the presence of furniture and equipment in the room where it is installed;
- The room must be equipped with artificial lighting and well ventilated;
- It is prohibited to install in steam rooms and washing rooms;
- If installation indoors is not possible, it is necessary to install the shield outside, ensuring the required tightness of the housing;
- The installation height from the floor should be 1.4 - 1.8 meters to the top edge of the shield.
Article on the topic: Construction of a bathhouse, how to fill the ceiling
The number of outgoing groups depends on the layout of the bathhouse (number of rooms), as well as the number of mounted lamps, sockets and heating devices. To select an introductory machine, it is necessary to calculate the installed power of all mounted devices, taking into account the safety factor.
Laying group lines
The laying of electrical lines from the distribution board is carried out in accordance with the developed diagram and floor plan.
Requirements for the type of electrical wiring, conditions for choosing wires and cables, as well as methods for laying them are regulated by the Electrical Installation Rules (PUE, Chapter 2.1).
Requirements to be met during installation:
- Wires (cables) are selected with a copper current-carrying conductor;
- Depending on the installation method and purpose of the room, cable brands are used for group lines:
- VVGng (VVGngLS) – cables with reduced smoke emission and flame retardant;
- RKGM, PRKA, PRKS, PVKV - cables that can withstand ambient temperatures of 180 * C;
- PMTK – can withstand temperatures up to 200 *C.
- The cross-section of cables (wires) is selected according to the permissible current (see PUE chapter 1.3);
- From the group circuit breaker to lighting devices, heating devices, installation products and distribution boxes, it is necessary to carry out installation in whole pieces of wire. Twisting and other connections outside the above listed elements of the power supply system are prohibited;
- The wiring is carried out hidden, on brick and concrete walls. Wires (cables) are laid under a layer of plaster, in the voids of floor slabs, grooves and pipes;
- If the construction material is wood, the wiring is done open;
- The lines are laid in horizontal and vertical planes; bending and twisting of wires is prohibited.
- It is prohibited to install installation products and distribution boxes in steam rooms and washrooms;
- The connection of wires (cables) must be carried out by pressing, soldering, welding or using special compressing devices;
- When passing through walls, the wires are laid in a ceramic or metal tube;
- Light sources and other elements of the system must have protective grounding of the elements, and if this is not possible, protective grounding.
- It is prohibited to install wires (cables) above heating elements and structures.
Article on the topic: How to insulate a dressing room in a bathhouse
How to connect a sauna to electricity from the house?
The bathhouse is built separately from the house and is connected to the switchboard with a separate cable, through its own machine and RCD. Most often, the power cable is laid underground, which has some advantages over creating an overhead line.
- Advantage number one is that this type of installation ensures the safety of the cable and prevents its breakage in gusty or heavy winds.
- Advantage number two is that the cable’s invisibility does not spoil the external aesthetic appearance of the surrounding landscape. The distribution board is most often installed at the entrance to the room, from the outside, but installation inside the room is also possible. Electrical sockets and lighting fixtures are connected to this panel.
If the plans include the installation of additional electrical equipment - an electric stove (although who would install an electric stove in a frame version or a log house?), a steam generator, electric heating, then the total power must correspond not only to the wiring in the bathhouse and steam room, but also to the main power cable itself.
Connecting electricity via overhead line
A free-standing bathhouse can be connected with a SIP cable or aluminum wires without insulation, which are stretched between two buildings. It is better to choose a SIP cable so as not to pull it over a section of wire without insulation. The SIP system has its own system of fastening to facades and a load-bearing steel core, which makes it possible to tension the cable.
If the footage from the line connection point is more than 25 meters, an intermediate pole must be installed. The SIP cable has aluminum wires and cannot be inserted into a wooden bathhouse. To enter the bathhouse, a power circuit breaker or switch is installed on the facade, after which a cable with copper wires is connected and introduced into the room using a metal sleeve.
Underground electrical cable installation
This method of connecting a bathhouse will require a significant amount of excavation work when digging a trench with a depth of 0.8 to 1.2 meters, from the connection point to the bathhouse. The cable for underground installation can be laid directly into the ground or a plastic sleeve from the pipe can be used to better protect the cable from damage.
For these purposes, it is better to use products with insulation made from XLPE grade cross-linked polyethylene, which has a guarantee of about 25 years. The cable can be connected to two panels from below, through the foundation along the internal wall and laid in a metal pipe. This type of connection is intended to protect the cable from possible mechanical damage and comply with the requirements of the Electrical Installation Regulations.
Installation of distribution panel
The dimensions of the internal shield are determined by the number of used circuit breakers and RCDs that will be installed. The shield is placed at a height of 1.5 to 2 m from the floor near the entrance to the bathhouse in order to turn it on upon entering.
At the input, an RCD must be installed for all electrical wiring and an input circuit breaker, which must have a lower operating current than the circuit breaker in the house that protects the outgoing line. If a 25 A automatic circuit breaker is installed in the house, a 20 A automatic circuit breaker can be installed in the bathhouse at the input. The RCD at the input protects all the electrical wiring of the bathhouse and is designed to protect the bathhouse from fire and protect people from possible electric shock if it leaks.
Installation of lamps
The choice of lamps installed in a bathhouse should be approached with special care, and a number of requirements must be met, such as:
- The protection class of luminaires must be at least IP-44;
- Lamps must be sealed and waterproof;
- Lamps with plastic shades cannot be used;
- It is not recommended to install lamps on the ceiling or near heating elements;
- It is recommended to use lighting fixtures with an operating voltage of 12 V in the steam room. To do this, use a step-down transformer, which is installed in the room adjacent to the steam room;
- It is also recommended, in order to create safe operating conditions, to turn on lighting devices in the washing room through an isolation transformer installed in the adjacent room;
- It is prohibited to install fluorescent lamps in the steam room.
How to make lighting in a bathhouse
Before you start laying the wire, you need to make sure that the locations for the lamps are chosen correctly. Light from lighting sources does not dazzle or create discomfort for the visual organs.
We pay special attention to illuminating the most important areas inside the steam room, this is the place for the heater and container with boiling water. Usually these places are equipped with two lanterns, so that if one of the lamps burns out, the area near the stove remains illuminated.
The remaining rooms of the bathhouse are equipped with lighting according to the standard scheme.
Stages of installing electric lighting in a bathhouse
Initially, you need to apply markings to the walls and measure with your own hands the length of each segment from the distribution panel to the sockets and switches. Next, cut the pieces to the required size and lay them on hinges directly on the wall. For lighting outside the steam room, you can splice small pieces by twisting and soldering contacts with insulation with a tube of shrink film.
We divide all the wiring in the bath into three circuits:
- Separate wire for lighting and electricity consumption inside the rest room, hallway, in the dressing room. Cable cross-section not less than 2.5 mm2, protection IP44;
- Wiring for lighting in the steam room, a separate power section to a step-down transformer in the dressing room, then a switching box is installed and a line is connected with a protected cable from the trance to the installation site of the lamps;
- The third part is used to connect the electric heater in the steam room.
According to the provisions of the PUE, wiring cannot be laid inside the bathhouse on flammable substrates using plastic pipes, metal cable ducts or metal conduits. For the steam room, non-flammable corrugated plastic with fiberglass filling is used. You will also have to place a grounding in the pipe for lighting the steam room; it is laid, often filled with a screed in the floor of the steam room.
Lighting in the dressing room
The room separating the steam room from the rest room does not require any special type of lighting. There is no high temperature and humidity in the dressing room, so it will be enough to install a couple of lanterns on the walls, perhaps the usual type with a voltage of 220 V. The lighting must be above the entrance door to the rest room, above the wall cabinet with a switchboard and above the stove portal if the steam room is heated with wood .
Automatic controls for electrical lighting and heating devices in the steam room are often installed in the dressing room.
The lamp above the entrance to the steam room must be moisture-resistant, otherwise the hot steam leaking through the cracks of the doorway will quickly damage it.
Lighting in the wash bath
To provide light sources in the washing compartment, you will need to make a separate branch with a wire in waterproof insulation from the step-down transformer to the installation site of the switch, and then to the wall lantern. The electrical wiring is laid separately from all other consumers of electricity and must be connected to the grounding circuit of the steam room.
The switch is mounted on the wall on the side of the rest room of the bathhouse or dressing room. The wiring to the wall lamp is laid through the wall in a silicone coupling.
For washrooms, lamps with a frosted glass shade and a body seal with a silicone gasket are usually used.
Lighting in the steam room
Lamps inside the steam room are usually located on the wall opposite the entrance. This may not be entirely convenient for those entering the steam room, but this method is considered the safest of all possible.
The wiring is laid openly, usually mounted on the wall under the shelves. Distribution boxes are not used; each light source is connected with its own piece of wire. General switching is performed outside the steam room, usually in the dressing room or in the relaxation room of the bathhouse.
It is best to make the lighting in the steam room reflected rather than a direct stream of light
Lampshades must be shaded with screens or decorative grilles; on the one hand, this is beautiful, on the other hand, it guarantees protection if the glass suddenly cracks or explodes into fragments.
Lighting in the rest room
For the remaining rooms of the bathhouse, you can use almost any light source, including housekeepers and halogens. The only limitation remains the requirements of the PUE for laying wiring for lighting, which apply to all rooms of the bathhouse, including the steam room.
It is impossible to hide wiring under the cladding in a bathhouse.
This method will be cheaper than buying a specialized cable with thermal protection.
In the rest room, lamps are located in two places:
- On the wall or on the ceiling above the entrance from the bathhouse hallway to the rest room. Usually they use an LED flashlight with a built-in battery;
- On the ceiling above the seating furniture and main table. Typically, a ceiling version of a fluorescent lamp with five tubes is installed, with the ability to turn off half of the lamps for operation in standby mode.
If the layout of the bathhouse has narrow and elongated rooms such as a corridor, then it will be necessary to provide lighting at the entrance and exit. In this case, the wiring is connected to the general power supply circuit of the bathhouse.
Installation of the ground loop
To meet the requirements of the “Technical Safety Rules for Consumer Electrical Installations” (PTEEP), also in compliance with the requirements of the PUE, to create safe conditions for people in the bathhouse, it is necessary to install a grounding loop.
The grounding loop is a set of horizontal grounding conductors and vertical electrodes made of profiled metal and placed in the ground.
The circuit is connected to the PE bus of the input panel or the main ground bus (GZSh).
The ground loop can be made in the form of a triangle, in a row or along the contour of the building.
Installation of a ground loop - electrical wiring in the bathhouse
Article on the topic: Why people faint in the bathhouse
Depending on the resistivity of the soil, the shape of the circuit and the materials from which it is made are selected.
Why is grounding needed?
The main purpose of the grounding loop in a bathhouse or sauna is to drain the current that has penetrated through damaged protective insulation. In the event of a short circuit, 220 V electricity is attracted to devices made of iron - the equipment can be damaged and cause serious injury to a person.
If there is a ground electrode in the bathhouse, this will help achieve the following goals:
- the equipment will remain operational;
- the person will be protected from injury;
- The power grid will begin to operate without interference or power surges.
Typically, grounding in a bathhouse is done in the presence of electrical appliances, an electrically heated oven, and a boiler. After installation, the ground electrode will drain leakage current into the ground, since electricity always follows the path of least resistance.
Do-it-yourself wiring in the bathhouse
Installing electrical wiring in a bathhouse is a very responsible undertaking, therefore, without knowledge in the field of electrical installations and electrical installations, it is better to entrust this task to professionals, since there are a huge number of offers on the market for this type of service. If you still decide to do this work yourself, then you can use the following recommendations and instructions.
Step-by-step instructions for installing electrical wiring in a bathhouse
- Depending on the material from which the bathhouse is made, a decision is made on what type of electrical wiring will be made (hidden or open);
- A power supply plan and diagram are drawn up;
- Selected materials are selected and purchased;
- An electrical panel with the required number of group circuit breakers is installed;
- Group line routes are marked;
- Distribution boxes and installation products are installed;
- Depending on the type of electrical wiring chosen, pipes are laid, walls are chipped, or cable ducts and other load-bearing structures are installed;
- Electrical wires or cables are laid (tightened);
- Wires are disconnected in junction boxes and installation products are connected;
- A ground loop is installed;
- The ground loop is connected to the PE bus or to the GZSh, if available;
- Devices and equipment to be grounded are grounded;
- The insulation resistance of wires and cables, the resistance to spreading of the ground loop and the metal connection of grounded elements are checked;
- The switchboard is connected to the external power supply line;
- A visual inspection of the installed power supply system is carried out;
- A test run is in progress.
DIY grounding device: step-by-step instructions
If you are asking the question: “how to make grounding at the dacha?”, then to complete this process you will need the following tool:
- a welding machine or inverter for welding rolled metal and bringing the circuit to the foundation of the building;
- an angle grinder (grinder) for cutting metal into specified pieces;
- wrenches for bolts with M12 or M14 nuts;
- bayonet and pick-up shovels for digging and burying trenches;
- a sledgehammer for driving electrodes into the ground;
- a hammer drill for breaking up rocks that may be encountered when digging trenches.
In order to correctly and in accordance with regulatory requirements perform a grounding loop in a private house, we will need the following materials:
- Corner 50x50x5 - 9 m (3 segments of 3 meters each).
- Strip steel 40x4 (metal thickness 4 mm and product width 40 mm) - 12 m in the case of one grounding point connected to the foundation of the building. If you want to make a grounding loop along the entire foundation, add the total perimeter of the building to the specified amount and also take a reserve for trimming.
- Bolt M12 (M14) with 2 washers and 2 nuts.
- Copper ground electrode. A grounding conductor of a 3-core cable or a PV-3 wire with a cross-section of 6–10 mm² can be used.
Once all the necessary materials and tools are available, you can proceed directly to the installation work, which is described in detail in the following chapters.
Selecting a location for installing the ground loop
In most cases, it is recommended to install the ground loop at a distance of 1 m from the foundation of the building in a place where it will be hidden from the human eye and which will be difficult to reach for both people and animals.
How to make grounding at home with your own hands
In any private home, a large number of household appliances work almost around the clock, the lights in the rooms periodically turn on and off, and all this determines a significant total power consumption of electrical energy. In order to ensure safety and security of using electrical networks, the house must have a grounding device.
The principle of grounding is clearly described in the video. To ground a 220V network, it is necessary to construct a so-called grounding loop. It is a wire that is connected to the main grounding bus on the electrical panel and is led out to a grounding device that is buried in the ground near the house (photo).
From the main grounding bus, grounding cables extend to all electrical appliances and power points in the house. Thus, grounding eliminates any negative processes that theoretically (and often practically) can occur inside the electrical wiring and appliances that are used in your home.
There can be many situations of this kind: an open phase, the formation of stray currents, a short circuit, etc. Grounding eliminates any consequences of such emergency situations and removes the current through the grounding device to the ground. The grounding diagram is shown in the photo.
Details about the components of the circuit
It was mentioned above that grounding consists of horizontal and vertical components. By analogy, ready-made kits are produced for the operational installation of grounding loops. Following the attached instructions, constructing grounding from factory elements is easy and pleasant, but expensive.
Vertical grounding conductors
Any long products made of ferrous rolled metal without galvanization can be used as vertical grounding rods for homemade grounding. This treatment is not necessary for parts located in the ground; it reduces the potential. A reinforcing bar with ribs is undesirable; it is difficult to drive it into the ground. A square, strip, channel and its I-beam counterpart will do. Rolled metal with a complex profile is applicable if it is planned to drill holes for laying vertical electrodes before installing the system.
Advice. To ensure that the process of driving ground electrodes into the ground is not unnecessarily labor-intensive, it is better to purchase rolled metal with a smooth surface. Before work, its lower edge needs to be sharpened with a grinder. During the work, the ground around the rod must be periodically “irrigated” with water. This will make it easier to score.
Common materials for making vertical conductors are:
- pipe with a wall thickness of at least 3.0 mm, recommended diameter 32 mm;
- corner with equal or different shelves with a preferred thickness of 5mm;
- circle with a diameter of 10mm.
The optimal cross-sectional area of the vertical electrode is 1.6 cm². Based on this size, you should select the material. The length of the ground electrode is determined in accordance with the local geological situation. It is necessary to go deep at least half a meter below the seasonal freezing level.
The second condition affecting the length of metal rods is the water saturation of the host rocks. Simply put, the lower the groundwater, the longer the electrodes are needed.
In order not to suffer with geological characteristics and calculations, information about the depth of laying ground electrodes should be obtained from the local energy department from the electricians on duty. Approximate data will help in any case, because... they have some estimated margin of efficiency.
The average standard length of the ground electrode varies from 2 to 3 meters with half-meter variations. Favorable environments for the construction of grounding are loams, peat, water-saturated sands, sandy loams, and fractured water-saturated clays. It is unrealistic to completely independently arrange grounding in rocks, but there are ways to create electrical protection. Before constructing the circuit, wells of the required depth are drilled. The rods are installed in them, and the free space is filled with sand or sandy loam mixed with salt or pre-filled with saline solution. Approximately half a pack per bucket.
If the electrical conductivity of the soil on the site is insufficient, it is better to use pipes as vertical grounding conductors. In the lower part of them you need to randomly drill several technological holes. Pipes with holes can be periodically poured with brine to reduce resistance. Salt, of course, will help the electrodes to break down from corrosion, but the grounding will work flawlessly for a long time. Then you just need to replace the rods.
Independent craftsmen most often use black rolled steel to make electrodes. After all, savings are at the forefront of personal efforts. An excellent, but expensive material for vertical electrodes is steel with electrochemical copper coating or copper. Grounding elements embedded in the ground cannot be painted; paint will worsen the electrochemical contact of the metal with the soil.
Grounding metal bond - horizontal conductor
The horizontal grounding element that unites the system and leads it to the panel is most often made from a strip 40 mm wide, strip thickness 4 mm. They also use round steel, less often angle or corrugated reinforcement. The strip is welded to the upper edge of the vertical grounding conductors or bolted. Welding has the advantage of being more reliable. Places of welded and bolted joints are generously treated with anti-corrosion bitumen mastic or simply bitumen. It is forbidden to connect underground grounding elements using a crimp method!
For the construction of a horizontal component located underground, it is undesirable to change the material so that, with inevitable moisture, a galvanic couple with its traditional corrosive consequences does not form. An aluminum, copper, or steel conductor can be connected to a horizontal grounding component that is removed from the ground. Next, with a grounding wire, the entire system is connected to the bus through a welded bolt, and from it it is supplied to each of the grounded devices separately.