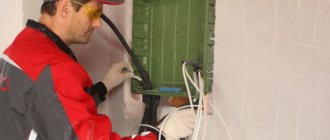
A safe stay in the bathhouse directly depends on how well the communications are laid out. Connecting electricity is a key point in finishing both seasonal buildings and those that are used all year round. The latter are given increased attention when an electric heater is chosen as heating.
The wiring in the bathhouse is laid in accordance with current fire safety standards, GOSTs, taking into account the characteristics and purpose of the premises, the materials from which the bathhouse is made.
Beginners should not attempt to install wiring themselves - mistakes lead to a threat to life and health, and the risk of a fire in the building.
Users often search for:
- Simple DIY sauna
- How to make ventilation in a bathhouse
GOST requirements for power supply to baths
According to the updated standards DBN V.2.5-2003, DNAOP 0.00-1.32-01, wiring is permissible only with three-core copper wires (phase, zero protective, zero working). Two-wire ones are allowed to be used for switches. Such requirements apply to single-phase wiring connections.
When installing switches, sockets, lamps with light bulbs, the room is divided into zones in accordance with GOST R 50571.12-96.
The list of zones is as follows:
- It is unacceptable to lay electrical wiring or install any equipment in the first zone. In this place a stove is being erected, a sink and a shower are being installed.
- In the second zone, you can lay a cable, but it is heat-resistant.
- The third and fourth zones are suitable for laying cables whose insulation can withstand temperatures of +170 degrees.
It is prohibited to use PUNP type cables for wiring. Products of this type presented on the market do not meet the requirements of the current GOST 22483-77.
According to statistics, when using PUNP wires, the risk of fire increases by 65%.
According to fire safety rules, it is prohibited to install sockets in the steam room. Switches are mounted in the dressing room or rest room.
Which wire is better to choose
The wire diameter is selected in accordance with the possible maximum power.
For a single-phase connection, a 2*16 SIP cable is suitable, for a three-phase connection - a 4*16 SIP. You shouldn't skimp on the section. In terms of prices, the difference will be insignificant, but it is always safer to take a cable with a larger cross-section.
You need to purchase only certified products. A cheap product will have a different cross-section along its entire length. In some areas the difference can reach 30%.
Steam room, shower
In such rooms, cables are used that can withstand heating temperatures up to +200 degrees.
The following types of heat-resistant copper conductors are suitable:
- flexible (up to 185 degrees);
- single, multi-wire (up to 205 degrees);
- imported flexible type (up to 200 degrees).
The following domestically produced brands are acceptable for purchase:
- PVKV 1*2.5;
- RKGM 1*2.5;
- PRKS 3*2.5;
- PMTK 3*2.5.
Of the imported models of good quality, Olflex Heat 3x2.5 can be distinguished, but it is more expensive.
Dressing room, rest room
In rooms not subject to high humidity, it is permissible to use non-flammable VVGng wires.
The following markings are suitable:
- PVS;
- NYM;
- VVG;
- AVVG.
To connect lamps you need to purchase the following brands of wires:
- NYM 3*1.5;
- PPGng-HF 3*1.5;
- VVGng-LS 3*1.5.
To make outlets, the cable cross-section must be at least 2.3 square meters. mm.
Power line laying
The bathhouse does not need to be connected to the overhead lines of the networks that transport electricity throughout the holiday village or village. It is connected to an electrical panel located in the main building. It is possible to connect to the input distribution panel where the electric meter is located, provided that it has space for installing an additional circuit breaker and the ability to output an additional line.
The automatic switch protecting the power line of the bath is selected from the total current of its load. To do this, you will need to add up the powers of all simultaneously switched on consumers. Based on this current, the cross-section of the cable or SIP is selected.
Voltage can be supplied to the bathhouse in two ways: overhead or underground. Let's look at how to do it better, identifying the advantages and disadvantages of both methods.
Overhead power line
This method of introducing power into the bathhouse is beneficial if it is not possible to dig a trench for the cable on the site.
The days of aluminum wires mounted on porcelain insulators are gone. Now overhead lines are laid using self-supporting insulated wire, abbreviated as SIP. Its cores are insulated along the entire length, resistant to weathering and not destroyed by sunlight.
And the main advantage of SIP is that it is not as afraid of falling trees as a bare aluminum wire. Not only does it withstand greater breaking force, but due to the strong insulation, it is very difficult to create a short circuit on the line. For the same reasons, it is safe, since a correctly assembled line does not have exposed conductive elements.
Structurally, self-supporting insulated wires are divided into types:
- SIP-1, SIP-1a - working insulated conductors are twisted around a supporting core having an increased cross-section. This core is used as a protective neutral (PE) or combined (PEN) conductor. For SIP-1, it does not have insulation, so laying it along the walls of buildings and in areas accessible to touch is prohibited. Fastening the wire to the supporting core.
- SIP-2, SIP-2a - have the same design, but a larger operating temperature range.
- SIP-4 (not to be confused with four-core wires!) - all wires are of the same cross-section, fastening is carried out by clamping them simultaneously.
The SIP-4 wire is used only for making entries into the building; it cannot be used for laying main lines. For this, SIP-1 and SIP-2 are used. These are exactly what will need to be used to transport electricity from the house to the bathhouse.
To fasten SIP, special fittings are used - anchor clamps, which are attached either to the load-bearing core (SIP-1, SIP-2), or to all the cores at the same time (SIP-4). To hook the clamp to a post or wall of the house, appropriate brackets are used. Naturally, each wire model has its own fittings.
Fittings for fastening SIP
The design of the SIP line from the house to the bathhouse will depend on local conditions: the distance between objects, the presence of obstacles on the route, the possibility of attaching anchors to the facades. At large distances, additional supports may be required; it is possible to use the existing support on which the metering unit is located. The choice of both the wire itself (it is even possible to use SIP-4) and the mounting hardware for it will depend on all of the above.
When designing a line, it is better to contact specialists in this field.
Although the introduction of self-supporting insulated wires into buildings with a connection directly to switching devices is used, it has a number of disadvantages:
- It is difficult to ensure a good connection with the terminals of automatic switches, since the material of the current-carrying core of the SIP is poorly deformed, the contact is point-like. Overheating is possible at the connection point.
- The wire is very rigid; sharp turns in small volumes of distribution panels are difficult to make.
- Due to the fact that the conductors do not have a common sheath, it is difficult to protect the input from moisture and dust where it is necessary.
Therefore, conventional cables are used for entry into the building.
Input into the building from SIP with cable
They are connected to the line wires using sealed branch clamps, also related to standard fittings for SIP.
Cable power line
The main advantage of powering a sauna with a cable is its complete invisibility. But this same property is also the main disadvantage: if it becomes necessary to carry out excavation work on the site over time, you must not forget about it.
If the cable is laid during the construction of a house along with a bathhouse, then places for the output and input of the line are organized in advance. To do this, pipes are laid in the foundations in advance. At this stage, you can dig a trench and bury the cable in it, leaving its ends inside the unfinished buildings. At the same time, ensuring their reliable protection from moisture.
If the installation is carried out between ready-made buildings, then where the cable goes underground it is protected from mechanical influences by steel pipes. They must be bent so that the transition of the cable from the vertical to the horizontal plane passes inside the pipe. Bolts must be welded to the pipes for connection to the ground loop. This is done before laying the cable in them.
Cables also pass through the wall through steel pipes. The insertion point is sealed with fireproof materials.
The trench for laying is at least 0.8 m deep. A sand “cushion” about 10 cm thick is poured onto its bottom; after laying the cable, it is covered with the same layer of sand. Do not pull the cable too tight - small zigzags will dampen the influence of seasonal ground movements.
Laying cables in the ground
Red brick is laid on top of the sand cushion for mechanical protection. Recently, it has been possible, instead, to cover the entire bottom of the trench over the cable with a special signal tape, so that during excavations, you can identify in advance a place where you can’t dig further.
Next, the trench is filled with soil without construction waste.
How to calculate the cross section correctly
In sauna rooms, according to the fire safety guidelines, only cables with copper conductors can be used.
Photo: variety of electrical cables
A wide range of cables with cross-sections starting from 0.35 sq. mm and above.
To correctly calculate the current value, it is necessary to divide the total power consumption (furnace, lamps, boiler, etc.) by voltage. The standard voltage is 220 V.
In accordance with the obtained indicator, a suitable cross-section of the copper cable is selected. This is easier to do using the PUE table (shown below).
| Cable cross-section, mm² | Conductor diameter, mm | Copper wire | Aluminum wire | ||||
| Current, A | power, kWt | Current, A | power, kWt | ||||
| 220 V | 380 V | 220 V | 380 V | ||||
| 0,5 | 0,80 | 6 | 1,3 | 2,3 | |||
| 0,75 | 0,98 | 10 | 2,2 | 3,8 | |||
| 1,0 | 1,13 | 14 | 3,1 | 5,3 | |||
| 1,5 | 1,38 | 15 | 3,3 | 5,7 | 10 | 2,2 | 3,8 |
| 2,0 | 1,60 | 19 | 4,2 | 7,2 | 14 | 3,1 | 5,3 |
| 2,5 | 1,78 | 21 | 4,6 | 8,0 | 16 | 3,5 | 6,1 |
| 4,0 | 2,26 | 27 | 5,9 | 10,3 | 21 | 4,6 | 8,0 |
| 6,0 | 2,76 | 34 | 7,5 | 12,9 | 26 | 5,7 | 9,9 |
| 10,0 | 3,57 | 50 | 11,0 | 19,0 | 38 | 8,4 | 14,4 |
| 16,0 | 4,51 | 80 | 17,6 | 30,4 | 55 | 12,1 | 20,9 |
| 25,0 | 5,64 | 100 | 22,0 | 38,0 | 65 | 14,3 | 24,7 |
A similar method is used to calculate the current load for a circuit breaker. The power of not all devices is taken into account, but of an individual line.
Preparatory work
In order to begin installation work, you need to prepare all the necessary materials and tools. These are cables of a certain cross-section, metal hose, sockets, switches, electrical tape. You should also prepare tools for electrical work. If the bathhouse was built on a stone or concrete foundation, then putty should also be prepared.
It is very important to choose the right cable. To determine the correct cross-section, determine the load for which the electrical wiring in the bathhouse will be designed
The rules recommend using a cable with a cross-section of 1.5 mm2 for a current of 19 Amps; for a current of 70 A, a cross-section of 10 mm2 is suitable.
You can also use the following formula: maximum possible load kW / voltage V
When making calculations, it is important to take into account all devices. As for the choice of metal hose, preference should be given to a more flexible option
The wall thickness must be at least 2 mm.
Which lighting fixtures to choose
Each room has its own characteristics. We will discuss the reasons and nuances below.
Steam room, washing
The main condition for lighting devices is a waterproof housing. Protection level - IP-44.
The reason for this is constant humidity and increased air temperature. The lamp housing must be completely insulated from moisture, otherwise there is a risk to the safety of those present.
Suitable lamps are heat-resistant, made of stainless steel. Appliances cannot be placed above the stove or next to the washbasin or shower.
Preference should be given to wall lamps with dim, even dim light, so that a relaxing atmosphere is created in the steam room.
Halogen lamps with a power of 12 V are considered safe. But under them you will have to install a step-down transformer in a dry room.
In the bathhouse, it is recommended to use closed sockets in the form of a box with a lid to prevent moisture from getting inside. Protection class - IP-44.
Dressing room, rest room
For these rooms there are no restrictions in the choice of lamps. Ceiling chandeliers and wall lamps are also suitable.
To save energy and keep residents safe, it is better to screw in LED bulbs. They can be beautifully inserted into the ceiling trim. Spot type lighting will come out.
In bathhouses with an attic equipped as a relaxation room, the main selection condition is safety and compatibility with other interior details.
Accurate selection of optimal voltage
It is very important to correctly select the required voltage level. Everything will depend on the specific power level that will need to be provided in the bathhouse. Sometimes wiring is needed only to power electrical appliances and lighting sources with minimal consumption, and in other cases there is a need to connect powerful equipment. And it is precisely these parameters that will determine the level and type of voltage. Let's look at typical options.
- Single-phase reduced. This is quite enough when a safe voltage of 12V, 36V is required. Such parameters are usually relevant when the electrical wiring system is used to connect lighting fixtures. A useful option for relatively small bath rooms with low ceilings, when energy is consumed to power the lighting system.
- Single-phase mains voltage is optimal for medium load levels. This is a level in the range of 1 – 14 kW. In this case, the entire sauna will be powered from typical single-phase networks with a voltage of 220V.
- When the load on the electrical wiring is planned to be increased, it is necessary to select a three-phase mains voltage. Then the wiring has parameters of 20 kW, 40 kW. And the possibilities will immediately expand dramatically: you can connect high-power electrical appliances, a heated floor system, an electric oven, as well as various pumps and water heating boilers.
When the required voltage level has already been determined, it is time to draw up a specific wiring diagram. It designates places to accommodate each consumer.
Features of cable laying depending on the bathhouse material
It is recommended to take into account the following fire safety requirements:
- Only a whole wire should come from the distribution board. There cannot be any pieces or intermediate fasteners.
- It is prohibited to route the cable directly above the stove.
- When wiring, it is recommended to use protective grounding.
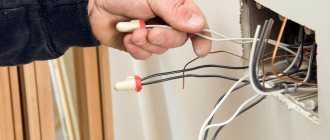
- The wire strands are connected to each other by soldering or welding. Twists are not allowed.
- The cable should not pass near windows, doors, or heating radiators.
- When installing a boiler or washing machine, grounding must be provided.
- Conductors in metal sheaths are not used.
- Cables can only be routed from the junction box strictly horizontally or vertically.
There should be no sockets in the steam room; switches are a direct threat to health and life. They are taken to the locker room, rest room.
Let's look at the nuances of laying wiring in Russian baths made of different materials.
In a brick
In brick buildings, a hidden method of wiring is used. Channels are hollowed out in the walls, into which the cable is laid and masked with a layer of plaster. The process is labor-intensive, but fireproof.
The downside is that in order to identify the breakdown, you will have to spoil the finish.
In wooden
In saunas made from fresh logs and timber, the wires are laid in an open manner. Asbestos plates (thickness from 0.3 mm) are placed under the wires. If the cable is damaged, the plate will protect the wooden covering from fire.
Do not lay cables inside plastic pipes. It is prohibited to lay the cable under the floor or between ceilings. All wires can go from above the wall. For camouflage, you can use a cable duct that matches the color of the room, but electricians advise avoiding such solutions.
In a bathhouse made of blocks
In bathhouses made of foam concrete, aerated concrete, or cinder block, wiring is installed in a hidden way, similar to that in brick buildings.
Internal wiring
If you still decide that you can do the electrical wiring in the bathhouse yourself, then take into account the following rules. First of all, it must be resistant to high humidity and high temperatures.
Advantages of open wiring:
- All electrical wiring is visible, and in case of any damage it will be much easier to detect.
- Any damaged area can be easily dismantled and replaced with a new one.
- Exposed wiring, even if you think it doesn't fit into the overall design, can be given an original retro look with porcelain insulators.
For electrical wiring in the bathhouse, it is necessary to use double-insulated wires. In a wooden frame bath, asbestos plates with a thickness of at least 0.3 mm must be placed under the wire. If the wire is damaged, this measure will prevent the wood surface from catching fire.
Install horizontal sections of wiring at a distance of 20 cm from the ceiling.
In the dressing room and washing room, install the wiring under the ceiling in cable ducts, in the steam room - only on roller insulators. Alternatively, you can run the wire from the washing room to the steam room through the wall in a steel sleeve.
Then a lamp should be located at the conductor entry point, that is, the wire coming out of the sleeve will be immediately inserted into the lighting apparatus.
All wiring in the bathhouse is carried out in metal or flexible corrugated pipes, or special plastic boxes. They are made of a material that, in the event of a fire, does not support an open fire, but only melts.
It is necessary to route wires from one room to another through steel pipes, which are inserted into holes made in the center of the log.
It is recommended that all wiring be done through the attic.
Very important! When wiring in a bathhouse, do not use conductors with vinyl or rubber braiding.
If you plan to install a washing machine in the bathhouse, then place it only in a dry room and run a separate supply line from an individual machine. There should also be a separate line for the heating tank.
Step-by-step instructions for installing electrical wiring in a bathhouse with your own hands
Before work, a general scheme for the electrification of the bathhouse must be prepared. Beginners should not undertake such a process without the supervision of a specialist. This should only be done under the clear guidance of a specialist, otherwise it risks a short circuit due to connection errors.
The distribution box, sockets, and switches can only be installed in a dry room. A dressing room or rest room would be suitable.
The entire installation process consists of four steps.
Electrical panel installation
Occurs subject to the following conditions:
- The place for installation is dry, well ventilated.
- Condensation does not accumulate in the room, there is no high humidity.
- You can freely approach the shield.
- The area of the room is brightly lit.
- The recommended mounting height of the box is 1.5 – 1.8 m from the floor.
- In small baths, it is permissible to use a three-core cable for single-phase wiring.
Electrical wiring starts from the central panel.
It is equipped with:
- input circuit breaker;
- RCD;
- automatic machines for boiler, electric heater, lamps.
To select an input circuit breaker of the required power, you need to divide the total power of all electrical appliances by the network voltage (220 V).
The power calculation for each individual machine is also carried out.
Wiring
Depending on the material of the bath, an open or closed installation method is used (discussed in the section above). Near the electric one they often run a wire for the Internet and telephony.
Output of switches and sockets
When the cable is laid, you can begin to assemble sockets and switches. The recommended installation distance is 90 cm from the floor. They are fixed in all rooms except the steam room. If the elements will be located near the steam room, then it is better to choose options with protective covers.
It is convenient to install double switches that will regulate the lighting in two rooms at once.
Lighting installation
For lighting, devices of protection class IP44 are used.
In the steam room and shower room, waterproof lamps are installed that are mounted on the wall.
Fiber optic lamps are in demand. They are resistant to temperature changes, humidity, and provide soft, diffused, relaxing light.
Built-in lamps look great, especially when the finishing is done with clapboard.
The recommended body material is metal; it is better to take lamp shades from glass. These are the requirements for lamps in a steam room. In other rooms there are no restrictions on the choice of lighting fixtures.
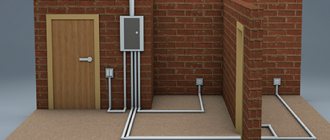
Distribution panel and load calculation
All electrical wiring is routed in the bathhouse from the distribution board. When choosing a place for its installation, you must follow several rules:
- There should always be a free approach to the shield.
- In the room where the shield is located, it is necessary to provide sufficient lighting.
- This place should also be ventilated.
- It is prohibited to place shields in a steam room or in other fire-hazardous rooms; most often they are mounted in dressing rooms or rest rooms.
An input circuit breaker and outgoing circuit breakers for individual electricity consumers must be installed in the distribution panel.
To select the power of the input machine, you need to know the total load. Add up the rated power of all electrical appliances involved in the bath, do not forget to add the lighting load. Divide the resulting figure by the voltage value. For example, you have a power of 5000 VA, divide the resulting figure by 220 V, and get 22.72 A. Choose a machine with a small margin, a 25 A device is quite suitable. Using the same principle, calculate the power of outgoing machines.
click to enlarge
Before wiring the bathhouse, draw up a schematic diagram of the power supply. It should display all the main consumers of electrical energy:
- Electric heater.
- A heat gun is often installed to dry rooms.
- Electrically heated floor.
- Pump.
- Electrical humidity and temperature meters.
- Perhaps you will have a washing machine there.
- Electric kettle and hairdryer.
- Water heater.
- Pool lighting.
- Refrigerator for soft drinks.
- TV, stereo system.
- SPA equipment.
In the distribution panel, assign a serial number to each machine and mark it somehow (write it with a marker or stick a piece of paper with the number). On the door of the distribution panel, stick a list of machines with the serial number and the room that it supplies.
It should roughly look like this:
- 1 – stove-heater;
- 2 – steam room;
- 3 – washing;
- 4 – locker room;
- 5 – swimming pool;
- 6 – rest room.
Also on the panel door there should be a diagram of the electrical wiring in the bathhouse.
In addition to the automatic circuit breakers, residual current devices (RCDs) must be installed in the distribution panel. If the electrical consumer comes into contact with water, they will operate and turn off the power.
Advice from professionals
We recommend paying attention to the following points:
- A common mistake is installing a non-built-in regulator for the electric heater in the steam room. This can be corrected by installing a limiter that will automatically disconnect the equipment from the network when it reaches 140 degrees.
- In the steam room and shower there should not be any connections consisting of several pieces of cables twisted together. Any violation in the insulation is a risk of a sudden short circuit in the wiring and fire.
- To save money, owners often lay the cable directly above the stove. This is prohibited by fire safety regulations. No matter how heat-resistant the cable turns out to be, there is always a risk of deformation and fire if there is constant exposure to high temperatures.
- When there are many machines, it is unsafe. Many masters assure owners that the more machines installed in the bathhouse for each equipment, the lower the risk of network overload. But practice shows the opposite. The slightest poor-quality connection will cause a short circuit - it is enough to secure one circuit breaker at the input, which will turn off the power if the permissible load is exceeded.
Laying an electrical cable is a critical stage in the construction of a bathhouse. An attempt to undertake installation without knowledge and experience threatens with dire consequences, including a fire. There is no need to skimp on material here. For advice and permission, it is better to immediately contact the responsible service. You should entrust the installation work to electricians or do it yourself, but under their guidance.
Useful video
A very visual and practical video that talks specifically about bathhouse electrification - we hope that it will be useful to many:
*** Just in case, if you are interested in manual labor , we will recommend you another material indirectly related to electricity in the bathhouse - an article about what types of lampshades for bath lamps there are and how to make them with your own hands.
For more materials on wiring, see the sections on lighting and lamps.