A building of any operational nature (office, industrial or residential) can receive a lightning-fast electrical discharge. The consequences of both a direct hit of a discharge and a pulsed impact on a structure are extremely unfavorable. Installation of lightning protection will protect the building from the consequences of such threats.
An additional method of protection, which guarantees the diversion of a lightning strike from the roof of a building into a lightning rod, is grounding the roof of a private house.
Installation and recommendations
The procedure for doing external protection work with your own hands includes the following fairly simple steps:
- installation of a metal lightning rod;
- installation of a down conductor made of round metal wire;
- grounding installation;
- connection of all structural elements into one, unified system.
Let's take a closer look at the stages of work:
- The lightning rod is made of a metal pin with a diameter equal to or more than 18 mm and a length of 30-300 cm. It is secured using special fasteners - tripods, by welding or other fasteners;
- A down conductor made of wire with a diameter of at least 6 mm is laid along the back of the building, and it is desirable to have a single piece without joints or connections. To protect against corrosion, down conductors can be painted or galvanized wire, which does not corrode, can be used;
- It is also allowed to use metal water pipes and underground metal structures as a grounding loop. In the absence of natural grounding conductors, it is necessary to use electrode pins that are driven into the ground. The cross-section of such electrodes must be greater than or equal to 50 mm 2; when using pipes, their wall thickness must exceed 4 mm;
- The grounding loop must have several electrodes connected to each other by a metal strip or corner. Usually they make a triangle with sides of about 2 m and electrodes about 2.5 m long and place the circuit no closer than 1.5 m from the foundation of the house;
- In dry soil, electrodes do not transmit current well, so the circuit is made in a damp place or the soil moisture is artificially maintained by directing runoff from the roof to the grounding installation site. Sometimes, for better soil conductivity, several depressions are made at the location where the circuit is installed, into which salt or nitrate is poured;
- To protect against corrosion, galvanized or copper electrodes are used; it is prohibited to coat or paint metal grounding rods with bitumen. According to standards, the resistance of the ground loop should not be more than 10 Ohms;
- It is not recommended to be within 5 m of grounding during a thunderstorm to avoid being exposed to dangerous voltage;
- All elements are connected to each other by welding. As an alternative to welding, bolted connections can be used, but in this case it is necessary to monitor the condition of the bolts from time to time.
It is not at all difficult to protect your metal roof, as well as the entire building, from lightning; you just need to follow all safety rules and requirements for the installation of individual elements.
Common mistakes when installing grounding
Errors during grounding installation can lead to catastrophic consequences, so you should not neglect the recommendations of specialized sources and, especially, “reinvent the wheel.” Below are the most common mistakes:
- Connecting the grounding tap to the building fittings. No one knows how the building reinforcement contacts the ground, to what depth the ground electrodes are laid and, most importantly, whether there is no contact between the reinforcement and internal elements in the premises.
- Use as grounding for water supply or sewerage systems. Firstly, the water supply or sewerage pipe is filled with water and has access to the room; secondly, the pipeline may be corroded by corrosion in any part of it or have a non-conductive insert (plastic, ceramic or asbestos-cement pipe).
- Coating of grounding electrodes with paint to protect against corrosion. Very often, in order to prevent destruction of grounding electrodes, they are painted along their entire length, thereby covering them with an insulating layer. Only those parts of the electrodes that are located at ground level and have welded joints need to be painted.
- Making a ground electrode from sheet metal. Sheet metal, despite its advantages (large contact area), tends to deform; therefore, voids can form under it, which negate the advantages. In addition, the sheet material is highly susceptible to corrosion and every year the efficiency of grounding tends to zero. This type of grounding was common in the days of the first radio receivers, when in addition to the antenna, grounding was also required for their operation. The grounding currents there are negligible.
- Making connections of grounding elements with aluminum wire. Aluminum wire is used due to its lightness and flexibility. This is where its advantages end. Among all conductive materials used in electrical energy applications, it has the lowest strength and melting point.
- Use as a lightning discharge receiver and a current conductor for metal roof elements. Since the sheets of metal tiles do not have reliable electrical contact with each other, the current passing through the joints will cause their local heating up to the point of melting the metal and igniting the load-bearing structures.
Installation of metal tiles
Actually, you can begin installing sheets of metal tiles immediately after installing the sheathing, leaving insulation and vapor barrier “for later.”
The cornice strip is nailed down first. It is attached along the roof overhang. Then, if there are valleys, special elements (lower valleys) are installed in them.
Several options for laying out metal tile sheets
The installation scheme depends on the height of the roof slope and sheet. If the roof is gable and the entire surface is covered with one sheet, installation will be extremely simple. It will be necessary to place and nail several whole sheets or those cut at the top one after another, and then close the ends and the ridge. In this case, one sheet overlaps the other by 60-85 mm, depending on the profile.
If one sheet is missing, make two rows. The top row overlaps the bottom row by 100-120 mm (also depends on the profile of the metal tile). When installing overlapping sheets, they are first secured at the joint with one nail (screw) into the ridge (protrusion), then aligned and then finally secured. First along the edge, then in the middle of the sheet.
Every 1m2 of roofing should be secured in 6-8 places. But you need to attach it not to the ridge, as at the junction, but to the bottom of the wall
During installation, use special fasteners
us. Special screws or nails with caps painted to match the roof are used as fasteners. If the coating of the caps is damaged, the fasteners cannot be used, except to paint them. A gasket is placed under each nail or screw to seal the joint. The service life of the roof depends on the quality of the gaskets: as soon as they lose elasticity, water gets into the joint and corrosion begins.
It is recommended to start installation on the right. The order of the sheets may be different:
- first along the overhang, then in the second row;
- first along the ridge, then lower, slipping the sheet under the one laid above;
- in a checkerboard pattern.
The order of installation is not important
Correct fastening is important. It is necessary to ensure that the sheet and cornice are perpendicular and do not allow deviations
Then the bottom and top edges will be even. If a misalignment (teeth) has formed somewhere, it means that two sheets are positioned incorrectly somewhere - their locks do not fit together. The result will be water flowing into the cracks.
To eliminate the defect, carefully remove the fasteners and remove the sheets. It is advisable to use new ones for installation, but if this is too expensive, all holes should be painted over. Then set the sheets again and align them. If possible, attach to existing holes. Some will not match exactly, which is why they were previously protected with paint.
The very last stage is the installation of shaped elements: on the ridge and sides of the roof. They are sold ready-made and are chosen to match the roof. Installed on top of sheets with an overhang of 100 mm for inclined surfaces and 200 mm for horizontal ones.
https://youtube.com/watch?v=Cp5O0W3ADSo
The essence of a lightning rod is lightning protection
The essence of the lightning rod's operation is as follows.
During a thunderstorm, a discharge occurs between electrified thunderclouds and the ground, like between the plates of a capacitor.
This discharge is very powerful, the voltage reaches billions of volts.
But the lightning rod is not a conductor of electric current in this situation; it does not absorb the lightning and divert it.
This is possible only according to one principle: a large natural capacitor does not accumulate charge on the plates, it is constantly in the charging stage.
Therefore, the voltage at the lightning rod is zero.
The result of the above: a lightning rod is not a conductor and a barrier against lightning; with a lightning rod, lightning cannot occur. Everything is exactly like this, under one condition, if the lightning rod is installed correctly.
One can cite a large number of cases where high lightning rods in the form of masts “caught” lightning.
Electric current is the movement of the electrodes, namely movement. And, as we know from physics, any movement follows the path of least resistance, be it electricity, water or gas.
What is an ungrounded lightning rod? It's just a piece of wire suspended in the air. And this is enough for lightning to pass through it. Now you understand that grounding in a lightning rod is considered the main element.
Sequence of work
Diagram of a pitched roof without insulation.
To install the waterproof membrane, you must remember that its installation is carried out with some sagging, approximately 20 mm. This device allows condensation to drain, that is, the rafters and other roof elements are protected from moisture. In order for water to effectively evaporate and not stagnate, creating an unfavorable atmosphere, it is necessary to ensure the presence of a ventilation gap, which is made between the waterproofing film and the roof ridge.
This gap allows air to circulate unhindered in the under-roof space, removing all traces of condensation. The membrane itself to protect the roof should not have ruptures or other defects; it should be secured using a construction stapler.
Among the features that distinguish a cold roof, it should be noted that it can be constructed for any climatic region. Many people mistakenly believe that this type of roof is completely unsuitable for the northern region, but this is not the case. This is where a cold attic is a traditional solution for a residential building. The attic floor itself is insulated, that is, the use of a cold roof does not in any way affect the internal microclimate of the upper floors. The attic itself may not even be used, since installing a layer of insulation between the upper floor and the under-roof space solves all problems regarding heat loss.
Diagram of a standing seam roof.
When constructing a cold roof, one should not forget about such a stage of work as proper insulation of technological openings and exits. To do this, all ventilation shafts, chimneys, and entrances to the roof surface must be thermally insulated. This will avoid such troubles as icing, condensation, precipitation, and heat loss.
To cover a roof of this design, a wide variety of roofing materials can be used. Most often this is metal tiles, the installation of which does not pose any problems. This option is considered optimal, since all installation work is completed in the shortest possible time, no additional work is required. You can use other materials for coating, for example, flexible tiles. But here a number of technological difficulties already arise that can make installation more expensive and complex. Therefore, the use of metal profiled sheet in this case is preferable.
Components of protection
Lightning rod
The main task is to choose the right lightning rod, which should provide complete protection of the country house in its coverage area. Today, a pin, mesh, cable, or the roof itself can act as a lightning receiver. Let's take a closer look at the features of using each option in a private home.
As for the pin, there are ready-made products from manufacturers that have a suitable shape and convenient fastening. As a rule, the metal used to make the lightning rod is copper, aluminum or steel. The most suitable and effective is the first option. In order for the receiver to cope well with its task, its cross-section must be at least 35 mm2 (if copper) or 70 mm2 (steel rod). As for the length of the rod, in domestic conditions it is recommended to use receivers with a length of 0.5 to 2 meters. The pins are convenient to use to make a lightning rod on a garden house, bathhouse or other small building.
Metal mesh can also be sold ready-made. As a rule, a mesh lightning rod is a cellular frame made of reinforcement, 6 mm thick. The cell size can range from 3 to 12 meters. Most often, this lightning protection option is used in apartment buildings and large buildings, for example, shopping class=”aligncenter” width=”732″ height=”505″[/img]
The cable is more practical at home and does the job better than the mesh. To make a lightning rod in a private house using a cable, you need to stretch it along the roof (along the ridge) on wooden blocks, as shown in the photo below. The minimum diameter of the cable for lightning protection of a building must be 5 mm. As a rule, this option is used if you want to make a lightning rod on a house with a slate roof with your own hands.
Well, the last option - the roof as a receiver, can be used if the roof of a residential building is covered with corrugated sheets, metal tiles or other metal roofing material. With this type of lightning rod, two important requirements are imposed on the roof. Firstly, the thickness of the metal must be at least 0.4 mm. Secondly, there should be no flammable materials under the roof. You can make a lightning rod in a private house with a metal roof much faster and at the same time save on the purchase of special lightning rods.
Please note that if you use a mesh, it must be installed at a height of at least 15 cm above the roof itself!
Down conductor
A 6-mm wire made of copper, steel or aluminum is used as a down conductor for a private home. The wire must be connected to the lightning rod and the grounding system by bolts or welding
The only, but very important requirement for a down conductor is that it must be isolated from the environment and pass to the ground along the shortest path. As for insulation, in dachas and country houses the use of ordinary cable ducts is popular, which are also used if you need to make open wiring in the house with your own hands
Ground electrode
Well, the last element of the lightning rod is the grounding circuit. In order not to make the material too voluminous, we have dedicated a separate article to this issue - how to make grounding in a private house. We recommend that you read the information so that you know all the intricacies of this stage.
In short, we can say that the grounding loop should be located next to the house, but not in the walking part of the site, but, on the contrary, closer to the fence. The charge is discharged to the ground by metal rods buried in the soil to a depth of 0.8 meters. It is better to place all the rods according to the triangle pattern, which is exactly what is shown in the photo:
So, we have become familiar with the constituent elements of lightning protection on the roof, now we will look at how to properly make a lightning rod with your own hands.
Reliable lightning rod at the dacha - video tutorial on how to create
Active and passive lightning rods
Installation of an external lightning protection system begins with the installation of a metal lightning rod at a height of 2 m above the highest point of the roof. Depending on the type and design of the building, 1 or several lightning rods are installed, and they can be of either active or passive type.
Active lightning rods are the same passive metal element that is connected to a special device that has the following operating principle:
- during a thunderstorm, tension increases in the air, when tension reaches a certain level the device is triggered;
- the device makes a spark discharge towards the lightning;
- a channel of ionized air is formed;
- the device will attract and discharge lightning in each case when lightning approaches the protected house.
Such active protection does not spoil the appearance of a metal roof at all, but is still little used in our country.
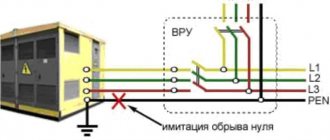
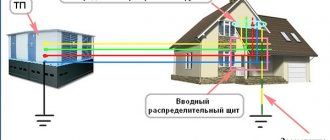
What is grounding
This is a complex consisting of metal structures and conductors, which ensures electrical contact of the electrical installation housing with the physical ground, that is, with the ground. The system begins with a ground electrode: a metal electrode grounded into the ground. These elements cannot be single; for reliability, they are combined into a grounding loop.
How it works
The external ground loop (which is located directly in the ground) is connected using a reliable conductor to the internal loop in the room, or to the grounding panel. Next, using an internal network of protective conductors, a connection is made to the housings of electrical installations and to the grounding contacts on switching devices (distribution boards, boxes, sockets, etc.).
Devices that generate electricity also have a grounding system to which the zero bus is connected. If an emergency occurs (a phase is connected to the electrical installation body), an electrical circuit arises between the phase conductor and the neutral bus along the ground line. The current strength in the emergency circuit spontaneously increases, the residual current device (circuit breaker) trips or the fuse insert burns out.
- the power cable does not ignite (fire hazard);
- The possibility of electric shock when touching the emergency housing of the electrical installation is prevented.
The resistance of the human body is tens of times higher than the grounding resistance. Therefore, the current strength (if there is a phase on the electrical installation body) will not reach a life-threatening value.
Grounding the roof of a house
Metal roofing attracts with its high strength, appearance and durability. But such coatings are subject to a high probability of lightning damage during a thunderstorm. Therefore, the installation of lightning protection, which ensures the safety of the house and the people living in it, must be carried out immediately upon completion of the roof installation
It is recommended to ground the roof, regardless of what materials it is installed from; grounding of a metal roof is especially important
Damaging factors of lightning
Lightning damage can be:
- primary, causing destruction and fires if it hits a building directly. Metal roofing is not subject to combustion, but it is mounted on a wooden sheathing and a lining waterproofing layer (roofing felt, roofing felt). These flammable materials lead to fire. When lightning strikes the coating metal, the enormous temperature of the discharge burns and melts the metal, which leads to the fire of the wood and the lining layer;
- secondary, the result of induced potential caused by nearby lightning discharges. When lightning strikes the utility metal communications of a house (gas and water supply pipes, electrical wires, etc.), sparking occurs, resulting in possible fires, injuries to residents, damage to radio and television equipment, and household electrical appliances.
Lightning is characterized by a complex trajectory of movement. Only a third of them go to the ground from the cloud along the shortest path, sometimes their shape looks like the roots of a giant plant. Lightning is often observed arriving from the side, with its origin a few kilometers from the house. This circumstance must be taken into account when installing grounding and lightning rods.
Is it necessary to ground a metal roof?
Grounding is absolutely necessary, all professionals agree on this. But lightning protection may not always be carried out. For example, when objects that dominate in height (buildings, main power line supports, water towers, tall trees) are located next to a building, protective devices can only increase the likelihood of being struck by lightning.
The installation of an external lightning rod in a dense residential area will cause complaints from the fire inspectorate. When building houses in open areas, lightning protection is indispensable. In this case, it is recommended to install separate lightning rods near the house.
Lightning protection device
Lightning protection is carried out mechanical (passive) or physical (active). The latter consists of a device that sends a discharge of electricity towards the lightning, taking the entire strike upon itself. This method is rarely used in our country. The reasons are the high cost of the devices and little knowledge of the results of use.
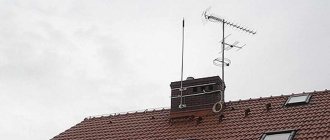
An lightning rod that receives a lightning discharge. There are:
- rod ones, installed on the roof in the highest places (ridge, chimneys, antenna masts) or on tall trees located near the house or on a specially constructed mast. On the roof, it is recommended to install one round rod 12 mm in diameter and 1.5 m long in opposite corners. There is a misconception that when grounding a metal tile roof, it itself is a current collector, but one must take into account the fact that metal thinner than 4 mm is easily burned through lightning;
- cable, consisting of a metal cable attached to low supports and stretched along the ridge (used mainly on non-metal roofs (slate, wood, bitumen roofing materials);
- made of metal mesh, an expensive option and disrupts the aesthetic appearance of the roof.
A down conductor made of smooth 6 mm or larger reinforcement rods, laid along the wall opposite the entrance to the house, through which the current will flow to the current collector. It is better to use galvanized wire, copper or aluminum, since ordinary steel is susceptible to corrosion.
A grounding loop installed at a distance of more than 1 m from the house and no closer than 5 m from pedestrian paths. There should be no buildings or playgrounds nearby. The circuit consists of several 50 50 corners driven into the ground or sections of pipes or sections of pipes connected by a plate to each other by welding or bolts. Electrodes must not be painted or coated with bitumen. The length of the rods depends on the type and moisture content of the soil and can be up to 3 m.
Metal pipelines with non-flammable liquids (water supply, well casing, lead cable sheath) can be used as natural grounding.
It is recommended to connect all elements using welding.
Lightning protection is an important task with the need to fulfill the parameters of each element, so it is recommended to involve specialists with experience in such work.
What are the dangers of not being grounded?
The consequences of a disaster can be very diverse: failure of electrical appliances and electric shock to people in the house. In addition, lightning striking the roof can cause a fire. Proper grounding of the roof of the house will help to avoid all of the above.
A popular bookmaker has released an application, officially you can click on the link without registration and absolutely free.
First of all, houses whose roofs are made of metal and lightweight rolled materials are at risk. Such roofs must be grounded at the construction stage, before the house is put into operation. This is due to the following reasons:
- the metal roof of a house can attract electricity;
- soft roofing can catch fire when hit by a random spark.
Thus, it is necessary to install a lightning rod in any building, especially if it is built of wood. But before you begin work, you need to carefully study all the nuances of grounding installation. This is due to the fact that grounding installation must be carried out taking into account many factors, for example, roofing material.
You need to know this from the very beginning
Particular attention when assembling the roofing pie is paid to two points: the correct location of the waterproofing and ventilation gaps
Many owners try to save on materials by purchasing cheaper mineral insulation, ecowool or glass wool instead of waterproof foam. With this choice, the costs will indeed be significantly lower. But then it is the thermal insulation that will become the most vulnerable point in the entire structure. After all, these materials are highly susceptible to the harmful effects of moisture. By “destructive” we mean the loss of its heat-saving properties up to 80%. Therefore, it is strongly recommended not to skimp on at least waterproofing.
However, not a single roof of a private house can be completely protected from moisture penetration into the roofing layers. For such cases, gaps are provided between the thermal insulation and the upper level of the cake, the dimensions of which are usually 30-40 mm. The air flow should go from the roof overhang to the ridge.
Slightly shorter gaps (10-15 mm) should also be present between the tiles and the waterproofing.
Is lightning protection necessary for a metal roof?
For more than a century, metal has been most often used to cover the roofs of residential buildings. These include traditional seam roofs made of sheet steel and copper, and roofs made of metal tiles or corrugated sheets.
Although the metal roofing itself does not burn, in most cases it is installed over wood sheathing and flammable insulation coatings. They are usually the source of ignition, since when lightning strikes, melts and burns occur in the metal covering of the roof, caused by the enormous temperature of the lightning discharge. Therefore, as soon as people understood the nature of lightning, they began to install lightning rods on tall buildings in order to protect them from the strikes of the elements.
Lightning protection of an individual residential building with a metal roof
The first lightning rods were metal rods raised high on special masts, which attracted lightning discharges during a severe thunderstorm. That is why lightning protection of a metal roof with a lightning rod immediately turns your home into the target of a possible attack, endangering not only you, but also your neighbors.
When deciding on the need for lightning protection, you must first study the height of the surrounding buildings. If there are dominant objects near you, such as tall buildings, water towers or main power line supports, it is better not to rush into installing a lightning rod.
In this case, it is better to ground the metal roof. To do this, the metal sheets of the roofing are securely connected to each other and to all metal structures located on the roof and connect them to the grounding network.
Metal roof grounding diagram
Electricians call this a potential equalization system. During a thunderstorm (with close lightning strikes), huge overvoltages arise in the electrified air, which can lead to electrical discharges between various parts of the roof. Grounding the iron roof will protect the building from the occurrence of step voltages inside the house with a large potential difference.
Roofing pie for metal tiles
The design of the roof depends on what functions will be assigned to it. If you need to cover a garage, workshop or some kind of outbuilding, then use a minimum set of elements, and such a roof is called cold. When a building requires high-quality insulation and noise protection (for example, if it is a residential building), the structure is supplemented with several layers of thermal insulation and accompanying materials. Moreover, it can include up to 10 layers, and such a roofing cake is called warm.
A complete roofing pie allows you to insulate the attic space in order to later use it as a living room
Cold roofing is often used in the construction of residential buildings, especially in the southern regions. In this case, the attic floor is insulated. As a rule, this is enough to ensure comfortable living in the winter. Nevertheless, it is not recommended to make a cold metal roof for a country house - this is due to the loud sound that steel sheets make during rain or hail.
For a cold roof
If you do not take into account the supporting structures of the rafter system, then the composition of the roofing pie on a cold metal roof includes only sheets of the material itself, a waterproofing film and battens and counter-battens
When installing a cold roof, it is important to ensure thermal insulation of the floors, because the attic space will be exposed to low temperatures in winter
For preliminary fastening of waterproofing panels, use a construction stapler or small nails. In this case, the film should not be stretched; on the contrary, it is necessary to achieve a sagging of at least 20–25 mm. Thanks to this, there will be a gap between the waterproofing and the metal tiles necessary for ventilation of the under-roof space and timely removal of condensate. The final pressing and fixation of the film is carried out using counter-batten slats, which are laid along the rafter legs and nailed or screwed with self-tapping screws. After this, the sheathing is laid across the counter beam, and sheets of roofing material are attached to it.
For an insulated roof
The structure of the roofing pie for a warm roof is distinguished by the presence of layers, which make it possible to provide a comfortable environment in the attic at any time of the year. Otherwise, the structure contains the same elements as during the construction of a cold roof.
When arranging the roofing pie of a warm roof, it is important to ensure good ventilation, otherwise moisture will contribute to damage to the thermal insulation and wooden frame elements
The structure of a warm roofing pie in the direction from the attic to the outside of the room looks like this:
- vapor barrier membrane, which prevents steam from penetrating into the insulation and at the same time allows moisture to be removed from the thermal insulation;
- one or more layers of thermal insulation located in the spaces between the rafters or on top of the counter battens;
- waterproofing film - unlike the method described above, it is installed with a sag of up to 50 mm. In addition, the same distance must be left between the film and the insulation - this will allow for normal ventilation. If membrane materials are used, then the gap to waterproofing can be reduced to a minimum;
- counter beam, which is attached in exactly the same way as in the case of a cold roof;
- sheathing slats - they are installed in increments of 35–40 cm;
- sheets of metal tiles.
Various slab and roll materials can be used as thermal insulation - basalt or mineral wool, glass wool, slabs of extruded polystyrene foam, etc. For lathing and counter lathing, pine beams with a cross section of 50x50 mm are best suited.
What does grounding consist of?
- External ground loop. It is located outside the premises, directly in the ground. It is a spatial structure of electrodes (grounding conductors) connected to each other by an inseparable conductor.
- Internal ground loop. A conductive bus located inside a building. Covers the perimeter of each room. All electrical installations are connected to this device. Instead of an internal circuit, a grounding shield can be installed.
- Grounding conductors. Connecting lines designed to connect electrical installations directly to the ground electrode, or internal ground loop.
Take a closer look at these components.
External or outer contour
The installation of the ground loop depends on external conditions. Before starting the calculation and completing the design drawing, you need to know the parameters of the soil in which the ground electrodes will be installed. If you have built a house yourself, these characteristics are known. Otherwise, it is better to call surveyors to obtain an opinion on the soil.
What types of soils are there, and how do they affect the quality of grounding? Approximate resistivity of each soil type. The lower it is, the better the conductivity.
- Plastic clay, peat = 20–30 Ωm m
- Plastic loam, ash soils, ash, classic garden soil = 30–40 Ohm m
- Chernozem, shales, semi-hard clay = 50–60 Ohm m
This is the best environment to install an external ground loop. The current flow resistance will be quite low even with low moisture content. And in these soils the natural humidity is usually above average.
Semi-solid loam, mixture of clay and sand, wet sandy loam - 100–150 Ohm m
The resistance is slightly higher, but at normal humidity the grounding parameters will not exceed the standards. If there is prolonged dry weather in the installation region, it is necessary to take measures to forcibly moisten the installation sites of ground electrodes.
Clay gravel, sandy loam, wet (constant) sand = 300–500 Ohm m
Gravel, rock, dry sand - even with high general humidity, grounding in such soil will be ineffective. To comply with standards, deep grounding will have to be installed.
Many facility owners, saving on matches, simply do not understand why a grounding loop is needed. Its task, when connecting a phase to the ground, is to ensure the maximum value of the short circuit current. Only in this case will the protective shutdown devices operate quickly. This cannot be achieved if the current flow resistance is high.
Having decided on the soil, you can choose the type, and most importantly, the size of the ground electrodes. Preliminary calculation of parameters can be performed using the formula:
The calculation is given for vertically installed grounding conductors.
Decoding the formula values:
- R0 is the resistance of one ground electrode (electrode) obtained after calculation in ohms.
- Rekv - soil resistivity, see information above.
- L is the total length of each electrode in the circuit.
- d is the diameter of the electrode (if the cross-section is circular).
- T is the calculated distance from the center of the electrode to the surface of the earth.
By setting known data, as well as changing the ratio of values, you should achieve a value for one electrode of the order of 30 Ohms.
If the installation of vertical grounding electrodes is not possible (due to the quality of the soil), the resistance value of horizontal grounding electrodes can be calculated.
Therefore, it is better to spend more time driving vertical rods than to monitor the barometer and air humidity.
And yet we present the formula for calculating horizontal grounding conductors.
Accordingly, decoding of additional quantities:
- Rв is the resistance of one ground electrode (electrode) obtained after calculation in ohms.
- b - width of the electrode - grounding conductor.
- ψ is a coefficient depending on the weather season. The data can be taken in the table:
ɳG is the so-called demand coefficient for horizontally located electrodes. Without going into details, we get the numbers from the table in the illustration:
Preliminary calculation of resistance is necessary not only for proper planning of material purchases: although it will be a shame if you don’t have enough electrode to complete the work, and the store is several tens of kilometers away. A more or less neatly drawn up plan, calculations and drawings will be useful for resolving bureaucratic issues: when signing documents on acceptance of an object, or drawing up technical specifications with an energy sales company.
Of course, no engineer will sign papers only on the basis of even beautifully executed drawings. Spread resistance measurements will be taken.
Next, we will talk about how to achieve the correct characteristics of the external ground loop.
Design of security elements and their purpose
To climb to the roof, you need a stable ladder. It consists of wall and roof ladders with brackets. 4 brackets are required per section; they are placed in the place of the lower wave bend, where the sheathing is solid. Both the brackets and the top of the roof ladder are secured with bolt screws. The wall staircase is installed so that the topmost step is opposite the edge of the cornice. In this case, the wall staircase itself must be aligned with the roof staircase.
Roof fencing
These metal elements are a necessary condition when working on the roof. They are secured using special supports to the continuous sheathing through the lower part of the wave, sealing with a rubber gasket. See photo above.
Transition bridge
Walking bridges are needed for safe walking on the roof from an attic window, hatch or staircase. They are fastened in the same way as fences, only continuous sheathing is not necessary.
Snow guards
Snow guards have a tubular design and are made of metal painted black, brown, red or green. They are installed along the entire perimeter of the roof, above the eaves overhang. In addition, they must be placed above the entrance to the house, attic windows, as well as above each level of a multi-tiered roof.
How to do it right
First, let's look at the shape of the ground electrode. The most popular is in the form of an equilateral triangle with pins hammered into the vertices. There is also a linear arrangement (the same three pieces, only in a line) and in the form of a contour - the pins are driven around the house in increments of about 1 meter (for houses with an area of more than 100 sq. m). The pins are connected to each other by metal strips - metal bonding.
The most popular ground electrode model
Procedure
From the edge of the blind area of the house to the installation site of the pin there must be at least 1.5 meters. In the selected area, they dig a trench in the form of an equilateral triangle with a side of 3 m. The depth of the trench is 70 cm, the width is 50-60 cm - so that it is convenient to cook. One of the peaks, usually located closer to the house, is connected to the house by a trench with a depth of at least 50 cm.
Digging a trench
At the vertices of the triangle, pins are hammered (a round rod or corner 3 m long). Leave about 10 cm above the bottom of the pit
Please note that the ground electrode is not brought to the surface of the earth. It is located 50-60 cm below ground level
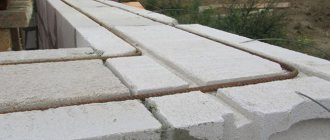
A metal bond is welded to the protruding parts of the rods/corners - a strip of 40 * 4 mm. The created ground electrode is connected to the house with a metal strip (40*4 mm) or a round conductor (cross-section 10-16 mm2). The strip with the created metal triangle is also welded. When everything is ready, the welding areas are cleaned of slag and coated with an anti-corrosion compound (not paint).
Welded strip
After checking the grounding resistance (in general, it should not exceed 4 Ohms), the trenches are covered with earth. There should be no large stones or construction debris in the ground; the earth is compacted layer by layer.
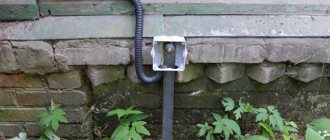
At the entrance to the house, a bolt is welded to the metal strip from the ground electrode, to which a copper conductor in insulation is attached (traditionally the color of the ground wires is yellow with a green stripe) with a core cross-section of at least 4 mm2.
Grounding outlet near the wall of the house with a bolt welded at the end
In the electrical panel, the grounding is connected to a special bus. Moreover, only on a special platform, polished to a shine and lubricated with grease. From this bus, the “ground” is connected to each line that is distributed throughout the house. Moreover, wiring the “ground” with a separate conductor according to the PUE is unacceptable - only as part of a common cable. This means that if you have two-wire wiring, you will have to completely change it.
Why you can’t make separate groundings
Rewiring the entire house is, of course, time-consuming and expensive, but if you want to operate modern electrical appliances and household appliances without problems, it is necessary. Separately grounding certain outlets is ineffective and even dangerous. And that's why. The presence of two or more such devices sooner or later leads to the output of the equipment plugged into these sockets. The thing is that the resistance of the circuits depends on the condition of the soil in each specific place. In some situation, a potential difference occurs between two grounding devices, which leads to equipment failure or electrical injury.
Characteristics of metal roofing
- The thickness of the metal base (0.4-0.5 mm) affects the strength of the metal tile, but at the same time the weight of the entire roof.
- Protective layer materials may have different resistance to aggressive influences, which is reflected in the cost of metal tiles.
- Sheet length. The longer length simplifies the installation of roofing material and reduces the risk of leakage, but increases the possibility of longitudinal deformations.
- Wave height. Greater height strengthens the metal tiles, but gives less usable width, since galvanized sheets of the same length are used for all types of tiles.
Lightning protection on soft roofs
Lightning striking a building causes destruction, sometimes irreversible. Buildings in open countryside are especially at risk. Properly designed and installed lightning protection on a soft roof will reliably protect the house from the elements. Requirements for the system, as well as recommendations for the device, are described in instructions RD 34.21.122-87.
Features of lightning protection
There are active and passive lightning protection. The systems are similar in design - lightning rod, down conductor, grounding - but have a fundamental difference in operation. Active technology works proactively, provoking and receiving lightning, and protects a certain radius around itself. A lightning rod with an ion generator is used, which attracts the discharge.
Metal rods, cable or mesh are used as lightning rods for passive protection. The system does not attract, but reflects and neutralizes strikes that fall within the lightning protection coverage area. The correct choice of technology depends on the characteristics and shape of the roof, the landscape of the area and the climatic conditions in the region.
Metal roofing
Installing lightning rods is the best way to protect metal roofs. An active system is appropriate if it is necessary to protect a large area: installing one neat lightning rod is preferable to a dozen metal rods. A metal roof can also be a conductor: if the sheathing is made of non-combustible materials and a lightning strike will not cause a fire. In this option, the down conductor is connected directly to the roof surface.
Roof tiles
Clay or asphalt shingles are excellent insulators. A reliable method of protection is the installation of a lightning protection metal mesh. For gable roofs, two grids are laid, which are connected to different down conductors.
Soft roof
Of the passive methods, lightning protection mesh is acceptable. However, installation may damage the roofing material. Installation of active lightning protection consists of installing a single lightning rod: a minimum of movements on the roof. This is why the active system is more suitable for soft roofs.
Active lightning protection system on soft roofing
Operating principle
A leading discharge is created, which provokes a lightning strike. The intercepted current is diverted into the grounding system and neutralized. Depending on the model, the radius of the protected area ranges from 17 to 44 meters. Professional systems are equipped with a lightning strike counter, a protective casing and an inspection unit.
Benefits of active technology
- quick and simple installation;
- increased protection zone;
- installation without the risk of damaging the soft roof;
- installation does not depend on surface features;
- minimum components.
Installation features
Lightning rod masts are installed on the roof. The quantity depends on the estimated area for which protection is being organized, as well as on the shape of the roof. The lightning rod must rise at least 2 meters from the highest point of the building. In order not to damage the roof, installation is carried out on brackets to the chimney or other similar structure on the roof.
For each receiver, a separate down conductor is installed, which is mounted along the drain on special holders. An aluminum rod with a diameter of 8 mm is used as a current conductor, which must be grounded. Metal structures within the radius of the protective field must be connected to each other.
Passive lightning protection
Types of lightning rods
- Metal pin. Installed at the intersection of slopes.
- Cable lightning protection. A steel cable is attached along the ridge.
- Lightning protection mesh. A steel mesh is installed over the entire surface, which must be protected from lightning.
Any lightning rod is connected to a down conductor, which must be properly grounded. When hitting the protection, the discharge is directed to the ground and dissipates.
Lightning protection device
It is convenient to carry out installation before installing a soft roof covering - in this case, the risk of damage to the waterproofing is eliminated. The mesh is placed on pre-prepared holders. A steel wire rod with a cross section of 6 mm is used, pre-aligned with a special tool. The optimal mesh pitch is 6x6 m, but an increase to 12x12 m is allowed. The wire is supplied as a solid coil in a coil or in separate rods of 3-6 meters. Fastening the rods is faster, but expensive clamps are used for connections. It is more advisable to use a coil, however, the risk of causing damage to the surface increases. Lightning protection can be installed under non-flammable thermal insulation material or directly on the roof.
Grounding a soft roof
Soft roofing materials have also gained popularity as a finishing coating for the roof of a house.
They are lightweight and easy to install, have a long service life, do not load the rafter system, and have a modern appearance. But they also require protection, just like metal models.
On a soft roof, grounding is carried out using a mesh, which is placed over the entire area of the roof slopes of the building.
The protective coating is made of steel wire with a conductor cross-section of 6 mm. It is placed on special mounts on top of the cladding with a cell pitch of 6 by 6 m or 12 by 12 m. The size depends on the class and dimensions of the building.
Grounding a soft roof
The grid is connected to the grounding device using a down conductor running along the facade of the building. Typically, work on installing the grounding system is carried out together with laying the roofing.
On a finished roof, such actions can cause a number of difficulties, and the biggest nuisance will be a violation of the integrity of the cladding. Steel wire for grounding is produced in rolls, and it must be straightened and rolled directly onto the slopes.
You can use products in rods, but their length is limited and ranges from 3 to 6 m. If the roof of the house is much larger, this will require the use of additional connecting elements, which will increase the cost of the entire system. In addition, he will have to walk a lot on the surface, and this will not do him any good.
Down conductor
Of the classic options, installation is allowed:
- cable devices along the roof ridge;
- one or more pin lightning rods.
But all these options, one way or another, are also associated with the need to perform many actions on the roof itself, and, therefore, increase the chances of damage to the delicate cladding.
A new type of protection includes the installation of an active lightning protection system on the roof of buildings under a soft roof. It is different:
- increased operational reliability;
- ease of assembly;
- the ability to carry out installation work on an already in use roof with minimal walking on it;
- aesthetic compatibility with roof details.
Active lightning protection can also be located at some distance from the building in order to minimize the potential difference and step voltage.
Installation of grounding of a house with roofing roof
You can install the system yourself, but it is still better to entrust such work as protecting a building from electric current to specialists.
They will make calculations, select the necessary model and correctly install the product in the place where its work will be most effective.
It is worth remembering that active lightning protection that does not work correctly due to improper installation will not only not save the building, but can also become a direct cause of trouble, since during a thunderstorm it is a good bait for all lightning in the area.
Was the article helpful? Rate and share it on social media. networks:
Types of lightning rods for a private house
Do-it-yourself lightning protection in a private house should consist of metal conductors. They are installed on the roof of the house to receive a lightning charge. The conductor should be installed at the highest point of the building. If the house has an unusual and complex structure, then several receivers should be installed. An air terminal for a private house can have several types of design. Here are the main types of structures:
- Metal pin to protect a private home. Its length should be from 20 cm to 1.5 meters. It can be installed both on the chimney and on the ridge of the roof. The pin must be made of galvanized steel or copper. The cross-sectional area of this lightning rod should be about 100 square meters. meters. This method of protecting a home from lightning strikes is suitable for any type of roof.
- Cable for a private house. It must be tensioned on two wooden supports, which have a height of 1 to 2 meters. To make the structure reliable, metal supports can be used instead of wooden ones. This method of protection is good for wooden or slate roofs.
- Lightning protection mesh for a private home. It is fixed along the ridge on the roof of the house. Down conductors made of mesh should be located along the entire surface of the roof. This type of protection is usually used for tile roofs.
Do-it-yourself lightning protection at the dacha, its scheme is no different from other designs. At your dacha you can also install three types of lightning rods.
Metal roof pie
It is difficult to imagine that any modern adult is not familiar with metal tiles - this roofing covering has become so popular here in Russia that it is simply impossible not to notice it! The roofs of private houses and cottages are covered with tiles, gazebos and outbuildings around the house - nowhere without metal tiles =) The reasonable price of this material pleases and allows you to save on roofing work + the lightness of the metal tiles - it is easy to deliver it yourself.
But not everyone knows how to make insulation for metal tiles, although if you are going to cover the roof yourself, and not trust it to a team of highly qualified guests from the Middle East, then it will be useful for you to know the arrangement of the roof, what is put in place and in what order so that the roof lasts for many years . Let us immediately make a note that despite the fact that a metal roof attracts with its relative cheapness, you should not save on the rafter system (they say, light tiles) - the rafters must be placed in such a way that 1 sq.m. the roof could withstand 150 - 190 kg of weight load. This is justified, because Although the tiles themselves are light, in winter the snow will put pressure on the roof - and of course, during installation or during future repairs there will be several people on the roof.
Let’s finish with the lyrical digressions and move directly to the question that interests us, namely, let’s figure out what kind of roofing pie there should be for metal tiles.
Roof composition
The common people simply call it a pie - I think it’s clear why - several layers resemble a confectionery product. All layers perform their functions; the absence of one of the layers makes the roof not so protected and can even lead to damage to the roofing.
Rice. 1. Metal roof pie
So, in what order is it correct to lay the roof pie? And here's which one:
- metal tiles;
- wooden lathing;
- counter-lattice made of wooden blocks;
- waterproofing material (sometimes called hydro-vapor barrier);
- ventilation space;
- thermal insulation material;
- vapor barrier (sometimes this is a separate film, not combined with waterproofing);
- rafters.
But this option is done in an area where the climate in winter is very harsh, or if there is a living space under the roof - the second floor of the house, the attic. If the climate is quite mild, or the under-roof space is intended for an attic, then there is no point in insulating it so intensively (look, again, savings are pure advantages!), the composition of the roof in this case will not have a heat-insulating and vapor barrier layer.
Soundproofing of metal tiles
Many future owners of a metal tile roof are concerned about this question - how can you make the roof as non-conductive as possible? Sound insulation is especially important if there is a room under the roof in which people live. Of course, it’s nice to listen to the sound of summer or autumn rain, but sometimes you want silence.
It must be said that it will not be possible to solve this problem and make sound insulation so that you cannot hear what is happening outside at all - you have chosen the wrong type of roof (ideal sound insulation for soft roofs, also called bitumen ones)
Any roof is a structure made up of more or less layers, and the entire set of these layers is called a roofing pie. Layers perform their functions, and for all types of roofs there are standard sets of materials, and sometimes several sets to choose from. Thus, a roofing cake for metal tiles is no exception; it, like other cakes from various roofing materials, is made according to certain rules.
Types of grounding
According to the PUE (electrical installation rules), metal, slate, tile and other types of roofs must be grounded. This will protect the residents of the house from electric shock and fire. Metal roofs and other types of roofing can be grounded in two ways:
- the first way is natural. Its peculiarity lies in the fact that the lightning protection structure is already included in the structure of the building. It is located in the ground and is capable of discharging electric current. In other words, the foundation or water supply pipes act as a lightning rod. This method is practically not used nowadays, because modern polymer pipes are used for laying communications;
- the second method is artificial. Grounding of a roof made of metal tiles and other materials is carried out artificially and purposefully. It helps discharge static electricity and keep a person safe during a thunderstorm.
“Grounding for a private home is several hours of work, after which you can “sleep peacefully” without worrying about the safety of electrical appliances during a thunderstorm.”
Is lightning protection necessary for a metal roof?
A metal roof is a large accumulation of metal that attracts atmospheric discharges, increasing the risk of fire.
Despite the abundance of summer rains and thunderstorms in our country, such fires occur relatively infrequently. Therefore, it is quite difficult to unequivocally answer the question of whether grounding is necessary for a metal tile roof.
It is impossible to say in advance whether grounding your home will be justified, whether it will save you and your property with every lightning strike, or whether it will forever remain unclaimed. But most people would agree that it's better to be on the safe side than to shiver in fear of fire during every summer thunderstorm.