How the electrical cable works
The self-regulating cable is an electric heater in the form of a tape.
A cross-section of the heating cable consists of:
- metal heating conductor.
- conductors insulated with insulating PVC.
- internal insulation is made using fluoroplastic.
- screens made of copper mesh in which the conductors are located.
- The insulation on the outside consists of thermal insulation PVC material.
The insulating material resists the effects of water, is resistant to elevated temperatures, and is not affected by the harmful environment of wastewater. The materials have Sanpin approval for use in food water supply systems, so cables are allowed to be laid in cold water systems.
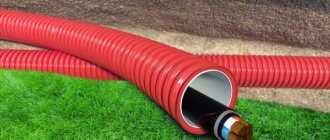
How to install a self-regulating heating cable inside a water pipe
The heating cable operates without human control. The system will automatically stop working if the ambient temperature exceeds the set values. Self-regulation protects the system from overheating, saving electricity consumption.
The advantages of a heating cable include:
- Reliable and safe operation.
- Simplicity of installation and operation.
- Energy savings due to automatic temperature control.
The main disadvantage is the cable's volatility. Some sections of the water supply must be equipped with additional sockets.
Modular connection method
The method is very expensive and problematic in terms of finding the required components. The most widely used heating cable for installation is the Raychem brand.
This manufacturer has a special system called FlexiClic.
There is no need to press, solder or twist anything here. The cable is sold in ready-made kits. The connection of one piece of cable to another, or to the supply wire, occurs through factory connectors.
You just snap them together, plug in the heating and everything works.
You can not only consistently build up straight sections along the water pipeline, but also make branches to the sides.
Just keep in mind that when extending two pieces of heating cable, you must use brands of the same power. Among other things, the joints will not have the same heating effect as the rest of the pipe.
Let us repeat once again that this method is not very common in our realities and is not cheap. Therefore, let's look at more “down-to-earth” connection options:
- with installation of the coupling through pressed sleeves
- without installation of a coupling with direct connection of the heating cable to a 220V network
Household repair No. 1
Choose reliable craftsmen without intermediaries and save up to 40%!
Post a task and find out prices
Installing a heating cable is a fairly common procedure. This element is used for heating water pipes, roofing, eaves and other elements where freezing of water is unacceptable in the cold season.
3 ways to connect a heating cable to the network when heating a water supply
A distinctive feature of a self-regulating water cable is its ability to determine the required heating intensity depending on the temperature of the object itself and the environment. There is such a tendency - the lower the temperature of the first, the more the wire heats up.
Heating cable device
This element contains two cores made of copper, as well as the most important part - the heating matrix. All its parts are individually connected in parallel to the electrical circuit. This allows the matrix to serve as a heating and regulating element.
Externally, the design of the heating cable for water supply is wrapped in a thermal protective layer. Below it is a shielding braid. It promotes reliable protection of the self-regulating cable from the effects of external electromagnetic fields. Grounding is also connected to the braid. The upper sheath of the cable protects the entire structure from mechanical damage.
Operating principle of the heating cable
It is not difficult to understand how this element works. This is due to the fact that its principle is based on the rather simple function of a conductor of electrical energy. When a certain section of the pipe is heated, the current resistance increases. Therefore, a lot of power is consumed.
The section of wire that is placed in a cold temperature has less resistance. The matrix transfers more electrical energy here, causing the cable itself to heat up more. In the area where the temperature is higher, the resistance is higher. Therefore, less current is supplied to the heating element. Consequently, heating of the water supply does not occur in this place.
The self-regulating cable turns on when water inside the pipes begins to freeze. The heating power in this case is maximum. As the pipe temperature increases, it decreases. The heating cable itself does not stop working. Its power simply becomes minimal.
Cable installation
Connecting this heating element with your own hands can be done in one of the following ways:
In the first option, the connection method is divided into:
- linear - produced along a water pipe
- turns - in this case, the self-regulating cable is wound in a spiral around the pipes
Regardless of the chosen installation option for the heating element, insulation of the water supply system is a mandatory procedure. Otherwise, heating will be directed not at the pipes, but at increasing the ambient temperature.
What is a heating cable?
The thickness of the insulating layer, as a rule, varies in the range from 2 to 5 cm. This depends on the installation conditions of the pipes:
- for underground water pipes, a smaller amount of heating layer can be used
- for above-ground structures - the insulation layer must be large
Moisture-resistant materials can be used as a heating layer. It can be polystyrene foam or polyethylene foam. You can create a protective layer to prevent damage to the heating element from pipes of larger diameter.
Options for connecting a self-regulating cable for heating water pipes with your own hands
The first method of installing a heating wire is one of the simplest. It involves placing the cable along the water pipes. In this case, the wire stretches along one of the walls of the pipe, attaching it to it with fiberglass adhesive tape after about 30 cm. You can use plastic clamps to mount the heating element yourself. But in this case, it is worth making sure that they can withstand the maximum temperature of the cable.
The second method of placing a heating element with your own hands is winding in a spiral. This method is good because it allows for maximum contact between the pipes and the cable. But at the same time, the consumption of the latter increases significantly.
To calculate how much heating wire is required in this case, it is necessary to multiply the length of the water pipe to be heated and the correction factor. The last value makes it possible to understand how many meters of wire are required to wind one meter of pipes. Taking into account the spiral pitch and pipe diameter, the correction factor can be from 1.1 to 1.5. You can clearly see this dependence in the table below.
Diameter of water pipe, mm
Number of meters of heating cable per meter of water pipe
What to look for when choosing a cable?
Before purchasing, you should immediately decide who will perform the installation work. If you plan to install it yourself, then it is better to go with a simpler option. Let's take a closer look at what criteria are important when choosing.
Criterion #1 - purpose of the pipeline
If you need to heat the pipe that supplies drinking water to your house, you should buy a food-wrapped cable. All manufacturers and stores must indicate this characteristic in the accompanying documents. The cable sheath requirements for systems transporting wastewater and process water are not as stringent.
It is strictly forbidden to place a cable system made of materials not intended for direct contact with it into a pipe with drinking water. This decision is fraught with health problems
Don’t be surprised, but a product in a shell safe for drinking water will cost more.
Criterion #2 - cable type and system length
Before purchasing, you need to determine the length of the area that needs heating. The length of the cable will depend on this.
You should immediately decide which type of heating cable you prefer - resistive or self-regulating. The first option is cheaper. But its service life is shorter and installation is more difficult, especially for a beginner in this matter.
Another significant difference between resistive wire is that you can only buy a heating product of a certain length - the manufacturer has prepared various options. Therefore, you will have to choose from what is available. Moreover, a resistive system is most often equipped with a plug for connecting to the power supply.
Resistive system for pipeline heating. Depending on the quality of materials and manufacturer, its price tag may vary significantly
The second option is more expensive, but easier to install. Self-regulating cable is sold in a coil if the buyer cuts a certain length, or there are ready-made heating system options equipped with a power cable.
Regardless of the chosen option, you should be extremely careful - do not hesitate to demand accompanying documents from the manufacturer, a warranty card and a product quality certificate.
Criterion #3 - preferred product power
In order for the installed cable to heat the communications, you need to select the right power. This characteristic is also indicated by the manufacturer.
For plumbing systems, pipes with a diameter of up to 32 mm are used, for which it is recommended to use heating systems of 9-16 W. Moreover, this is the power of one linear meter. To calculate the total value, you need to multiply the specified parameter by the entire cable length.
It is preferable to use a cable with the ability to regulate the heating level independently. These are more advanced and new developments; such cables are actively used in domestic conditions.
Moreover, experts do not recommend buying a resistive type of product in order to save money, considering the latter to be less reliable for installation inside a pipeline.
Criterion #4 - cost of the heating system
As for cost, this criterion is also important: you cannot buy a cable that is too cheap. The rule “good things can’t be cheap” when choosing a cable fully confirms itself.
If the price is very low for the cable system you like and there are documents from the manufacturer, then you must definitely pay attention to the expiration date - an unscrupulous seller may offer an expired product, or the expiration date will expire in 6-12 months.
It is better to refuse such a “profitable” offer - at the end of the warranty, the cable may no longer perform its functions and will have to be replaced, which threatens repeated costs.
The price tag of a self-regulating product is directly affected by the quality of the matrix. The service life directly depends on it, as stated by the manufacturer. For example, the product xLayder-EHL from Caleo has a warranty of 3 years and a service life of 20 years.
Also, when choosing a cable for internal heating, it is better to give preference to well-known manufacturers:
- German – Eltherm Gmbh (Germany);
- American – Raychem and Heat Trace Products, LLC;
- Korean – Caleo;
- French - Eltrace;
- Danish – Devi;
- Finnish – Ensto.
There are many Japanese-made products on the market designed for heating water pipes. Here you should also be careful and not buy a cheap Chinese counterfeit. In addition to wires and seals, you need to choose high-quality ones.
Pay attention to the cross-sectional shape inside the sealing rubber - it can be round and rectangular/square for different cable cross-sections. It is very important to buy reliable coupling elements - their price should be no less than 5 m of cable. When it comes to heating the pipe, you should not save too much.
Types of cables for heating pipes
A properly selected heating system is the key to long-term protection against freezing of any type of pipeline. Therefore, before settling on a specific product, let's take a closer look at the range offered by the market.
Cable products available for sale are divided into 2 types depending on the type of installation - intended for placement outside and inside the pipe.
Using a heat cable with automatic thermoregulation to warm up and prevent pipes from freezing
Let's take a closer look at the second option, which in turn is divided into 2 types depending on the purpose of the pipeline:
- for food purposes;
- for household needs and other tasks.
In the first case, the cable has a protective coating made of a food-grade polymer that does not affect the composition and quality of water, for example, polyolefin, fluoropolymer.
In the second case, there are no strict requirements for the type of coating, but such a system cannot be used to heat food pipelines.
Another difference between the cables is the operating principle. They are:
- resistive;
- self-regulating.
In the first case, we are talking about a single or two-core product. The manufacturer, as a rule, immediately produces a ready-made system for installation, which has a certain length.
The cable is often equipped with a plug for connecting to the network. The resistive system additionally includes a thermostat and a temperature sensor.
And in the case of a self-regulating product, additional sensors and regulators are not needed. In it, a semiconducting matrix is responsible for the heating level, capable of turning the system on and off automatically when certain temperature values are reached.
Heating cable with a matrix of semiconductors. On its two sides there are two parallel conductors, independent of each other. What allows you to divide such a cable into pieces of the required length
Types of cable and how it works
The most common types of heating cables are:
- resistive
- self-regulating
How do they differ from each other and which one is better for plumbing? Resistive ones can be single-core or two-core.
The operating principle of this brand is very simple. Inside the cable there is a core made of a special alloy with high resistance.
When current passes, the core heats up. You can purchase ready-to-install kits or order the required footage.
Which is better, single-core or double-core option? With a single-core cable, it is necessary to make a loop and pull the cable twice from the beginning to the end of the pipe in order to supply 220V voltage to its ends.
With a two-core one everything is much simpler. You measure the required distance, at the beginning of the cable line you apply phase to one core, zero to the other, and at the end you simply short-circuit them together, installing an end coupling.
This type of heating will require temperature sensors and a thermostat, similar to what is used in heated floors.
Mistake #1
You cannot use a resistive cable without a regulator!
Otherwise, it can simply melt and burn the pipe.
How to properly connect two different parts of a self-regulating heating cable?
Heating cables are allowed to be connected according to certain rules. Given the right conditions, a customized system will work properly for many years.
To connect two different wires, follow this algorithm:
- Cut the top insulating layer of the cable. Remove the inner insulation.
- The semiconductor part will need to be heated. For this you will need a hairdryer. After this it will become soft. Expose thin wire strands.
- Repeat the first two steps for the other cable.
- Use the compression or soldering method to connect two different wires.
- To insulate the veins, use heat-resistant plastic tubing.
Do-it-yourself heating cable repair under tiles and under screeds
Sequence of actions when performing repairs:
- Having determined the location of the break in the heating cable, it is necessary to lift the floor covering at the location of the fault. Depending on the material from which it is made, the coating can be raised as a whole strip. If the floor is made of tiles, they must be removed, being careful not to damage them.
- Then, having familiarized yourself with the heating cable installation diagram, carefully break the concrete screed. To easily repair a cable break, it is important to free up sufficient length.
- After stripping the cable at the break point, connect it and firmly clamp the connection with pliers, then put on a special sleeve to create a strong connection. Insulate the cable using heat-shrinkable couplings.
- After a control check of the work, a concrete screed is performed and, after drying, the floor covering is restored.
Experts recommend being extremely careful when working with electrical appliances. If you do not have sufficient knowledge and are not confident in your abilities, it is best to entrust the work to professionals.
Main technical characteristics when choosing
The choice of the maximum length of the self-regulating cable depends on the size of the heated area and the diameter of the pipes. They also take into account the maximum temperature the soil freezes to. How much electricity a heating cable consumes depends on its power and the temperature it heats up to. The power of the heating cable is selected depending on the diameter of the pipe. Products with a power of 10 W/m are used for pipes up to 2.5 cm in diameter. Pipes with a diameter of 2.5-4 cm are heated with 16 W/m models. Models with 24 W/m are designed for pipes with a diameter of 4-6 cm. When purchasing a cable, consider:
- product power;
- temperature class;
- type of external insulation;
- equipped with protective braiding;
- manufacturer.
Products from foreign companies Devi, Nelson, Raychem and Ensto are very popular. The products of the Russian company SST (Teplolux) have also proven themselves.
Scope and technical characteristics
Self-regulating cable is used not only for heating pipelines. They can heat almost anything - from huge tanks to air conditioner drainage pipes.
Main areas of application:
- Freeze protection, maintaining the required temperature of containers, pipelines, industrial tanks.
- Protecting the roof from icing, storm drains from freezing, preventing the formation of icicles.
- Protection of water pipes and sewerage systems of private houses from freezing if they are not deep enough.
- When installing heated floors (the cable is poured into concrete), arranging heated greenhouses (placed in the ground).
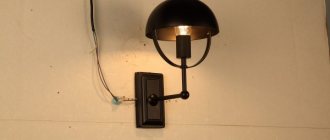
- Use of leftovers to provide comfort in the home - warm footrests, sofas, etc.
There are several main technical characteristics of a self-regulating cable:
- nominal voltage;
- linear power;
- maximum operating temperature;
- minimum operating temperature;
- minimum permissible bending radius;
Operating principle
The principle of operation of the device is the use of the properties of the matrix of the heating self-regulating cable. Two parallel conductors are enclosed in a plate. This is a conductive polymer that changes its electrical resistance in direct proportion to changes in ambient temperature. In some models, the conductors are connected by spiral matrix threads instead of a plate. To understand how self-regulating heating cables work, we need to consider several types of heating.
Example with heated floors
A comfortable heating temperature for the floor covering is 36-380C. To select the length and power of the SNK, a special thermal calculation technique is used. As long as Samreg is turned on, a stable, comfortable temperature will be established in the room. The only drawback of such warm floors is the lack of ability to adjust the heating level.
Self-regulating heating cable for heated floors
Plumbing example
SNK heats the water pipe at a certain level. When the air temperature begins to drop, the resistance of the matrix simultaneously drops, which causes an increase in the current flowing in the copper conductors of the samreg. As a result, the degree of heating of the conductors increases. As the temperature rises, the process occurs in the reverse order.
Example with roof heating
It is well known what a danger posed by accumulated masses of snow on the roofs of houses and hanging icicles. The self-regulating roof heating system is a SNK laid in a special way. The shape of the samreg layout depends on the roof configuration.
The roof heating level is constantly adjusted by a self-regulating cable. This ensures the gradual melting of the snow cover and its drainage in the form of melt water.
Important! With this method of heating the roof, two goals are achieved. Snow precipitation does not accumulate on the roof and does not create the risk of snow falling on people, while at the same time the roof of the house is not subject to excessive snow load
Water heated floor
A water floor is a structure made of pipes that are laid according to a certain pattern (snake or snail). Such a device has a long service life - more than 50 years, provided that high-quality material is used and the rules for maintaining heated floors are followed.
In addition to the pipeline through which the heated liquid moves, the hydrofloor is equipped with:
- bypass;
- circulation pump;
- collector and electric drive - they are necessary to regulate water flows;
- balancing valve - it is designed for mixing cold and hot coolant;
- thermostat and thermostat - they are responsible for the heating level.
Food and non-food - 3 differences
Self-regulating cables are divided into food-grade cables, which can be laid directly into the pipe, and non-food-grade cables, which can be laid on top.
How do they differ from each other structurally? Firstly, the size.
Food grades, with fairly similar characteristics, have a smaller cross-section so as not to occupy useful space inside the water supply. Compare, the most common dimensions for external ones are 7*14mm, 7*15mm, and for internal ones – 5*7mm.
Mistake #4
You can't go wrong with the size, and such a cable can actually reduce water pressure.
At the same time, do not forget about the end coupling, which has a cross-section 1.5-2 times larger than the wire itself.
The second difference is the mandatory presence of a screen. External ones may not have it.
And thirdly, and most importantly, the external insulation material.
Here, for example, is a food option.
On the outside we have:
This shell is chemically inert to aggressive environments and does not decompose inside the water supply.
Next come:
- armored, protective screen or braid
Mistake #5
Without such a grounding screen, the cable inside the pipe cannot be used.
- two copper strands with a polymer between them
For the non-food model, the shell consists of ultraviolet-resistant polyolefin.
The primary purpose of the heating cable is to prevent the water in the pipe from freezing. And this can only be achieved with sufficient power.
Which one should you choose in your case? In domestic conditions, a water pipe with a maximum diameter of 32 mm is usually heated.
For such a pipe, a cable with a power of 16 W/m is sufficient. For larger pipes from 50 to 110mm, choose a power of 24W/m.
If you are extreme and do not insulate the pipe at all, then such a water supply system will have to be wrapped with a cable of at least 32 W/m.
If the required power is not available, you will need to wind two cables at once.
All heating cables operate normally only if the voltage corresponds to the nominal values specified in the product data sheet. If you have problems with the voltage at home, and it rarely rises above 180-190V, then do not be surprised that the selected power may not be enough, and one day the pipe will freeze.
Why does the cable itself sometimes die? Self-regulators are afraid of frequent switching on and off. They usually have a finite number of such switchings.
They also fail due to improper connection to the 220V power cable. Poor quality end seal and moisture getting into the shell are another reason.
To seal the food cable into the pipe, seals are used. When choosing them, pay attention to the shape of the cable. They are round or flat.
They use their own seal for a specific brand. If you choose the wrong one, you will get a leak.
Features of thermal insulation
The final stage of work should be thermal insulation of the pipeline in order to retain heat. Special cylinders, cut on one side, will act as a heat insulator. Such cylinders are made from various materials - mineral wool, expanded polystyrene or foam plastic. You must choose one or another option depending on your financial capabilities, and then, having purchased it, wrap the pipeline with it. Typically, a thermal insulation layer is necessary not only to retain heat, but also to additionally protect the cable from mechanical damage (if we are talking about an external installation). As for the thickness of the heat insulator, it should be at least 2 centimeters (for pipes with a diameter of ? inches), 3 centimeters (if the diameter is 1 inch), 5 centimeters (if 2 inches) or 6.5 centimeters (for products of all other diameters).
MKT design
MKT design solutions vary depending on the expected operating conditions. These differences may consist of slight changes in the composition and type of materials. The basic design of the couplings is basically the same.
A standard heat shrink end sleeve consists of the following materials and parts:
- heat-shrinkable tubes;
- insulators;
- bandage thread and wire;
- insulating tape;
- heat shrink cuffs;
- tips with bolt heads breaking off;
- metal pigtail for grounding.
Main parts of the coupling
Contents may vary with the inclusion of various additional materials. Each manufacturer presents the composition of the MKT supply at its own discretion.
MKT device for 3-phase cable
Installation of heating cable inside the water supply
Let's now look at the installation process inside the pipe. In what case should you choose this option?
For example, when you bought a house with a ready-made water supply system, laid incorrectly or with insufficient thermal insulation.
Or you need to remodel a country house for year-round use, and access to possible places where pipes freeze is difficult.
In order not to dig up the ground and not break the structures through which the water supply passes, the only way out is to “push” the heating cable inside. How it's done?
For this work you will need a special oil seal and tee. Select it based on the size of your pipe.
It is best not to use a tee at a right angle of 90 degrees.
This angle is considered extreme for heating cables and shortens their service life.
Place the gland kit through the cable, and then begin to push the wire into the pipe.
Double-check that the end is securely coupled so as not to damage the wires when cornering.
The most important thing in this work is accuracy. A small dent or scratch from a burr on the tee can damage the outer casing. And this will definitely sooner or later lead to failure of the heating.
And this will definitely sooner or later lead to failure of the heating.
As soon as the cable has reached the end of the tube, screw the gland into the tee and tighten it.
If you do not have enough space to install the junction box in which the wires will be connected, you can place it directly on the pipe itself through an L-shaped corner.
Before applying voltage, professionals must check the cable insulation with a megometer.
And of course, the connection in the switchboard must be made through an RCD or a differential circuit breaker.
You don't want you or your children to get electrocuted in the bathroom at the most inopportune moment.
https://youtube.com/watch?v=9xdcjUmU09M%3F
Raychem heating cable termination
Original heating cables have found the widest application in various systems. They are used as a heating agent that prevents icing and thickening of various process fluids, to maintain a given temperature in containers, tanks, and pipelines. During installation, a certain technology must be followed; termination of the heating cable is an integral part of the high-quality installation of the entire cable heating system.
Why do you need to seal the end of a heating cable?
• The end of the heating cable is sealed during installation.
• The end sleeve can be manufactured using a rigid body or heat shrink tubing.
• Rigid housing is most often used in industrial plants, when it is recommended to provide quick and easy access to the end of a self-heating cable.
• Heat-shrinkable end sleeves are used much more often, since the cost of a complete installation kit is quite affordable; the free end of the sleeve is crimped with pliers, which guarantees maximum reliability of the shell.
• After which the coupling is heated with a heat gun to 250 degrees and compressed again, making the protection airtight to immediately prevent moisture from entering.
• The termination of the heating cable is considered complete.
In addition to the end couplings, connection couplings are required during installation. They are equipped with sealing glands, clamping contacts, insulating cuffs, and can withstand not only a wide range of temperatures, but also mechanical stress. It is recommended to connect the cores using connecting terminals.
By purchasing a self-regulating or resistive heating cable, components, protection and control equipment from us, you can immediately place an order for design, relevant calculations and installation.
Order the full range of Raychem equipment from official dealers
By purchasing the entire range of Raychem equipment from official dealers, you get the opportunity to save money, since we offer products at manufacturer prices. In addition, from us you can immediately receive the full range of services - from design to installation at fixed prices. We cooperate with wholesale and retail customers, we provide fast delivery of the purchased cable heating system to any point in the Russian Federation.
- https://raychem.biz
- [email protected]
- (multichannel)
- 105082, Moscow, Bolshaya Pochtovaya st., 38, building 5
Laying methods
Laying the heating cable is done in two ways. The external method is to wind it around a pipe or lay it along it. Internal - run the wire inside the pipe to prevent the water supply from freezing. The heating cable connection is made according to the connection diagram.
Linear installation
When installing the heating cable in a linear manner, fixation is done using plastic or fiberglass holders. They are installed at intervals of 0.3 m from each other. Metal fastenings are not used. If the pipes are in the ground, then the location of the wire is made with a slight offset. It cannot be laid flat at the bottom or at the top.
Spiral installation
For medium and large diameter pipes, spiral installation is used. The wire is wound onto the pipe in turns at regular intervals. The turn interval is reduced if any section of the pipe freezes heavily. Although such installation requires a large consumption of material, it ensures maximum contact between the pipe and the wire.
Internal installation
Installing a heating cable for a water supply system internally is only suitable for short pipes with a diameter above 0.4 cm. The wire will interfere with the passage of water if it is installed in a pipe of a smaller diameter. It will also be difficult to install into a long water pipe. In vertical pipes, the wire is pulled through using a tee and a sealing coupling.
Coupled cable connection for heated floors
The coupling connection is the most common, classic option. This option is used by most well-known manufacturers of heated floors, such as:
- Devi;
- Stoller;
- Raychem;
- Ensto;
- and others.
In our opinion, the widest model range of both cable connection options for underfloor heating is clearly presented in the online catalog of imported and domestic manufacturers Heating – Systems. The principle of the classic version is simple and reliable. The metal conductors of the heating and cold cables are crimped using sleeves, each wire is individually insulated on top with heat-shrink tubes, then a finishing thick heat-shrink tube with glue insulates the entire structure.
Advantages of this type:
- simplicity;
- reliability;
- maintainability;
- You can connect both a multi-core cable and a monolith.
High-quality Shtoller cable coupling. For additional reliability, the junction points of each wire are located at a safe distance from each other:
Connecting to the network is an alternative method
We took this cable:
The heating conductor (3) and the conductors (1 and 2), through which current flows, cannot be short-circuited
- This is what the end looks like.
- Cleaned it up.
- Using this terminal block I connected it to the wire.
The opposite side must be insulated. It is prohibited to bridge the conductors. And we must ensure that they do not bridge in any environment. You can buy a special plug for this. They cost around 300 rubles apiece. But you can do everything yourself using improvised means, such as heat-shrink tubing and a heat gun.
- Thermal gun.
- Heat-shrink tubing.
- End of insulated cable.
The plug is made as follows. We put on the heat shrink tube. We warm it up with a hairdryer. Afterwards we fill the entire structure with a heat gun.
The same procedure can be done with the terminal block to which the cable power is connected. You can also wrap everything with electrical tape just in case. If operating conditions are harsh.
What to do if a heated floor pipe is broken?
If there are warm water floors in a house or apartment, there are times when the floor pipeline may be broken. First of all, if the floor is functioning, you should disconnect it from the water supply. But more often, such damage occurs during installation or repair of the system, when the topcoat is not laid and the screed is not poured - this is a huge plus.
If there is a concrete screed, in order to find the location of the damage, you will need a hammer drill, a chisel and a hammer to destroy the concrete. This should be done carefully so as not to damage the entire circuit.
When pipes made of metal-plastic or polyethylene are pierced, they are repaired using press couplings using a special press.
For your information! If the heating element is filled with screed after repair, then the use of threaded fittings is not possible.
Having calculated the location of the breakdown, you should remove the damaged area and install a whole circuit in its place. The connection is made using press couplings, which should be wrapped in plastic film to protect them from cement mortar.
Pipe mounting with valve
What if you have a more complex case? For example, are there fasteners and valves on the water supply section?
There are certain nuances here. First, prepare the pipe itself by gluing the tape.
At the fastening points, the clamps will have to be temporarily removed.
In this case, the wire itself must pass through the lower attachment point of the clamp.
What to do with the tap?
Mistake #10
If the cable is pulled here in a straight line or even in a spiral, then if it is necessary to replace the valve, it will no longer be possible to do this without cutting the cable.
Therefore, a reserve must be made in the form of a loop.
After this, simply fold this loop around the valve and tighten it with a tie.
Thermal insulation is stretched over everything.
Instructions for connecting heating
In fact, figuring out how to install a heating cable with your own hands is not difficult. This element can be installed on both plastic and cast iron water pipes. First, preparatory work is carried out. In addition, you need to purchase all the necessary tools and materials.
First, the heating cable is installed; the connection diagram is often indicated by the manufacturer in the documentation included with the heating element. The next stage of installation of such a system is the installation of a casing for protection. The last step is to connect the cable to the network and check its operation. In addition, you can install the heating cable inside the pipe. This will increase its effectiveness.
Preparatory work
You need to immediately purchase all the tools and materials necessary for installation, incl.
- connecting sleeves;
- pliers;
- roulette;
- crimper;
- construction hair dryer;
- mounting knife and tape;
- wire cutters;
- heat shrink tubes.
After this, the end seal should be carried out. The free end, which will not be connected to the network, must be freed from the protective insulation and cut off with a step. After this, it is necessary to insulate its heat-shrinkable tube. Some systems are already prepared for installation.
This option is more convenient, so it is recommended for people who want to install a heating cable correctly, but do not have experience in carrying out such work.
Fastening the cable system
The simplest arrangement option is rectilinear. In this case, the cable is fixed parallel to the pipe. This mounting option is suitable for heating pipes located indoors, which will additionally be covered with a layer of insulation. In this case, only a small part of the pipe is exposed to thermal effects, but this will be enough to prevent ice from forming inside it.
Using the table, you can quickly select the pitch length for laying the cable through the pipe.
In this case, several cables are located on the pipe at once. This option is recommended if the pipe, even with the additional installation of a heat-insulating layer, will be exposed to elevated temperatures in winter. Due to this arrangement of heating elements, more uniform heating is achieved.
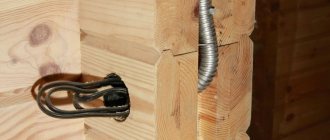
For fixation, use metal tape. When installed in a straight line, it is fixed with tape along its entire length. When laying the heating element using the winding method, the pipe is wrapped around the pipe in increments of at least 30 cm for fixation.
Often a self-regulating heating cable is installed in a wound manner. In this case, the conductor is wrapped around the pipe at a pitch of 20-50 cm. This method provides good heating of the pipe, but leads to an increase in the consumption of the element.
Attaching the protective cover
After the self-regulating cable is installed, you can begin to form the insulating layer. It is necessary not only to prevent heat loss, but also to protect the heater from mechanical damage.
If the instructions supplied with the heating system indicate the need to install one or another insulation, you need to follow it.
If there are no manufacturer's recommendations, you can use rolled insulation rubber, mineral wool or foam rubber. The entire pipe is wrapped with the selected insulation. The material can be secured with tape or twine. Additionally, it is advisable to treat the insulation with mastic or other waterproofing compound.
Connection to the mains supply
Connecting the cable to the network is carried out with special elements that must be purchased in advance.
First, the free end of the heater must be freed from insulation. The insulating screen should be twisted into a bundle and the conductor cores should be stripped. The cores and power cable are connected. Heat shrink is fixed over the joint.
Testing and commissioning
The heater must have a separate line. After this, you need to turn on the system and wait until the element heats up. If no faults are found, then the installation was completed correctly.
How to make a heating cable with your own hands?
You can purchase heating elements in specialized or construction stores, but you should be aware that their cost is quite high. With some dexterity and certain technical skills, you can try to make a heating cable with your own hands. To do this, it is enough to use suitable material. A power telephone cable can become a replacement for a branded heating cable. It is similar to the heating one in shape and characteristics. This cable is thin, durable and rigid. It has reliable insulation and can be used in damp environments.
It is clear that a heating system made from telephone cable will be deprived of many important functions. For example, it will be impossible to carry out the process of self-regulation. In addition, the system does not have special food insulation. However, all the useful qualities described above are not particularly necessary, so you can safely use a homemade heating cable. Do-it-yourself installation is not at all difficult. First, determine the location of its installation - that is, outside the pipe. Attach the wire to the surface very tightly. The pipe with the cable is usually tightly wrapped in foil, over which aluminum tape is wound, which is what presses the heating element to the base. Such heating for pipes can be arranged not only for water supply, but also for sewerage. It is necessary to ensure maximum protection of all heating cables and protect them from moisture. To do this, you can use heat and waterproofing. For one-time or periodic work, a heating cable made with your own hands from a power cable can be used in a country house or in a place where people do not live permanently.
In conclusion, we can say that the heating system for heating the water supply, which is the heating cable, is its necessary component for full functioning throughout the year, and especially in winter.
Step-by-step instructions for installing a heating cable in a pipe
Before purchasing a cable, you need to determine its quantity. The size of the product is equal to the length of the pipe for which the cable is selected
Along with it, it is important to buy additional materials used in the installation process. These include a set of couplings, an oil seal and a section of wire with a Euro plug
Important! It is necessary to pay special attention to the quality and reliability of the cable. It is better to give preference to the option with a metal braid inside. The water pipe requires a top layer of food-grade insulation
To correctly enter the cable, you will need a tee
The water pipe requires a top layer of insulation made from food-grade material. To correctly enter the cable, you will need a tee.
For the self-regulating cable to function, a power supply is required, so a separate line is allocated for it. And, despite the presence of double insulation on the heating wire, it is necessary to include an RCD and a circuit breaker in the connection diagram, protecting this line in case of accidental damage to the shell.
Preparing for installation
Self-regulating cable systems fail not only from constant switching on and off. This mainly happens due to improper splicing with the power cable and poor-quality termination, which leads to a short circuit.
Kit for coupling the heating cable during installation inside the pipe
It is necessary to carry out insulation according to all the rules, using proven consumables. Poor quality couplings may occur. Also, a lot depends on the professionalism of the master himself.
To prepare the heating wire for installation work, you need:
- Perform end seal.
- Place the pass-through kit on the cable.
- Splice the supply wire with a plug with a self-regulating section.
Connection to the power grid
After all the installation work has been completed, there is only one step left - connecting to the electrical network. For this, experts recommend using a separate line
It is important to take care in advance and equip this line with a 10 mA RCD, which will protect against current leakage in case of accidental damage to the wire. The RCD will simply de-energize the line, preventing electric shock to the owner of the object
Note! The connection process is simple - you need to plug the Euro plug located at the end of the power wire, which is connected to the heating wire, into the socket. Temperature control is carried out automatically
Connecting the heating cable - how to repair the break yourself, connect the heating cable
How to connect the heating cable?
A heating cable is a special cable that prevents water pipes from freezing. The use of a self-regulating heating cable also prevents failure of heating systems. According to the general rules of use, self-regulating cables are attached to pipes on both sides. The heating cable is connected to the electrical network.
Application of heating cables
First of all, the use of heating cable is relevant for water supply and sewerage systems. It is almost impossible to remove ice and icicles from hard-to-reach areas. But various insulation materials still won’t save you in very severe frosts. Using a self-regulating cable will help maintain the required temperature, ensure reliable heating of the water supply and prevent the formation of condensation.
Recently, the use of heating cables for underfloor heating structures has become widespread.
Types of heating cables
Currently there are the following types of such cables:
- resistive
- self-regulating
Operating principle of a self-regulating heating cable
A self-regulating cable is made from a special material that can change its thermal conductivity during operation. The lower the ambient temperature drops, the lower the resistance of the heating cable becomes. The main feature in the operation of this heating element is that its resistance does not change along its entire length simultaneously. Currently, such a process can be maintained even without the use of automatic machines.
With the help of a self-regulating cable, you can reduce your electricity costs. Another advantage of this device is that it can be cut anywhere.
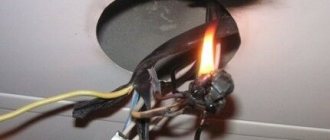
When connecting a heating cable, it is necessary to use a large amount of insulating materials. Otherwise, spontaneous combustion cannot be ruled out.
How does a resistive cable work?
Resistive cable is a wire with one or two cores. Metal conductors act as heating elements. They are isolated. The electric current passing through the veins is converted into heat due to the resistance of the metal, resulting in heating.
Resistive cable must not be cut.
In addition, its use is quite energy-intensive.
Despite their reliability, heating devices may malfunction and break due to improper operation.
Repair broken heating cable
Damage may occur due to overheating or failure of the temperature sensor. If the device stops working inside or outside the water supply, you need to disconnect from the network and carefully remove the cable.
Since self-regulating wires can be cut, strip and connect the wires taking into account grounding. For insulation, use heat shrink sleeve. You can heat the shrink sleeve using a hair dryer.
After completing all the manipulations, reinstall the heating device.
How to install a self-regulating cable inside a pipe after repairing a break
Work on laying a self-regulating cable in a pipe is carried out if the air temperature is not lower than five degrees. The connection of the conductors is made using soldering. The use of insulation helps prevent moisture from entering and protects the heater from high temperatures. The device operates in a temperature range from five to fifteen.
After eliminating the break, the following types of work must be performed:
- install a tee where you will enter the cable
- then screw the adapter
- insert cable
Installing a self-regulating cable outside the pipe
To avoid new breaks in the heating cable, you need to clean the pipes from rust and other contaminants.
Secure the cable to the bottom of the pipe. The cold end of the wire must be outside the insulating material. Work very carefully around the break point. If you have plastic pipes, use foil to wrap them. This will ensure uniform heating of the pipe and avoid new breaks.
Connecting a self-heating cable to the electrical network after a break
You will need the following materials:
- connecting wire and heat-shrinkable tubing
- plug for connecting to the network
After preparing the materials, remove the cable’s own insulation by no more than eight centimeters with a sharp object. Separate the braid. Carefully remove its insulation to expose the polymer matrix. Clean the wires, exposing the conductors by 10-20 mm.
Clean the ends of the wire. Use a three-wire stranded cable. Using such a cable makes it easier to identify the ground (this wire usually has two colors). Heat-shrinkable tubing is placed over the power cable to insulate the connection. A thermal tube is attached to the corresponding terminals of the connecting sleeve. Twist and crimp the wires. Perform all manipulations with each output.
Submit your application now!
And get the best offers from trusted craftsmen and teams.
- Compare prices and choose the best conditions
- Feedback only from interested specialists
- Don't waste time communicating with intermediaries
Types and varieties
The genus of basil is extensive, the boundaries of the genus are quite vague, and there is no certainty about many. There are approximately 120 to 200 species in the genus.
In the garden you can most often find:
- Basil foliage (Thalictrum aquilegiifolium) - up to 120 cm. It is he in the title photo. The leaves are large, openwork, bluish-green. It got its name because the leaves are shaped like the leaves of a columbine. The flowers are lilac, white (modern varieties also have flowers of various shades of burgundy, wine, lilac, dark red, violet, pink), collected in a loose panicle, appear on the plant in June and last until the end of August.
- Delavay's Basil (Thalictrum delavayi) - up to 150 cm. The flowers are double, lilac-lilac, or pink. The foliage is openwork. Blooms in late summer, from mid-July to mid-August. A very beautiful, graceful plant.
- Yellow cornflower (Thalictrum flavum) – from 60 to 110 cm. The leaves are entire, bluish-gray in color. The flowers are yellow, collected in thyroid-paniculate inflorescences. Flowering in June-July.
- Hybrid cornflower (Thalictrum hybridum) – up to 250 cm. The stem can be leafy or defoliated. The inflorescences are large, of various colors. Flowering - in July. These are garden forms of the plant.
- Threaded cornflower (Thalictrum filamentosum) is a short, up to 25 cm, delicate ground cover plant with beautiful foliage, native to the Far East. The flowers are white, openwork. Flowering is early, from mid-May for 3 weeks. Does not require replanting and retains its decorative appearance for 20 years, excellent for planting in tree trunks.
- Spreading-flowered cornflower (Thalictrum diffusiflorum) - height 70-90 cm. The flowers are relatively large - about 2 cm in diameter, collected in loose inflorescences.
Delavay's Basil - Thalictrum delavayi
Yellow Basil - Thalictrum flavumglaucum
Threaded Basil Thalictrum filamentosum
Spreading flower - Thalictrum diffusiflorum
Black Shoking variety with expressive, almost black stems.
Below are a few more common varieties:
Thalictrum Thundercloud - quite compact, expressive dark stems, very light pink flowers.
Below in the photo is a modern variety of Delaway's basilisk with double flowers - Hewitt's Double.
Thalictrum Delavayi Hewitt's Double
The “Elin” variety is one of the longest-lasting varieties. Blooms from early July to late September.
Thalictrum 'Elin'
Sometimes you can find mention of the magnificent basil, but this species does not exist.
Types of heating cable
For electrical heating of pipelines, 2 types of cords are used:
- resistive;
- self-regulating.
Resistive
Stability of operating parameters ensures uniform energy consumption. To reduce heating costs (for example, during thaws or in the spring-autumn period), sensors and a current regulator are introduced into the design of the water pipe heating system.
The resistive type heating cable is made with 1 or 2 cores. Single-core wires are connected to the household AC network from 2 sides. Two-core products are equipped with a connector for connecting to the network or a piece of installation wire with a factory-installed plug.
The opposite side of the cord is closed with a sealed plug (end sleeve). Inside the end element there is a metal insert that ensures the closure of the electrical circuit.
The design of resistive conductors does not provide for cutting the material into sections of the required length. Manufacturers prohibit laying excess wire in coils; it is necessary to mount the entire existing cord onto the pipe section.
When laying resistive elements, it is prohibited to locate the lines next to each other. When placed close to each other or when laying routes intersect, the metal cores overheat and the products fail.
Self-regulating
Operating principle of heating cable
As the temperature increases, the polymer material passes a lower current, which reduces the degree of heating. As the polymer cools, the conducted current increases and the heat transfer of the substance increases. Due to this physical feature of the material, the self-heating cable for water supply automatically regulates the heating temperature of the pipeline or adapter couplings.
Cords with independent heating control can be laid overlapping and next to each other. It is possible to cut the product into sections; there are notches on the outer shell that determine the permissible size of the section.
After separating the required fragment, it is necessary to install a protective end coupling. The disadvantage of the product is the increased cost (compared to resistive elements), but the service life increased to 10-12 years compensates for the increased costs of purchasing the material.
Installation of connecting and end couplings of the heating (heating) cable.
1.1. Installation of the coupling
1.1.1. Cut and remove the sheath from the heating cable (see Fig. 1).
1.1.2. Unravel the shielding braid and twist it into a “bundle”. Cut with a knife and remove the insulation from the heating cores, leaving 30 mm (see Fig. 2).
1.1.3. Cut with a knife and remove the semiconducting matrix. Shorten one core by 15 mm. Place heat-shrinkable tubes T2 3.0/1.5 onto the stripped cores and heat-shrink them using an air heat gun with hot air (see Fig. 3). Shrinkage temperature 200°C.
1.1.4. Strip the installation wire PVA 3×1.5 according to Fig. 4.
1.1.5. Place heat-shrinkable tubes T-2 6.0/3.0 30 mm long onto the core (length 45 mm) of the heating tape insulated with a heat-shrinkable tube and the insulated core (length 45 mm) of the installation wire. Place a heat-shrinkable tube CFM 19/6 100 mm long onto the heating tape, and a heat-shrinkable tube CFM 19/6 140 mm long onto the installation wire.
1.1.6. Insert the strands of the installation wire and heating tape into the copper tubes M 4×0.75×10 (see Fig. 5). Crimp using a hand crimper (see Fig. 6).
1.1.7. Push heat-shrinkable tubes T2 6.0/3.0, 30 mm long, over the connection points of the cores and heat-shrink them using an air heat gun with hot air (see Fig. 7). Shrinkage temperature 200°C.
1.1.8. Slide a 100 mm long heat-shrinkable tube CFM 19/6 over the resulting connection (lead the grounding wire and shielding braid outside the heat-shrinkable tube, as shown in Fig. 8). Heat shrink it using an air heat gun with hot air. Shrinkage temperature 250°C. Connect the grounding wire to the shielding braid using a copper tube M 5 × 0.5 × 5 and crimp it with a hand crimper.
1.1.9. Slide a 140 mm long heat-shrinkable tube CFM 19/6 onto the resulting connection and heat-shrink it using an air heat gun with hot air. Shrinkage temperature 250°C. The final view of the coupling is shown in Fig. 9.
1.2. Installation of the heating cable end sleeve.
1.2.1. Cut and remove the sheath from the end of the heating cable (see Fig. 10).
1 2.2. Trim the shielding braid, leaving no more than 5 mm (see Fig. 11).
1.2.3. Cut the end of the tape with a step and put on a heat-shrinkable tube CFM 10/3 30 mm long (see Fig. 12).
1.2.4. Heat shrink the CFM 10/3 heat-shrinkable tube using an air heat gun with hot air and immediately crimp the free end of the tube with pliers (see Fig. 13). Shrinkage temperature 250°C.
1.2.5. Place the 80 mm long heat-shrinkable tube CFM 19/6 over the outer sheath of the cable (see Fig. 14).
Heat shrink it using an air heat gun with hot air and immediately crimp the free end of the tube with pliers (see Fig. 15). Shrinkage temperature 250°C.
1.2.6. The final view of the connecting and end couplings (see Figure 16.)
Read further:
Connection diagram for self-regulating heating cable
DIY self-regulating heating cable installation
Sealing the ends of the heating cable
Connecting the heating cable for pipes
What is dry cable stripping?
Installation procedure for end coupling
The end coupling is designed to isolate the end of the heating cable from short circuiting of the cores and cable sheath, as well as negative environmental influences.
When installing the end coupling we will need the following tools:
- Wire cutters
- Knife
- Technical hair dryer
- Passatizhi
Installing the coupling is quite simple and consists of 9 clear steps, let's look at them.
Step 1
Cut off the desired length of cable using wire cutters.
Step 2
Cut the sheath along the cable approximately 70mm.
Step 3
Wrap the grounding braid so that it does not interfere with you for now.
Step 4
Cut approximately 40mm from the end of the cable.
Step 5
Put on the heat-shrinkable tube and shrink it using a technical hair dryer.
Step 6
Clamp the ends of the heated tube 1 and 2 with pliers.
Step 7
Now extend the ground jacket over the heat shrink tubing.
Step 8
Put on the second heat-shrinkable tube and shrink it using a technical hair dryer.
Step 9
Also clamp the ends of the heated tube 1 and 2 with pliers.
Technology and information
world.mirlive.com
Resistive: pros and cons
Resistive cable has a simpler design and lower price. There are three types:
- single-core;
- two-wire;
- zonal.
During installation, it requires care and precision, since failure of one of the sections requires replacement of the entire circuit. A distinctive feature of a resistive cable is that it provides stable, uniform heating along the entire length of the route.
Available in the form of coils and sections with a given length and power of wire. If the factory product is shortened, the resistance of the conductor can increase, and thereby increase its heating temperature. This is fraught with melting of the insulation and failure of the heating system.
Many manufacturers of resistive cables accompany their products with detailed installation instructions and complete them with the following materials:
- disc with video materials;
- corrugated pipe for installing a temperature sensor;
- mounting tape.
Single-core
This conductor is simple in design. The simplest conductor in design. Consists of several elements:
- metal wire (heating core);
- insulation made of polymer alloys or magnesium oxide;
- copper braid acting as a screen;
- external insulation.
The maximum heating temperature for conductors of this type is 60–65°C.
Two-core
A two-core cable consists of several elements. A two-core cable differs from a single-core cable in the number of conductive wires and the method of connection. It is a more powerful conductor, consisting of several elements:
- two heating cores, each of which is in fluoroplastic insulation;
- one drainage core without insulation (laid on top of the first two);
- a foil shield covering all three cores;
- external heat-resistant insulation.
Single-core and two-core resistive cables are called “series” because the conductive elements in them are located evenly along the entire length of the wire. The following companies offer the most reliable products:
- Norwegian NEXANS;
- Finnish ENSTO;
- DEVI (Denmark);
- Spanish CEILHIT;
- Ukrainian "EXON";
- Russian "SST".
Zonal
The zones make up a system of heating elements. A zone resistive cable is otherwise called “parallel”.
It differs from the two previous types of resistive type conductors in its design solution. Consists of two conductive wires. At a certain distance (100–150 cm) “contact windows” are provided in the core insulation. A spiral made of an alloy with high resistivity is laid on top of the cores. The spiral at its bending points (contact windows) is alternately closed with each of the two cores. In this case, parallel heating zones are formed, the maximum length of which can be 200 cm.
The zones form a system of heating elements - resistors and are independent, independent from others, sections of the heating system.
Advantages of zone cable:
- guarantees power stability, regardless of ambient temperature;
- allows you to design systems of any length without losing heating power.
Self-regulating cable - operating principle
Self-regulating, there is no closed loop or loop.
Mistake #2
There is no need to short the cores together at the end of the cable!
Between them, along the entire length, there is a cunning polymer, which, when cooled to a certain temperature, forms different conductivity bridges.
That is, at the cooling point, the loop of two wires closes on its own, current begins to flow between them and the cable heats up. In this case, you will have different temperatures along the entire length of the cable.
The hottest point will be in the coldest place. But at no point will the temperature exceed 85C. The nominal heating is 65 degrees.
This cable is completely fireproof. Even if it is overlapped on itself, it will still not burn.
Mistake #3
However, make no mistake, when the weather is warm enough outside, it does not completely turn off on its own.
He simply reduces his consumption several times. There is no such option for its consumption to be zero when switched on.
Self-regs from different manufacturers differ in the quality of the so-called matrix. This is the same miracle polymer that transmits electricity through itself.
The vast majority of specialists use self-regulating types of cable to heat pipes. This is explained by their simpler operation and simplified installation.
You don't have to buy and connect a thermostat.
All you have to do is plug it into a power outlet, and it will immediately start working as it should.