Design features
Depending on the design, a timer socket can be mechanical or electronic, the former are much simpler and cheaper, the latter have more functionality.
Depending on the response time, an outlet equipped with a timer can be daily or weekly. As a rule, the first are mechanical relays, the second are electronic. As mentioned above, the functionality of sockets with an electronic timer is much more extensive; as an example, we will give instructions for programming the TM-25 device.
Video: example of a daily socket with a timer - TM-32
Instructions for programming a socket with a digital timer TM-25.
First of all, you need to prepare, for this you will need:
- connect the device to the power supply to charge the battery (a full recharging cycle takes about 12 hours);
- clear the stack of program tasks by pressing the “Master clear” button using a sharp object, for this you can use a pencil, pen or pin;
- start programming the device.
- setting the current time. To do this, you need to hold down the button labeled “Clock” and set the current day of the week (“Week” key), hour (Hour) and minutes (Min);
- set the turn-on time (press the “Timer” key once), and the inscription “On 1” will appear on the liquid crystal display. After which the operation (turn off) time of this timer is set. Setting the time and date is done using the “Week”, “Hour” and “Min” keys. When you have finished entering, press the “Timer” button again. Programming of several tasks is carried out using the same algorithm;
- To view the list of tasks, press and hold the “Timer” key for several seconds;
- Having completed programming, press the “Clock” key to switch the timer to operating mode.
Please note that completing the entered tasks is only possible when the timer is in “Auto” mode. After setting the “Manual on” mode, the device works like a regular socket, and the “Manual off” function turns off the device.
This function allows you to automatically turn on devices connected to the device randomly. The socket with a timer is turned on in the time interval from 18:00 to 6:00, the operating interval is up to 32 minutes. The function is activated by pressing the “Random” button.
This function allows you to create the illusion of the presence of people in the house, which can scare off intruders in your absence.
Expert opinion
It-Technology, Electrical power and electronics specialist
Ask questions to the “Specialist for modernization of energy generation systems”
How to set up a mechanical and electronic socket with a timer K1 any relay with an operating current of 50mA and a 12V winding, respectively, its contacts must be designed for switching voltage 220V;. Ask, I'm in touch!
Application
Read the instructions carefully before connecting an electrical appliance to an outlet with a timer.
Attention:
You cannot connect an electrical appliance to the network if the load is more than 16A. Make sure that the plug of the electrical appliance is firmly connected to the outlet. To clean the socket, you need to remove it from the network and wipe it with a dry cloth.
Do not immerse the socket in water or any other liquid.
Heating electrical appliances should not be left plugged into an outlet unattended. The manufacturer advises not to use the outlet with such electrical appliances.
Guide: how to make a device with a mode setting for several hours with your own hands
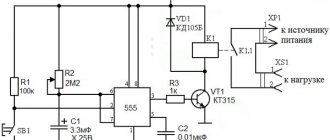
If creating a programmable socket with a timer requires not only knowledge of electrical engineering, but also microcontroller programming skills, then making a device with your own hands that sets the mode for several hours is quite possible. Below is a schematic diagram of such a device.
What kind of lighting do you prefer?
Built-in Chandelier
Socket circuit with analog timer
- A, B – connectors for connecting the load;
- comparator DA1 – KR142EN19;
- resistors: R1 – 10 kOhm, R2, R3 – 1 mOhm;
- capacitors: C1 - 1 µF 400V, C2 - 1000 µF 16V, C3 - 100 µF 16V;
- diodes: VD1, VD2 – 1N4005, VD3 – D815E, VD4 – KD521A;
- K1 – any relay with an operating current of 50mA and a 12V winding, respectively, its contacts must be designed for switching voltage 220V;
- SB1, SB1-2 – power button;
- K1-1 – relay contacts K1.
The figure below shows an example of the circuit board layout for this device.
The operating principle of the device is as follows:
The shutdown time is regulated by variable resistor R2; if you need to increase it, you can install a larger capacitor C3. The device does not require configuration; it can be used immediately after assembly.
Of course, the functionality of this device will be significantly inferior to such models as EL-01 or EL-02 from Robiton (Germany), but on the other hand, it does not require fine tuning and can be used even in the cold, for example, an outdoor socket in a protective case.
In addition, the cost of a homemade socket with a timer (automatic shutdown function) will be significantly less than the price of a finished product with digital control.
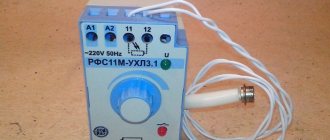
For the price review, we chose the TMH-E-5 electrical socket from Elektrostandard, which has an information display. As the survey showed, this model is in significant demand.
Photo: model TMH-E-5
| City | Price $ | City | Price $ |
| Ekaterinburg | 11,30 | Krasnoyarsk | 11,10 |
| Irkutsk | 12 | Minsk | 10,85 |
| Moscow | 10,80 | Omsk | 12,00 |
| Permian | 11,00 | Khabarovsk | 11,00 |
| Chelyabinsk | 11,3 | Tomsk | 11,70 |
| St. Petersburg | 10,8 | Novosibirsk | 12,10 |
| Krasnodar | 11,00 | Dnepropetrovsk | 12,20 |
The table shows that a socket with a timer in Moscow, Minsk, Khabarovsk, Chelyabinsk, Novosibirsk and Krasnodar costs approximately the same. From this we can conclude that the price will not be much different in other regions, for example in Voronezh. Thanks to the development of online commerce, buying timer sockets or other products is no longer a problem.
Instructions for programmable socket TGE 2A
The TGE 2A model can often be found in the assortment of stores offering “smart” equipment. A programmable socket (instructions for use are included, but not everyone can set up the device the first time) of this model is popular among buyers. To configure it correctly, you first need to prepare the device:
- completely discharge the outlet and restore charging to 100% (takes about 11 hours);
- using a pencil, carefully press the Master clear button, thereby clearing the memory of program functions;
- re-program the device.
Electronic
Using the TM24 model as an example, let's look at how to set up an electronic socket with a timer.
When you turn it on for the first time, you must leave the device in the outlet for 12-14 hours to charge the built-in battery.
This programmer has the ability to configure twenty on and off programs.
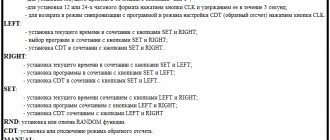
To start using the outlet, you must first set the current time. You must hold SET for 5 seconds until the day of the week flashes. Use the RIGHT or LEFT buttons to set the desired day. Pressing and holding SET again takes us to setting the clock. Using RIGHT or LEFT we set the desired time. We repeat the same procedure to set the minutes.
Now you can start setting up the program. You can do this as follows:
- Press and hold RIGHT until “1_ON” appears, this is the first timer.
- After this, press and hold SET until the days of the week flash, use the RIGHT or LEFT buttons to select the desired day or combination of days.
- Next, using SET, select the hours and RIGHT or LEFT the desired value, and so on with the minutes.
- Then we repeat the operation while holding RIGHT until the value “OFF_1” appears.
- We repeat the setting similar to the point above, set the day, hour and minutes.
- To exit programming mode, press CLK.
Instructions for setting the parameters of an electronic socket are provided in the video below:
Setting up the remaining sockets with a timer is no different from the installation algorithm described in the example and should not cause difficulties. Do not forget to change the clock to winter and summer time for more correct operation of the device.
We hope our instructions were clear and useful for you. Now you know how to set up a socket with a mechanical and electronic timer!
Expert opinion
It-Technology, Electrical power and electronics specialist
Ask questions to the “Specialist for modernization of energy generation systems”
TGE 24 instructions The device stops working, the LCD display does not display any information, the back wall of the device is cold; a working feron timer is warm. Ask, I'm in touch!
Masterclear socket specifications
When using smart plugs, you need to know the general rules for their operation. They, like most electrical devices, are designed for a certain load - 16 A, exceeding which can cause various damage to the device and even cause it to fail.
For example, when you turn on a heater with a power of 5 kW, the current will be 25 A, which is detrimental to the outlet; it will simply burn out. Also, when connecting the plug, you must pay attention to ensure that it is tightly connected. The socket should be cleaned with a dry soft cloth before connecting to the electrical network and, under no circumstances, should it be wet or immersed in water.
Setting up and using a socket with a timer
- No food is served from 1 a.m. to 2 p.m.
- After two in the morning the pump turns on for fifteen minutes.
- From four to five it is off.
- At 6.00 the pool filter runs for fifteen minutes.
- Afterwards this happens at nine and twelve o’clock, again for fifteen minutes.
- At 3:00 p.m., peak bathing time, we turn on the pump for thirty minutes.
- At six and nine in the evening we make the pump run for thirty minutes.
- And the final cycle at twelve at night is to filter the water for 15 minutes.
Special Random mode
Random is another interesting feature of the new generation of sockets. Using this option, you can automatically connect the device to absolutely any electrical object in the house. All that is needed is to set the intermediate interval of the two devices and activate the function by clicking on the corresponding Random button.
This function will be especially useful when the owners are temporarily absent from the house. The socket can create the illusion of people in the house and can, to some extent, prevent a robbery attempt.
Electronic timer socket
Let's solder it. We make sure that it is really faulty.
We immediately think about what its stabilization voltage might be. Based on indirect signs, such as the voltage on the relay and the filter capacitor, we can assume that it is at a voltage of about 40 volts:
And so that it does not dangle, we secure it with a glue gun:
We connect the device being repaired to the network. We measure the voltage on the capacitor and battery. Everything should be normal or slightly underestimated, which will not affect its operation in any way.
Attention! Be careful when setting up. This timer does not have galvanic isolation over the network. Secondary circuits have high potential.
After the repair, all three feron TM22 61925 sockets feel normal. The very first of them has been operating for four years after renovation.
Expert opinion
It-Technology, Electrical power and electronics specialist
Ask questions to the “Specialist for modernization of energy generation systems”
Sockets with an on and off timer: setup instructions, types, basic functions, how it works Using an electronic timer, you can set various simple or complex programs for a week or even a month, and also show the current time and parameters of the installed programs on the display. Ask, I'm in touch!
Possibilities
Using sockets with timers, you can solve a variety of problems. Often, devices are equipped with the ability to create an immersive effect, allowing you to turn on and off the lights in a room according to a random schedule or at a given time, even when residents are not at home.
The software allows you to save electricity. For example, you can configure the program so that when the owners are absent from the house, electronic heating equipment is turned off. In this case, heating devices can be turned on shortly before the arrival of residents in order to have time to heat the premises to a sufficiently comfortable temperature.
Outdoor lighting can also be turned on and off according to a specific schedule. Using the device, it is possible to solve another problem - turning on and off the irrigation system in the garden according to a schedule.
Timers are often used where there is a need to adhere to a strict schedule, for example, in aquariums and swimming pools. Using time tracking devices, the operation of filters, compressors and lighting equipment is monitored here.
Features of timers on electromechanical relays
This variety has only two options for functioning - weekly and daily. The timer can be programmed here using a graduated wheel and several levers. All elements are usually located on the front panel of the device. Lighting timers of this type are either installed permanently in a rail or a special box, or simply plugged into an outlet.
This option should be chosen by those for whom the smallest switching range or setting programs with an accuracy of one second is not so important. With all this, ease of setup for many can be a completely decisive positive argument when choosing. However, low accuracy and possible program failures due to the lack of an additional power source will become the main problems of such a device in the future. In addition, the gear teeth gradually wear out, which will affect the serviceability of the adjustment wheel.