Electric warm baseboards have become widespread in our country relatively recently, although they have been used in Western Europe for more than 20 years. This is due to the fact that this auxiliary heating system has some features in installation and operation that hinder its widespread use.
At the same time, the efficiency of a warm baseboard is 30% higher compared to a conventional classic radiator.
The efficiency of a warm baseboard is 30% higher compared to a conventional classic radiator
Installation Features
When deciding to install a heating device, you don’t have to resort to the services of specialists.
Installing a warm water baseboard with your own hands will not be difficult. Before starting work directly, it is necessary to study the diagram, as well as carry out the necessary calculations and measurements. You should prepare all the necessary tools: adjustable wrenches, pliers, wire cutters, sharp scissors, a hammer and a drill. To install the plinth, you will need thermal boards, as well as additional components. The latter include:
- connecting adapters for various sections and plastic pipes;
- pipes for connection;
- rotary corner pipes;
- protective pipes are red and blue.
Don't forget about the pipe rotation angles
Installation of the water baseboard should be carried out strictly following the instructions. Its installation diagram looks like this:
- Pipes are laid, with the distribution manifold serving as the starting point.
- The distance between the collector connection point and the baseboard itself is measured.
- The pipes are adjusted in size according to the measurements obtained and laid into the wall so that the blue icon is on top and the red icon is on the bottom.
- The place where the plinth is mounted is covered with self-adhesive tape.
- Installation of the aluminum profile starts from the corner.
- The profile is attached to the wall using self-tapping screws or silicone.
- It is necessary to move 15 cm away from the corner, drill holes for the dowels and install the clips at a distance of 40 cm from one another.
- To install convectors, plastic pipes must be adjusted so that they are attached to the baseboard section as accurately and firmly as possible.
- To install the coupling correctly, you need to put a nut and bushing on each pipe and provide them with a rubber gasket.
- A sleeve must be inserted into the plastic pipe for support.
- An adjustable wrench is used to twist the pipes.
- The thermal board is applied to the wall, the number of brass ribs is adjusted (extra ones can be removed using wire cutters).
- The next section is connected using an adapter. During installation, you should make a 1 cm indent under the decorative elements.
- At corners, special corner pipes should be used that follow the shape of the corner. They are installed similarly to pipe connections using bushings, nuts and gaskets.
- The final section is corrugated stainless steel, fastened in a similar way to other couplings.
- The plinth cover is attached as follows: its inner surface is covered with electrical tape, applied to the profile and snapped into place with clips.
- At this stage, decorative plastic plugs and corner joints are installed.
- The last step is to connect to the collector and start the water.
Installation of electric warm baseboard:
General scheme of work
Before installing a warm baseboard, you should calculate the required power of the system and decide on its type. The number of modules that will heat your room depends on:
- general thermal insulation of the house;
- total glazing area;
- climate of the region.
The general installation of warm baseboards, regardless of the type chosen, is a fairly simple process that can be divided into the following stages:
- Before installation, mark the installation line of the panels; the warm baseboard should be located at a height of 1 cm from the floor.
- The back panel is applied to the approximate line and markings are made for mounting holes, which are then drilled with a hammer drill.
- The panel is secured with self-tapping screws and plastic dowels or glue. There are stops on the back of the strip that provide the required 15 mm gap between the wall and the device.
- A heat-insulating tape is glued between the wall and the heater body, its edges are carefully trimmed.
- Mount brackets for convectors. For this, dowels are used, the installation step is 40 cm. A fluoroplastic gasket is inserted into each bracket.
- For the corner connecting elements of a warm plinth, prepare and install the upper parts of the corners with your own hands in advance.
- Hang warm baseboard panels.
Features of installing the electrical system
Do-it-yourself installation of a warm electric baseboard has its own characteristics. Externally, such a system is no different from a water system, but the filling is completely different:
- Inside the heating element, a heating element is inserted into the lower copper tube, and a heat-resistant power cable with silicone insulation is laid inside the upper copper tube.
- The power supply for such a warm baseboard is switched with your own hands by a thermostat with an air sensor, which, by turning the system on and off, maintains the required temperature in the room.
- A characteristic feature of the electrical system is its complete electrical safety. The contact points are first insulated with heat-shrinkable hoses to protect them from moisture, and special boxes protect them from mechanical stress.
Features of installing a water system
Before starting work on installing a warm water baseboard with your own hands, it is imperative to determine the number of sections of the water heater
When making calculations, it should be taken into account that the length of one plinth should not exceed 12 m, otherwise large heat losses can be caused:
- Work begins with the removal of plastic pipes from the heat source - an individual boiler or central heating system. To do this, measure the distance from the distribution source to the first section of the warm baseboard with your own hands. Then cut pieces of pipes to the required length and connect them to the heating system through the floor or wall.
- Prepare the heating radiator - remove the two outer lamellas and place connecting nuts on the copper tubes.
- Using fittings, connect the copper pipes to the plastic outlet pipes. Attach rubber gaskets between the nuts and fittings. Install rotating pipe elements at the corner joints and ends of each circuit.
- Apply heat-reflecting tape to the inner surface of the front panel. Using brackets and screws, secure the panel to the upper and lower back strips.
- Install the decorative elements of the warm baseboard with your own hands - corners, plugs, caps for screw heads.
After connecting the warm water baseboard, do it yourself by crimping, balancing and washing the circuits. Also, do not forget about setting up automation. After this, you can put the system into operation.
Device and technical features
Externally, the heating device looks unremarkable: it is a long baseboard no more than two tens of centimeters wide.
The design of the device includes:
- radiators made of brass in the form of thin plates, they warm up and give off heat to the air;
- a module containing coolant, pipes through which the liquid circulates;
- decorative closing panel with a slot for the passage of heated air;
- rear strip protecting the wall from the high temperature of the heater.
The operating principle of the heater is very simple. The water is heated in the system’s boiler, then the heat is distributed through the pipes around the entire perimeter of the room. The heat flow moves from the floor to the ceiling, uniformly heating the entire space of the room. Heat flows along the walls, warming their surface. The wall also begins to release thermal energy to the air.
The coolant in the baseboard can be heated up to 70 degrees, but maintaining such a high temperature is not recommended due to possible damage to the walls and their decorative coating. The optimal temperature of radiators is about 40 degrees. This indicator will ensure uniform heating of the air in the room to a comfortable temperature of twenty-four degrees.
Advantages and disadvantages
Despite the fact that the heated baseboard has a compact size, it can surpass any heating system in its performance characteristics. Its design has the following advantages:
- Hygiene. In rooms where such heating is located, the walls will never become moldy.
- Uniform heating of the room. The air in the rooms has the same temperature, both at the floor and at the ceiling, with the only difference being only 1 degree.
- Saving on electricity. During operation, a warm baseboard consumes no more than 0.5 kilowatts per 2.5 meters of battery.
- Safety. Fire and electrical safety properties allow this structure to be installed in wooden buildings.
- Room space. The small size of the equipment excludes the presence of large radiators.
- Design. The presence of decorative skirting boards makes it possible to decorate the room in an original way.
- Ease of installation. You can install the structure without specific skills.
They can also create the comfort of a warm floor, not only indoors, but also on balconies, terraces and greenhouses.
But, despite such positive qualities, warm skirting boards also have their disadvantages, which are worth paying attention to when choosing them:
- High price. Expensive and high-quality materials are used to manufacture this model.
- To avoid short-circuiting the wiring, this device should not be used in buildings with high humidity.
- Models cannot be placed behind large furniture, as the heat supply will be reduced.
Having considered all the qualities of the model, you also need to familiarize yourself with the principles of their heating.
What is the design of a warm baseboard
As you can guess from the name, this design is very similar to a regular baseboard. The external collapsible box is made of durable materials; its width is about 3 cm and its height is 14 cm. Inside it, a coolant (water or an electric heater) is placed on specially designed holders.
A warm baseboard is laid around the entire perimeter of the room or along one massive wall. It heats the walls, which in turn reflect heat into the room. This thermal radiation provides comfortable and uniform heating, and also has high efficiency. But it should be remembered that the wall must have good thermal conductivity: so, next to wooden walls, a warm baseboard will be ineffective.
Warm skirting boards will perform best along damp and cold walls, in rooms with panoramic glazing (for example, in a greenhouse, insulated balcony), in apartments with high ceilings. You can place them at the head of the bed or next to your workspace by the window. They are installed in a swimming pool, in a store, in an office.
General information
The compact design does not reduce its effectiveness. The time required for design and installation is the same as for installing standard radiators. Masking the heating parts with an aluminum profile, such a plinth does not spoil the interior of the apartment. It has low sides and evenly distributes the heat that flows along the floor and walls of the room.
There are two types of baseboards, which differ in the type of coolant (water, electricity) and, accordingly, structural elements and connections.
Standard indicators
The standard installation, which is manufactured in a factory, has a power of 240 watts. This is the optimal indicator for a room whose perimeter is approximately twenty meters (taking into account the average ceiling height).
Frequently asked questions concern the possibility of making such a radiator yourself. In principle, it makes sense to do this yourself, but you need to be prepared for the fact that the process will take a lot of time, effort and finances. In some cases, such an experiment turns out to be more expensive than buying a ready-made warm baseboard.
Baseboard heating is comfortable, beautiful, economical
A radiator heating system and heated floors are not the only way to heat a room. Recently, warm baseboards have become increasingly popular. This type of heating appeared on our market only a few years ago and there is not much experience in its operation yet. However, it is quickly gaining popularity - it is the most discreet and very comfortable type of heating.
Warm baseboard - small heaters located along the floor around the perimeter of the room. They are named so because of their location and size: the thickness of such a heater is 2.5-3 cm, which is comparable to the size of a standard floor plinth. The height is greater: 12-15 cm, but everything looks organic
What is important: such a system does not limit the installation location of furniture and decorative items, since heat is transferred not by convection, but by radiation
This is what baseboard heating looks like. No more other heating devices
Installing a thermostat for a warm electric baseboard
Before attaching the skirting boards to the floor, you need to take care of the thermostat. Its installation also has its own nuances that must be taken into account during the installation process: it should be located at a height of approximately 1.2-1.5 m on a section of the wall free from furniture and decorative items.
Related article:
Thermostats with air temperature sensor
Operating principle of a thermostat with temperature control. Basic functions of the thermostat. Types and types of thermostats.
Installation is carried out as follows: the rear panel of the device is placed against the wall and, through the mounting holes, appropriate marks are made at the mounting points using a pencil or marker. Then holes are drilled into which dowels with a diameter of 6 mm will fit. The dowels are secured, and then the device panel is attached to them using self-tapping screws.
After this, you need to connect all the cables that run from the device to the baseboards, temperature sensors, as well as the power source, that is, the outlet. All that remains to be done after this is to install the top panel of the plinth and check the serviceability of the system in all modes.
Steps 6 and 7: preparation and installation of the heating module
It is also worth thinking about what type of installation you want to use: open or closed. The second option is possible when the installation of a heated baseboard is carried out in parallel with the rest of the renovation in the room. In this case, it makes sense to try to hide all the cables in the wall. Otherwise, use special boxes designed for laying cables on top of the wall.
Helpful advice! Pay attention to the cross-section of the cable that you choose to connect to the AC network - it is recommended that it be at least 2.5 cm² if you need to connect a whole block of panels at once.
You can also use the information the manufacturer provides on the packaging as a guide. If you purchase skirting boards from a trusted manufacturer, the kit will always come with detailed installation and connection instructions, so it won’t be difficult to carry out all the necessary work yourself.
As for testing the newly connected device, it is worth spending some time on this. Give the device the opportunity to operate in all temperature conditions for some time. This will allow you to verify that the system is working properly. At the same time, carry out constant monitoring so that if any malfunction occurs, you can take appropriate measures.
Steps 8 and 9: laying and connecting cables, installing external trim
Also, be sure to make sure that the thermostats react accordingly when a certain temperature is reached and automatically turn off the heating of the system.
Baseboard heating
Despite the fact that in our country what a warm baseboard is became known not so long ago, in Europe premises have been heated using this method for several decades. This technology is very simple, but at the same time quite convenient. The basis is metal (most often copper) pipes, which are also the heating element. The pipes are installed in the same place where the baseboard usually runs, that is, along the perimeter of the room. Then they are covered with a metal box made of plates with a corrugated surface. Due to this design, the box acts as a heat exchanger, thereby increasing the efficiency of the structure.
In general, a water baseboard consists of the following elements:
- front panel with holes that ensure air flow (standard size: width - 3-4 cm, height - 15-20 cm);
- rear panel - facilitates installation of the structure and protects the wall from constant exposure to high temperatures;
- heating radiator that performs the heating function (standard dimensions - 1 m x 0.4 m x 1.6 m);
- rotating side plugs;
- a heat exchange module consisting of two tubes through which water circulates.
Due to the fact that the baseboard is installed around the perimeter of the entire room, the heat gradually rises, and then the entire room is evenly heated. As a result, this technology does not cause temperature changes. Since the heating element is hidden under the front panel, it is not noticeable, which distinguishes it from massive radiators. As you can see in the photo, the warm baseboard looks very neat; it can be additionally decorated so that it better matches the overall style of the room. The system is effective, but at the same time quite simple to install. Having minimal skills, you can carry out installation without involving professionals.
Construction of a plinth convector
The electric baseboard heater has a heating element made of a special alloy as a heating element, resistant to high temperatures and ensuring durability. The tube into which the heating element is inserted is long.
The principle of operation of a baseboard heater is the same as that of electric heated floors. Its design includes:
- A thermostat that ensures that the temperature inside the apartment is maintained at a given temperature. With its help, you can set various modes within the framework of its functions.
- Thermal sensors installed on the wall at human height to take the current temperature values and transmit them to the thermostat.
USEFUL INFORMATION: How to bleed air from a heating radiator: use the Mayevsky tap
How to make a warm baseboard with your own hands
Even if made in Russia, this pleasure is not cheap. But what if you want to try such a system, but don’t have a lot of “extra” money? Do it yourself. There are two working options.
Option one
Unannealed copper pipes with a diameter of 12 mm and roofing copper sheets 0.4 mm thick were used. The order of work is as follows:
- Cut a strip of roofing copper (60 cm) with a grinder into strips of 15 cm.
- The edges of the full length strips should be beaded at an angle of 90 o and the flange length is 7-8 mm. The length of the strips is no more than 3 meters - it is inconvenient to work with large pieces.
- Solder copper tubes to the back side of this plinth. To do this you need solder (plumbing solder containing 3% copper) and a torch. When soldering, point the torch at the tube: the strip is thin and will warp if overheated. The tube can withstand heat normally.
- Bend the ends of the tube slightly before soldering. This will make it more convenient to put adapters on them.
- For assembly, oil and petrol resistant hoses were used that can withstand working with coolant up to 120 o C (internal diameter 12 mm). At the connection points with the pipe they were secured with ordinary clamps.
- To regulate the temperature, a manually adjustable thermostat is installed.
- The joints are covered with similar inserts/plinths made of copper, but without pipes.
- The panels are attached directly to the wall using standard mounting clips (by the pipes). Do not insert them into the recesses - most of the heat is lost.
This system has worked in a wooden house for 9 years. There were no problems or need for repairs. The coolant temperature at the inlet is from 50 o C to 70 o C. In the room, 20-21 o C when increased is too hot.
Watch the video about the features of installing warm baseboards. May be useful.
Second option
In this case, aluminum profiles for working with drywall were used to make a warm baseboard with your own hands. Holes are cut (sawed) in them with a grinder at the top and bottom, after which they are attached to the walls. Two copper pipes are laid on a thin aluminum ceiling profile, screwed with aluminum wire. This entire structure is laid inside and fixed to the wall so that the pipes are one above the other. The pieces of such a homemade plinth were assembled by welding with copper pipes and fittings. “Front panel” is the same profile, only painted with radiator paint to match the walls (floor). This homemade warm baseboard is less effective and more difficult to clean, but it is also very functional.
“I have a baseboard like this at home. In addition to heated floors. I advise you to install it too. The warm baseboard does its job well. Of course, it cannot be compared with warm floors in terms of power, but still there is noticeable warmth from it.”
“I bought a Megador 600 W for a 9 m2 bedroom. At first it worked at full power, but now we set it to maintain 20 degrees at 200 W. This is enough for my area, we don’t need a higher temperature, we don’t like it. And at the same time, on the wall where the heater is located, our ventilation hole is almost always slightly open. I'm happy."
As you can see, reviews about warm baseboards are positive. This is no wonder: the heating is efficient, comfortable, and even invisible. The only thing that spoils the picture is the high price, but there are options for making it yourself.
Like everything new, the plinth system has many critics and theorists. Their main thesis: “It’s stupid to heat walls and then heat the air. It’s better to heat the air directly, and then start heating the walls.” The point of view is clear. This is what is used for convector heating. But the result and its shortcomings are known to everyone. And for the efficiency of heating the walls, an experiment was carried out: in one room the air was +12 o C, and the walls were heated to +37 o C. And the people in it were sweating. In another, the air was heated to +40 o C, and the walls were cooled to +12 o C, and people were freezing.
How to install a plinth on the floor: do-it-yourself installation
Compared to the installation of any underfloor heating system, the installation of heated baseboards does not require too much construction work. You can install the baseboard yourself, and it’s quite simple to do. Due to their low weight, such heating devices are easily attached to drywall or any other partitions, and you do not have to worry about their fixation.
The main thing you will need during the work process is a hammer drill and the ability to use it. When purchasing skirting boards, you will receive self-tapping screws and brackets in the kit, which you will use to mount them.
Helpful advice! If you want to decorate only part of the room with an electric baseboard, and not its entire perimeter, then in the remaining zones you can place a regular decorative baseboard, which will look the same in appearance as a warm one.
The installation of such a heating element is not carried out close to the floor surface, but with a certain gap of about 1 cm. In this case, the distance from the wall should be about 15 mm in order to provide convection to the device and prevent the device from overheating.
Steps 1 and 2: Preparing the holes and securing the bottom strip to the floor
Sequence of installation work
In order to secure the electric baseboard, you first need to measure the required height relative to the floor. Mark it with a simple pencil on the wall. Then, placing the plinth against the wall along the horizontal markings, determine the places where holes for fastenings should appear in the future. Also mark them with a pencil. Then drill holes at the marked points using a hammer drill and insert the dowels that come with the kit. Next, screw the panel using self-tapping screws.
After this, you need to hang two brackets on it, on which the heating element will be installed. All you have to do after installation is connect the device to the network, not forgetting the thermostat and air temperature sensors. When all the elements are connected, the entire interior is closed with a decorative aluminum panel.
As you can see, the process of installing a warm baseboard does not cause any particular difficulties. There are only two nuances that need to be taken into account during the work process:
- in order for the plinth to look aesthetically pleasing, all panels must be installed at the same level;
Steps 3 and 4: installing insulating tape and attaching the top strip to the wall
- if we are talking about installing a warm baseboard in a fairly large room, and the number of panels that need to be connected exceeds 17 pieces, it is necessary to use several blocks. This is primarily due to the fact that the total power of the panels connected to one unit should not exceed 200 W. Moreover, if several blocks are used, they must be connected separately and in parallel.
Calculations must be made based on the thermal output of each element. Due to the fact that the power of the device can be different, there is no single formula for calculation, and the only thing you can use as a basis is that 1 kW of thermal energy corresponds to 10 m² of floor surface that will be heated. However, there is an exception here too - this ratio is only true if the ceiling height in the room does not exceed 2.8 m.
Helpful advice! If you do not want to do the fastening yourself, you can invite a professional to carry out the calculations and installation of the skirting boards. The price per meter of installation in this case will be about 1000-1200 rubles.
Step 5: attaching brackets in 50 cm increments
Advantages of using warm baseboards
The use of such a modern heating system provides many advantages for consumers, namely:
- the ability to save free space due to its compact size, which is very important for small rooms;
- creating comfortable conditions for all living things in a heated room. The warmth of the baseboards provides an optimal microclimate for humans, animals and plants. Especially warm plinth is suitable for corner apartments, where, if used, the walls will be completely warmed up and thus you can forget about the fungus;
- no condensation on the windows and uniform heating of the entire room;
- due to the absence of convection currents, as with traditional heating, the level of dust in the room decreases;
- high efficiency at work;
- absolute safety and ease of operation;
- ease of installation and the ability to fit into any interior due to the variety of designs and color schemes;
- energy savings, which is approximately 40%;
- affordable price.
Water warm baseboard
Particular comfort in residential premises can be created by assembled warm water baseboard with your own hands. If we look at the water plinth from a constructive point of view, we will see compact modules “stretched” in length.
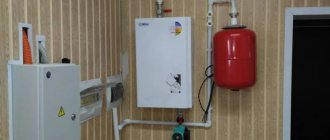
Private households or public institutions are most suitable for installing baseboard water heating systems. The necessary conditions for installing warm baseboards are the presence of a gas boiler and a central water supply.
In some cases, boilers operating on solid and liquid fuels are used. You will also need a reserve tank (water tower) to replenish the water level in the heating system.
Skirting convectors with water coolant are installed around the perimeter of the room. The modular liquid electric heater can be of various lengths. In the corners of the room, the modules are connected with special corner elements, thereby filling the completely heated perimeter of the room. Thanks to this placement of baseboards, the room is heated more evenly than when heating with conventional water radiators.
Otherwise, you may be fined and forced to dismantle the heaters.
Water converter design
The design of the plinth is quite simple. The upper pipe, as a rule, exits the gas boiler system, passes through the entire perimeter of the heated area and passes into the lower return pipe. The lower pipe returns the cooled coolant to the gas boiler.
The pipelines are mounted in the housings of finned heat transferrs. Due to the ribbed structure, the heat transfer surface increases many times over, which significantly contributes to the active circulation of heated air masses.
To install a warm water heating baseboard yourself, you must have sufficient experience in installing plumbing equipment. When we talk below about the features of installing a warm water baseboard, we are addressing precisely such people. This will help when choosing a particular home heating system.
The principle of operation of water skirting boards
Cold air enters through the lower groove of the baseboard body.
Passing through the heat exchanger, the hot air slowly rises, spreading evenly throughout the entire volume of the room.
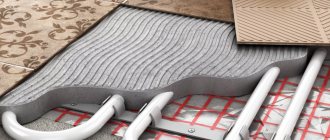
Installation of baseboard water heating system
In construction supermarkets you can always purchase the ready-made water heating system for baseboards you need. Having even a little experience in plumbing work, you can easily make a warm baseboard with your own hands. heating with warm baseboards, watch this video:
After appropriately marking the mounting points for the brackets and installing them, the liquid modules themselves are installed (see installation of electric baseboards above). Unlike electric heaters, installation of liquid modules requires careful monitoring of the tightness of pipeline connections.
Testing of installed skirting boards
Air molecules are much smaller than water molecules. Practice shows that checking the tightness of connections is more effective by creating high pressure of compressed air inside the pipelines.
Bubbles will appear in areas where leakage occurs. Leaks in connections are eliminated and the entire system is retested for leaks.
Pros and cons of electric skirting boards
Electric warm baseboards have both their pros and cons. For example, unlike radiators, it does not work on the convection principle, so air flows in the room do not actively circulate. As a result, zones of unstable temperature conditions in the room disappear, and it begins to warm up evenly.
A warm baseboard can show the greatest efficiency during its operation when used in rooms that have high ceilings and a large number of windows.
In addition, this heating system can be used on balconies. This is due to the fact that this device can simultaneously heat the floor and walls, which eliminates the possibility of mold and mildew in the room. Other heating systems do not have this effect.
If you install a warm electric baseboard yourself, you can get additional savings
As for the question of how much a warm baseboard costs, it usually has a price in the region of 870-1500 rubles per meter. At the same time, if you install a warm electric baseboard yourself, you can get additional savings. This heating system is affordable for most people.
Important! A warm baseboard can show its greatest efficiency during its operation when used in rooms that have high ceilings and a large number of windows.
It also performed well in rooms with an arched or wide entrance. This is due to the ability of a warm baseboard to create a thermal curtain.
The plinth fits perfectly into any interior and can be done discreetly
In addition, such a heating system allows you to quickly adjust the temperature regime of the room. At the same time, the plinth fits perfectly into any interior and can be done discreetly. It is compatible with underfloor heating, does not dry out the air in the room and can be easily installed and dismantled on site.
During the installation of electric baseboards, it will be necessary to consult a specialist in order not to disturb the uniform heat transfer in the room
As for the disadvantages of this method of additional heating, during installation of the electric baseboard it will be necessary to consult a specialist in order not to disrupt the uniform heat transfer in the room. Also, the device can damage the wallpaper in the places where it is attached, and the covers on it have a limited choice of colors.
If everything is in order with your finances, choosing a warm baseboard will be an ideal option for installing an additional heating system in the room
Well, perhaps the main disadvantage of an electric warm baseboard is the fact that it has a high level of energy consumption. As a result, its active use can create a fairly serious hole in your budget. This is also worth keeping in mind when installing it in your home. If everything is in order with your finances, choosing a warm baseboard will be an ideal option for installing an additional heating system in the room.
The warm baseboard is compatible with heated floors, does not dry out the air in the room and can be easily installed and dismantled on site
Operating principle and differences
Manufacturers of baseboard heating claim that the system is more economical than all other types of heating. Savings are 20-30%. This happens because lower temperatures are required to achieve a comfortable feeling. This is because most of the heat is transferred by radiation rather than by convection.
Almost all existing heating systems do not create the best thermal picture: warm air accumulates at the top, while cold air remains at the bottom. If the room does not have very high ceilings, the situation is tolerable, but in rooms with large heights this is critical. To equalize the temperature picture, forced convection is used: fans are built into heating devices that more or less effectively mix the air masses. But active air movement carries dust and germs. At the same time, stagnant zones still remain in the corners of the rooms, in which cold air accumulates.
When using baseboard heating there is no thermal cushion at the top, the air is fresh and the feeling is comfortable
Uneven temperatures and dust in the air are not all the troubles of convection heating. There is also dampness that appears on the walls. The fact is that convection heats the air. The walls remain cold. When warm air comes into contact with cold walls, condensation occurs, the walls become wet, and fungi and mold develop. Moreover, this picture is typical for houses and apartments with good insulation.
Baseboard heating works differently
The first important difference: the lower layers of air immediately heat up, which is already comfortable. Gradually and slowly rising up along the walls, the air cools, transferring heat to the walls
Therefore, it turns out that the top is not warmer (or not much warmer) than the bottom.
Only about 20-30% of the heat is spent on heating the air by convection. Everything else goes to heating the walls
And this is the second important difference. Heated air rises along the walls, rather than mixing with the rest (this effect was noticed by the scientist Coand)
Therefore, the rising warm flow cuts off the cold from the walls and heats them. Yes, while the walls heat up and dry out, a lot of energy (and fuel) is consumed. But after that the entire surface begins to radiate heat.
This is where the savings zone begins: a person feels comfortable if the wall temperature is 36-37 o C and the air temperature is 16 o C. We simply feel the heat emanating from the walls with the entire surface of the body. At the same time, the cost of maintaining the temperature of dry walls is low. After all, it is the water contained in the materials that is the best conductor of heat, and the air that replaces it, on the contrary, conducts heat poorly.
This is what one of the options looks like up close
That is why with such heating it is not so important whether there are pieces of furniture along the walls or not: it is mainly the walls that are heated, not the air. Let them take away some of the heat, but then they themselves will begin to give it back
But the walls will heat up anyway.
Stages of installation work
As for the installation stages of other elements of a warm electric baseboard, they are as follows:
- Determine the installation height of the heating elements. It should not be less than 1 cm above the floor surface.
- We place the back panel of the plinth against the wall horizontally and make marks in the area of the mounting holes with a pencil or felt-tip pen. After this, holes are drilled according to these marks into which plastic dowels are placed. With their help, a warm baseboard panel is installed and secured with self-tapping screws.
Warm baseboard design
- Next, we hang a couple of brackets on which the heating element will subsequently be installed. After this, you can turn on the device to the AC network, as well as install temperature sensors and a thermostat.
- The mounted structure is covered with a decorative panel made of aluminum.
In this case, during the installation process it will be necessary to pay special attention to 2 points:
- All plinth panels must be installed at the same horizontal level. This approach should ensure high-quality design in the room.
- Most manufacturers of electric warm baseboards offer to install no more than 17 warm baseboard modules in series. The fact is that they cannot collectively consume more than 200 watts of power. To prevent this from happening, all elements are connected in series. If you need to connect more than 17 modules, you will have to connect each unit separately.
By the way, it is worth calculating in advance the number of warm baseboard elements installed in the room. This calculation completely depends on the heat transfer performance of each heating element. Moreover, due to the fact that the dimensions of the equipment will be different in each case, such indicators will differ.
Joining warm floor skirting boards
Typically, the ratio is taken as 1.0 kW of thermal energy per 10 m² of heated floor area. However, it will be relevant only if the height of the ceilings in the room does not exceed 3.8 meters.
Operating principle of baseboard heating
Baseboard heating is quite effective due to the fact that it is not the air that is heated, but the walls of the room. The walls here act as radiators that maintain the temperature in the room. To ensure that air flows normally to the baseboard coolant and leaves it unhindered, special two slots are provided in the boxes.
For baseboard heating, the main thing is materials that must have high thermal conductivity. Heating the coolant to very high temperatures is not so important here.
It should be noted that this system can operate as a device that lowers the room temperature. It is enough just to fill the system with special coolant. The effect of such an application will be significantly lower than with heating, but quite noticeable.
The advantages of this system should be noted:
- complete absence of convection, which means no suspended dust in the air;
- baseboard heating is absolutely safe for humans;
- heat spreads evenly throughout the room;
- boxes and walls have a temperature safe for animals and humans;
- dry walls and air;
- amazing ease of installation;
- absence of any contraindications for use;
- baseboard radiators look quite aesthetically pleasing and also save space;
- significant fuel savings;
- ease of dismantling and repair;
- possibility of installing thermostats.
- high price of components - aluminum and copper;
- You won’t be able to make proper baseboard heating with your own hands;
- the most permissible length of the heating circuit should definitely not be more than 15 meters;
- the impossibility of any decoration of the baseboard;
- impossibility of installation close to furniture walls;
- placing heating elements very close to the wall leads to rapid destruction of the wall covering.
In today's conditions, when the materials used in finishing and construction help to reduce all heat loss to a minimum, and the installation of double-glazed windows limits the access of air into the room, baseboard-type heating has become quite relevant.
Video “Plinth heating”:
Installation of warm baseboard
Preparatory work
Before you begin installing a warm baseboard, you must first select the most suitable type: water or electric, depending on the most accessible source. Based on this, further work will be carried out. So, if it is a water baseboard, then you should think about how to connect it to central heating or an individual boiler, and if it is electric, then ensure a safe connection to the outlet.
Determining the number of skirting boards
In order to correctly calculate the required number of baseboards, you need to take into account the total power of such a system, adjusting it for possible heat loss for each room. The latter depend on the level of thermal insulation of walls, glazing of windows, outside air temperature, etc.
The less heat loss, the less power a warm baseboard is needed and, accordingly, the cost of such equipment, which is important. On average, power is calculated using the following formula:
- for an electric baseboard of 10 square meters, approximately 0.5 kW is required;
- for water, for the same area you will need twice as much power.
Determining the installation location
- The warm plinth is installed in one row at a distance of 1 cm from the floor and approximately 15 mm from the wall on two stops. The resulting gap is necessary to prevent overheating.
- First, mark the wall using a tapping thread along the level along which the plinth will be installed.
- Next, mark the holes for drilling by placing the back panel against the wall.
- Having drilled the holes, we insert plastic dowels into them and install the plinth module strictly according to the level. And so on until the end, until all the baseboards are installed.
- After this, we install special power supply jumpers and make grounding.
- Each of the modules is connected in series. At the same time, there should not be more than 17 pieces.
- We turn on the installed plinth to check its functionality and only then can we close the modules with lids and install all the plugs.
Installation and connection of the thermostat
- The thermostat is installed on an open wall at a distance of approximately 1.5 meters from the heating elements.
- To do this, we attach its back panel to the wall in order to mark the holes for drilling.
- We insert 6 mm dowels into the finished holes, and then mount the thermostat to the wall.
Cabling
- The heating elements are connected to the network, as previously mentioned, in parallel.
- The connecting cable can be hidden in the wall by drilling a hole for it or hidden outside in a special box.
- The cable is laid to a junction box or thermostat.
After all work is completed, the operation of the entire system is tested.
Types of heating baseboards
The baseboard heating system can be of two types: with electric and water heaters. At the installation stage, a system with warm water baseboards is more complicated (a collector or radial connection is required), but during operation it is more economical. An electric warm baseboard can be installed quickly - you just need to fasten the heaters to the wall, and immediately after installation it is ready for use. But heating costs, like any electric heating, are high.
One of the most inconspicuous heating systems is a warm (heating) baseboard
Heating device with warm water baseboard
The water baseboard heating system differs only in the non-standard shape of the heating devices. The key components do not differ from the standard ones: you need a hot water boiler, a collector unit and a pipe system with which the warm baseboard is connected.
There is also a combined warm baseboard - with an electric heating element and pipes for coolant
Please note: the optimal operating mode of the system is low temperature. Supply 40-50°C, return about 5°C lower
Therefore, you need to select a boiler or build a system based on this. If the boiler is gas, the best choice is a condensing boiler. When installing any other, the system requires a heat accumulator and/or a mixing unit to reduce and stabilize the temperature.
Connection method
There are also features in choosing the connection method. Connecting all baseboard heaters in series in a room is ineffective: by the time the coolant reaches the last ones in the heater branch, it will cool down greatly and they will remain cold almost all the time.
The radial connection diagram looks something like this
For a water heating baseboard, a radial system is used: devices are connected one at a time or in pairs. To do this, a collector unit is built into the system, to which the pipes that go to the heating devices are connected. The disadvantage of such a system is the high consumption of pipes. After all, each device (or small group) has two pipes - supply and return. The pipe flow rate is much higher, but the heat distribution is more uniform and the system itself is more reliable. Why is it more reliable? If pipes or radiators in one group are damaged, all others work normally.
Installation features
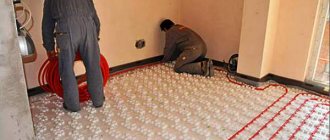
When installing water baseboard heating, the pipes are usually hidden in the floor. It will not be possible to lay them along the walls, since the space is occupied by heating devices. That is, installation of warm water baseboards is possible only at the renovation stage - the floors will have to be raised.
Very attractive when assembled
It is recommended to lay special polymer pipes in the screed - they are not subject to corrosion and have low heat transfer, that is, heat loss during transportation of the coolant will be small. But since these systems have limited availability for repairs, you need to buy high-quality products from well-known manufacturers, and this is not cheap.
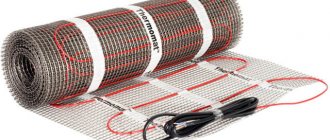
Electric warm baseboard
An electric heated baseboard differs in appearance from a water baseboard only in the presence of terminals for connecting power. Otherwise the view is the same. These are two tubes with perpendicularly fixed aluminum/brass/copper plates. In the lower tube there is a heating element - heating element, in the upper tube there are wires for connection.
General design of a heating baseboard
Installing and connecting an electric heated baseboard is much easier. You just need to secure it, stretch the wires and connect them to the terminals. To maintain the set temperature, a thermostat is built into the system, which turns the heaters on and off. The use of thermostats is desirable, as it optimizes operation and saves electricity.
Installation is really simple, but you need to connect the electric warm baseboard to a dedicated line with a correctly selected circuit breaker rating and single-core copper wires of the appropriate cross-section. So in this case, repairs are required - it is customary to lay the wiring in the wall, and for this you need to do it, that is, break the walls.
What is a warm baseboard
Warm baseboard is the latest heating system, which consists of an external collapsible box in which the coolant (pipes for water circulation or electrical conductors) is built-in. Heat transfer occurs due to the supply of electric current to it or to a closed circuit - hot water. Warm baseboards are usually installed around the entire perimeter of the room or along the coldest wall. At first glance, it is no different from a regular baseboard; it has approximately the same thickness from 2.5 to 3.5 centimeters. The only thing is that the height of the warm baseboard is slightly higher than usual and is approximately 14 cm.
There are two types of warm baseboard system:
- that runs on liquid (water or antifreeze) and must be connected to a central heating system or an individual boiler;
- that works from a socket or electric.
How is heating organized using a warm baseboard in an apartment?
A cabinet is installed in the bathroom or utility room, which houses the necessary equipment: heat exchanger, circulation pump, manifold and fittings. The heating system involves collector wiring. The pipelines are connected to the collector and are diverted from it through the rooms in which heating is installed.
Pipelines are connected to the manifold
Important! It is recommended to install a heating point for a system of warm baseboards before finishing the apartment.
A heat exchanger is necessary to heat the liquid to the required level and protect the entire structure from high pressure and temperature values. For heating installation, adapters are used, which usually come complete with a warm baseboard. For the liner, it is recommended to use pipes made of cross-linked polyethylene or metal-plastic analogues. Their diameter: 1.4 or 1.6 cm.
Warm baseboard installation diagram
Expert opinion
Afanasyev E.V.
Chief editor of the pol-exp.com project Engineer.
To regulate the temperature in the circuits, servo drives are connected to the room thermostat. This can also be done manually on the manifold.
Disadvantages of the system
Baseboard water heating also has disadvantages that you should be aware of before deciding to install it:
| Cost of materials | It must be admitted that while the cost of components for a baseboard heating system exceeds traditional batteries. This is a temporary drawback. With the growing popularity of such heating, the market supply will also increase. In the competition, manufacturers will reduce prices, but so far the supply on the market is modest, which cannot be said about prices. |
| Damage to walls where baseboards meet | This flaw in the system can be argued against. Provided the installation is of good quality, this problem should not arise. Difficulties arise only in an emergency situation when the circuit leaks. |
| Reduced work efficiency due to furniture | This problem can be avoided by creating a structure that wraps around large, permanently placed objects. Such maneuvers will lead to additional costs, but will pay off in the absence of energy losses. |
Installation of a warm baseboard system
When a warm water baseboard is installed, PVC pipes from the distribution manifold are first laid, and then the connection points are prepared. You should especially carefully monitor the correctness of the beam layout, since after pouring the screed it will be difficult to change anything. All connections are made during the construction process.
The system is installed only after the finishing of the room is completed. The first module is connected using a coupling, and then all elements are mounted in series. In the corners and at the very end, the connection is made using rotating polyethylene tubes. Each heating circuit is limited to a length of 12.5 m. Heating is carried out near the outer walls of the house. Internal walls are also used. Skirting boards are not installed in areas where plumbing fixtures, household appliances and bulky furniture are located. Then pressure testing is carried out, all circuits are balanced and the automation system is adjusted.
Radiators do not have to occupy the entire perimeter of the room, but must be located along the walls. Air enters the heaters from below and exits through the upper slots of the boxes.
Is the price per meter justified for installing a warm water baseboard?
The data from this table will be useful for calculations.
| product name | Unit | Price per m.p./piece, rub. |
| A heating element | m.p. | 2010 – 2120 |
| Front Panel | m.p. | 670 – 720 |
| Top mounting strip | m.p. | 360 – 400 |
| Bottom mounting strip | m.p. | 190 – 230 |
| Bracket for mounting the heater | PC. | 70 – 90 |
| Inner corner cap | PC. | 70 – 90 |
| External corner cap | PC. | 50 – 60 |
| End cap | PC. | 100 – 120 |
| Fitting for straight sections | PC. | 170 – 200 |
| Flexible tube with seals for 90° and 180° rotation | PC. | 415 – 440 |
To analyze the parameters of a warm water baseboard, the price and reviews should be studied together. The approximate cost of one linear meter of the system is 3,600 rubles. To equip a room of 20 sq. m. when installing a plinth along only two walls, you will need to spend 32,400 rubles. The price of standard aluminum radiators for such a room, together with Mayevsky taps and regulators, is about 8,500 rubles. According to construction forums, ordinary users do not experience significant installation difficulties in both cases.
When painting the outer surface of a water heating baseboard in a certain color to better match the interior, you will have to pay from 900 to 1,400 rubles. for 1 m.p.
Water baseboard heating
The main components of such baseboard heating are baseboard heating radiators, a distribution manifold, and plastic tubes that do not allow oxygen to pass through.
A baseboard heating system can be connected to central heating when the coolant temperature is no more than 85°C and the pressure is no more than 3 atmospheres. It is necessary to maintain such parameters in order to avoid the so-called water hammer. When installing heating, the following recommendations should also be taken into account:
- It is preferable to use copper tubes instead of conventional plastic ones.
- You can use a heat exchanger that receives heat from central heating and is built in using special copper plates.
- Install thermostats to each radiator.
- It is possible to install a special servo drive on a special distribution manifold.
- Install the circulation pump, thermometer and pressure gauge.
The principle of operation of warm baseboards
The essence of the very idea of heating with warm baseboards is that the heating system is located around the perimeter of the room near the floor. The heated air in the convector slowly rises along the walls. Due to this, the entire volume of the room is heated.
Warm baseboards practically do not take up much space. Despite the high power ratings, you can safely place furniture and other interior items near the convectors. The surface of convectors does not heat up to dangerous levels of temperature that cause burns.
The retail chain offers two types of warm baseboard systems for sale. These are electric baseboards and warm water baseboards. Let's look at each heater.
Electric warm baseboard
The heater consists of two horizontally located copper tubes. A power cable coated with silicone insulation passes through the top tube. A tubular electric heater is threaded into the lower copper tube. The entire system is controlled through an air temperature sensor by a thermoregulation unit.
When the temperature inside the room drops or increases, the heating elements periodically turn on and off, thereby ensuring a constant temperature regime.
Purchase a set of warm baseboards based on calculating the length of the heaters, rotation angles and other related elements. The heating element itself is a tubular electric heater (TEH) enclosed in a copper shell.
In turn, the copper pipe is threaded through a housing of ribbed heat reflectors (radiator). Electric heating modules are produced in several sizes. Depending on the length of the electric heater, its power changes, as can be seen from the table:
| 1 | 700 | 140 |
| 2 | 1000 | 200 |
| 3 | 1500 | 300 |
| 4 | 2500 | 500 |
Installation of electric skirting board
Only a person with extensive experience in electrical work can assemble their floor electric heater manually. Calculating the dimensions of heating elements, making radiator nozzles, installing connecting cables is a very complex and responsible job. Therefore, it is easier to buy ready-made heating elements for warm baseboards.
When a heating set of baseboards has already been purchased, preparatory work begins.
- I install the mounting box at a height of 4–6 cm from the floor. Connect the power wires to the junction box.
- A switch with a thermostat is mounted on the wall at a convenient height.
- A protective tape 3 mm thick is glued to the walls along the entire height of the plinth.
- Markings are applied to the walls for fastenings for heated baseboards.
- Drill holes for dowels in the places where fasteners are to be installed.
- Screws are screwed into the dowel through the technological holes in the brackets.
- The thermal heating module is hung on the installed brackets.
- The modules are connected with electrical wires in parallel.
- A residual current device (RCD) is connected to the system.
- Connect the air temperature sensor.
- The electric baseboard is turned on for control. If a malfunction is detected, correct it immediately.
- Install the plinth covering.
Work related to supplying electricity to the baseboard, connecting to an electric meter, and installing a thermoregulation system is best entrusted to a specialist.
Installation of a warm baseboard ensures complete electrical safety. The connections between the wires and the module contacts are covered with heat-shrinkable tubes. The tubes protect the contact surface from moisture.
Basic operating principles
Electric heated baseboards have an operating principle similar to that of a heated floor..
Electric warm baseboard diagram
At the same time, unlike this gender, it has its own characteristics in work:
- A warm baseboard is attached to the wall around the perimeter of the room in place of a regular baseboard, in contrast to a warm floor, which is laid on the subfloor. From the outside it looks like an ordinary decorative element.
- This heating system warms up not only the air, but also the walls next to which it is mounted, which reduces the level of heat loss passing through them.
Baseboard heating system
- A warm baseboard reduces the level of warm air convection. As a result, thermal energy is distributed evenly from the ceiling to the floor.
- This heating device prevents the movement of dust in the room due to moderate air convection.
The electric warm baseboard has an operating temperature range from +40 to +70°C, which allows you to have a wide range of temperature control in the room. By the way, such regulation can occur automatically without human intervention. As a result, the microclimate in the room will be optimal, and the homeowner will not be distracted by switching the thermostat settings.
The electric warm baseboard has an operating temperature range from +40 to +70°C, which allows you to have a wide range of temperature control in the room
It is also worth noting that a warm electric baseboard, calculated per section, emits 190 W of heat. This is approximately equal to the volume of heat generated by one section of a heated floor, while the baseboard consumes 30% less electricity for its operation. This indicator illustrates the savings possibilities with this heating system.
From a technical point of view, this heating device looks like an aluminum plate approximately 3 cm wide
From a technical point of view, this heating device looks like an aluminum plate approximately 3 cm wide. The height of such a heating element can range from 10 to 24 cm. As for color and shape, they can vary from model to model.
As for the interior of the premises in which it would be preferable to install such a plinth, it will suit almost any type. From practice we can conclude that electric skirting boards are best suited for rooms with panoramic windows. The fact is that heating radiators cannot be mounted under them, and thermal baseboards are quite capable of creating a thermal curtain. Moreover, such elements will fit perfectly into most interiors.
The “heart” of this system is a thermostat, which provides temperature control in the room where it is installed. The temperature itself is controlled using temperature sensors mounted on the walls.
The heart of this system is a thermostat, which provides temperature control in the room where it is installed.