Perhaps for some this will be a discovery as significant as the discovery of America by Columbus, that there is electricity everywhere around us. It literally permeates our entire lives. But even knowing this sometimes does not prevent our eyes from widening when we learn that tension can be obtained from the most ordinary things and even from food. Using what you have in the kitchen or garage, it is quite possible to build a simple battery at home.
Homemade battery from improvised means
The battery can be made from materials whose properties are similar to those of substances used in industrial conditions.
From lemon
The acid contained in the juice of the fruit acts as an electrolyte. Electrodes are made from thin wire, nails or needles. The iron element is the anode, the copper element is the cathode. The lemon is cut in half and placed in a small container (jar or glass). The wires are connected to the electrodes, the stripped ends are inserted into the pulp of the fruit at a distance of 1 cm from each other.
Using a multimeter, measure the voltage supplied by a homemade galvanic cell. If it is not high enough, several lemon batteries are connected in series.
Jar with electrolyte
Using this method, it is possible to assemble a device that resembles the world's first battery. Electrodes are made of copper and aluminum. Elements must have a large area. The aluminum electrode is connected to the wire using a clamp or bolt, while the copper electrode is soldered. The parts are immersed in a jar at a short distance from each other. A lid with holes is used for fixation. The following compositions are used as electrolytes:
Making batteries with your own hands.
- Ammonia. The substance is mixed with water in a ratio of 1:2. Ammonia cannot be used as an electrolyte. A suitable substance (ammonium chloride) has the form of a white, odorless powder. It is used as a fertilizer or soldering flux.
- Sulfuric acid solution. The substance is mixed with water in a ratio of 1:5. You cannot pour the acid first. In this case, the added water boils and splashes fall on the person’s skin and clothing.
The solution is poured into a glass container so that the distance to the edges of the jar is at least 2 mm. Using a multimeter, measure the resistance and calculate the required number of batteries. The principle of operation of a homemade element is similar to that of a salt power source.
Copper coins
The electrodes are made of aluminum and copper; 9% acetic acid is used as the electrolyte. Coins are cleaned of dirt by soaking them in vinegar. Circles are cut out of cardboard and foil. Cardboard products are soaked in a solution of acetic acid; they must absorb the electrolyte. A column is laid out from circles and coins.
The cardboard piece is placed first, the foil piece is placed second, and the coin is placed third. Wires are pre-connected to the extreme elements. Instead of soldering, the cables can be pressed to metal parts and sealed with tape. When the battery is used, the coin becomes unusable. You should not make power supplies from valuable products.
Battery in a beer can
The negative terminal is the body of the aluminum container, the positive terminal is the graphite rod. You will also need coal dust, polystyrene foam, water, paraffin candles and salt. The top of the jar is removed, a circle is cut out of foam plastic, which is inserted into the container. A hole for the rod is made in advance. The latter is installed in the central part of the jar. The remaining space is filled with coal dust. The material is impregnated with an aqueous solution of salt (3 tablespoons of product per 0.5 liters of water). The edges of the jar are filled with paraffin.
Potatoes, salt and toothpaste
The potato battery is intended for one-time use. It is used to produce a spark by shorting wires. To make the element you will need a large potato, insulated copper cables, salt, wooden sticks and toothpaste. The assembly is done like this:
- Potatoes are cut into 2 equal parts. A recess is formed in one half, where salt and paste are added.
- The ingredients are mixed until smooth. The electrolyte should fill the depression.
- In the other half of the potato, make 2 holes at a distance of 1-2 cm. They should coincide with the filled recess.
- The stripped ends of the wires are inserted into the holes, and the halves are combined. The wires must be immersed in the composition.
- Potato parts are secured with toothpicks. After a few minutes, the cables short out, creating a spark to start the fire.
A little theory
Device "on fingers"
Schematic structure of a galvanic cell.
Let us assume that we have a container with acid with zinc and copper electrodes immersed in it (Fig.). When the cell produces electrical current through an external circuit, the zinc on the surface of the zinc electrode dissolves into solution. Zinc atoms dissolve in the electrolyte as electrically charged ions (Zn2+), leaving 2 negatively charged electrons (e—) in the metal
Zn → Zn2+ + 2e—
This reaction is called oxidation.
While the zinc enters the electrolyte, two positively charged hydrogen ions (H+) from the electrolyte combine with two electrons on the surface of the copper electrode to form a hydrogen molecule (H2)
2H+ + 2e— → H2.
This reaction is called recovery.
The electrons used at the copper electrode to form hydrogen molecules are transferred from the zinc electrode through an external wire connecting the copper and zinc electrodes. Hydrogen molecules formed on the copper surface as a result of the reduction reaction are released in the form of hydrogen gas.
About electrolyte
The voltage across the cell depends on the acidity of the electrolyte, measured by its pH. A decrease in acidity (increase in pH) causes a voltage drop. The acid used does not affect the voltage other than through the pH value. This is not true for strongly acidic electrolytes (pH <3.4), where the zinc electrode dissolves in the electrolyte, even when the circuit is open. The two redox reactions listed above only occur when electrical charge can be transferred through an external circuit.
About electrodes
From chemistry: a number of metal voltages are used in practice for the relative assessment of the chemical activity of metals in reactions with aqueous solutions of salts and acids and for the assessment of cathodic and anodic processes during electrolysis. The reducing activity of metals (the ability to donate electrons) decreases, and the oxidizing ability of their cations (the ability to gain electrons) increases in the indicated row from left to right. Metals to the left are stronger reducing agents than metals to the right: they displace the latter from salt solutions. For example, the interaction Zn + Cu2+ → Zn2+ + Cu is possible only in the forward direction. Zinc displaces copper from an aqueous solution of its salt. In this case, the zinc plate dissolves, and metallic copper is released from the solution.
The most common metals are arranged in a series of voltages in the following sequence: Li, K, Ca, Na, Mg, Al, Mn, Zn, Fe, Co, Ni, Sn, Pb, ( H2) , Cu, Hg, Ag, Au.
In total, the farther the metals are from each other in this row, the greater the voltage that arises between them.
Theoretical conclusions
- It turns out that the energy comes not from the lemon or potato, but from the chemical change in zinc when it dissolves in acid.
- The higher the acidity (less pH) of the electrolyte (but up to pH <3.4), the higher the voltage
- The farther the electrodes are from each other in the voltage series, the higher the voltage
- Between identical electrodes the voltage should be 0
- There is no need to talk about significant current strength in such experiments. It is, of course, directly proportional to the area of the electrodes, but this area is such that to obtain an analogue of the average car battery would require several million cells from lemons.
You can start checking.
Required materials and tools
Before starting the experiment, prepare the following materials and tools:
- corrugated cardboard;
- flat copper washers with a diameter of 1 cm - 12 pcs.;
- flat zinc washers with a diameter of 1 cm - 15 pcs.;
- purified water;
- heat-shrink tubing;
- acetic acid 70%;
- salt;
- soldering iron;
- containers for preparing solutions;
- multimeter;
- sandpaper.
Corrugated cardboard is one of the materials for making batteries yourself.
lemon battery
Even from this fruit you can get electricity. To do this you need to prepare the following things:
- one lemon;
- a piece of something steel;
- something made of copper;
- and two pieces of wire for insulation.
First we will need to clean up our steel and copper items. Regular sandpaper will help with this.
Reference. An object made of steel can be the most ordinary nails. There are plenty of them in any garage. And for “something made of copper”, you can use coins in denominations of ten and fifty kopecks.
Now we stick a nail and a coin into the lemon. Between them you need to make a gap of about three centimeters. These will be our electrodes, all that remains is to connect the wires to them. You can just stick it right next to it. The coin is our positive contact, and the nail, therefore, is negative.
Reference. Lemon can be successfully replaced with an ordinary apple. The main thing is to choose the most sour one that you don’t mind using for experiments. And the acid is useful for the reaction to proceed.
A lemon or apple battery (if you take only one fruit) will produce about 0.5 or 0.7 volts. This is very little - you can’t charge even the simplest mobile phone. You need to somehow bring the voltage to three or even five volts. But how? Yes, it’s very simple - connect more fruits into a single chain.
Reference. To increase the charge of our circuit, it can be charged. It is enough to include a crown battery or even a mobile phone charger into the circuit.
Making lemons or apples produce electricity becomes possible because the copper element interacts with the steel element. The acid contained inside the fruit triggers this reaction. As long as there is at least a drop of acid inside or as long as the contacts are intact, the battery will continue to work.
Potato battery
If you have potatoes at home, then this is quite an energetic thing. True, one-time use. The potato battery can only be used once. For example, on a hike.
To obtain the battery, we will prepare the following elements:
- you will need large potatoes;
- copper wires in insulation;
- toothpaste;
- wood chips or toothpicks;
- table salt.
Cut the potatoes into two parts. It is advisable to do this lengthwise to get a larger cutting area. Cut out the core in one half to create a hole. Place a mixture of toothpaste and salt in this hole. The composition should fill the entire recess. This mixture will act as an electrolyte.
We make two holes in another piece of potato. The distance between the holes should be such that both are located above the electrolyte mixture when both halves are connected. These holes are needed for wires. The ends of the wires must be stripped of insulation to a length of two centimeters. Now we connect both parts of the potatoes and, so that they do not fall apart, we fix them with toothpicks.
We wait five minutes for the reaction to begin. Now we close the wires and see a spark at the end. This is how you can safely light a fire with a potato battery at a camping stop.
DIY coin battery
Even the coins that are in your wallet or piggy bank can generate electric current. From coins you can build the simplest galvanic cell, which in science is called a Voltaic column. We need to prepare:
- several copper coins (such as coins of fifty and ten kopecks);
- food foil;
- several sheets of paper;
- table vinegar or a solution of water and salt.
To make our structure look aesthetically pleasing, it would be better to use coins of the same denomination. Before conducting the experiment, you need to wash all the coins in vinegar. He will wash away all the dirt from them. Now we take scissors and cut rounds from paper and foil, the same shape as coins. The number of these blanks should be two less than the number of coins.
Now let's assemble our energy column:
- We take a piece of paper, soak it in vinegar and attach it to a coin.
- Place foil on paper.
- Now again the coin.
- Until we finish adding the coins, we repeat everything sequentially.
- As a result, there will be a coin at one end of the structure. This is the positive pole, the other end will have foil. This is the negative pole.
The more coins you can collect, the greater the tension. The coins cannot be reused. After the experiment they will already be rusty.
Do-it-yourself solar battery - how to make, assemble and manufacture?
Moving away from homemade options, we will pay attention to more serious things. Now we’ll talk about how to properly assemble and make a real solar battery with your own hands
Yes - this is also possible. And I want to assure you that it will be no worse than purchased analogues.
To begin with, it is worth saying that you probably will not be able to find on the open market the actual silicon panels that are used in full-fledged solar cells. Yes, and they will be expensive. We will assemble our solar battery from monocrystalline panels - a cheaper option, but showing excellent performance in terms of generating electrical energy. Moreover, monocrystalline panels are easy to find and are quite inexpensive. They come in different sizes. The most popular and popular option is 3x6 inches, which produces 0.5V equivalent. We will have enough of these. Depending on your finances, you can buy at least 100-200 of them, but today we will put together an option that is enough to power small batteries, light bulbs and other small electronic elements.
Selection of photocells
As we stated above, we chose a monocrystalline base. You can find it anywhere. The most popular place where it is sold in huge quantities is the Amazon or Ebay trading platforms.
The main thing to remember is that it is very easy to run into unscrupulous sellers there, so buy only from those people who have a fairly high rating. If the seller has a good rating, then you will be sure that your panels will reach you well packaged, not broken, and in the quantity you ordered.
Site selection (attitude system), design and materials
After you have received your package with the main solar cells, you must carefully choose the location for installing your solar panel. After all, you will need it to work at 100% power, right? Professionals in this matter advise installing it in a place where the solar battery will be directed just below the celestial zenith and look towards West-East. This will allow you to “catch” sunlight almost all day.
Soldering elements and connecting
Once your base is ready, you can place your elements on its surface. Place the photocells along the entire structure with the conductors down (you push them into our drilled holes).
Then they need to be soldered together. There are many schemes on the Internet for soldering photocells. The main thing is to connect them into a kind of unified system so that they can all collect the received energy and direct it to the capacitor.
The last step will be to solder the “output” wire, which will be connected to the capacitor and output the received energy into it.
Installation
This is the final step. Once you are sure that all the elements are assembled correctly, fit tightly and do not wobble, and are well covered with plexiglass, you can begin installation. In terms of installation, it is better to mount the solar battery on a solid base. A metal frame reinforced with construction screws is perfect. The solar panels will sit firmly on it, not wobble or succumb to any weather conditions.
That's all! What do we end up with? If you made a solar battery consisting of 30-50 photocells, then this will be quite enough to quickly charge your mobile phone or light a small household light bulb, i.e. What you end up with is a full-fledged homemade charger for charging a phone battery, an outdoor country lamp, or a small garden lantern. If you have made a solar panel, for example, with 100-200 photocells, then we can already talk about “powering” some household appliances, for example, a boiler for heating water. In any case, such a panel will be cheaper than purchased analogues and will save you money.
Making a battery
Now let’s solve the question of how to make a battery with your own hands at home. More precisely, not yet a battery, but a single battery. Let's start with the most interesting design in terms of operating principles - a gas battery. To assemble such a current source, we will need:
- two carbon rods;
- Activated carbon;
- opaque container;
- cotton fabric;
- needle and thread;
- salt.
Carbon rods can be obtained from salt batteries, and those that have expired will also be suitable. Activated carbon is sold in pharmacies in tablets. A plastic cup painted or covered with opaque paper is suitable as an opaque container.
Unlike galvanic cells, both electrodes in gas batteries are made of the same materials and have the same design. But let's get down to business. Let's start with the extraction of electrodes. It is better to take D-size salt batteries - they have larger cores. It will not be difficult to get graphite out of them. We flare the upper side of the upper part of the battery, pry up the metal cover with an awl and remove it. There is a plastic gasket under the cover. We remove it with an awl too.
We see a graphite rod stuck into a black dense mass. We pick out the mass with an awl and remove the rod.
Now we take two mined graphite rods, attach wires to their ends in one way or another - these will be current leads. We sew two bags from cotton fabric of such a size that they contain approximately 80–100 grams of powdered activated carbon.
It's coal's turn. It is sold in tablet form, but we need it in powder. We crush the tablets in a mortar and mortar for a long time until we get very fine dust. We pour it into bags, insert coal rods, tamp it down, add more if necessary. We sew up our bags as carefully as possible and wrap them tightly with thread. The better we wrap it, the better the contact between the coal and the graphite rod will be.
We install the electrodes in a cup and separate them with some kind of separator. In the photo below, ordinary wood chips are used as a separator, but it is better to make something more ion-permeable. For example, thick batting.
The electrodes are in place, the electrolyte is ready
Fill in the electrolyte (100 g of salt per 1 liter of water), but not to the top - the contacts should remain dry. The battery is ready, but it still needs to be charged. Since we have the same electrodes, we arbitrarily choose which one will be positive and which negative. You can start charging. To do this, you will need a DC source with a voltage of 4.5–5 V. For example, a charger from any five-volt gadget will do. We connect it to the terminals and start charging.
Healthy! Before charging, it is better to wait 10–15 minutes so that the coal in the bags is properly saturated.
During the charging process, electrolysis of the electrolyte (sodium chloride + water) begins. As a result of electrolysis, hydrogen accumulates on one of the electrodes, and chlorine on the other. It is stored in the pores of activated carbon in its pure form and does not interact with anything. As soon as the “containers” are filled, a violent release of gases will begin (the battery will “boil”, since hydrogen and chlorine have nowhere else to accumulate). By that time, the voltage at the battery terminals will be 2.2–2.4 V.
With these dimensions, our rechargeable battery will have a capacity of approximately 1 Ah, and the short circuit current will be approximately 300 mA. As the discharge progresses, the voltage will decrease until it drops to zero - the device is not afraid of a complete discharge. And if desired, you can even reverse the polarity by charging it the other way around. While we discharge the battery, gases will leave the electrodes, reducing salt and water. What are the disadvantages of gas batteries? The main one is high self-discharge. Even if the load is completely turned off, the electrodes will lose gas, and literally after a couple of days the source will have to be charged again.
Expert opinion
Alexey Bartosh
Specialist in repair and maintenance of electrical equipment and industrial electronics.
Ask a Question
Important! To reduce self-discharge, it is necessary to completely protect the electrodes from light - take an opaque body and make a light-proof cover.
Now about lead batteries. Of course, good performance can be achieved from a battery of this type (as well as from an alkaline one). But the process of manufacturing a high-capacity lead battery is so expensive and labor-intensive that it makes no sense to manufacture a current source of this type. Therefore, we will not bother with making a lead-acid battery, but will simply watch an entertaining video. And if there is a desire, everyone can repeat this experiment on their own.
Homemade lead-copper battery
Everything seems simple, but, as we see, the results are disappointing. But there is no point in casting the plates yourself, applying lead oxide and dioxide on them, as noted above.
Eternal battery
Prepare:
- glass jar;
- a silver element - for example a spoon;
- cling film;
- copper wire;
- 1 teaspoon baking soda;
- 4 bottles of glycerin;
- 1 teaspoon 6% apple cider vinegar.
How to make a battery, read on:
- Wrap the spoon tightly in cling film, leaving the top and bottom ends slightly exposed.
- Now it's time to wrap the spoon over the film with copper wire. Remember to leave long ends at the beginning and end for contacts. Make space between the turns.
- And again a layer of film, followed by wire using the same method. There should be at least seven layers of “film-wire” on this improvised reel. Do not tighten the layers too much - the film should wrap freely.
- In a glass jar, prepare a solution of glycerin, salt and vinegar.
- After the salt has dissolved, the coil can be immersed in the solution. As soon as the liquid becomes cloudy, the “eternal” battery will be ready for use. Its service life directly depends on the silver content in the base element of the coil.
How to make a battery in a beer can?
To make this battery you should take:
- Salt and water.
- Aluminum jar.
- Paraffin candle.
- Coal or dust from an extinguished fire.
- Graphite rod.
- Polystyrene foam from 1 centimeter and above.
First of all, cut off the top part of the resulting jar. We create a circle from a piece of polystyrene foam. It should fit to the bottom of the jar. You should also make a non-through hole. It is needed for the rod. The foam is placed on the bottom and a graphite rod is stuck into it. Make sure it sits squarely in the center of the can. Next, fill the entire void with coal.
Remember that the graphite rod should not come close to the walls of the jar, otherwise it will not be possible to make a battery.
After this procedure, all that remains is to create a solution from salt. To do this, you will need to take half a liter of water and 3 tablespoons of salt. Now mix everything and let all the salt dissolve completely. Pour the resulting electrolyte into a jar and seal it with wax. But remember the graphite rod should stick out of the can.
Now attach the wires to the poles you just created. The end of the protruding graphite acts as the anode or positive pole. The minus or cathode will be the body of the jar. In order for the completed battery to generate up to 3 volts, 2 such elements should be connected in series.
A clock, light bulb or calculator will operate from such a battery. Such a homemade product can even be recharged.
Electricity in a bank
Even from an ordinary can you can build something similar to the very first battery in the world. To do this you will need:
- a simple glass jar (you can use a glass);
- zinc or aluminum plate;
- strip of copper;
- several wires;
- ammonia, also known as ammonium chloride;
- tap water.
Our battery will have an aluminum plate as the anode, and a copper plate will serve as the cathode. Their size must be selected so that their area is equal to the palm of a person. This will make our battery more efficient. Solder the wires to the plates. Now our task is to install the plates in the jar so that they do not touch each other. And the height of these plates should be greater than the can itself.
It's electrolyte time. It's easy to do. Mix ammonia with water. For every 0.1 liter of water you need to add 50 grams of powder. Mix everything thoroughly and pour into a jar. Instead of ammonia, you can also use sulfuric acid. To do this, it will need to be brought to a twenty percent state.
Important! If you make an electrolyte based on sulfuric acid, then when diluting it you need to pour the acid into water, but not vice versa. Otherwise, the water can simply boil, and as a result of a violent reaction, everything will splash out. In addition, do not forget that when working with acid you need to wear protective equipment.
Fill the jar with the resulting solution. If you combine several cans into a single circuit, you will get a very good battery, the energy of which is quite enough to charge a fairly powerful device. This battery is similar to salt batteries.
How to make a lighter from a AA battery
You can make a lighter from one AA battery, which will certainly come in handy on a camping trip.
For these purposes, you will need a regular AA battery that still has some charge left. You will also need foil, even food foil will do, and a piece of cotton wool. To light our homemade lighter from a AA battery, you will need to bring a narrow piece of foil, first to the negative and then to the positive terminal of the battery. If there is enough charge, the foil will burst into flames after a while.
What our ancestors lacked for making fires were AA batteries!
How to make a stun gun from a battery?
For production you will need:
- Krona battery 9 volt.
- Conversion transformer. It can be removed from the charger or AC adapter.
- Ebonite rod 30-40 centimeters long.
- Insulating tape
- Wire.
Build process
To assemble a battery shocker, attach 2 pieces of wire to the end of the rod. Steel wire 5 cm long. They also need to be connected to a transformer and an energy source.
Next you will need to attach the battery to the two-pin connector of the transformer. At the other end they place a rod and attach a switch. If you press it, an electric arc will pass between the steel contacts. For the human eye to notice this arc, you need to press the button as many as 25 times per second.
In this homemade product, the current strength will be low and therefore it will not be possible to knock out anyone using such a stun gun. Therefore, it can only be used to intimidate as a means of defense.
What can be done from used batteries
A discharged power source can be charged for a short time if purchasing a new one is not possible at the moment.
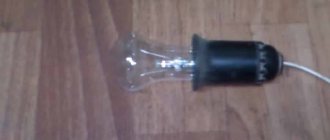
To do this, carefully deform the body, preventing it from being damaged. If the shell is cracked, then the battery can no longer be placed in the electronics, since caustic liquid will leak out of it and ruin the device. From a battery that has served its intended purpose, you can make a lamp, designing it according to your own wishes
From a battery that has served its intended purpose, you can make a lamp, designing it according to your own wishes.
Take a small light bulb for crafts so that the remaining battery power is enough to produce a glow
To make sure that the battery is discharged, it is thrown onto the table with the minus side down from a height of three centimeters. A new battery falls with a dull sound, a dead battery falls loudly and bounces off.
To make it you will need:
- used but not damaged battery;
- bulb;
- thin copper wire;
- scotch;
- paper and clay for creativity.
Manufacturing instructions:
- The wire is divided into two parts.
- Tape one part of the wire to the terminal with a negative charge.
- The second part is wound around the metal area of the lamp.
- The free end of the wire (the one on the lamp) is attached to the second terminal of the battery.
- In order for the lamp to light up, the circuit must be closed.
The light from the lamp is quite bright.
You can turn the product into an interesting craft by covering the battery with cardboard or plasticine. The resulting flashlight can become a lighting fixture in a dollhouse or become a bug with antennae terminals. Play with the product under adult supervision.
Similarly, you can highlight the glass.
Battery made of foil, cardboard and coins
Before making a battery, prepare:
- copper coins;
- vinegar;
- salt;
- cardboard;
- foil;
- scotch;
- two pieces of insulated copper wire.
All is ready? To the point:
- First you need to thoroughly clean the coins - to do this, pour vinegar into a glass container, add salt there and add money.
- As soon as the surfaces of the coins have transformed and shone, remove them from the container, take one and trace its outline on the cardboard 8-10 times.
- Cut out cardboard rounds along the outline. Then place them in a container with vinegar for a while.
- Fold the foil several times so that you end up with 8-10 layers. Trace a coin on it and also cut out round parts along the contour.
- At this point, start assembling the battery. This is done like this: a copper coin, cardboard, foil. In this order, put all the components you have in a column. The final layer should only be a coin.
- Remove the insulation from the ends of the wires.
- Cut a small strip of tape, glue one end of the wire onto it, place an improvised battery on top, and the end of the second wire on it. Securely secure the structure with adhesive tape.
- Connect the second ends of the wire to the “+” and “-” of the device that needs to be saturated with energy.