Author: Alexander Starchenko
A system such as a video intercom consists of separate electronic devices that are connected to each other by cable lines. You should know that connecting wires play a role no less important than the electronic components themselves when organizing any video systems. A video intercom cable that is incorrectly selected or of poor quality can cause not only malfunctions in the operation of the device, but also its complete failure. In order to choose the right cable, you need to understand its main characteristics, as well as well-known brands.
Cable Requirements
The presence of switching connections that ensure the operation of intercom equipment leads to the fulfillment of certain requirements for the installation system and switching elements:
- Powerful sources of magnetic fields located nearby contribute to signal distortion. Therefore, using coaxial wire in the pipe will help avoid this.
- A line resistance cable of 20 Ohms will ensure normal operation of long communication lines.
- Do not use a wire with damaged insulation.
- The voltage of the external unit and electric lock must be 24 V.
- Increased room humidity is considered a prerequisite for a short circuit. It is not recommended to place equipment in such conditions.
- If there are sudden voltage changes in the network, operation of the intercom system is prohibited.
- The electromagnetic lock is equipped with an additional power cable.
Intercom connection diagram
Today you can find three types of intercom connection. Do-it-yourself installation of an intercom can be done using any scheme. A complex scheme is used in apartment buildings. A simpler intercom connection scheme is used in a private house where there is only one connection network. Thanks to these schemes, you can install an intercom yourself.
Intercom connection diagram for an apartment building
This method is considered complex as you need to connect multiple users to one device. Installing this system is considered an expensive process. That is why you need to collect money from all residents. It is almost impossible to carry out this process yourself as it is expensive.
Connection diagram for intercom with lock
This system is considered standard. Thanks to this diagram, you can connect the intercom and the lock in one circuit. Many people might think that doing this process on your own would be difficult, but it is not. Using the diagram, you can install the intercom yourself. From the receiver, which is located in the house, you just need to run a few wires. If the installation is normal, then it is necessary to lay a three-core wire. If you plan to connect a video camera to the intercom, then you should use a four-wire wire. You also need to remember that both parts of the intercom must be powered using a step-down power supply.
Intercom connection diagram without a lock
This scheme is considered the simplest. Here the connection between the indoor and outdoor units occurs using four wires. Two wires are responsible for power supply, and the remaining two are for audio and video signals. As a result of this, you will see and hear your interlocutor behind the gate.
As you can see, thanks to these diagrams you now know how to connect the intercom yourself. If you decide to install an intercom, then it is better to do everything together.
Varieties
The intercom system is connected with a four-core and three-core cable. It all depends on the distance between the intercom and the audio tube or video intercom. Interference is created over large distances; for this purpose, the technical properties of the wires used are taken into account. The following types of intercom equipment are used: twisted pair, coaxial and combined wire.
UTP cable
Its structure can contain from one to several pairs. All conductors are isolated from each other. The cable is divided into 7 categories and is called “twisted pair”. Each class differs in frequency range. The intercom system uses “twisted pair” category CAT 5. It has 4 copper cores of different colors, twisted at a certain pitch. There is no shield in this type, since the properties of twisted pair are used to combat interference during the transmission of differential signals.
Category 5 has found its active use in telephony and for broadcasting video signals. Advertising and information systems widely use twisted pair signal transmission in vehicles, shopping centers, and entertainment venues. Durable polyethylene insulation allows the CAT 5 brand to be used outdoors.
pros:
- Affordable price.
- Versatility of use.
- Possibility of transmitting two signals over one wire.
- Easy to install.
Minuses:
- Dependence on electromagnetic interference (signal attenuation and distortion).
- Low level of security during information transmission (radio interception and through twisted pair contacts).
- Exposure of conductors to high frequency current (signal weakening).
Specifications:
- Operating temperature in the range (+60 minus 55) degrees.
- Characteristic impedance 100 Ohm.
- Maximum operating voltage 125 V.
- Frequency range 0.772 – 100 MHz.
- Core diameter 0.51054 mm.
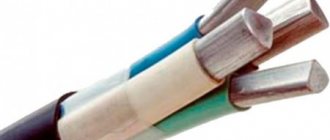
Coaxial cable
Its basis is a copper conductor, a layer of insulation on top, then a metal braid and all this is covered with insulation in the form of a plastic shell. Coaxial wire is designed to transmit high frequency signals.
In turn, it is divided into “thick” (diameter 1.2 cm) and “thin” (diameter 0.5 cm) types. The last option (“thin”) is distinguished by its flexibility and ease of installation in the wall.
pros:
- Low attenuation.
- Stability of properties.
- Affordable price.
- High throughput.
- Noise immunity is higher than that of twisted pair.
Minuses:
- Limited bandwidth.
- Difficult to install (thick type).
- Difficulty installing connectors.
- High price of connectors.
- Ease of damage.
Specifications:
- Minimal loss and signal strength.
- Used at a distance of over 50 meters.
- Characteristic impedance 50 Ohm.
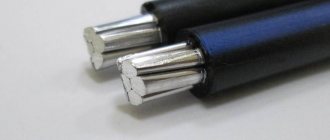
Cable KVK-V (P)–2
This combination type is used for wired intercom connection over long distances. This type of structure includes 3 thin cores, all of them of different colors with copper braid and screen. It is optimal to use it for outdoor equipment when the distance exceeds 50 meters. This option allows you to simultaneously transmit control signals and power it.
pros:
- Long service life (15 years).
- Resistant type to external damage.
- Easy to install.
- Resistance to solar radiation.
Cons: attenuation level 4 dB.
Specifications:
- Maximum voltage 220 V.
- Permissible distance 450 m.
- Frequency range 10–40 MHz.
- Attenuation coefficient 4 dB/100 m.
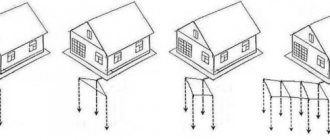
Features of installing an intercom in a cottage
We install a gypsum plasterboard ceiling, which plasterboard is best to use for the ceiling
Unlike high-rise apartments, installing a video intercom in a country house has a number of features. As a rule, in an apartment, the intercom calling panel and the receiving unit are mounted on opposite sides of the wall into which the door is built. The distance that separates these two modules is minimal.
Structure of an intercom system for a private home
In cottages, everything is completely different - the videophone is placed inside the house, in the corridor or one of the rooms, and the calling panel is installed behind the entrance gate, a fence that encloses the area adjacent to the house.
The calling panel is mounted on the outside of the gate itself or near it. When a visitor arrives, he uses the appropriate key to make a call to the indoor module, through which the owner of the house can find out who came to visit him.
Thus, the intercom will work if the installation is carried out correctly, and this can only be done if the cables from the calling panel to the internal video intercom are laid in advance. It is through the cable that power will be supplied to the panel and two-way communication between the guest and the owner will be ensured.
It is important to know
Intercoms for cottages may have such a useful function as a remote electric lock. It lies in the fact that the owner, having decided to let a guest into his house, will not run to the gate to open the door, but will do it remotely, using the remote lock function.
This function is especially useful when it’s raining outside and you don’t want to go out to open the gate.
In order to use it, it is important to lay all the required cables in advance
Connection diagram for an intercom with an electric lock
Thus, in order not to spoil the design of a newly renovated or built cottage for installing an intercom, it is important to initially foresee its use and remove all the necessary electrical cables.
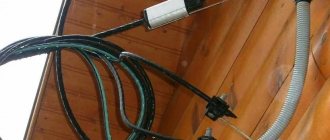
Errors when laying the cable to the calling module
Even if you remember about the intercom and run a cable to the gate, this is not always done correctly. Very often, builders who were constructing a building or renovating it lead a cable to the gate in a plastic pipe, forgetting to seal it. This process involves sealing the ends of cables that are laid outdoors.
This is done in order to prevent moisture from getting inside the cable. If this happens, the copper will begin to oxidize, which will deteriorate its electrical performance and may even short out the conductors. In addition, the cable tends to collect moisture, which, under the influence of capillary processes, penetrates between the external and internal insulation.
It is impossible to connect an intercom with such a cable, and it is dangerous. This can cause both damage to the device itself and a short circuit in the cable, which will then have to be replaced, which also means additional work, new repairs and new waste.
The process of installing an intercom in a country house
Another mistake that technicians who are unfamiliar with the features of connecting an intercom make is that wires that are not marked are connected to the calling panel.
What is important to remember
- it is almost impossible to install an intercom correctly without a previously agreed project;
- it is necessary to design a video intercom system at the initial stages of cottage construction;
- the customer must decide on the functional features and model of the intercom (presence of an electronic remote lock, illumination of the calling panel, etc.);
- the customer must decide on the installation location of the calling panel and the internal video intercom module;
- appropriate cables should be laid for a specific type of intercom (this procedure is performed in the early stages of building a house);
- The laid cable should be reliably sealed so that it does not collect moisture until it is connected.
Conclusion
Summarizing all the information presented above, we can conclude that the timely design of this system and the correct laying of electrical cables in advance will eliminate the problems of installing intercoms in cottages. If this is not implemented, then the problem can only be solved by laying a new cable.
This process will entail digging a trench near the house for the cable, making holes in the walls and gate to enter it. All these are extra costs, both financially and in terms of the need for a lot of free time.
Another option to correct the situation may be to install a new intercom - wireless. True, these models are significantly more expensive than cable devices.
Price
The CAT 5e cable, which has a diameter of 0.48 mm, is unshielded and is intended for indoor installation, costs 3.28 rubles per meter. Sold in coils, 305 meters long.
Coaxial wire RK-50-4-11, made in Russia with a characteristic impedance of 50 Ohms, with black insulation, is offered on markets for 55 rubles per meter. Brand RG-6U (01–201) – China, characteristic impedance 75 Ohm, estimated at 12 rubles/meter.
Brand KVK-V-2e, Russian, with a diameter of 6.9 mm, two cores 2x0.5 sq. mm, offers products for 30.43 rubles/meter.
Which to choose
For high-quality operation of the intercom, you should select a cable according to several criteria:
- Wire for video communication.
- Separate braided screen.
- Core cross-section.
The last parameter affects the length of the transmitted signal line. And the signal level depends on the length of the line when a video intercom is connected to the circuit, thus:
- The call panel up to 15 m can be connected with any cable: SHVEV, KSPV 4x0.5, KVK.
- Up to 50 meters, KVK 2x75 wire is used.
- For distances greater than 50 m, the manufacturer of video intercoms does not guarantee constant operation. For those people who want to take a chance, they offer coaxial cable.
The cable is laid indoors with PVC wire, outdoors with HDPE.
The panel and the audio intercom handset are connected by a cable into two cores TRP 2x0.4, as well as KSPV 2x0.4.
Description of models
There is a wide variety of cables and each of them is used for specific purposes.
| Cable brand | Description |
| ShVEP and ShVEV | Specially designed for connecting video intercoms. This is confirmed by the presence of one core with a shielding braid. They are used to connect the system over long distances without distorting the quality of image and sound. |
| KSPV | The model is universal. Used to connect both audio and video intercoms, but over short distances. KSPV is also common for connecting the system in apartment buildings. Experts attribute the inconvenience of installation due to high rigidity to the main disadvantages of the model. |
| Twisted pair UTP 5e | Used to connect systems over short distances (no more than 10-15 meters). UTP 2 and UTP 4 are additionally used for connection. The main disadvantages include the low degree of noise immunity. |
| KVK-2P | It is preferable to use for dachas and country houses when the call panel is located on the street. To ensure that the camera is constantly supplied with voltage, a separate line is laid. To save money, it is better to give preference to combined models. Inside the winding there are 2 types of conductors. One of them is coaxial, its resistance reaches 55 Ohms. The shielded core is located in the center; two lines for power supply run parallel to it. |
The range of cables in stores is extremely large. To choose the most suitable one, you need to familiarize yourself with their characteristics and compare them with the requirements of the system.
Combined cable KVK for connecting a video intercom Intercom
systems equipped with video are quite demanding, so they are vigilant when choosing auxiliary components and performing installation work.
For high-quality and uninterrupted operation, four-core cables are connected to the system. Experts also advise buying models with a separate shielded core. This will improve image quality. The shielded core protects the signal from interference.
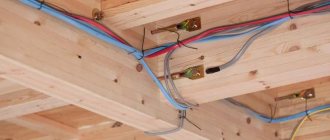
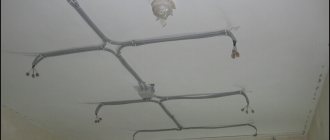
At the installation stage, first of all, wires are laid between the monitors and calling panels. Each of these devices must be included in the overall system.
The power supply in the circuit is 12 V, this indicates the complete safety of using such wiring.
To avoid emergency and emergency situations, the wires for the intercom are laid separately from the power electrical lines.
Cabling. Required Tools
In our work we will use a set of tools:
- Self-tapping screws.
- Putty.
- Twisted pair.
- Wire cutters.
- Pliers.
- Screwdriver.
- Hammer.
- Insulating tape.
- Latex gloves.
- Knife.
We carry out the following steps:
- Choosing an intercom kit.
- Determining the location of the fastener.
- Cabling.
- Mounting and connecting the intercom.
Step-by-step instruction
- We decide on the choice of intercom kit. This could be a handset through which you can communicate at a distance. The kit also includes a button that performs the function of opening the doors. You can also purchase a video intercom. Here you can not only talk, but also see the person standing in front of the door.
- Next, choose a location to mount the device. The distance from the bottom of the surface is 150 cm. You should choose a location so that you can hear the ringing signal from all corners of the apartment or house.
- Now let's move on to laying the wire. The material used is twisted pair cable with a screen. Do not forget that the possible cable length is 40 meters. Laying the wire should not be done near power cables to avoid interference and, even worse, can lead to damage to the intercom. We provide additional power (220 V) to the place where the intercom module will be installed (entrance or gate of the house).
- A hole is drilled into the apartment where the cable is inserted. We secure the device with self-tapping screws and connect the power.
Digital intercom
To connect devices of this type, only a cable with two cores is used, through which an encrypted signal is transmitted. The handset installed in the apartment, the number of which was dialed on the call panel, responds to the signal. To set the correspondence between the dialed code and the handset, special jumpers are used - jumpers - which bridge the required contacts in the answering machine.
To correctly program the operation of the handset, jumpers are placed between the numbered terminals so that the sum of the numbers equals the apartment number.
The advantages of such intercoms include ease of installation and connection of new subscribers.
The main disadvantage of such equipment is the influence of each tube on the operation of the entire system.
When replacing a device due to its breakdown, as well as when connecting new subscribers, the correct installation of jumpers is extremely important
Currently, to partially eliminate this drawback, floor controllers are used, which allow the fault to be localized within one level.
Another disadvantage of digital intercoms is their relative high cost, which does not allow these devices to become widespread.