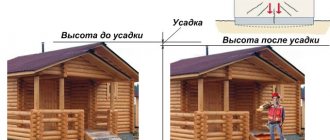
Wood is considered an environmentally friendly material for the construction of residential buildings, so it is not surprising that the demand for beautiful and comfortable houses made of timber or rounded logs is not decreasing. First of all, a residential building must be safe from an electrical installation point of view.
It is important to understand how electrical wiring should be done in a wooden house. You need to know how to install and organize the electrical system so as not to harm the health of residents and ensure the safety of property. We have presented in detail all aspects of this issue.
Our article will introduce you to the general requirements for wiring. We will talk about methods for installing an electrical network in a house, rules for arranging an electrical panel and methods for installing cables. All electrical installation work must be carried out in strict accordance with the fire safety regulations we provide.
General wiring requirements
The main difference between wooden houses and reinforced concrete and brick structures is their high degree of fire hazard. This means that increased requirements apply to the selection of electrical devices, cables and the conditions for their installation.
According to statistics, about 1/2 of fires or ignitions in wooden houses or in houses with wooden trim occur due to gross errors by electricians.
If you install the socket incorrectly, do not connect the wires in the junction box carefully enough, or ignore the grounding rules, a fire may occur, followed by a fire.
Undemanding owners of a wooden house entrust electrical installation work to neighbors, acquaintances, or do it themselves, without thoroughly knowing the PUE standards. The sad result of gullibility and unprofessionalism - in the photo
It is necessary to know the basic rules of electrical installation for two reasons: to be able to carry out some of the installation or repair work yourself and to control the actions of unscrupulous “specialists”.
The following requirements should be remembered:
- The technical characteristics of cables and electrical equipment must correspond as closely as possible to the power consumption of the devices of each individual group.
- The operation of sockets, switches, and emergency shutdown devices must be carried out taking into account the load placed on them.
- It is prohibited to use cables, wires, and terminal connections when they are regularly heated.
- It is necessary to completely prevent the transfer of fire from the cable to structures made of wood or other flammable materials using fireproof protection.
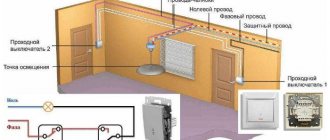
Electrical wiring must be completely safe for home owners, their families (especially small children) and pets.
Strict requirements come to the fore, and sometimes aesthetics have to be sacrificed. For example, owners of a wooden cottage need to come to terms with external sockets and enhanced protection for both hidden and open electrical wiring (NPB 246-97)
Material from video reviews and instructions posted on the Internet is very contradictory, so you should not rely entirely on the opinion of people in work overalls. You should focus on excerpts from regulatory documentation - sections of PUE, SNiPs, GOSTs.
Supplying electricity to the distribution panel
First of all, it should be said that the most difficult section of the network is the gap from the power line to the distribution panel of the house. Moreover, the connection of the house wiring to the power line must be carried out exclusively by specialists who have permission to carry out such work. However, all other actions can be carried out independently, which will significantly reduce the cost of connection.
There are two ways to bring the cable to the house and enter it:
- Air - this installation method is the simplest and cheapest. However, it is not without some disadvantages, namely, the cable can be damaged by branches, snow from the roof, a strong gust of wind, etc.
- Underground - such installation is much more reliable, safe and aesthetically pleasing. However, the labor intensity of the work in this case increases significantly. If you entrust cable laying to specialists, the price for their services will be quite significant.
Below we will take a closer look at the features of entering each of these methods.
Air
The aerial method involves hanging the cable from a pole to the entry point. In this case, the connection to the line, as well as the entry of the electrical cable into the wooden house, is carried out using porcelain fittings.
Note! When laying the cable overhead, the distance between the entry point into the house and the ground must be at least 2.75 meters.
To supply electricity to a wooden house, a SIP cable (self-supporting with insulation) is usually used. Its main advantage is strength.
Air power input circuit
In addition, the cable insulation is made of high-quality polyethylene, which does not deteriorate when exposed to the sun. Thanks to this, the wire can last for many years. However, it should be taken into account that the introduction of SIP cables into a wooden house is prohibited by the PEU.
Therefore, before inserting it is necessary to switch to VVGng, KVVGng cables through porcelain fittings. Otherwise, the introduction of SIP into a wooden house will be considered a violation of fire safety.
It should be noted that when supplying electricity by air, cable installation is carried out by specialists from the power supply service, so you can only prepare the switchgear and entry point yourself.
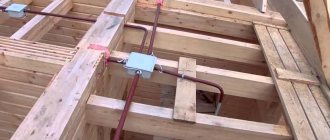
To arrange the passage of wires, holes are made in the wall and metal sleeves from thick-walled pipes are inserted into them. The location of the hole is chosen taking into account that moisture and ice do not form in the area of the cable entry in winter.
Note! You can make a technological hole in a wall or attic floor, but not in the roof, window opening or drainage devices.
The photo shows the electricity input point
According to SP 31-110-2003, the wall thickness of the pipe used as a sleeve should be as follows:
| Cable cross-section, mm2 | Wall thickness, mm |
| 4 | 2,8 |
| 6-10 | 3,2 |
From the outside, the tubes should extend 20-30 cm from the wall. In the house itself, as additional protection, a VVGng cable is placed in a corrugated plastic pipe that has a fire safety certificate NPB 246-97.
After entering the cable, all that remains is to connect it to a standard metering panel with automatic protection.
Underground electricity supply diagram
Underground
For installation in a trench, VVBShv cable should be used. It is laid in pipes at a depth of at least half a meter and no more than two meters from the surface of the earth. Moreover, no more than one power cable is allowed to be pulled into one pipe.
Note! According to the PUE rules, the input cable must have a cross-section of at least 16 mm 2.
The pipes are laid up to the room in which the input distribution device is located. In trenches they should be laid with a slight slope towards the street. To prevent the penetration of moisture and gas into the room, the ends of the pipes and the place where they pass through the wall must be carefully sealed.
Note! Cable entry into a wooden house underground is allowed through a hole in the foundation or above it. Entering cables under the foundation is strictly prohibited!
Input cable protection
The section of the network from the input to the distribution panel is the most dangerous, since it is not protected from voltage surges, short circuits, etc.
Features of the electrical panel
Externally, the distribution board is a plastic or metal (which is preferable) box with a door with fastenings for automatic machines and an electricity meter.
It has no size restrictions, and when a new box is installed, a little free space is always left for further connections.
Inside there is a meter (sealed), a main automatic shutdown device (RCD), which is also sealed, and single-pole circuit breakers for various groups of electrical wiring (lighting, socket, etc.)
Circuit breakers are mounted on the DIN rails provided for this purpose. The nominal value of the machines directly depends on the parameters of the connected line: if the permissible limit of the socket group is 16 A, then the machine must correspond to this value.
If you have automatic machines, installing an RCD is not necessary, but its installation should not be neglected. Additional protection is triggered when a leakage current appears. The RCD is manually turned off when it is necessary to cut off the flow of electricity into the house.
Despite the expensive cost of the equipment, responsible electricians insist on installing zone-based protection, which increases the safe use of the electrical network in a wooden house.
The nuances of connecting RCDs and circuit breakers in the panel are described in this article.
Laying electrical wiring in a wooden house
After all the machines have been installed, you can proceed directly to the electrical wiring device.
There are several methods of electrical wiring:
- External or exposed electrical wiring.
- Electrical wiring in cable ducts or flexible electrical boxes.
- Internal or hidden electrical wiring.
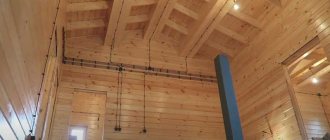
External electrical wiring in a wooden house
Open electrical wiring in a wooden house
External electrical wiring is one of the simplest and most accessible types of wiring in a wooden house.
- relatively simple installation;
- comparatively cheap.
- unaesthetic, especially if there are several cables in one place. But this drawback is easily solved if you use the so-called antique wiring, when twisted wires were attached to the wall through ceramic holders - now this is again in fashion.
Electrical wiring in cable channels
Electrical wiring in cable ducts or flexible electrical boxes
Perhaps this is some compromise between open and closed wiring.
- compliance with the necessary protective measures (for example, the cable should not touch the surface of the walls and should go with a certain gap from the wall, again, according to the PUE);
- a fairly neat appearance after completion of installation work, the ability to change the electrical wiring configuration if necessary - change the cable path, add new ones - all this is possible thanks to the large number of additional elements.
- the room takes on a certain appearance of a production or office space. But some people may like it - everyone has different tastes.
Hidden electrical wiring in a wooden house
Hidden electrical wiring in a wooden house
The installation of hidden electrical wiring is perhaps one of the most important and complex types of work. Hence all the pros and cons.
- wires are not visible on walls or ceilings - they are hidden.
- complexity of installation. The entire cable must be enclosed in a steel pipe or other sheath that prevents combustion. Naturally, all internal electrical wiring of the house should be planned at the stage of building the house, so that it can be easily installed in compliance with all requirements. Any changes in the future will require quite complex work. But, as they say, beauty requires sacrifice.
When carrying out any work with electricity in a wooden house, you should remember that wood is a very flammable material. Therefore, you should not deviate one step from the recommendations in the PUE requirements. By deviating from these requirements, you create the danger of losing your property! Indeed, according to statistics, the main cause of fires is a short circuit in the electrical wiring. Don't skimp on materials or skip any details when installing electrical wiring in your beloved wooden house.
Electrical wiring in cable ducts or flexible electrical boxes
Installation of hidden electrical wiring in a wooden house
Fire protection measures
If we analyze the entire process of electrical installation work in a wooden house from a safety point of view, we can highlight the main rules:
- correct selection and installation of RCD;
- installation of a grounding loop using a modular-pin method (with a resistance of 4 Ohms);
- installation of a potential equalization system;
- ensuring grounding continuity throughout the entire network;
- installation of overhead sockets only;
- hidden installation - in metal boxes and pipes.
Upon completion of electrical installation work, the risk of accidental fire or electric shock, as well as breakdown of household appliances due to unsatisfactory wiring conditions, must be completely eliminated.
How to choose a cable for electrical wiring in a wooden house
When choosing a cable for electrical wiring in a wooden house, you need to conditionally break down all the wiring into circuits. Each of them will require a wire with its own parameters. Laying all circuits with one cable is impractical and economically unprofitable. Each line must be protected by a circuit breaker and (or) a residual current device (RCD) .
To facilitate the calculation, you will need to draw up a wiring diagram for the entire building. It must be accompanied by an explication of the premises indicating the electrical appliances and electrical equipment connected to the network. Guided by the diagram, you need to calculate the necessary parameters for each circuit - the cross-section of the cable cores and its length.
Having determined the conditions for laying the internal electrical wiring, select the type of cable. According to the PUE, internal electrical wiring in a wooden house should be carried out only with products with copper conductors. For power circuits, it is recommended to use non-flammable cable for electrical wiring in a wooden house.
Cable VVG-NG
Among domestically produced products, the best product is the one marked VVG-ng. This is a cable with solid copper cores in double PVC insulation. Such insulation does not support combustion and protects the core material from damage, exposure to aggressive environments and short circuits.
NYM cable
For imported products, it is recommended to use a cable marked as NYM for wiring. Its structure is similar to the VVG-ng cable. In terms of characteristics, they are also not very different from each other.
For single-phase power circuits, a three-core cable is used. The presence of a grounding conductor will allow you to avoid making separate grounding for each outlet. When connecting equipment operating on three-phase current, use a cable consisting of four or five cores, depending on the consumer connection diagram. The version of this document is limited