1Download Arduino IDE
Download the Arduino development environment (Arduino IDE) from the official website for your operating system (Windows, Mac OS X, Linux are supported). You can select the installer ( Installer ), you can choose the archive ( ZIP file for non admin install ). In the second case, the program is simply launched from the folder, without installation. The downloaded file contains, in addition to the development environment, drivers for boards of the Arduino family.
Download the Arduino IDE from the official website
Platform choice: Windows, Mac or Linux
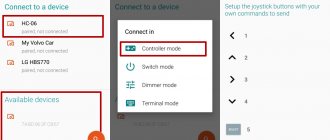
Arduino Web Editor can work with many different platforms. If you are using Windows, Mac or Linux, you will simply need to install a special plugin from Arduino Web Editor, which will allow you to upload sketches from the browser to your Arduino boards.
If you have any problems installing this plugin, you can always write about the problem in a special topic on the forum, where technical support specialists will try to solve your problem.
At the end of the installation process of this plugin, you will be redirected to the Arduino account login page - use your credentials to log in.
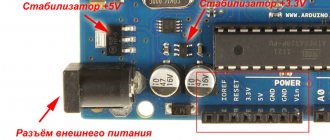
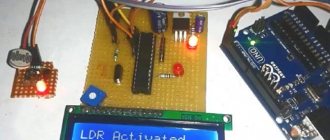
3Installing the driver for Arduino
Install the driver for Arduino. Consider the installation option on the Windows operating system. To do this, wait until the operating system prompts you to install the driver. Decline. Press the Win + Pause , launch Device Manager . Find the section "Ports (COM and LPT)" . You will see a port there called Arduino UNO (COMxx) . Right-click on it and select Update Driver . Tell the operating system the location of the driver. It is located in the drivers in the folder we just downloaded.
Note the port to which the Arduino board is connected. To find out the port number, launch Device Manager and look for the “Ports (COM and LPT)” section. The port number will be indicated in parentheses after the board name. If the board is not in the list, try disconnecting it from the computer and waiting a few seconds, then connecting it again.
Arduino in Windows Device Manager
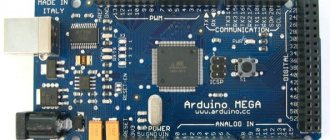
Arduino Basics
Arduino is a platform that allows many engineers from all over the world to create their projects with minimal investment.
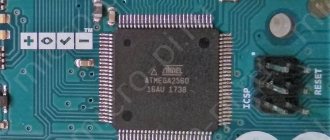
First of all, it is a special microcontroller with a control system of the same name and libraries built in C++. Accordingly, if you plan to create something unique, you should learn all the nuances that Arduino programming has.
Let's make a brief description of Arduino programming and clarify the points that are worth paying attention to if this is your first time doing this.
Before you start solving a specific problem on Arduino, it is best to have a basic knowledge of programming. So let's look at what this term actually means. Absolutely any project is built on a step-by-step block model, which describes what your microcontroller needs to do and how to do it.
To simplify the work of users, ready-made libraries of functions have been created in Arduino; you just need to enter commands from them to achieve some goal. Naturally, you won’t achieve much this way, but to create your own libraries you will need knowledge of the C++ in which the chip’s firmware is built.
The key feature of the system is that the characteristics of Arduino can be improved with the help of additional components, and you can always customize them for a specific project. Accordingly, your only limitation is your knowledge of the language and its capabilities, as well as your own imagination.
All functions are built from the simplest operands that are typical for C++. These operands are variables of various types and their uses. Therefore, any function used in a microcontroller to receive information or send a signal is a set of simple operations that is written in the main library. And you will be limited until you have enough experience and practice to understand what library you should write for what purpose.
The main disadvantage of constructing complex projects with Arduino is that you will have to write code from scratch and select components for the system, so it is better to practice on the simplest tasks first.
Also, keep in mind that the language for writing the system libraries is low-level, and, accordingly, consists of the simplest commands, in contrast to high-level python or pascal, which are user-friendly. On the other hand, it is also multi-paradigm, so it is suitable for solving any problem using the programming paradigm that suits you.
OOP is most often used. C++ itself has a core of numerous libraries and additional functions or methods, so if you are going to understand everything radically, you should start by mastering the language from scratch.
4Setting up Arduino IDE
Point your development environment to your board. select Arduino UNO from the Tools Board .
Select the Arduino UNO board in the settings
Specify the number of the COM port to which the Arduino board is connected: Tools Port.
Set the serial port to which the Arduino board is connected
What is Arduino Web Editor
Arduino Web Editor is an online tool that allows you to write sketches and upload them to any Arduino board using your web browser (Chrome, Firefox, Safari and Edge). The Arduino platform developers recommend using the Google Chrome browser.
This IDE (Integrated Development Environment) is part of the Arduino Create project, an online platform that allows developers to write programs, access tutorials, configure boards, and share their projects with other members of the Arduino community. Providing users with a seamless workflow, Arduino Create provides connections between all processes of creating a finished product, from its conception to its implementation. That is, with the help of this service you can manage all aspects of creating a project for Arduino.
Arduino Web Editor is an online service, so it always takes into account all the latest changes in the Arduino platform and all the latest boards that have appeared within this platform.
This integrated development environment (IDE) allows you to write program code (a sketch) and save it in the cloud, which you can then access from any device with Internet access. It automatically recognizes all Arduino and Genuino boards connected to your computer and makes the necessary settings. An account in this system is all you need to get started.
7Loading sketches into Arduino memory
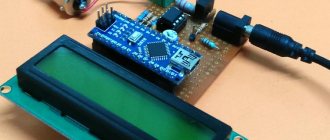
Now you can load the program into the board's memory. Connect the board to the computer, wait a few seconds while the board initializes. Click the Upload , and your sketch will be written to the memory of the Arduino board.
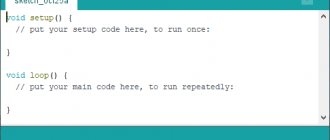
The LED should start blinking cheerfully at you every 2 seconds (1 second on, 1 second off). Below is the code for our first Arduino program. void setup() {
// initialization block pinMode(13, OUTPUT);
// set pin 13 as output. } void loop() {
// loop that repeats endlessly as long as the board is turned on: digitalWrite(13, HIGH);
// apply a high level to pin 13 - light the LED delay(1000); // for 1000 ms = 1 sec. digitalWrite(13, LOW); // apply a low level to pin 13 - turn off the LED delay(1000); // for 1 sec. }
// then the cycle repeats
Read the comments in the text of the program - they are enough to understand our first experiment. First we describe the initialization block setup()
, in which we set the initial values of the variables and the functions of the Arduino pins.
What follows is an endless loop()
that repeats over and over again as long as power is supplied to the board.
In this cycle we perform all the necessary actions. In this case, we turn on and turn off the LED. The delay()
operator specifies the execution duration (in milliseconds) of the preceding operator.
The digitalWrite()
statement tells the Arduino which pin to apply voltage to, and exactly what voltage level. Your first sketch is ready!
Helpful advice
There are many sites on the Internet dedicated to working with Arduino family boards. Read, master, don’t be afraid to experiment and learn new things! This is a fun and rewarding activity that will bring you a lot of pleasure.
Are there any other programs that work with Arduino?
In addition to the official Arduino IDE, there are third-party programs that offer their products for working with Arduino-based microcontrollers.
A similar set of functions can be provided to us by a program called Processing. It is very similar to the Arduino IDE, since both are made on the same engine. Processing has an extensive set of functions that are not much inferior to the original program. With the help of the downloadable Serial library, the user can create a connection between the data transmission that the board and Processing transmit to each other. In this case, we can make the board execute programs directly from our PC.
There is another interesting version of the original program. It is called B4R, and its main difference is that it uses not the C language as a basis, but another programming language - Basic. This software product is free. There are good tutorials for working with it, including those written by the creators of this product.
There are also paid options for Arduino IDE. One of these is the PROGROMINO program. Its main advantage is the possibility of code completion. When compiling a program, you will no longer need to look for information in reference books. The program itself will offer you possible options for using a particular procedure. Its set includes many more interesting functions that are missing in the original program and can make it easier for you to work with boards.
Structure of Arduino Web Editor
After launching the Arduino Web Editor, you will see three main columns in it.
The first column is used to navigate between:
- Your Sketchbook – a collection of all your sketches;
- Examples – examples of sketches to demonstrate the capabilities of the main Arduino commands and examples of working with libraries;
- Libraries – libraries that can be connected to your program (sketch) to expand its capabilities;
- Serial monitor – serial communication monitor, allows you to receive and transmit data to your Arduino board via a USB cable;
- Help – useful links and a dictionary of Arduino terms;
- Preferences – your settings for the appearance of the Arduino Web Editor (font size, color scheme, etc.).
When you select one of these menu items, its contents are shown in the second column (sidebar).
And finally, the third column is the area for entering the program code (sketch) - you will use it most often. In it you will write your sketches, check their operation and upload them to Arduino boards, save your sketches in the cloud and give access to them (share) with anyone you want.
Serial Monitor
In the Arduino Web Editor, the Serial Monitor is available in the sidebar.
The serial communication monitor reads data from the card that is currently selected in the card list. If you want to change the board (for example, you have several boards connected to your computer), then simply select the required board in the list of boards. When changing the board, the used serial port will be automatically updated.
If you want to test the serial communication monitor, you can open Examples > 03.Analog > AnalogInOutSerial. Load the code of this example into the board and after that you will see the result of its work.
While the program code is loading, the panel will be gray as shown in the following figure.
If at this time no card is connected to the computer, a message will appear stating that the serial port is unavailable.
If the same port is also used by other programs (such as Processing or desktop applications), a warning message will appear indicating that the port is being used by other software.
If you want to free up this port for other applications to run, simply click the Disconnect button on the panel.