How can you write programs for the Arduino board?
Arduino natively supports a language which we call Arduino Programming Language or Arduino Language.
This language is based on the Wiring development platform, which in turn is based on Processing, which, if you're not familiar, is what p5.js is based on. It has a long history of projects based on other very open source projects. The Arduino IDE is based on the Processing IDE and the Wiring IDE is built on top of it.
When we work with Arduino, we usually use the Arduino IDE (integrated development environment), software available for all major desktop platforms (macOS, Linux, Windows) that gives us 2 things: a programming editor with support for integrated libraries and a way to easily compile and load our Arduino programs onto the board connected to the computer.
The Arduino programming language is essentially a framework built on top of C++. You could argue that it's not a real programming language in the traditional sense, but I think it helps avoid confusion for newbies.
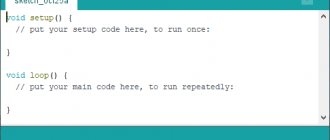
A program written in the Arduino programming language is called a sketch . The sketch is usually saved with the .ino extension (from Arduino).
The main difference from "normal" or C++ is that you combine all your code into two main functions. Of course, you can have more than two, but any Arduino program should provide at least these 2.
One is called setup(), the other is called loop(). The first one is called once when the program starts, the second one is called repeatedly while your program is running.
We don't have the main() function, as you're used to in C/C++, as the entry point for the program. Once you compile your sketch, the IDE will make sure that the end result is a correct C++ program and will basically add the missing glue by pre-processing it.
Everything else is regular C++ code, and since C++ is a superset of C, any valid C is also valid Arduino code.
One difference that may cause you problems is that while you can create your program in multiple files, all of those files must be in the same folder. If your program grows to very large sizes, this could be a deal-breaking limitation, but at that point it will be easy to move to a native C++ setup, which is possible.
Part of the Arduino programming language are built-in libraries that allow you to easily integrate with the functions provided by the Arduino board.
Your first Arduino program will probably involve turning an LED on and then turning it off. To do this, you will use the pinMode(), delay() and digitalWrite() functions, as well as some constants such as HIGH, LOW, OUTPUT.
Like this, the canonical first Arduino project (“Hello, World!”):
#define LED_PIN 13 void setup() { // Configure pin 13 to be a digital output pinMode(LED_PIN, OUTPUT); } void loop() { // Turn on the LED digitalWrite(LED_PIN, HIGH); // Wait 1 second (1000 milliseconds) delay(1000); // Turn off the LED digitalWrite(LED_PIN, LOW); // Wait 1 second delay(1000); }
It's all part of the Arduino programming language, or better called a suite or library.
Built-in constants of the Arduino programming language
Arduino sets two constants that we can use to
HIGH equates to a high voltage level, which may vary depending on the hardware (>2V on 3.3V boards such as the Arduino Nano, >3V on 5V boards such as the Arduino Uno) LOW equates to a low voltage level. Again, the exact value depends on the board used.
Then we have 3 constants that we can use in combination with the pinMode() function:
- INPUT sets the pin as an input pin
- OUTPUT sets the pin as an output pin
- INPUT_PULLUP sets the pin as an internal pull-up resistor
The other constant we have is LED_BUILTIN, which points to the bead pin number, which is usually equated to number 13.
In addition to this, we have the C/C constants ++true and false.
Getting started using Arduino
If you have never programmed before and this is your first experience, then programming Arduino microcontrollers will be much easier if you start with the basics.
Of course, when you don’t have any complex projects in your plans, you can work on ready-made libraries and at the same time understand what their functions consist of. This is one good way to learn, but then it is worth looking for function sets that were written by professionals to be sure that they are correct.
Otherwise, you may see the wrong solution to the problem and, as a result, apply those in your projects.
But it’s much better to start with the basics and devote at least a week to mastering algorithmization and learning to break your projects into blocks, and those into specific steps. This type of block diagram construction will come in handy more than once in the future.
When you have studied all the basics, you can move on to practice and self-study in C++; any simple projects or tasks prepared on the Internet will do.
At this stage, your goal will be to understand the underlying paradigms and learn how to use them, and to explore the capabilities of the language so that you clearly know what it can do and can reasonably evaluate the feasibility of your projects.
Built-in functions of the Arduino programming language
In this section, I'm going to make reference to the built-in functions provided by the Arduino programming language.
Program life cycle
- setup() This function is called once when the program starts and when the Arduino is turned off and restarted.
- loop() This function is called repeatedly while the Arduino program is running.
I/O Processing
The following functions help you process input and output from your Arduino device.
Digital I/O
- digitalRead() reads a value from a digital pin. Takes a pin number as a parameter and returns HIGH or LOW constant.
- digitalWrite() writes a HIGH or LOW value to a digital output pin. You pass the pin code and HIGH or LOW as parameters.
- pinMode() sets the pin as an input or output. You pass the pin code and INPUT or OUTPUT value as parameters.
- pulseIn() reads a digital pulse from LOW to HIGH then to LOW again or from HIGH to LOW and to HIGH again on a pin. The program will be blocked until a pulse is detected. You specify the pin number and the type of pulse you want to detect (LHL or HLH). You can specify an optional timeout to stop waiting for this pulse.
- pulseInLong() is the same as pulseIn(), except that it is implemented differently and cannot be used if interrupts are disabled. Usually interrupts are disabled to get more accurate results.
- shiftIn() reads a data byte one bit at a time from the output.
- shiftOut() writes a byte of data one bit per output.
- tone() sends a square wave to the pin used for buzzers/speakers to play tones. You can specify the contact and frequency. It works with both digital and analog outputs.
- noTone() stops the tone() generated wave on the pin.
Analog I/O
- analogRead() reads a value from an analog pin.
- analogReference() adjusts the value used for the high range of the analog input, defaulting to 5V on 5V boards and 3.3V on 3.3V boards.
- analogWrite() writes an analog value to the pin
- analogReadResolution() allows you to change the default resolution of analog bits for analogRead(), the default is 10 bits. Only works on certain devices (Arduino Due, Zero and MKR)
- analogWriteResolution() allows you to change the default resolution of analog bits for analogWrite(), which defaults to 10 bits. Only works on certain devices (Arduino Due, Zero and MKR)
Arduino models
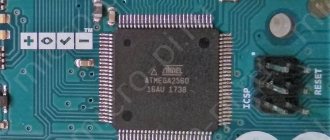
So we got to the Arduino boards themselves, of which there are now a great variety thanks to the openness of the platform: all circuits and source codes are in the public domain, and you can make your own version of the board and sell it, which is what the Chinese are actively doing. The only point: the word Arduino is a registered trademark, and you will have to name your board something else, hence all sorts of Sparks, Elders and other so-called Arduino compatible boards. There are a lot of types of boards, but they use the same models of microcontrollers. The amount of memory and the number of legs depend on the model of the microcontroller, and there are some special features. Most Arduino models use 8-bit AVR microcontrollers with a 16 MHz crystal oscillator (or lower), that is, ATmega boards do not differ in performance, they differ only in the amount of memory, the number of legs and interfaces/timers. Arduino models with MCUs from the ARM manufacturer, for example Arduino DUE, are many times more powerful than their counterparts due to the 32-bit processor, but that's a completely different story.
| Parameter | ATtiny85 | ATmega328 | ATmega32u4 | ATmega2560 |
| Number of legs | 8 | 32 | 44 | 100 |
| Of these are available | 5 | 23 | 24 | 86 |
| Flash memory | 8 Kb | 32 Kb | 32 Kb | 256 Kb |
| EEPROM memory | 512 bytes | 1 Kb | 1 Kb | 4 Kb |
| SRAM memory | 512 bytes | 2 Kb | 2.5 kB | 8 Kb |
| ADC channels | 3 (4 with rst) | 6 (8 in SMD case) | 12 | 16 |
| PWM channels | 3 | 6 | 7 | 15 |
| Timers | 2x 8bit | 2x 8bit | 2x 8bit | 2x 8bit |
| 1x 16bit | 2x 16bit | 4x 16bit | ||
| Hardware Serial | No | x1 | x1 | x4 |
| External interrupts | 1 (+6 PCINT) | 2 (+23 PCINT) | 5 (+44 PCINT) | 8 (+32 PCINT) |
| Boards based on it | Digispark, LilyTiny | Uno, Nano, Pro Mini, Lilypad, Strong | Leonardo, Micro, Pro Micro, BS Micro | Mega, Mega Pro |
Thus, you should immediately understand that, for example, Arduino Uno = Nano = Pro Mini = Lilypad in terms of its capabilities and interchangeability. Or Leonardo=Pro Micro. You can find links to inexpensive Chinese Arduins on my website. Exactly there you will find links to a bunch of sensors, modules and other hardware that can be connected to Arduino. We'll talk about Arduino's capabilities for working with other hardware in one of the following lessons.
Mathematical functions
- abs() absolute value of a number
- constrain() constrains a number within a range, see usage
- map() reassigns a number from one range to another, see usage
- max() maximum two numbers
- min() minimum two numbers
- pow() value of a number to the power
- sq() square of a number
- sqrt() square root of a number
- cos() cosine of angle
- sin() sine of angle
- tan() tangent of the angle
Note: There are more built-in math functions if you need them, documented here.
Working with alphanumeric characters
- isAlpha() checks if the character is alpha (letter)
- isAlphaNumeric() checks whether a character is alphanumeric (letter or digit)
- isAscii() checks whether a char is an ASCII character
- isControl() checks whether the character is the control character
- isDigit() checks if a character is a number
- isGraph() checks whether a char is a printable ASCII character and whether it contains content (e.g. it is not a space)
- isHexadecimalDigit() checks whether a character is a hexadecimal digit (AF 0-9)
- isLowerCase() checks whether a char is a lowercase letter
- isPrintable() checks whether a char is a printable ASCII character
- isPunct() checks whether a character is punctuation (comma, semicolon, exclamation point, etc.)
- isSpace() checks whether the character is a space, form feed\f, newline\n, carriage return\r, horizontal tab\t, or vertical tab\v.
- isUpperCase() checks whether a char is an uppercase letter
- isWhitespace() checks whether a character is a space or a horizontal tab\t
Uploading a sketch to the Arduino board
Let's first understand what happens inside the Arduino when we decide to change the internal program that controls it.
What happens when we click the "Download" button
The Arduino board is an AVR microcontroller (Atmega8/168/328 or Atmega1280/2560), which is flashed with a bootloader. A program called firmware is written into the microcontroller, which allows you to receive signals from sensors, process button presses, communicate with various devices through interfaces, and control executive processes.
Typically, the firmware is written into the microcontroller crystal using special devices called programmers. There are different programmers for different microcontrollers - from specialized to universal. An important difference between Arduino and other controllers is the ability to upload firmware via a regular USB cable. This is achieved using a special program - a bootloader. Firmware does not require extra wires, you do not need to connect additional devices or press anything on the board. Also, when working through the bootloader, you cannot get to dangerous settings that will disable the Arduino.
When you connect the Arduino board to a power source, active microprogram activity begins inside it. When the microcontroller starts, control is given to the bootloader. The first 2 seconds it checks whether a new code has arrived from the user. In addition, the bootloader sends pulses to the pin to which the LED is connected, and it begins to blink. This means that the bootloader is installed and working properly. When a sketch is submitted, the bootloader writes it to the microcontroller's flash memory. This program is then submitted for execution. If no data is received, the bootloader runs the previous program. During program execution, a number of operations are performed inside Arduino to initialize and configure the environment, and only after that code execution begins.
Call setup and loop on boot
The code itself contains several basic functions; using them as an example, we can consider the operation of a microcontroller.
The void setup() command – it records data that the microcontroller executes at boot time, and can then forget about it. This function specifies the pin numbers to which the device is connected, libraries are connected and initialized, and the speed of operation with the serial port is set.
The void loop function is where commands are placed that must be executed while the board is turned on. The microcontroller will begin executing programs starting from the first, and when it reaches the end, it will immediately return to the beginning to repeat the same sequence an infinite number of times.
Uploading a sketch to the Arduino IDE
In the Arduino IDE, compilation of the sketch begins when you press the Verify button, after which the sketch can be loaded into the Arduino memory via USB using the Upload button. Before loading the program code, you need to set all the parameters in the Tools menu. In this menu, you select the port to which the board is connected and the platform. The Arduino IDE window below will display the progress of the sketch compilation. If the sketch is successfully uploaded, the message “Done uploading” will be received. The sketch starts running immediately after the download finishes. To expand the capabilities, you can connect additional external libraries developed by the Arduino team or third-party authors.
Overview of possible sketch upload options
Briefly, the entire algorithm can be written as follows: Writing code >> compiling >> loading into the microcontroller. When loading a sketch, the Bootloader is used. It is a small program that is loaded into an Arduino microcontroller. With this program you can upload a sketch without using additional hardware. When the bootloader is running, the LED on the board will blink.
1. Upload to Arduino IDE. The simplest and most convenient option for downloading code. All you need to do is write or find the sketch you need and upload it.
- Accelerated sketch loading into Arduino IDE. Using this method, you can double the upload speed to the microcontroller. To do this, you just need to go to Settings and uncheck the Code Check box. By skipping the verification step, the number of bytes that are transferred during download will be reduced. However, some types of checks will still be carried out, but they do not take long. It is not recommended to disable code checking if Arduino is placed in any critical project (for example, a satellite). You can also check if the connection is made via a very long USB cable (about 10 meters).
Reducing boot time by disabling verification works with any Arduino board that uses a USB connection. All these microcontrollers use the avrdude bootloader. Boards that use the Catarina bootloader do not need to disable code verification as the bootloader is faster.
- Uploading a sketch to Arduino via Bluetooth. This method is used when there is no need to physically connect the Arduino and the computer - for example, in power circuits or radio frequency circuits. To implement the download, you will need a Bluetooth module, which is equipped with an adapter board for Arduino. This module must be connected to the computer via a USB-UART-TTL adapter. The module is operated using AT commands.
- Download using an Android device. To carry out this type of code download, you will need USB-A – USB-B and USB-Host (OTG cable), Arduino and an Android device with support for host mode. On your Android device you need to install the ArduinoDroid or ArduinoCommander program from Google Play. All devices need to be connected using cables, after which you can turn on the Arduino and upload the code to it. You need to run the installed program. When you turn it on, the IDE will begin updating, which will take some time.
First, the work will be considered using the ArduinoCommander program as an example. After launching it, you need to click USB-Device. Then you need to add Autodetect so that the Android device searches for the Arduino and displays it on the screen. As soon as the Arduino appears on the screen, you need to click on it. To go to the menu, you need to click in the lower right corner. In this menu you can load a sketch from an SD card.
ArduinoDroid is a development environment, compiler and bootloader at the same time. You need to start compiling the sketch by clicking on the Lightning-Button. After compilation is complete, you need to click on the download button. The download takes a few seconds. Once the download is complete, the Arduino will launch new code.
- Programming with Raspberry Pi. You can upload sketches in two ways - using the Arduino IDE and using the arduino-mk package. The package allows you to compile and upload Arduino sketches from the command line.
Working with bits and bytes
- bit() calculates the bit value (0 = 1, 1 = 2, 2 = 4, 3 = 8...)
- bitClear() clears (sets to 0) a bit of a numeric variable. Accepts a number and a bit number, starting from the right.
- bitRead() read some numbers. Accepts a number and a bit number, starting from the right.
- bitSet() sets the bit of a number to 1. Accepts a number and a bit number, starting from the right.
- bitWrite() writes a 1 or 0 to a specific bit of a number. Accepts a number, the bit number starting from the right, and the value to write (0 or 1)
- highByte() get the most significant (leftmost) byte of a dictionary variable (having 2 bytes)
- lowByte() get the low-order (rightmost) byte of a dictionary variable (having 2 bytes)
Summarizing
As can be seen from our brief overview, today you can find a fairly wide range of ready-made Arduino kits made in Russia for electronic design. The advantage of Russian kits is that the quality of the components is better than that of inexpensive Chinese designers and the availability of instructions in Russian. The main disadvantage is the rather high cost compared to the same analogues in China. Very often, when you open a Russian set, you can find simply repackaged Chinese spare parts with hieroglyphs on the modules and sensors. Only a few manufacturers offer unique construction sets of their own design. Let's hope that the market for educational Arduino robotics will only grow and we will still have many discoveries ahead.
Additional electronics lessons:
- Arduino vs Raspberry Pi
- Introduction to Arduino
- Arduino Uno rev 3 board
- Arduino Uno WiFi rev 2 board
- Introduction to the Arduino Programming Language
- Milli Micro Nano Pico
- The Arduino MKR WiFi 1010
- Introduction to Electronics
- Electronics Fundamentals: Analog and Digital
- Electronics Fundamentals: Current
- Electronics Fundamentals: Voltage
- Electronics Basics: Vcc, Ground,...
- Electronics Fundamentals: Resistance
- Electronics Basics: Short Circuit
- Electronics Basics: Your First Circuit
- Electronics Fundamentals: Prototyping with Breadboards
- Electronics Basics: Using a Multimeter
- Measuring voltage, current and resistance using a multimeter
- What to buy to get started with Arduino and electronics
- Arduino Project: Flashing LED
- Built-in Arduino LED
- Development Board Power Module
- Arduino Create Platform
- How to Connect to a Wi-Fi Network Using Arduino
- How to run a web server on Arduino
First project on Arduino
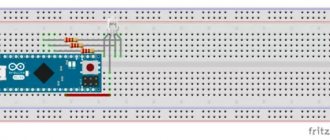
Let's build our first Arduino-based device. We will simply connect the clock button and LED to the Arduino. The project diagram looks like this:
LED brightness control
Note the additional resistors in the circuit. One of them limits the current for the LED, and the second pulls the button contact to ground. I explained how it works and why it is needed in this lesson.
In order for everything to work, we need to write a sketch. Let's make the LED light up after pressing the button, and go out after the next press. Here's our first sketch:
// variables with pins of connected devices int switchPin = 8; int ledPin = 11; // variables to store the state of the button and LED boolean lastButton = LOW; boolean currentButton = LOW; boolean ledOn = false; void setup() { pinMode(switchPin, INPUT); pinMode(ledPin, OUTPUT); } // function for debouncing boolean debounse(boolean last) { boolean current = digitalRead(switchPin); if(last != current) { delay(5); current = digitalRead(switchPin); } return current; } void loop() { currentButton = debounse(lastButton); if(lastButton == LOW && currentButton == HIGH) { ledOn = !ledOn; } lastButton = currentButton; digitalWrite(ledPin, ledOn); }
In this sketch, I created an additional debounse function to suppress contact bounce. There is a whole lesson on contact bounce on my website. Be sure to check out this material.