LED strips are becoming more popular every year. They fit favorably into the interior of living rooms, entertainment facilities, or are used to attract attention on advertising banners. But, like any backlight, LEDs can fail after a while. To solve the problem, the tape can be replaced, but this is not always beneficial.
If the breakdown is not critical, the elements can be repaired yourself. To do this, you need to understand their design and operating principle. Experience in soldering microcircuits will also come in handy. But before you start repairing, you need to understand whether it will help or not. Sometimes a breakdown cannot be fixed.
Application area
Particular demand for 220 volt LED strips is observed in show business and various commercial structures, where with the help of bright lighting effects you can attract a person’s attention. This could be illumination of billboards, design of concert stages, creation of color and musical fountains or huge inscriptions and figures. For non-commercial purposes, LED strip powered by 220 volts is often used as decorative lighting in interior and exterior decoration.
Looking ahead, it is worth noting that due to the design features of the power supply, it is highly not recommended to use a 220-volt LED strip in everyday life.
The classification of 220 V LED strips is no different from the classification of low-voltage analogues and is based on technical parameters. Based on the type of chips used, high-voltage LED strips are divided into many types. It is only worth noting that most products are made on SMD LEDs 2835, 3014, 3035, 3528, 5050, 5060 or on modern, more powerful SMD 5630.
The current consumption and luminous flux of the LED strip depend on the type and number of chips per meter.
As a rule, according to the degree of protection, high-voltage tapes are divided into two types: IP67 and IP68. A high level of protection prevents accidental human contact with live parts of the LED strip and allows its operation in an open external environment. Just like low-voltage LED strips, 220-volt LED strips vary in power and glow color. Depending on the type of installation, a 220-volt LED strip can be either self-adhesive or without an adhesive layer. Separately, it is worth mentioning the 220 volt RGB LED strips, which are assembled on three-color LEDs (usually SMD 5050). They have 4 contacts on a flexible printed circuit board, and they are connected through a special RGB controller.
Important. On the Internet you can often come across the concept “duralight LED strip”, which can have a double meaning. Recently, online stores have begun to call luminous flexible strips powered by 220 V that way. This is not entirely correct. In fact, a duralight lamp is a transparent cord made of flexible polymer, inside of which there were originally incandescent lamps, and now LEDs. The internal space of the cord is filled with polyvinyl chloride in order to increase strength and degree of protection. In appearance and method of use, the 220v LED strip and the duralight cord are very similar, which, in fact, creates confusion.
Tips before buying a new tape
When looking for suitable lighting, you should not pay attention to cheap Chinese online stores with attractive prices. Such products contain low-quality chips that quickly burn out or become dull. In addition, the backlight is unlikely to be returned under warranty.
It is also worth considering the purpose of the LED strip. It comes in single color and multi-color. The latter is used as decorative illumination of a surface or individual objects. A single color is suitable for highlighting a certain area in a house or apartment, window and door openings.
Design and principle of operation
Conductive tracks are applied to the base of the LED strip, which connect SMD LEDs and resistors into a single electrical circuit. Then the flexible printed circuit board with the elements is coated with a silicone layer or a transparent PVC shell is created.
The main design feature of the 220-volt LED strip is the absence of a step-down converter used as a power source. Instead of an expensive switching voltage stabilizer, the power supply unit (PSU) consists only of a diode bridge located in a sealed housing.
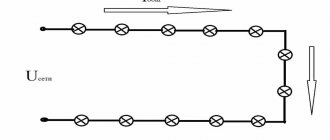
On the one hand, it includes a network cable, and on the other, a wire with a connector for connecting to the LED strip. The voltage at the rectifier output is constant and is about 200V. In order for the LEDs to operate without overload, they are combined into groups, compensating for excess voltage with resistors.
As a rule, LEDs used in 220 V LED strips have a voltage drop of about 3.3 V, so each group includes 60 chips.
The voltage after the rectifier is pulsed in nature, which clearly affects the quality of the light. Rectified pulses with a frequency of 100 Hz, although invisible to the human eye, negatively affect the functioning of the brain and nervous system as a whole.
Light sources with such a high pulsation coefficient cannot be used as main lighting.
It would seem that the problem can be solved by installing a capacitive filter at the output of the diode bridge. However, this will lead to an increase in the average rectified voltage to 280 volts, which is unacceptably high. Logically, manufacturers could increase the number of LEDs connected in series in each chain, but so far there are no such products on sale.
How to fix an LED strip
If one of the chips is burned out, it can be replaced and the backlight will be fully restored. When it comes to the breakdown of the SOV plate, repair will not help. First, they check with a tester, then unsolder the damaged diode, connecting the circuit without it or with another element. In most products, the circuit board is made of aluminum to effectively dissipate heat to the heatsink.
Structure of LED strip.
The heat dissipation substrate on the back side of the chip is soldered to the current-conducting track. During dismantling it will have to be unsoldered. Plastic printed circuit boards also contain such tracks. Based on the material, it is necessary to choose the correct soldering method. To work you will need:
- blade;
- tester;
- holder;
- tweezers;
- flux;
- soldering iron (it is recommended that it be thin). For a standard soldering iron, you will have to make the tip yourself. Copper wire is suitable for this.
To remove the aluminum board, the case is separated from it. You can use a knife. The board is usually soldered to the base with two wires; they need to be unsoldered. For convenience, the tape can be fixed in the holder. At the next stage, the tester checks each track. A burnt-out diode can be visible to the naked eye, but not always.
Burnt out diode.
The quality of soldering should be inspected. If there is a defect in production, this will affect the service life of the diodes. When the burnt chip is identified, you need to take a soldering iron and tweezers. The burner should be on the other side of the board. When the soldering softens, the diode is removed with tweezers. The new chip must be fastened before the aluminum base cools down.
Dimmable
The luminous flux of any LED strip powered by 220 volts can be controlled. Moreover, this can be done optionally (later and at will) or immediately provide a convenient place for the dimmer. In the case of an RGB product, you need to install a special controller, the functional load of which is much higher than that of a dimmer. For example, an RGB controller with remote control can set any shade of light.
Read also: Main workshops of a full-cycle ferrous metallurgy plant
Why do LED lamps burn out?
The most popular reason that LED light bulbs in a chandelier often burn out today is the poor build quality of these products. In pursuit of savings, consumers often give preference to Chinese-made products, which do not always meet the requirements for manufacturing quality and, as a consequence, service life.
In particular, cheap lamps based on light-emitting diodes may simply not have protection against power surges in their design, which lead to burnout of the LEDs included in the lamps.
Another design flaw that leads to the fact that LED structures quickly fail is such a combination of their elements - a resistor and a capacitor - in which the light bulb will burn with the maximum possible brightness for it, which will lead to a faster depletion of its resource.
Unscrupulous manufacturers deliberately take such a step in order to offer consumers more powerful light sources at a lower price. Speaking about the same quality of assembly of light bulbs based on LEDs, one cannot fail to mention a possible violation of their soldering technology, which Chinese craftsmen often commit.
If you are confident in the quality of the installed LEDs, and their systematic burnout occurs only in one of the rooms of your apartment or private house, then you should think about problems with the electrical wiring. It is necessary to check the quality of the wire connections - both in the junction box and on the light source itself and its switch.
LED bulbs
Important! There should be no exposed strands of current-carrying conductors in the power supply system. The optimal solution for implementing conductor switching is to use special terminal blocks and terminal blocks
Another reason for the systematic failure of LED light bulbs may be a malfunction of the sockets in the lighting fixture. These elements of the chandelier should be inspected for damage or burning. If they are found, you can try to clean and tighten the cartridge contacts yourself, and if this does not help, replace the cartridge.
Also, don't forget that the LED lamp driver is designed to be turned on and off a certain number of times. For those who like to “flip” the switch one more time, LED lighting fixtures burn out faster.
Differences from low-voltage LED strips
Those who have held 12V powered tape in their hands have probably noticed cut lines at small intervals. You cannot cut a 220 volt LED strip in this way. In it, the cutting lines are multiples of 50 or 100 cm (depending on the installation density of the LEDs), that is, every 60 emitting diodes. This is the first difference that matters when decorating rooms, since due to the larger multiple length, unnecessary “tails” may remain. The operation of electronic equipment is calculated on an operating network voltage of 220–230 volts. How many real volts are there in an outlet? By taking a measurement with a conventional voltmeter, you can see any number that differs from the norm and is located in the range from 190 to 240. Oddly enough, such a spread is considered normal according to existing standards, which means that electrical appliances must withstand such network differences for a long time.
Since the power supply for a 220v LED strip does not have a stabilization function, the LEDs are forced to operate at the voltage that is supplied to them. With Unet = 220 V, the output of the diode bridge will be 198 V, which is ideal for powering 60 light-emitting diodes. If there is about 30 volts less in the socket, then taking into account the rectification coefficient, the output will be 170 V. It is easy to guess that each LED will receive about 0.5 volts less, which will inevitably lead to a decrease in brightness along the entire length. Increased network voltage, on the contrary, overloads each element of the luminous chain, trying to be evenly distributed on each LED.
Short-term network fluctuations are unable to sharply reduce the working life of the product. If a U network of more than 240 V is considered the “norm,” then it is better to use a voltage stabilizer so that the LED strip does not begin to rapidly lose brightness. At reduced network voltage, the 220 V LED strip is in a gentle mode and can be used for a long time without a stabilizer, but due to its low light output its use becomes questionable.
Why does an LED lamp glow when the switch is off?
Miracles do not happen and I, as an electrician, responsibly declare that if an LED light bulb lights up after turning off, there can be only 2 reasons for this:
- the switch does not break a phase, but a zero, and there is a section in the wiring with poor-quality insulation;
- A backlit switch is used.
Let's consider both cases in more detail.
Illuminated switch
The most common reason for an LED lamp to glow after being turned off is the use of a backlit switch.
Inside such a switch there is an LED with a current-limiting resistor. The LED lamp glows dimly when the lights are turned off because even when the main contact is turned off, current continues to flow through them.
Why does an LED lamp burn at full heat and not at full power? Thanks to the limiting resistor, the current flowing through the electrical circuit is extremely insignificant and insufficient to light an incandescent electric lamp or ignite fluorescent lamps.
What does it look like? There can be two lighting options. Either the LED lamp lights up continuously after turning off, which means that sufficient current flows through the LED backlight of the switch, or the light flashes periodically.
This usually happens if the current flowing through the circuit is too small to cause a constant glow, but it recharges the smoothing capacitor in the power supply circuit.
How to fix? The simplest is to remove it from the backlight switch. To do this, we disassemble the housing and unscrew or bite off with wire cutters the wire going to the resistor and LED. Or change the switch in the house to a regular one, without backlight.
You can purchase such a resistor at any radio store. Installing the resistor is not difficult. It is enough to remove the lampshade and fix the resistance legs in the terminal block for connecting the network wires.
If you are not particularly friendly with electricians and are afraid to “interfere” with the wiring yourself, another way to “fight” backlit switches can be to install a regular incandescent lamp in the chandelier. When turned off, its spiral will act as a shunt resistor. But this method is only possible if the chandelier has several sockets.
Incorrect connection of the lamp
The reason for the continuous burning of the lamp may be hidden in connection errors. If, when installing the switch, a zero was connected instead of a phase, it will turn off when the circuit is opened. At the same time, due to the preserved phase, the wiring (and, accordingly, the light bulb) will be constantly under voltage. The LED light will illuminate when the switch is off, due to leakage current through worn insulation or poorly insulated connections.
Violation of polarity (phase and zero) during installation causes a constant supply of current, which leads to the glow of LED devices even when the switch is off. This situation is quite dangerous for the inhabitants of the apartment: since the device is energized, even if it is turned off. And you can accidentally get an electric shock (for example, when replacing a light bulb).
How to fix? It is necessary to turn off the power supply, disconnect the wires, and then mount them in the correct way (phase to switch).
Connection
The circuit for connecting high-voltage tapes is extremely simple.
The entire connection sequence can be divided into several successive stages:
- The required length is cut, a multiple of the minimum allowable length of the tape.
- A pin connector is inserted into the cut end of the 220 V LED strip and fixed with glue or sealant.
- Observing the polarity, the connector is connected to the output of the rectifier.
- The reverse part of the segment is closed with a plug.
- The entire structure is checked for tightness and reliability of connections.
When the unit is turned on, there is no sound, no lights come on, and, accordingly, no work.
- Turn off the device.
- Let's take it apart.
- We check the board - everything should be clean, there is no burnt odor, the capacitors are not damaged.
- We turn on the device.
- We check the rectified voltage at C22, C23.
- There should be about 310V between OV and 310V. If everything is normal, the amplifier and output switches are working properly.
- Turn off the power again.
- Checking the master oscillator.
- If it works, look at pins 8 and 11.
- If there are no pulses at these pins, you need to check the TL494 in more detail.
Advantages and disadvantages
Firstly, the most obvious advantage of a 220-volt LED strip is the absence of a bulky and expensive power supply. It is replaced by a miniature block with an input and output cable. When connecting to a 220 volt network yourself, it is enough to buy the required diode bridge and thin copper wires or special connectors. Due to the use of high voltage, the current in the load is small, which makes it possible to use a wire with a cross-section of 0.75–1 mm 2.
Secondly, thanks to the consumption of only 20–150 mA per meter of length, a single piece of tape can reach 100 meters, which is important when creating large-scale advertising projects. For comparison, the longest length of a low-voltage LED strip powered from one end is only 5 meters.
The main disadvantages of LED strips powered by 220 volts are their limited scope of application due to harmful flickering with a frequency of 100 Hz and dangerous voltage that runs along the entire length. In addition, you cannot ignore the following obvious disadvantages:
- non-repairable, since replacing the SMD chip will lead to damage to the sealed layer;
- minimum multiplicity 50 or 100 cm;
- poor quality of cheap Chinese-made products;
- lack of adhesive base in some models.
The LED strip, operating on 220V AC power, has become a new achievement for manufacturers of diode products. There are practically no differences with low-volume analogues. Currently, 220V high-voltage tapes have become popular in commercial activities and show business, where the use of lighting effects attracts the attention of visitors. LED strip can be used in organizing concert stages, illuminating billboards, creating large-scale inscriptions, figures or musical fountains. Tape with 220V power supply can also be used in non-commercial activities: for decorating exteriors and interiors.
Low quality of the lamps themselves
Low quality products mean that cheap lamps quickly burn out. Chinese LED devices attract with their budget price, bright and stylish design, but, unfortunately, they are not durable.
At the first voltage surge, they will burn out, because their circuit does not have a driver that adjusts the current strength in the device.
When buying a lamp, we look for a device that is in the budget price segment, but at the same time shines brightly. Manufacturers of LED products and diodes satisfy the requirements of customers - they select capacitors and resistors so that the light is bright, and the price of the product is budget-friendly.
But such lamps operate at full power, which reduces the service life.
Poor-quality lighting devices cause a blow to the family budget, so you shouldn’t skimp on light bulbs. In addition, high-quality lighting has a beneficial effect on your vision and overall health.
Areas of application of LED strips
220 Volt LED strips are designed for outdoor use, are made in a silicone shell and have maximum protection. They can be single or multi-colored. They do not require the use of power supplies or converters. They are connected via a power cable with a diode bridge, which converts AC voltage to DC.
Read also: Connection diagram for an analog camera
There are different varieties (LED strip duralight or luminous flexible strips for 220V). In fact, a duralight lamp is a transparent cord made of flexible polymer, inside of which miniature lamps were originally located, and now modern LEDs can operate without a power supply directly from 220V. The internal space of the cord is filled with polyvinyl chloride to ensure an airtight degree of protection. In appearance and method of use, the 220V tape and the duralight cord are very similar.
Modern LED strip 220V
Durolight tape
Drivers and blocks from a computer - is it possible or not?
Let's take a closer look at the question of what power supplies there are and where it is better to use certain power supplies. After all, completely different types are used to connect LED lighting in the bedroom, on the street or in the pool.
However, do not confuse power supplies and drivers. These are completely different devices and they perform different tasks.
By connecting the LED strip from the driver, you can easily burn it and damage it. Why this happens is explained in a separate article.
People often wonder whether it is possible to use power supplies from a computer instead of a standard magazine unit?
If its characteristics match the characteristics of the LED strip - there is a constant stabilized voltage of 12V + sufficient power, then connect.
Everything will light up and work properly. However, for high-quality illumination, it is better to select specialized types. Let's move on to them.
Product varieties
The classification of 220V tapes does not differ from low-voltage products and is based on technical characteristics. Depending on the power, the following options are distinguished:
- LED strip 220 volts power 4.4 watts per meter;
- LED strip 220 volts power 7.2 watts per meter;
- LED strip 220 volts power 14.4 watts per meter.
Based on the nature of the chips used, products are divided into many types. Basically, strips are made on SMD LEDs 3014, 2835, 3035, 5060, 5050, 3528 or from more modern SMD 5630 diodes. The light intensity and current consumption depend on the number and type of chips per linear meter.
LED strip in a coil of 100 meters
According to the level of protection of the tapes, there are IP68, IP67. The high protection of LED products prevents the user from coming into contact with live parts, which allows use in an open environment. That is, they are equipped with a silicone tube and are intended for use outdoors and in wet areas. According to experts, such tapes are resistant to temperature changes. The tapes can be rigid or flexible, depending on the base for the diodes. Another difference between high-voltage tapes is the color and power of the glow. Depending on the type of installation, they can be self-adhesive or without an adhesive layer. It is also worth noting the 220 Volt RGB LED strips, assembled on three-color diodes (mainly SMD 5050). They have 4 contacts on a flexible printed base, and the connection is made using a special RGB controller. According to the color design, the ribbons are white, blue, red, green and tri-color. Recently, stores have begun to sell duralight strips, which are a cord made of transparent polymer containing LEDs. Inside the cord there is polyvinyl chloride, which increases the level of protection and strength of 220 V ice tapes. In terms of their method of use and appearance, they are similar to duralight cords.
Exploitation
Does the LED lamp glow when the switch is off? It is recommended to replace the device with a new one if there are no problems with the electrical wiring. Try not to neglect the rules for using LED lamps, then they will work properly.
- Dismantling and installation of the device is carried out with the electricity turned off.
- Do not allow the LED lamp to come into contact with water.
- It is not recommended to use a lamp for street lighting unless it is protected from water and dust.
- Lamps cannot be used in devices with a brightness control.
- If the LED is used in a circuit with a switch that has a neon backlight, the light will glow faintly when turned off.
- Connecting the lamp to a voltage different from the rated voltage leads to a reduction in service life.
- Temperature changes in the operation of the lamp lead to its failure.
- LEDs do not need to be recycled as they contain no hazardous substances.
- The lamps are guaranteed for three years from the date of purchase.
LED lighting can completely replace traditional lighting. Such light bulbs are used in any lighting fixtures and interiors, depending on a person’s preferences.
Features of LED products
Due to the high voltage, 220V tapes can have a serial connection up to 100 m in length. Therefore, they are sold in reels of 50, 100 meters. This allows you to cover a large lighting perimeter from a single connection to a 220 Volt network. The power (W/m), level of moisture protection and color temperature are determined. The cost of 220V LED strips is less than their analogues, where the voltage is 12 and 24 volts. They are durable and economical light sources. The light plugs into a simple socket to provide light levels similar to incandescent bulbs. With proper connection and installation, the tapes will last up to 50 thousand hours of intensive use. The reduction in the cost of products is due to the absence of an expensive power supply. The cutting frequency of LED strips is 1 meter, which does not always allow you to measure the required length. Taking into account the unstable voltage in the network, where ripples or voltage drops can occur, LEDs from cheap, low-quality strips quickly break down. Another disadvantage of the products is the heaviness of the sealed silicone tube in which the tape is located, which is why it needs to be attached at 4 points per linear meter. This eliminates any sagging or uneven fit in the tape. The tapes are not suitable for repair, since when replacing the chip the sealed layer is broken. Some models do not have an adhesive layer. Products from Chinese manufacturers are of poor quality. Due to harmful flicker and dangerous voltage, high-voltage tapes have a limited scope of use. For example: street lighting, advertising. If the LED strip is permanently installed outdoors, then after about 5-6 years the silicone shell begins to deteriorate.
Considering all the advantages and disadvantages of the tapes, it is advisable to use them in street lighting of the facades of various buildings. To obtain dynamic light effects by changing shades, you need to buy an RGB 220 Volt tape.
Features of LED installation
Cheap LED lamps do not tolerate high temperatures well. In such conditions they quickly burn out. Therefore, when choosing an area for installing LEDs, it is necessary to avoid installing them near heating elements and household appliances. It is not recommended to install LED lamps in the kitchen, especially near the stove. In this room, the temperature often (especially in summer) exceeds 30 degrees, which causes the destruction of crystals.
For a car, it is recommended to purchase LEDs with a current stabilization unit. The resistor is not able to cope with changes in the power of the vehicle’s on-board electrical network, which will negatively affect the condition of the LED lamps. LEDs from well-known and trusted brands such as Gauss, Camelion, Feron, Jazzway and others should be installed in cars. By searching, you can find LEDs suitable for a particular car.
Design and principle of operation
The main design feature of 220V tapes is that they do not have a power source in the form of a step-down converter. In the power supply, the voltage stabilizer is replaced by a diode bridge, which is located in a sealed housing. On one part of it there is a network wire, and on the other a cable with a connector is connected to the tape. The rectifier output has a constant voltage of 200V.
The main advantage of LED strips for 220V direct connection is that, unlike conventional strips with a 12-24V power supply, the former allow you to create a continuous strip length of 100 meters, protected from moisture. To avoid overloads when operating LEDs, they are connected in groups, using resistors to compensate for excess voltage. Basically, the voltage drop of LEDs is 3.3-3.5 V, which is why each group contains 60 chips. Diodes require polar power supply, which is why a rectifier (diode bridge) is used. After the rectifier, a pulse voltage is observed, which affects the quality of light. To control the light flux, a dimmer is installed in the design. For RGB strips, a special controller is installed, which has a greater functional load than a dimmer. When purchasing powerful SMD 5630 tapes with a power consumption per 1 m of more than 10 W, you need to pay attention to the presence of an aluminum mounting profile or a cooling radiator in the design.
Read also: Gearbox types purpose device gear ratio
Main conclusions
Repairing an LED structure is not as difficult as finding the cause and location of the problem. There are typical problems:
- flicker;
- stopping the lighting of the entire backlight or one part;
- brightness reduction;
- disappearance of one or two colors in RGB lamps.
All of these faults are caused either by problems with the power supply or by faulty LEDs. Repair consists of replacing problematic components or individual elements, as well as restoring contact with the power supply or connector. Share your repair methods in the comments.
Previous
LEDsRequirements, characteristics and best manufacturers of waterproof lamps
Next
LEDs Do-it-yourself computer lighting: diagrams, instructions, necessary materials
Other causes of problems
Several more reasons why the LED strip may burn dimly. In addition to problems associated mainly with installation and overheating, one more factor needs to be taken into account - power.
Some unskilled installers want to make a greater impression on the client by artificially increasing the brightness of the tape by applying more current to it.
The power supply may have an additional function - adjusting the output voltage. This helps to set the required supply voltage and eliminate manufacturing defects associated with deviations from nominal values, but in no way for experiments and quackery.
If you turn it to the maximum, the voltage may be instead of the required 12V, for example, at 13.5V. This circumstance often causes the LED strip to burn out.
Also, such simple reasons as:
- Power surges;
- high humidity;
- ingress of liquids;
- insects and rodents;
Follow the installation rules and your structures will last a long time!
Please rate the article. We tried our best:)
Did you like the article? Tell us about her! You will help us a lot :)
Checking an LED with a Tester
LEDs have a lifespan and will eventually fail. Let's look at how to test an LED.
To check a soldered LED with a multimeter, you need to switch the device to diode testing mode:
- anode - positive electrode, the red tester probe is connected;
- cathode – negative electrode, the black probe of the tester is connected;
- On the display we will see the magnitude of the voltage drop;
- if you change the polarity, there should be no voltage drop; such results tell us that the LED is working properly.
Photo 09. Tester in the LED testing position.
How to check the LED on the board
The verification procedure remains the same, the only thing that is necessary is to make remote probes. If you do not have special adapters for removing probes, then sewing needles fit perfectly into the connector for checking the LED. Thus, we simply make an adapter with our own hands.
Photo 10. Factory replacement stylus tips.
Making a dial with your own hands
You can construct a homemade device that consists of two medical needles, wires and a battery. We wind a wire around each needle and connect each end to a battery. Without desoldering the LED, we throw needles on the contacts of the LED and see whether it works or not. Remember: any LED is powered by constant voltage, and therefore has a plus and a minus. Observe polarity. The error does not disable the LED, but does not light it either. I put a video on how to make the device below.
Homemade mini tester: