01/26/2017 master
The most popular type of lighting today is LED lighting. Many people in this matter prefer LED strip, which is very easy to install with your own hands.
LED Strip Light
Typically, such LED products are connected to a 220-volt network using a power supply. But it is possible to power a small backlight of this kind from batteries. In this article you will learn how to power an LED strip from a battery.
Advantages of this connection method
For LED strip, the traditional option is to connect to the network via a power supply. This need is dictated by the fact that the standard voltage network is designed for 220 volts. At the same time, the tape is powered from a voltage of 12 or 24 volts. Moreover, such power supply of the lighting device has the following disadvantages:
- you need to correctly calculate the power of the voltage converter;
- The connection diagram for the power supply and additional devices (controller with power remote control) is not always simple and clear;
Connection diagram of the LED strip to the power supply
- the presence of a sufficient number of wires that need to be masked. When lighting a cabinet with this product, the wires can be hidden quite easily, but in other situations you will have to tinker with their disguise;
- the need to have an outlet near the backlight through which the lighting installation will be powered;
- During operation, the voltage converter heats up, which is a common cause of its breakdown. Therefore, to extend its service life, the power supply should be properly cooled and ventilated. And this requires additional time and effort.
But the LED strip can be powered not only from a 220-volt network, but also from batteries. This method of connecting this type of LED product has the following advantages:
- there is no need to calculate the power of the power supply required for a particular type and length of illumination;
- no dependence of the placement of the LED strip on the location of the sockets;
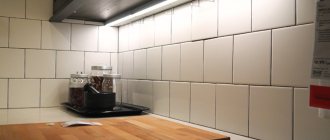
- the ability to place lighting not only in the closet, but also to create high-quality work surface lighting for the kitchen;
LED work surface lighting
- The number of wires required to ensure optimal power supply to the light source is reduced significantly.
At the same time, making such lighting yourself will be much easier than creating a traditional connection method.
What can be used in connection
An RGB controller will add brightness control and lighting effects. In designs with such devices, a power supply is required. Controllers differ in type of control:
- push-button controllers are switched by hand;
- infrared ones are controlled by a remote control at a distance of up to 10 m, which must see the sensor;
- radio controllers have a long range and do not need a visible sensor;
- Wi-Fi controllers are controlled by a mobile phone or tablet;
- Audio controllers are equipped with a microphone that receives audio commands.
The controller power standard is 20% more than the tape. An amplifier is used with low-power devices. Its price is comparable to the cost of a cheap controller.
Any batteries can be used for connection, but it is more profitable to use rechargeable ones. The total battery voltage should be between 8 and 12 volts.
When it might come in handy
Powering the LED strip from any batteries will be the right solution in situations where you need to create small-length and low-power lighting.
Note! If the LED backlight is long, you will still have to use the traditional method and connect it to the mains voltage via a power supply.
Cabinet lighting with LED strip
Using a small battery-powered LED strip, you can quickly and easily power your cabinet. At the same time, you can illuminate the closet with clothes in the bedroom, as well as wall cabinets in the kitchen. In addition to kitchen units and cabinets, such lighting can be arranged for shelves, whatnots, paintings, etc. It is independence from the mains that is the main advantage of operating an LED strip on batteries. This method of powering the light source frees up your hands and allows you to create more original and non-standard lighting for various interior elements. It is worth noting that this connection method will be relevant for rooms in which, for some reason, there is no wiring. Also, connecting the tape to the battery can be organized in situations where there are power outages. In this way, you can not only illuminate such non-standard rooms, but also create an atmosphere of celebration and comfort in them.
Note! By using waterproof and sealed models of these LED products, you can create spectacular lighting for the kitchen, bathroom or balcony.
In addition to furniture (for example, kitchen units and cabinets), such a lighting installation can be placed:
- on clothes when creating light suits;
- on sports equipment;
- built into cars and other vehicles (motorcycles, mopeds, bicycles);
- lighting in apartments and houses in hard-to-reach places.
As you can see, the use of autonomous light sources of this type can be used in a wide variety of situations, and not just to illuminate a cabinet or organize lighting for the kitchen. By using your imagination you can always find a new and non-standard use for such seemingly familiar lighting products.
How long does it work
To calculate how many batteries we need and how long they will last, we look for the amount of current consumed by the LEDs. This value differs for different types of equipment and is indicated in the documentation. The quantity is indicated both per LED and per unit length.
Having calculated the total amount of current consumed, we select batteries of the required capacity. The 18650 lithium batteries have a capacity of 2600 mAh - with a consumption of 2600 mA (or 2.6 A), they can provide continuous light for an hour. Five meters of diode strip for 30 diodes, depending on the specification, can consume a current of 1-3 A; for an hour and a half of operation they will require two 18650 batteries.
The quality and operating time depend on the accuracy of soldering or the connectors used.
Additional connectivity options
Any LED strip, whether it is connected to a battery or a network, can be connected to additional equipment - a controller with a remote control.
Controller with remote control
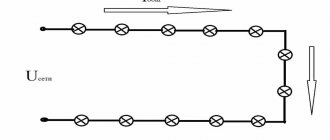
The controller will allow you to control the luminous flux emitted by the lighting installation using a remote control. If you connect it to an LED strip, you can not only change the brightness of its glow, but also control the modes, creating the effect of blinking, flickering, etc. Of course, in a situation where the tape is connected from batteries, such a variety of effects will be impossible due to the limited power of the power source. Therefore, you need to connect the controller to a lighting installation powered according to a traditional circuit. To connect additional equipment of this type with a control panel to the LED strip with your own hands, you need to be guided by the following diagram:
Connection diagram of the controller to the tape
Having the ability to control lighting allows you to make your stay in the house more comfortable, as well as save on utility bills for electricity consumption. And this despite the fact that LED products are already the most economical of all light sources existing today.
Disadvantages and advantages
A traditional power supply has several disadvantages that are not obvious at first glance:
- firstly, you need to select it correctly and calculate the appropriate power
An error can lead to the fact that it will either burn out, or the tape will shine dimly without ever reaching full brightness.
- complex connection diagram
This especially applies to lighting with additional amplifiers, controllers, etc.
- a bunch of wires that need to be pulled from the power supply across the room to the connection point to the tape
Plus, do not forget about the 220V wires - from the distribution box or switch, which must be used to connect the power source itself.
- the need for nearby AC voltage 220V
- dimensions and dimensions
If this is ceiling lighting, then a constant headache becomes the question of where to hide this not at all miniature-sized box. Often you have to make a special niche.
It is based on these shortcomings that many people think about connecting LED backlighting via batteries. The advantages of this solution immediately emerge:
- This LED strip can be used to illuminate even those rooms where there is no 220V voltage (garage, barn, cottage without light)
- This creates convenient and safe lighting in the kitchen (especially the work surface of the countertop)
- immediately eliminating the need to lay tens of meters of unnecessary wiring
- Well, you no longer need to rack your brains about where to hide this big, heavy block
How does offline connection work?
Before connecting the tape to the battery, you must remember that the most important point here will be the charge of the power source.
Note! All LED strips that exist on the lighting market operate on the same principle. Therefore, they can all be connected and the cabinet, any other furniture or element of the interior of the room (bedroom, kitchen, etc.) can be illuminated according to a single scheme.
LED strip connection diagram
When lighting a closet or any other furniture in the house, you can use any type of battery to power the tape. You can even use rechargeable batteries. This power source has the following advantages:
- is reusable. This means that when the accumulated charge is depleted, they can be recharged and used again to power the backlight. At the same time, in order for the lighting to always be on, you only need two batteries. When creating lighting for the kitchen, it is recommended to use battery-type batteries, since the lighting here should always be on. This will help reduce the frequency of power supply replacement;
- despite the high cost in relation to conventional batteries, batteries actually turn out to be much more profitable;
- high-quality lighting power supply.
For power, you can use both finger and little finger batteries, as well as “tablets”.
How to connect 3V batteries
You can connect a super-bright LED to a 3V battery without using any additional parts. Since the operating voltage of the LED is slightly higher than 3 V, the LED will not shine at full strength. Sometimes it can even be useful. For example, using an LED with a switch and a 3 V disk battery (popularly called a tablet), used in computer motherboards, you can make a small flashlight keychain. This miniature flashlight can be useful in different situations.
From such a battery - 3 Volt tablets you can power an LED
Using a pair of 1.5 V batteries and a purchased or homemade converter to power one or more LEDs, you can make a more serious design. The diagram of one of these converters (boosters) is shown in the figure.
The booster based on the LM3410 chip and several attachments has the following characteristics:
- input voltage 2.7 – 5.5 V.
- maximum output current up to 2.4 A.
- number of connected LEDs from 1 to 5.
- conversion frequency from 0.8 to 1.6 MHz.
The output current of the converter can be adjusted by changing the resistance of the measuring resistor R1. Despite the fact that from the technical documentation it follows that the microcircuit is designed to connect 5 LEDs, in fact you can connect 6 to it. This is due to the fact that the maximum output voltage of the chip is 24 V. The LM3410 also allows you to adjust the brightness of the LEDs ( dimming). The fourth pin of the chip (DIMM) is used for these purposes. Dimming can be done by changing the input current of this pin.
Step-by-step connection instructions
To connect an LED strip to a battery and illuminate a closet or any other place in the house with it, you will need the following tools and materials:
- batteries with a voltage of 8 or 12 volts. Remember that the higher the voltage at the power source, the brighter the backlight you created yourself will shine;
- soldering iron with flux and solder;
- a couple of wires. It is best to take flexible wires that bend well without damaging the conductive elements. You can use products made of aluminum and copper;
Note! The cross-section of the wires is selected depending on the current that will flow through them. Since diodes consume little current, the cross-section can be taken as small as possible.
- toggle switch;
- LED Strip Light.
When everything is prepared, you need to cut the product into pieces of the required size and solder the wires to them. The most difficult part of connecting LED products to a battery is soldering the wires. This process is carried out as follows:
- First we clean the metal contacts on the plus and minus. Sandpaper is suitable for these purposes;
- then carefully solder the wires to them that will go to the battery. They must first be tinned;
- After this, we repeat the procedure for the wires to which the toggle switch will be connected. In this case, one wire must be taken from the battery;
Soldering wires and toggle switch
- then the wires soldered in this way should be soldered to the selected LED strip. The wire going to the positive of the battery must be soldered on a tape to the +12V contact, the second wire is soldered to the GND contact.
Soldering wires to LED strip
After the work done, you should have the following:
LED strip connected to a battery
At this point, the connection work is considered complete.
How to connect 9V Krona batteries
“Krona” has a relatively small capacity and is not very suitable for powering high-power LEDs. The maximum current of such a battery should not exceed 30 - 40 mA. Therefore, it is better to connect 3 light-emitting diodes connected in series with an operating current of 20 mA to it. They, as in the case of connecting to a 3 volt battery, will not shine at full power, but the battery will last longer.
Krona battery power supply circuit
It is difficult to cover in one material all the variety of ways to connect LEDs to batteries with different voltages and capacities. We tried to talk about the most reliable and simple designs. We hope that this material will be useful to both beginners and more experienced radio amateurs.
What you need to know about soldering
The most important thing in working with LED strips is cutting them correctly into separate fragments and soldering them. In order for everything to go well, you should know the following nuances of carrying out this type of work:
- The product needs to be cut only in special places. Otherwise, the conductive contacts will be damaged and the device will be damaged;
Place for cutting tape
- you need to solder carefully, applying the soldering iron tip to the contacts and wires for just a few seconds;
- the wires must first be tinned;
- After soldering is completed, the contacts should be cleaned of solder residues.
By adhering to these recommendations, the process of soldering individual fragments of the product and connecting to a power source will be as easy and quick as possible.
To solder or not to solder
The battery is attached using soldering. If there are several batteries, it is not necessary to solder each one separately - we use a battery box with 2-6 compartments.
When connecting using a power supply or box, as well as in designs with controllers and amplifiers, connectors can be used. Compared to soldering, this method is simpler, but:
- the connectors gradually begin to oxidize;
- plastic melts at high temperatures;
- diodes located at the connection points lose brightness.
Soldering is not necessary when using power supplies, and connecting with batteries will be safer and more reliable for long-term operation. But you will need certain tools and materials. Connectors are convenient to use in lighting of complex designs, especially high-rise ones.
Collaboration with motion sensors
The presence of motion sensors greatly simplifies the operation of autonomous LED lamps without wires. The lamp turns on only in situations where the device detects the movement of an object in the work area. You can install the device anywhere. For corridors, the ideal option would be to place the sensor above the entrance, and the time between turning on and off in the absence of movement should be enough for a person entering the corridor to leave through the exit at the other end.
On the other hand, such a light source can be used for safety purposes. Install it on the street, near the entrance gate, and you will always know if someone is near it.
Main features of battery-powered lamps with motion sensor:
- The angle of action varies from 45 to 360 degrees. The device can even rotate around its axis;
- installation is possible on stairs, walls, cabinets, cabinets, refrigerators;
- high protection from moisture, dust, temperature changes;
- made from environmentally friendly materials;
- durable.
The presence of autonomous light sources in a house or apartment, especially those supplemented with motion sensors, improves conditions for the people living in it. In addition, battery-powered automated systems save on energy consumption. If a few years ago not everyone could afford them, today every third resident of the country can buy them.