Preparatory work
In order to correctly lay wires under the ceiling, you should know some points:
- Where is the main distribution board located?
- What brand and what cross section is the cable?
- Where is the equipment located?
- Which wiring method to use, based on the specifics of the room?
Having completed the first step, you can begin selecting the necessary cable and tools. Guided by the recommended standards, you should opt for the VVGng cable, which can be used as both a recessed and external electrical wiring system.
The possibility of laying electrical wires depends on where the electrical equipment is located. So, if it is not possible to lay hidden electrical wiring, then it is worth planning the route along which the external cables will pass.
How to choose the right one
The choice of products for fastening wires must be treated very responsibly. After all, if you do not calculate the size of the cable, then deformation of the products over time cannot be avoided. Therefore, when choosing fasteners, you should give preference to stronger models for heavy wiring.
Dowels and screws must be the same size and have corresponding hole diameters. If you do not take this advice into account, then wiring installation simply will not work.
Before working on fastening the wiring, it is recommended not to rush to buy the entire quantity of necessary products at once. And purchase a trial version of fasteners. This will not only save money, but also make the installation of electrical wiring as high quality as possible.
Attaching the cable to the ceiling from the outside
Currently, there are several types of external wire fastening:
- Carrying them out in a special metallized or corrugated sleeve
- Gasket in steel pipe
- Use of electrical pipes made of plastic
- Application of cable channels
- Fastening the cable to the ceiling with insulators and brackets
Any of the above options for external mounting of an electrical cable can be suitable for a home, but it all depends on the situation. Some types are best mounted on one type of surface, while others are undesirable for the same surface.
Fastening exposed wiring
In wooden buildings without additional interior finishing, wires are laid openly. You have to do the same in cases where no repairs are expected, but you need to install an additional socket or lamp. If it is not possible to run the cable through the baseboard, use cable ducts, insulators or plastic staples with nails.
- Cable channels are 2-meter plastic boxes of different sections with snap-on lids. The box is attached to the surface with self-tapping screws screwed into the inner surface of the rear wall; conductors are placed in it and closed with a lid.
Products come in different colors, including wood patterns, which allows you not to disturb the aesthetics of the premises. Source cable.ru
Porcelain insulators allow you to attach the wire to the wall or ceiling, imitating the retro style in the interior. They are made in the form of small barrels with a through hole, through which they are fixed with nails or screws, and wires twisted into a twisted bundle are pulled between them.
Against the background of wooden walls, insulators look more organic than cable channels
Plastic brackets with a hole for a nail, which is usually included, are fixed to surfaces made of wood, plastic and other non-solid materials. With their help, single cables can also be attached to furniture, for example, to organize computer wires under the desktop. They are often used to run telephone or internet cables above baseboards.
Nail clips for exposed mounting Source www.elektrikaup.ee
The only tools you need for electrical installation on wooden and similar surfaces are a hammer or a screwdriver, which can easily be replaced with a regular screwdriver.
Wood type ceiling
It is best to equip a wooden ceiling with steel tubes. Their transverse size greatly depends on the diameter of the electrical wires. In addition, several cables can be placed in one tube at once.
As a branch to the electrical consumer, it is better to use IP65 boxes, which must be mounted from fire-resistant material. Inside the box, the possibility of the cable cores touching its walls should be prevented by applying insulation. This technique is important when installing both recessed and exposed wiring.
The process of installing the cable to the tree:
- First, the minibus is marked for laying the wiring.
- Next, you should mark the location and install distribution and passage boxes.
- Then the tubes are shortened to the required length and attached to the ceiling. Next, the pipes are connected to each other by welding.
- All wobbling of the wiring must be done at an angle of ninety degrees.
- Using pulling, the cable is stretched from box to box, leaving leads at the ends, the length of which will be adequate for wiring in boxes (about 20-25 cm).
- Next, the wiring strands in the boxes are connected using welding or soldering. Next comes the cable insulation.
- Then you need to ground.
- Finally, the last step is to check the integrity of the resulting wiring.
Homemade cable fasteners
There are not always suitable brackets, clamps or platforms at hand for installing wiring. These elements can be easily made with your own hands, but visually they will be inferior in design to factory components. If done carefully, the fasteners will be a worthy replacement for branded products.
Installation elements are made from various materials, presented:
- single-core, two-core power wires;
- plastic;
- galvanized sheet, etc.
Depending on the selected material, work is carried out according to the following rules:
- two-core cables are cut into pieces, their length is matched to the wire being attached, and a self-tapping screw is inserted into the middle of each;
- single-core, pre-cut pieces are wrapped around the dowel head;
- Strips of tin are cut and a nail is driven into the middle.
With self-made fastenings you can sew up one or more cords at the same time.
The advantages of homemade devices are considered to be:
- easy manufacturing and installation;
- no need to search for a product and then purchase it in a store;
- possibility of repeated installation and replacement of homemade products.
Homemade options
How to attach a cable to a ceiling made of metal
The metal surface of the ceiling is a good conductor of current, so it is necessary to approach cable installation as responsibly as possible in order to avoid unpleasant incidents. Thus, it is best to lay the cable in plastic electrical conduits.
This material is perfect for a distribution box. However, if the room is not conducive to installing this material, you can run the cables in steel tubes.
Installation features:
- The route along which the cable will pass is marked.
- It is necessary to determine the location of the passage and distribution boxes.
- Excess pipes should be cut off, then fixed to the ceiling, and then glued together, connecting the structure.
- It is necessary to use a corrugated tube when turning the cable route, which must be made at right angles.
- Use a pull when laying the cable from box to box, leaving leads at the ends, the length of which will be 20-25 cm.
- The cable cores are interconnected in the boxes by welding or soldering. Then they need to be insulated.
- After these steps, the structure should be checked for integrity.
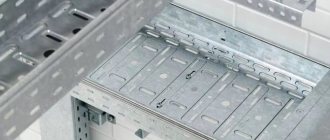
Cable trays - for hidden laying of large bundles
Illuminating the ceiling with spotlights requires laying a large number of cords, fixing them on the ceiling. In standard apartments, the role of the latter is played by a concrete slab, in which drilling many holes is problematic and time-consuming. For such cases, suspended cable trays are used. Products are made of perforated metals or galvanized wire.
Cable trays come in different sizes, each with its own type of fastening. Studs, T-shaped or L-shaped hangers can be used. The installation process is simple:
- the structure is assembled;
- mounted on a ceiling surface;
- wires are laid in it.
They can later be attached to the grilles with ties, but this procedure is usually not necessary.
Trays of non-perforated or perforated metal are used when laying armored cords inside walls with increased fire hazard properties, including frame houses.
Perforated tray
Laying cables on a reinforced concrete slab
These slabs are found in old houses, so their design is somewhat different from that used in the construction of modern buildings.
Currently, the floors are being prepared during construction. Electrical plastic pipes are laid in advance, installation and passage boxes are placed in the future ceiling. Next comes the pouring of the floors. However, this is typical for modern designs, but not for old houses.
The use of reinforced concrete slabs forces the cable to be laid through channels, but often at the edges of the slabs or inside there are concrete piles that make wiring difficult.
An open cable can be laid on a reinforced concrete slab in the following ways:
- Fastening the wiring to the ceiling with brackets.
- Fastening the corrugated pipe with cable with clips.
- Fastening the metallized tube with the cable using clips or staples.
- Fastening in a steel tube, fixed with staples or clamps.
- Fastening an electrical tube made of plastic with a cable using clips.
Having understood the installation methods, you can consider the features of external cable installation: - First, the wiring route is marked.
- The places where the distribution and passage boxes will be located are marked.
- The existing tubes are cut to bring them to the required length. Next, they are attached to the ceiling and connected.
- Before attaching the tubes to the ceiling, they are tightened using a broach, leaving leads at the ends with a length of 20 to 25 cm (
Variety, characteristics
The market offers a huge number of elements for wiring installation.
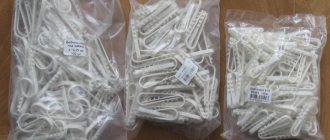
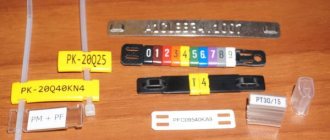
The most popular types of fasteners for exposed wires:
- Rigging shackle. Has a diameter of 3-14 mm. Presented for sale with the letter P. The product has one fastening using a steel nail. Made from polypropylene. Use staples on wood, chipboard and VDF surfaces. Experts advise using these products for laying wires along wooden baseboards;
- Dowel clamp. It is a product folded in half. Made from plastic. Suitable for wires with round or flat structure. Used for fastening on concrete, brick and stone. Installation of such a product requires drilling a 6 mm hole. and further securing the clamp. If necessary, hammer it in carefully with a hammer. A very popular mount due to its low cost and easy installation;
- Screed. Available in the following sizes: 100-400 in length and width 2.5-8 mm. It is represented by a nylon product, which is equipped with notches and a lock at one end. The wire is secured with a loop. This device secures the cable very well. Features: inexpensive price and easy installation;
- Bandage. Made from nylon. The product is presented with a hole through which the bandage securely fastens the wiring. Installation takes place with a drilled hole into which a plastic dowel is inserted, and then the bandage itself using a self-tapping screw. The product is suitable for fastening large wires and corrugated cardboard structures. The cable is secured with a loop tie and the excess end of this product is cut off. The mount is ideal for both walls and ceilings.
Features of cable routing in plasterboard construction
A distinctive feature of such a false ceiling is limited access to electrical wires, so it is necessary to plan in advance where the wiring will be serviced. The cable will be attached to the ceiling using a method that is suitable for the existing ceiling base, be it metal, concrete or wood. Similar techniques are mentioned above in the article.
Drywall makes it easy to hide wires, so there is no need for hidden cables. However, it will be necessary to move the distribution and passage boxes outside the ceiling to make them easier to access.
For fastening the cable under a plasterboard structure, watch the video:
Features of wiring installation in a slatted ceiling
This ceiling is suspended, like the previous one, so many of the features of the plasterboard construction are also suitable for slats. Therefore, distribution boxes should be moved beyond the ceiling to allow easy access.
Slatted ceilings are often installed in bathrooms, so wiring under the ceiling must be done:
- In electrical pipes made of plastic or corrugated analogues, provided that the ceiling is made of reinforced concrete.
- In steel tubes, provided that the base of the ceiling is wood.
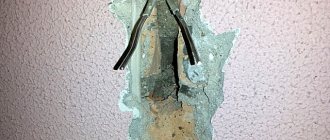
Quick-drying mortar (gypsum, alabaster)
Gypsum plaster can be used to fix cables in grooves or corrugated sleeves. A small volume of solution is placed every 50 cm; after the process is completed, the groove in the wall is covered with mounting tape.
The advantage of this approach is presented:
- speed of laying cords;
- low price;
- the ability to perform without the use of specialized clamps.
The disadvantage of this method is that it is difficult to install the corrugated hose in the groove. Replacing it when damaged also causes problems.
Cable installation in electrically conductive panel conditions
These ceilings are modules filled with polyurethane foam. Conductive plates are built into these plates. Modules can be connected up to 5 pieces to one connector. The wiring is laid based on the characteristics of the room, whether the ceiling is made of reinforced concrete, wood or metal. In addition, wire distribution boxes should be moved beyond the ceiling.
Conductive panels look great at night when all the lights are off except the ceiling lights. By taking a photo of this ceiling at night, you can enjoy the unusual contrast of light and darkness.
The proposed options for placing wiring on the ceiling and under it are basic and relatively easy to reproduce on your own. If you carefully follow the installation instructions and comply with all safety standards, then there should be no problems with electrical wires, and installing lighting fixtures will turn into a real pleasure.